

How To Change Key And Switch 01 Saturn Wagon
General Achievements
🏆 Escape Room
Finish any room playing solo.
🏆 Escape Together
Stop any room playing co-op.
🏆 First in Collection
Collect any token.
🏆 Nifty Tower
Stack items into a tower. Try doing this on Edgewood Mansion: The Library, where you have over a hundred books available, and tin can use bigger items to keep your structure from toppling over.
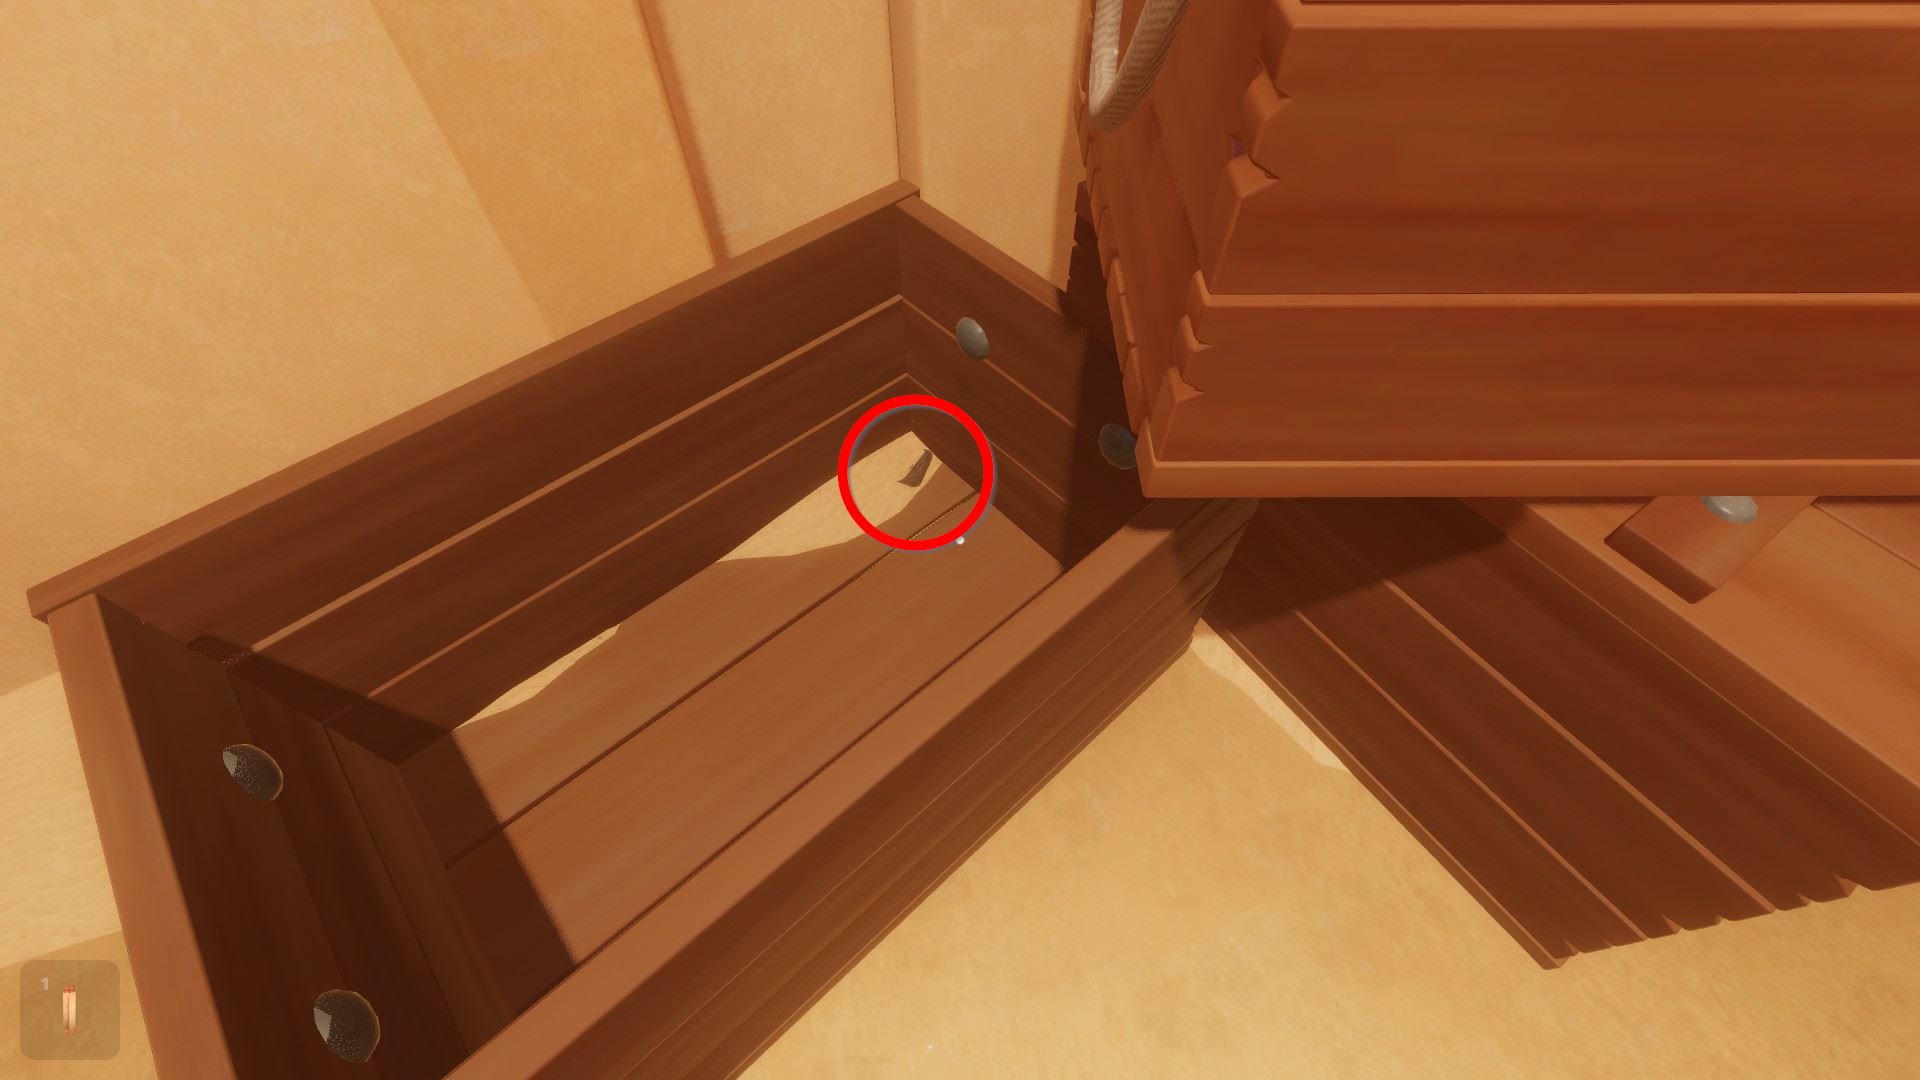
Alternatively, some people reported that they managed to obtain the achievements past dropping items on one of the wooden beams from Labyrinth of Arab republic of egypt: First Chamber.
Instance: https://i.imgur.com/xiNk2hU.png (credit goes to Masu for the prototype)
The developers announced their intention of modifying / reworking this accomplishment in the time to come.
🏆 Pockets With Holes
Drop 10 objects in five seconds
Have at to the lowest degree 10 things in your inventory, then hammer Q repeatedly to drop items.
🏆 Expert Throw
While belongings an item in your hand, concur down left mouse and allow become afterward a while to throw it.
🏆 Destroyer
Destroy all brittle objects in a room. Very easy on Labyrinth of Egypt: First Chamber.
🏆 Cleaner
Collect all items from a level and throw them into the trash (hammer T repeatedly while aiming at the trash can).
🏆 Clumsy Escapist
Intermission 7 objects in v seconds. Easy on Labyrinth of Egypt: Gold Bedchamber.
Pick upwardly breakable objects similar vases, then hammer T repeatedly to throw them.
🏆 Break Out
Throw an object out of the level boundaries. Easy on Labyrinth of Labyrinth of Arab republic of egypt: The Top if you throw the flask (or some other heavy object) over the side with the lights pillars and let it slowly roll outside the level.
🏆 Make it yourself
Create a room in the level editor. (Main menu -> Workshop -> Create -> Place an object -> Relieve)
Level-Specific Achievements
🏆 Uber Skull
Can merely be achieved on Labyrinth of Arab republic of egypt: Bedroom of Danger. Take the skeleton's skull and chuck it into one of the fires.
🏆 Holy Mug
Tin can only be acquired on Afloat in Infinite: Emergency Enkindling. Save all three mugs from devastation past hiding them in the trash bin (or your character inventory). If you lot just plough on gravity quickly without moving the mugs or hitting them with other floating items, they as well don't break. Achievement unlocks on level completion.
🏆 Don't Expect at The Sun!
Tin can exist acquired on Adrift in Space: Emergency Awakening and on Afloat in Space: Space Walk.
Use the zooming in part (eye mouse primal).
🏆 Mystic Toy
Can merely exist achieved on Afloat in Space: Emergency Awakening. Supersede the corroded battery in the robotoy with a fresh one, and press the ability button a few times to hear a special line.
🏆 Safe Precautions
Tin only be caused on Afloat in Space: The Lab. After you lot finish using the blowtorch, driblet it in the sink and turn on the water. This breaks the blowtorch.
🏆 Writer
Tin merely be acquired on Edgewood Mansion: The Cranium. Make full an unabridged sheet of paper on the typewriter. Observe paper in the correct drawer beneath information technology.
🏆 Jack Beanstalk
Tin can simply exist acquired on Edgewood Mansion: The Cloak-and-dagger.
Look upwards in the center of the level, to 'where the beanstalk ends'.
Use the zooming in function (heart mouse fundamental).
🏆 D'oh!
Can only be acquired on Adrift in Space: The Lab while wearing the yellow character pare (change information technology from the graphic symbol customization screen).
Collect the doughnut that is located in the left drawer nether the fabricator.
Completionism Achievements
🏆 Arab republic of egypt Escapist
Finish all v Egypt levels in under 15 minutes each (having a trophy honour on each of them).
🏆 Space Escapist
Finish all 5 Space levels in nether 15 minutes each (having a trophy award on each of them).
🏆 Victorian Escapist
Finish all five Mansion levels in under xv minutes each (having a trophy award on each of them).
🏆 Egypt Collector
Find all tokens in Egypt levels.
🏆 Space Collector
Find all tokens in Space levels.
🏆 Victorian Collector
Find all tokens in Mansion levels.
Tutorial
⏹ Token 1 / viii
🏆 Starting time in drove
⏹ Token ii / 8

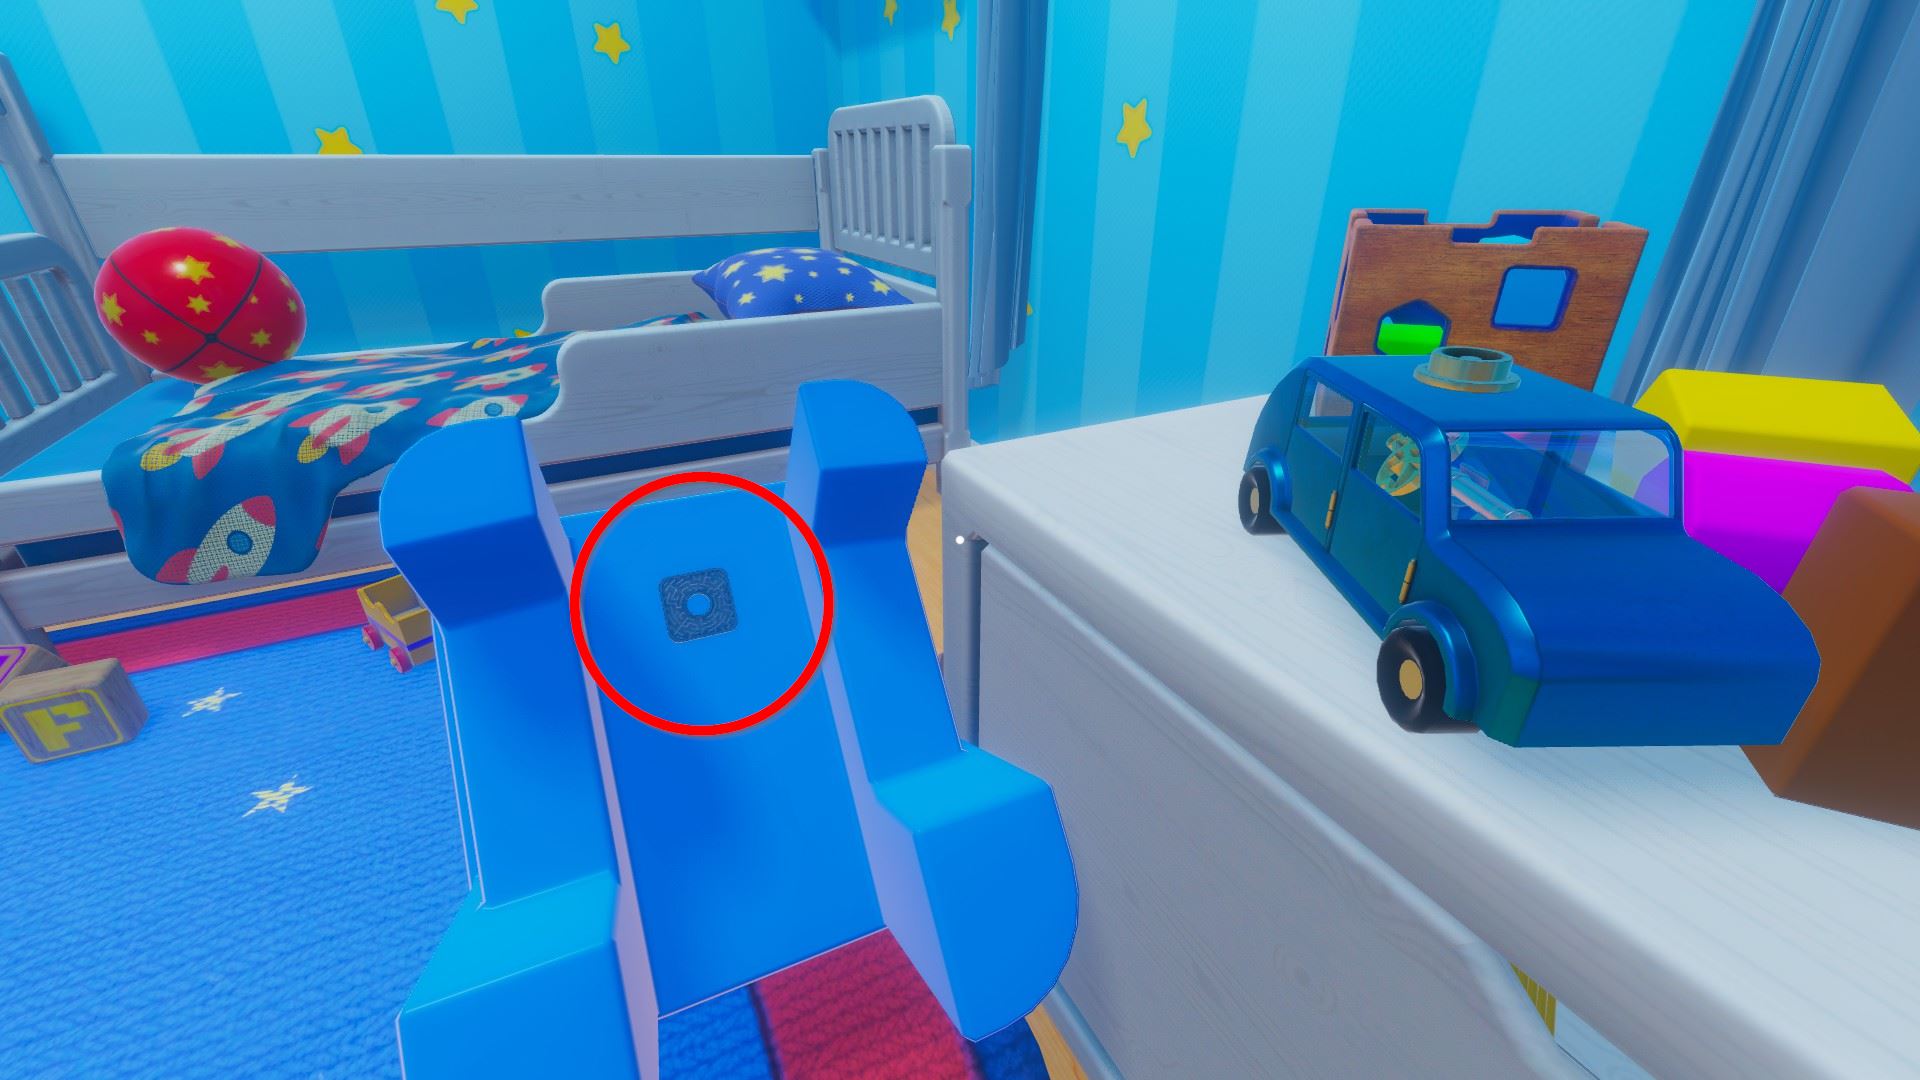
⏹ Token three / eight - under the blue car:
⏹ Token iv / 8

⏹ Token v / 8

⏹ Token 6 / 8

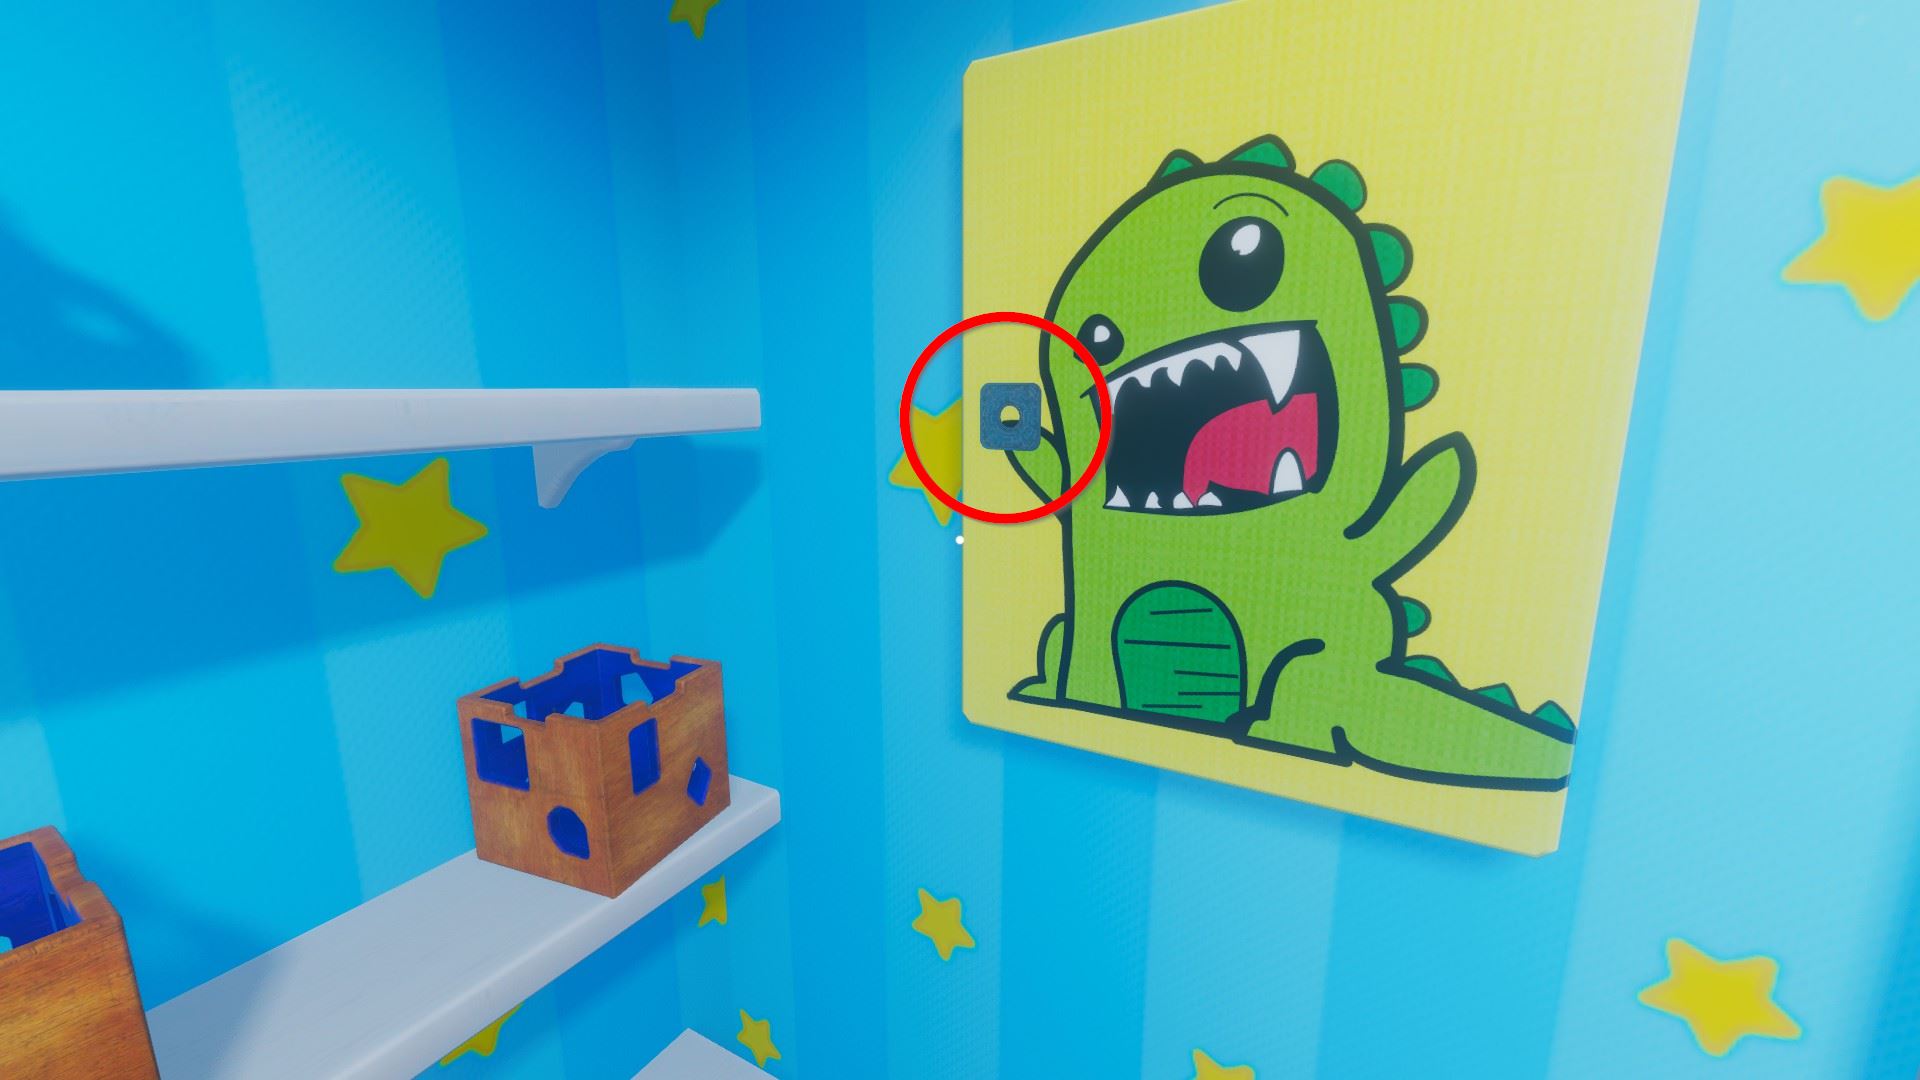
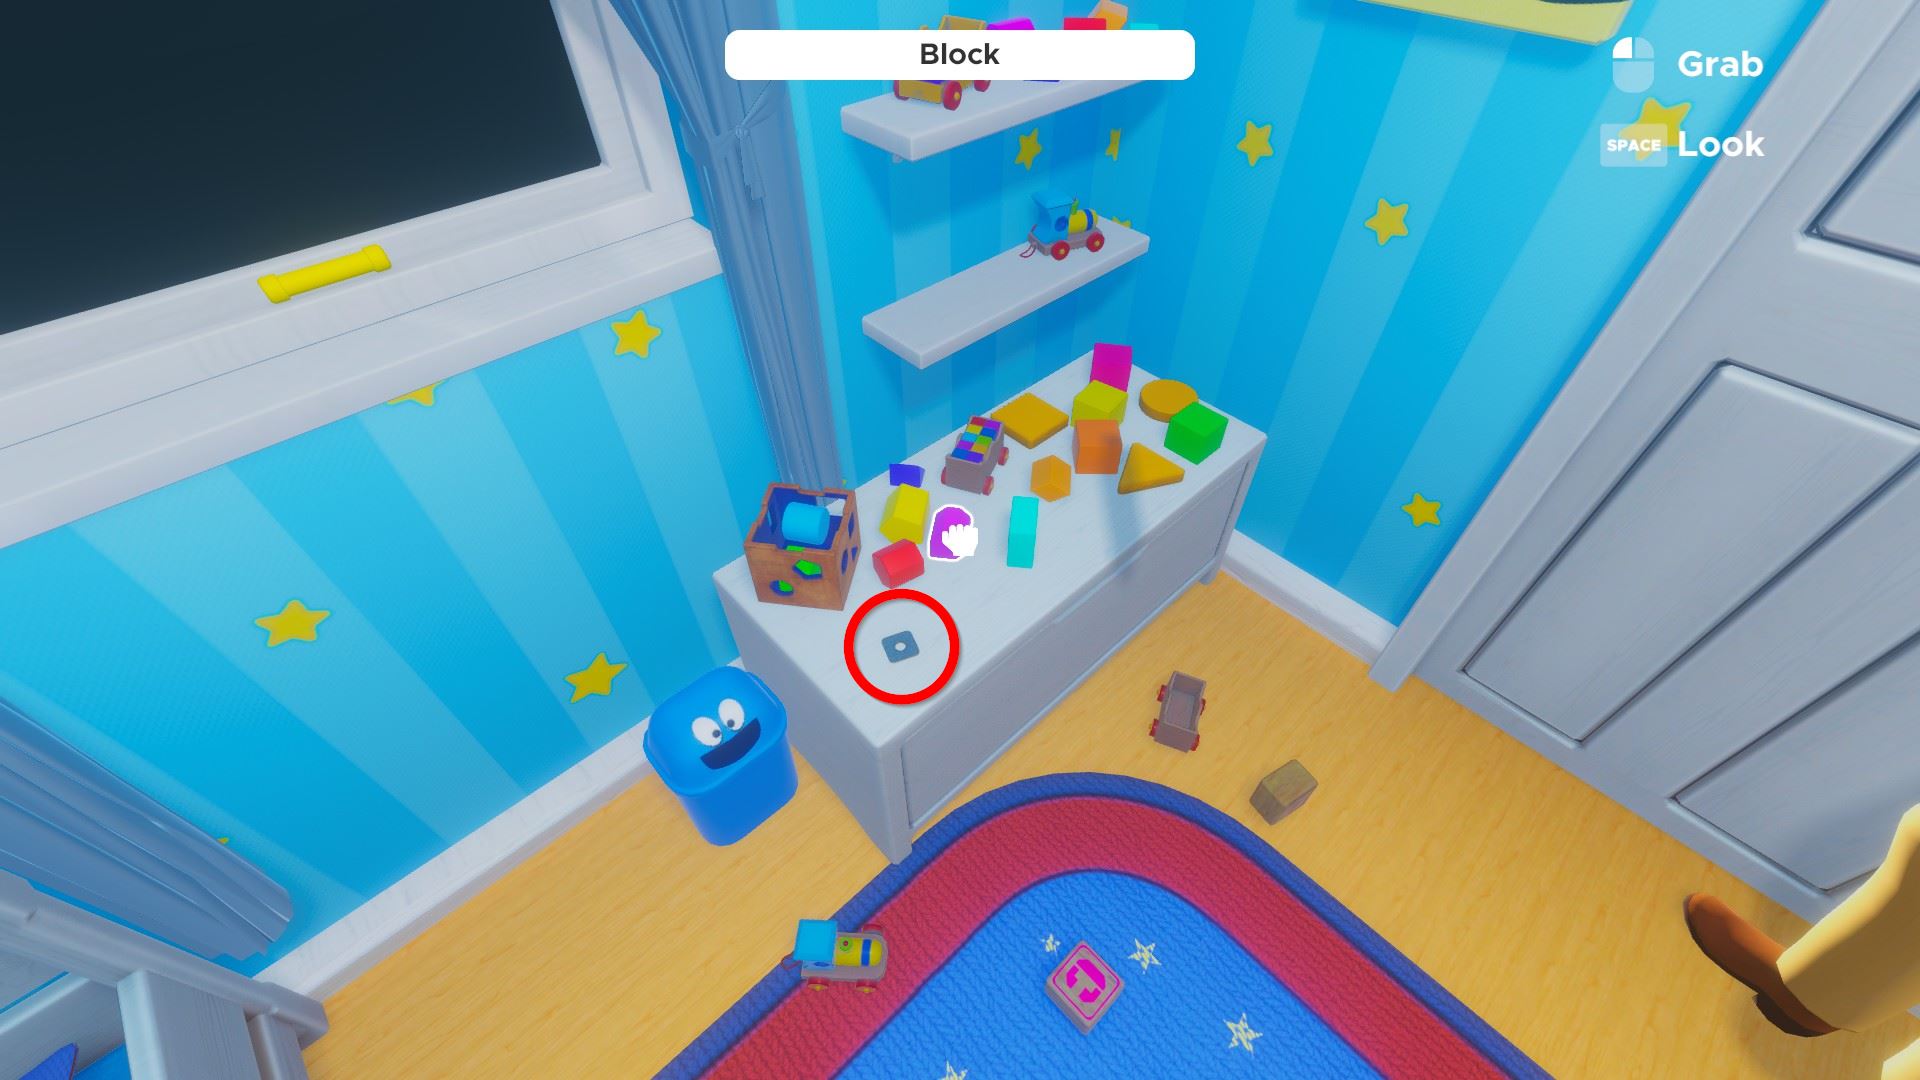
⏹ Token 7 / 8 - block from the top shelf:

⏹ Token 8 / 8 - under the chair (employ physics = drag into other objects to flip it):
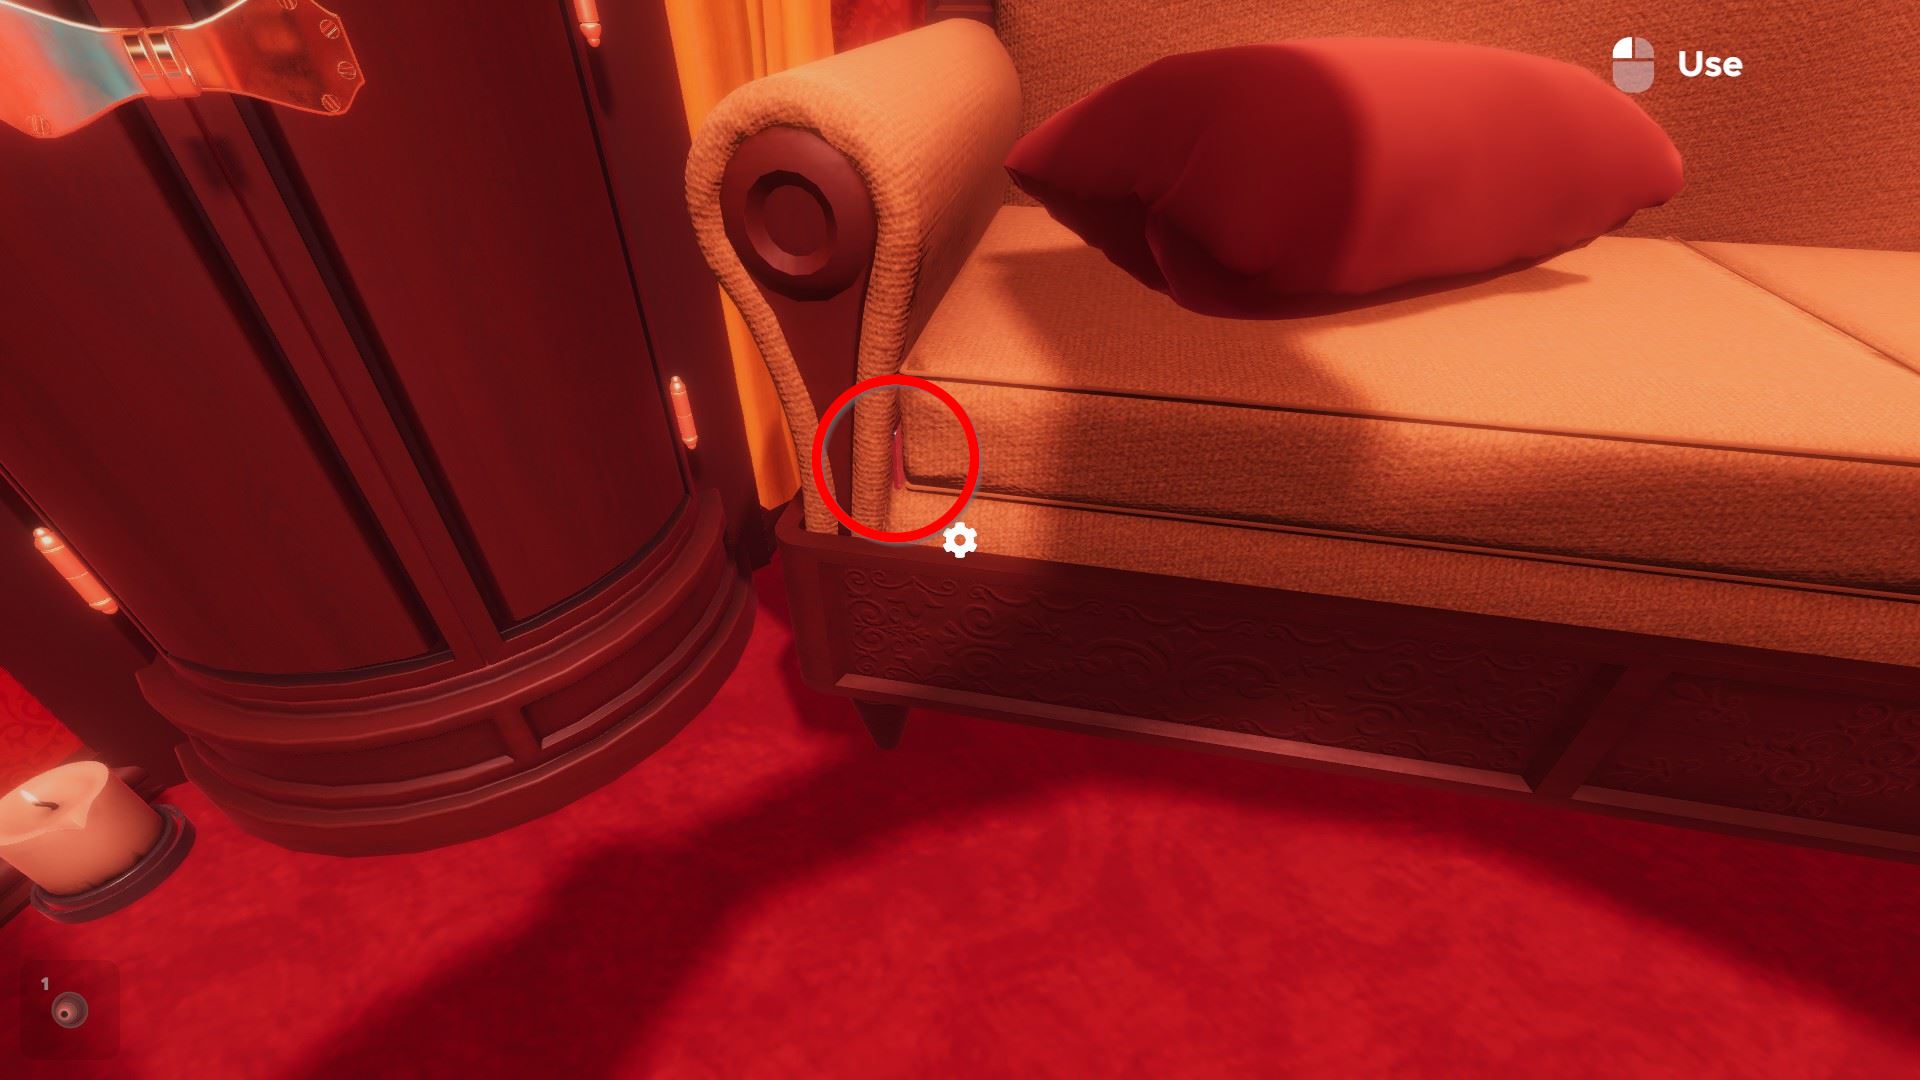
Drag the pillow on the bed away, pick up the Winding Cardinal.
Audit the blueish car. Drag the Winding Key on the peak of the blue motorcar and selection upwards the key from inside the car.
Use the primal in the door.
Labyrinth of Egypt: Beginning Sleeping accommodation
🏆 You lot can hands get the Destroyer achievement here past breaking all objects.
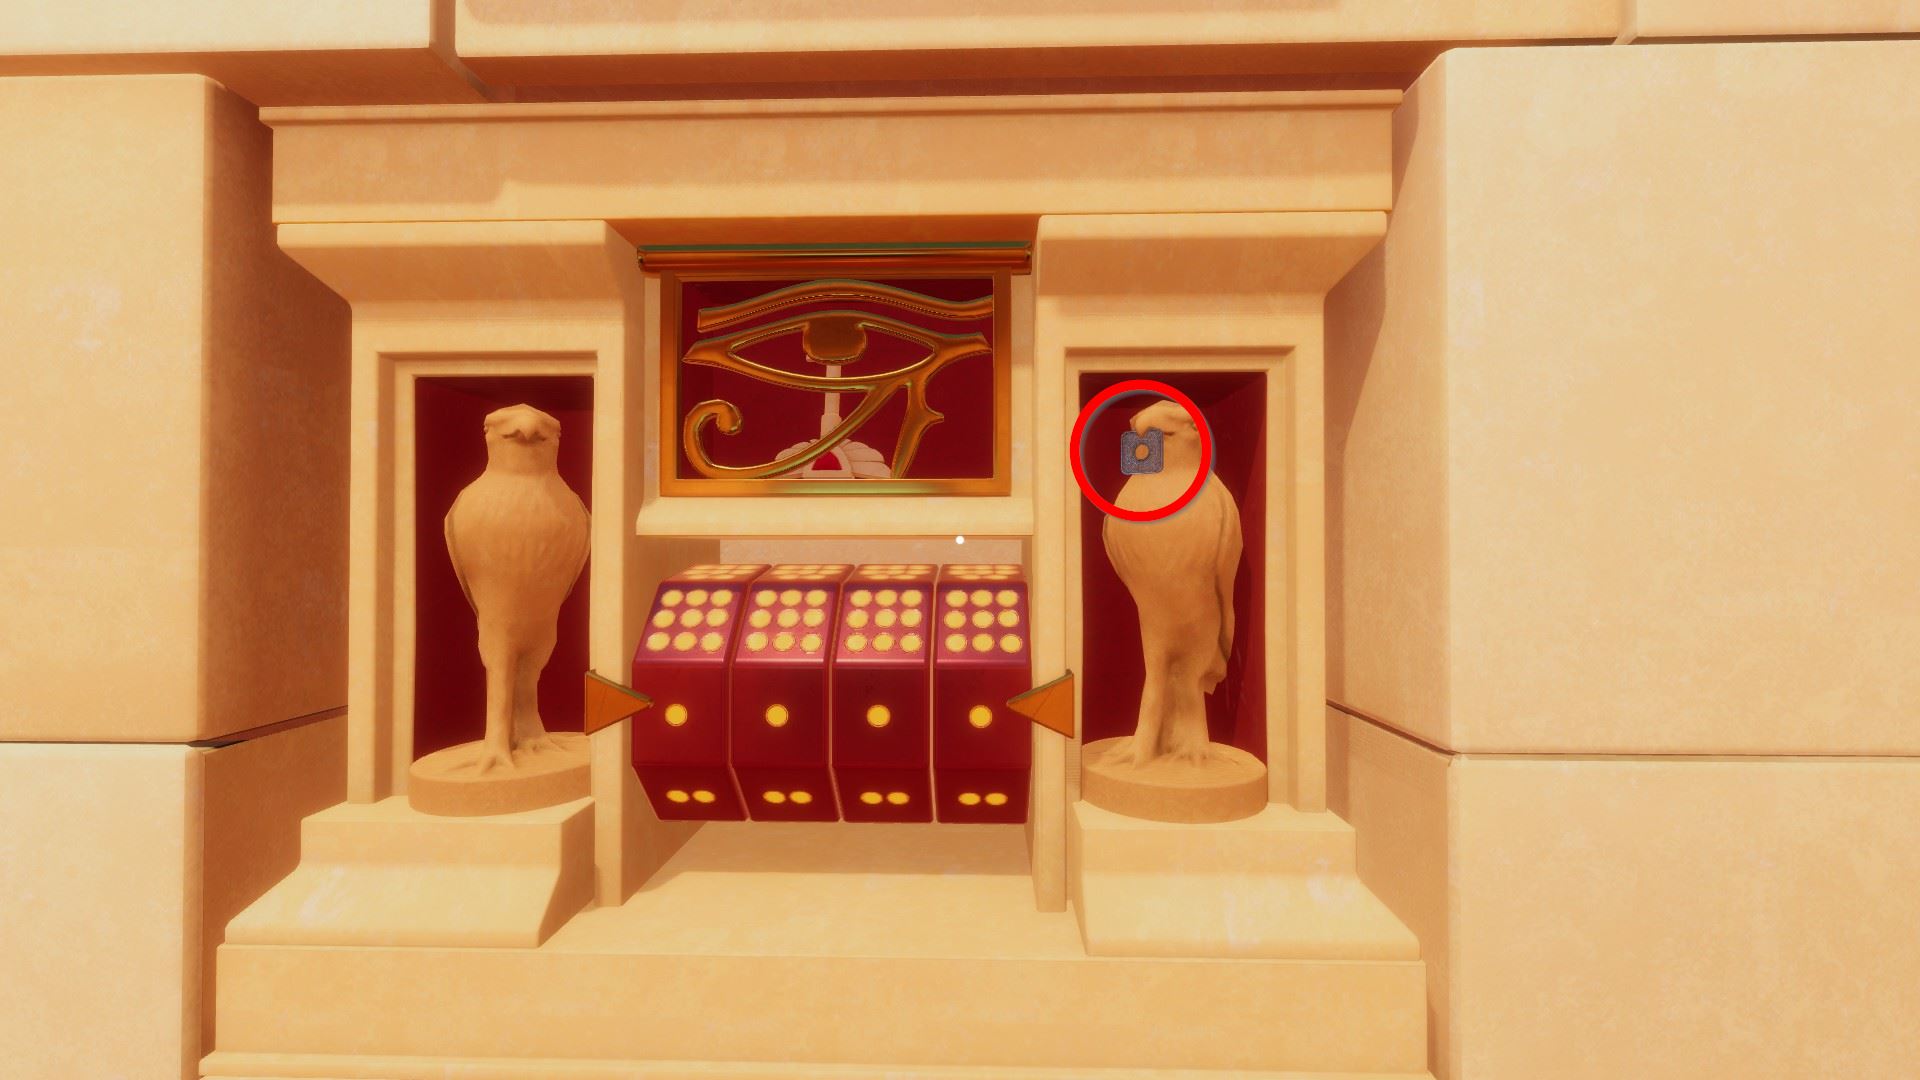
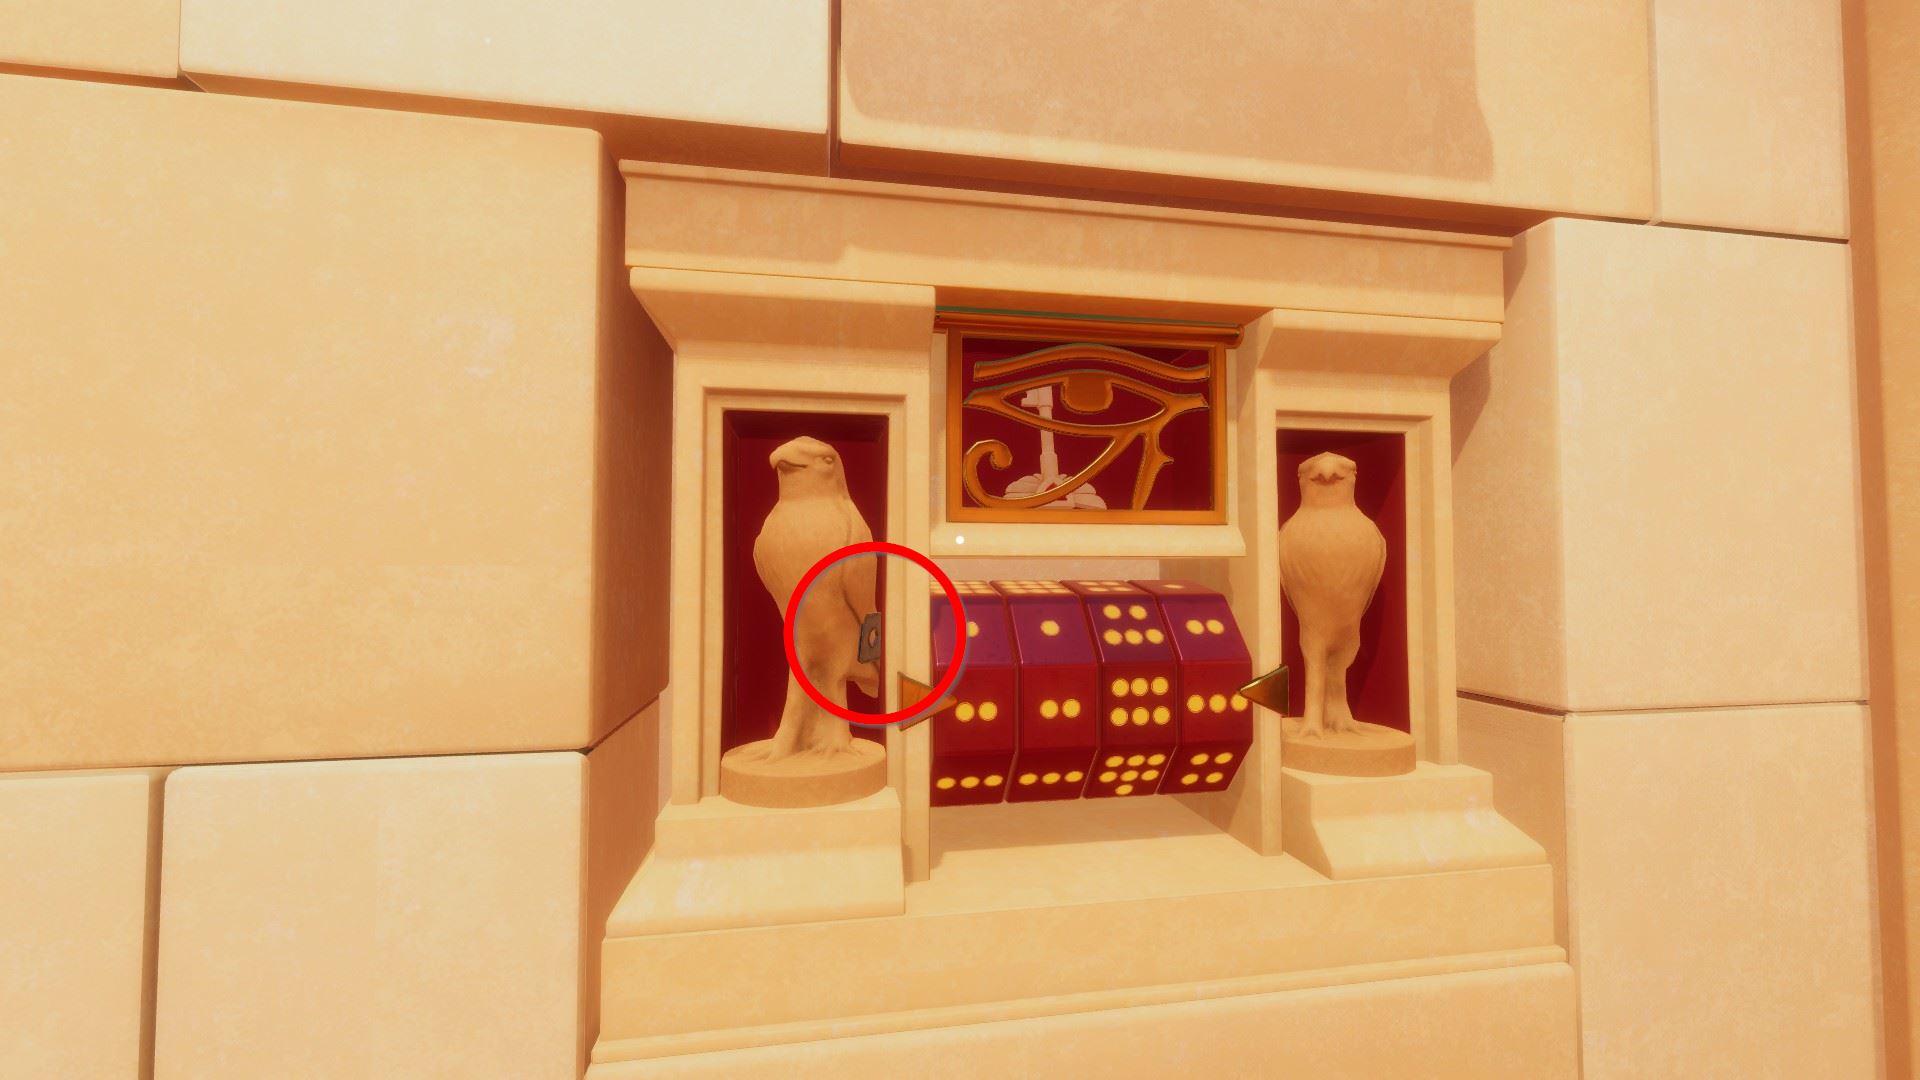
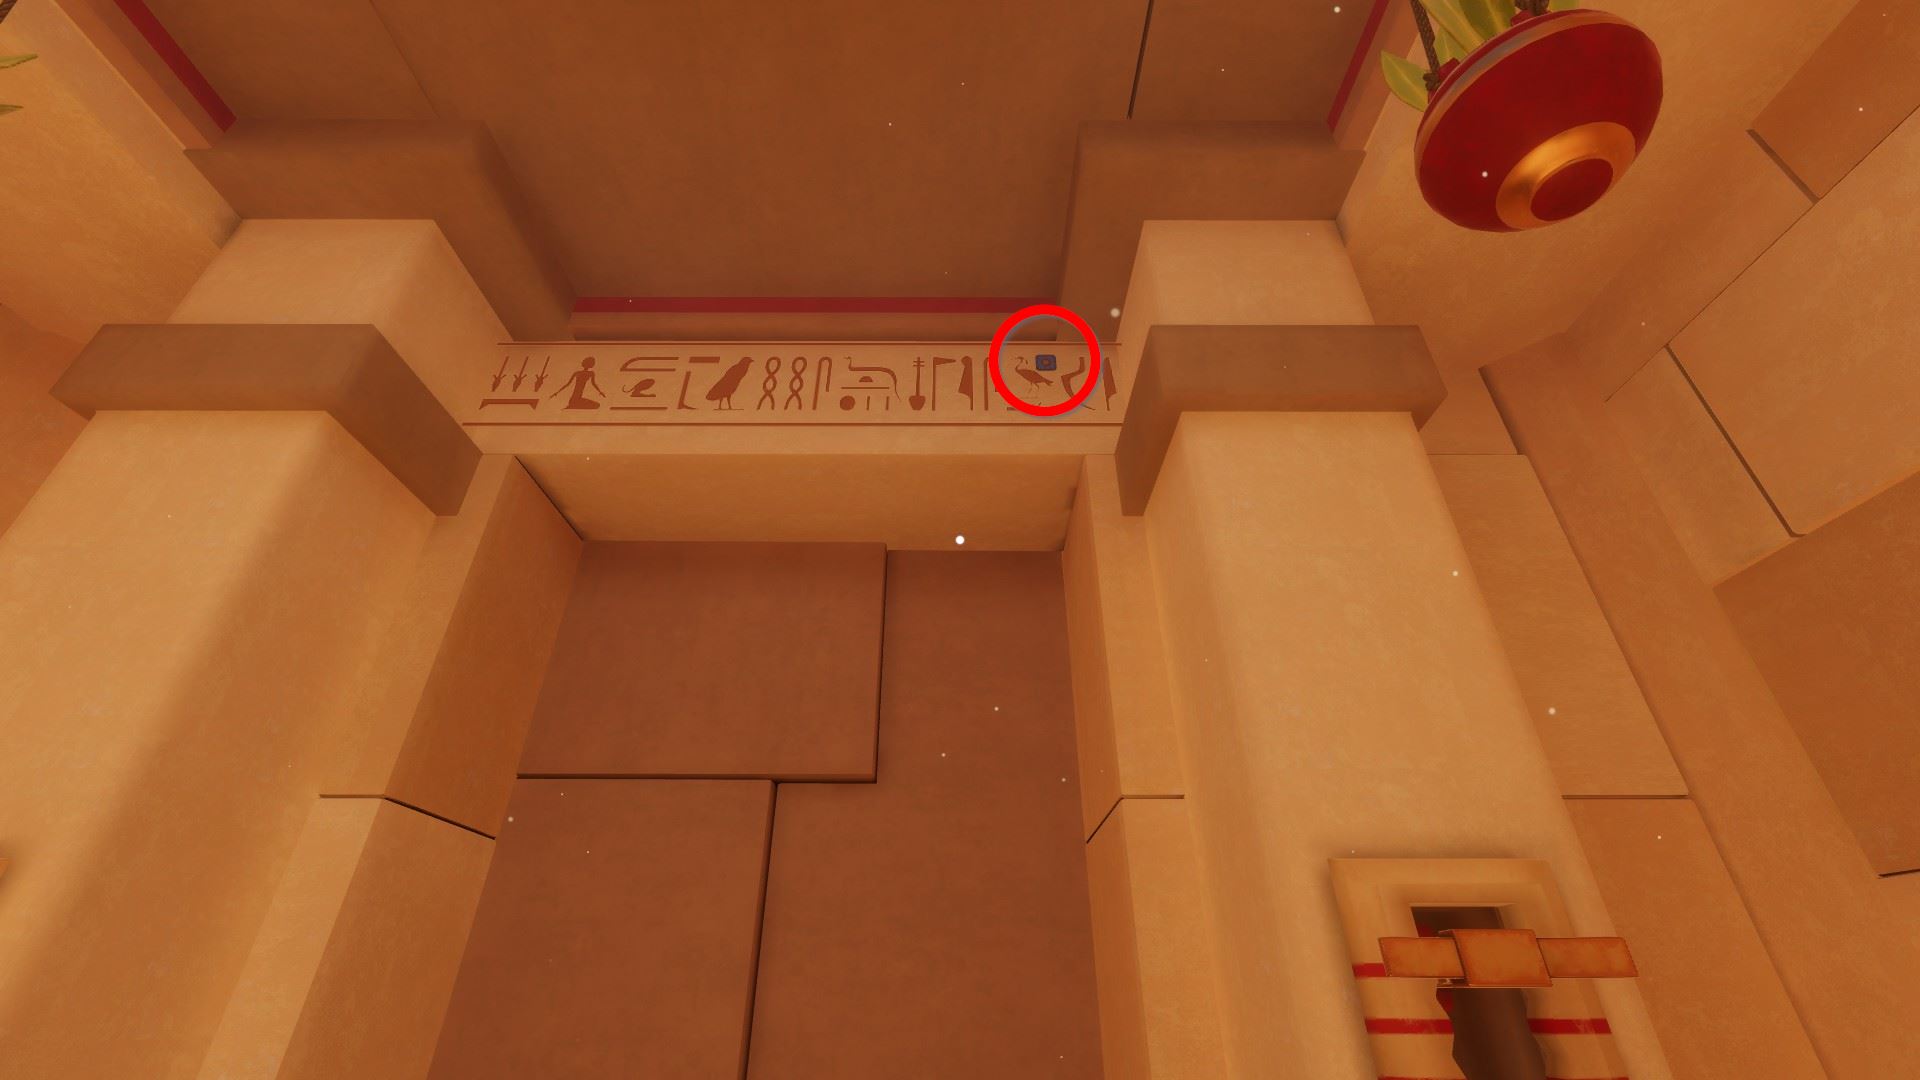
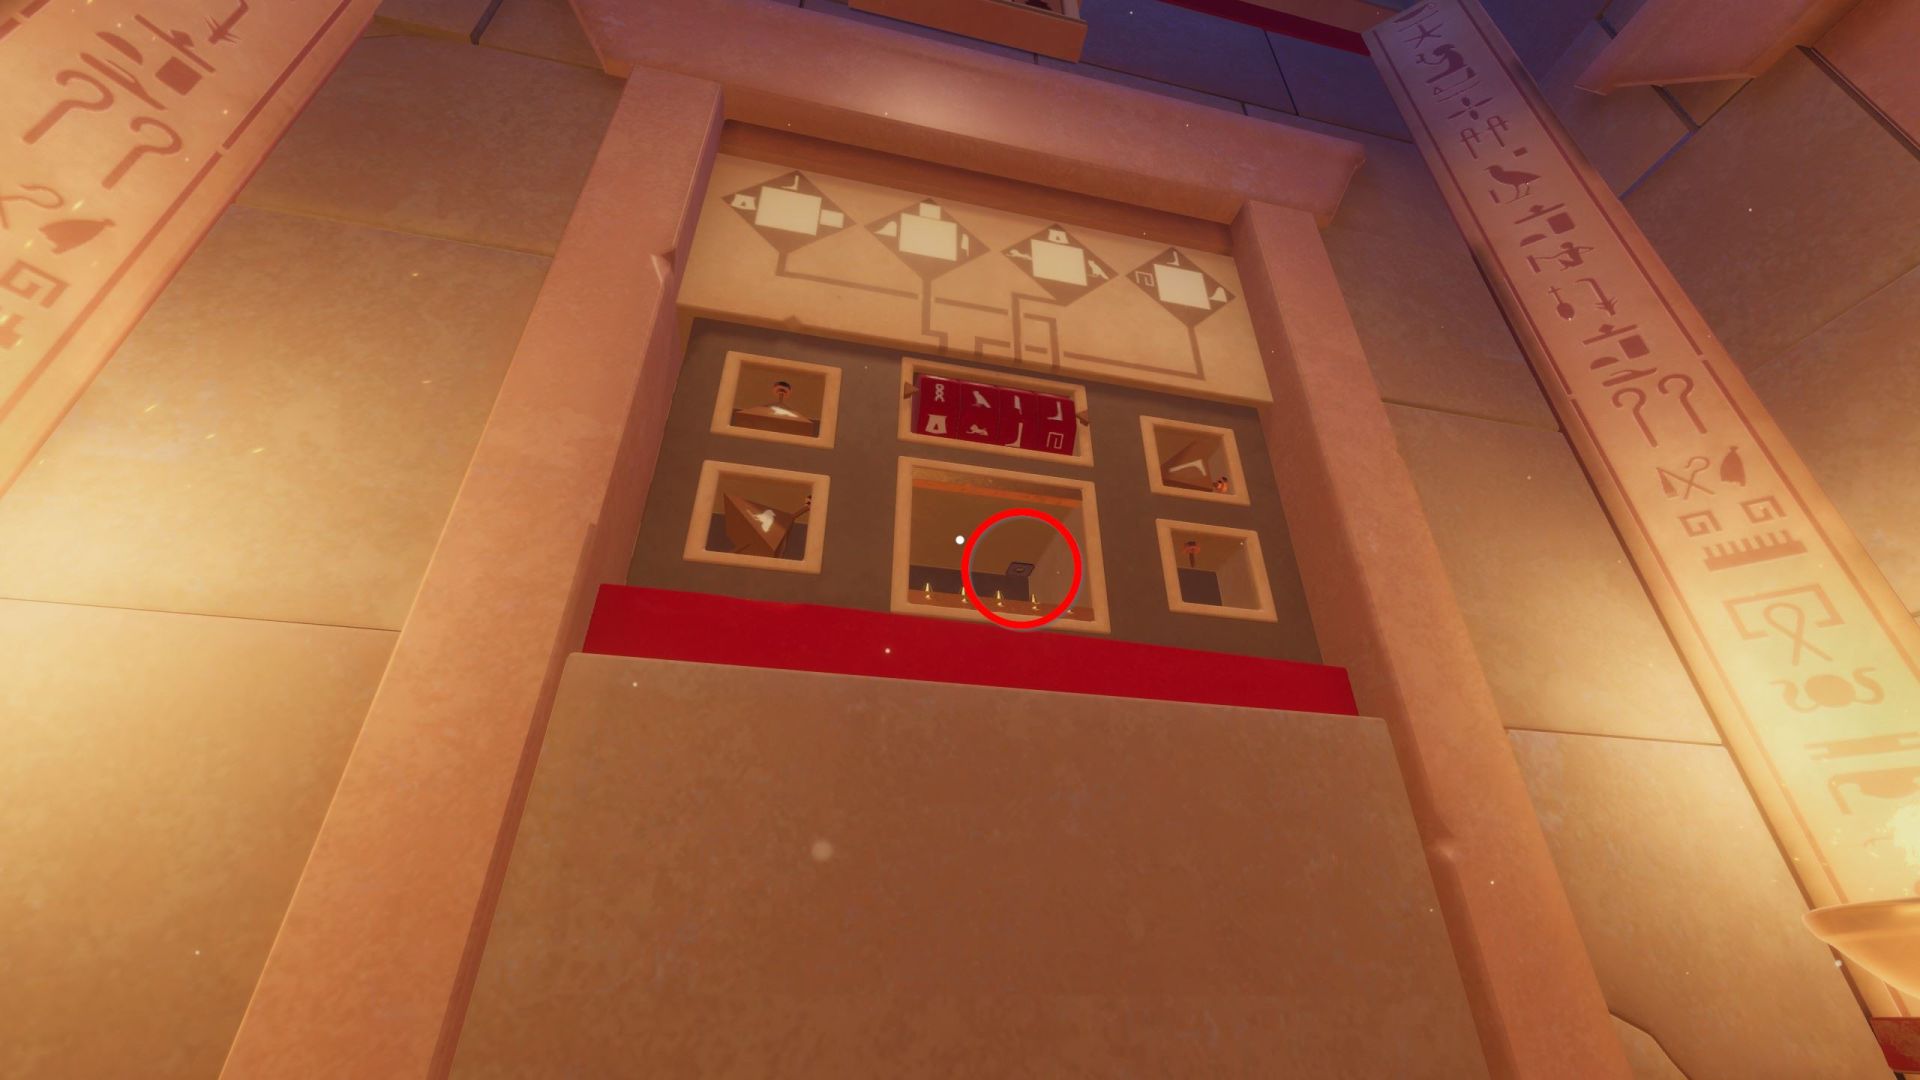
⏹ Token ane / eight - in the beak of the rightmost bird:
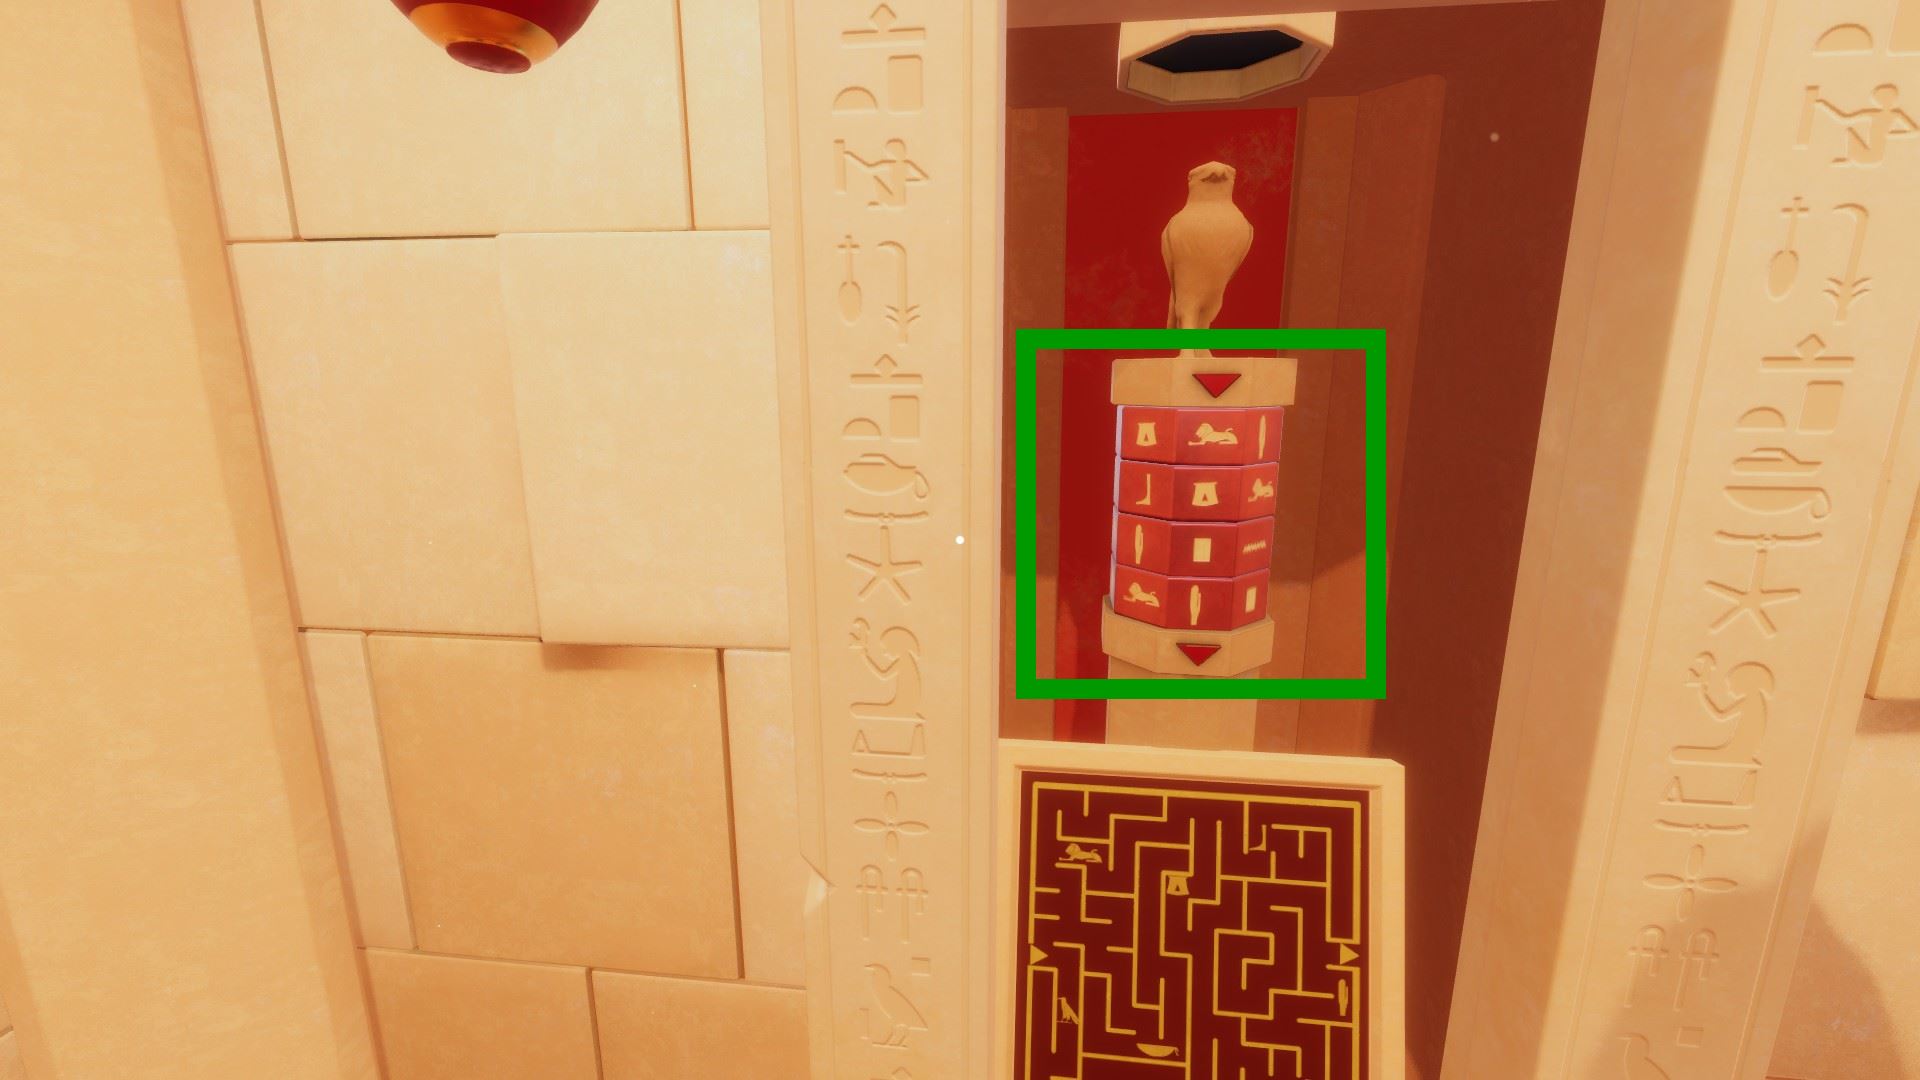
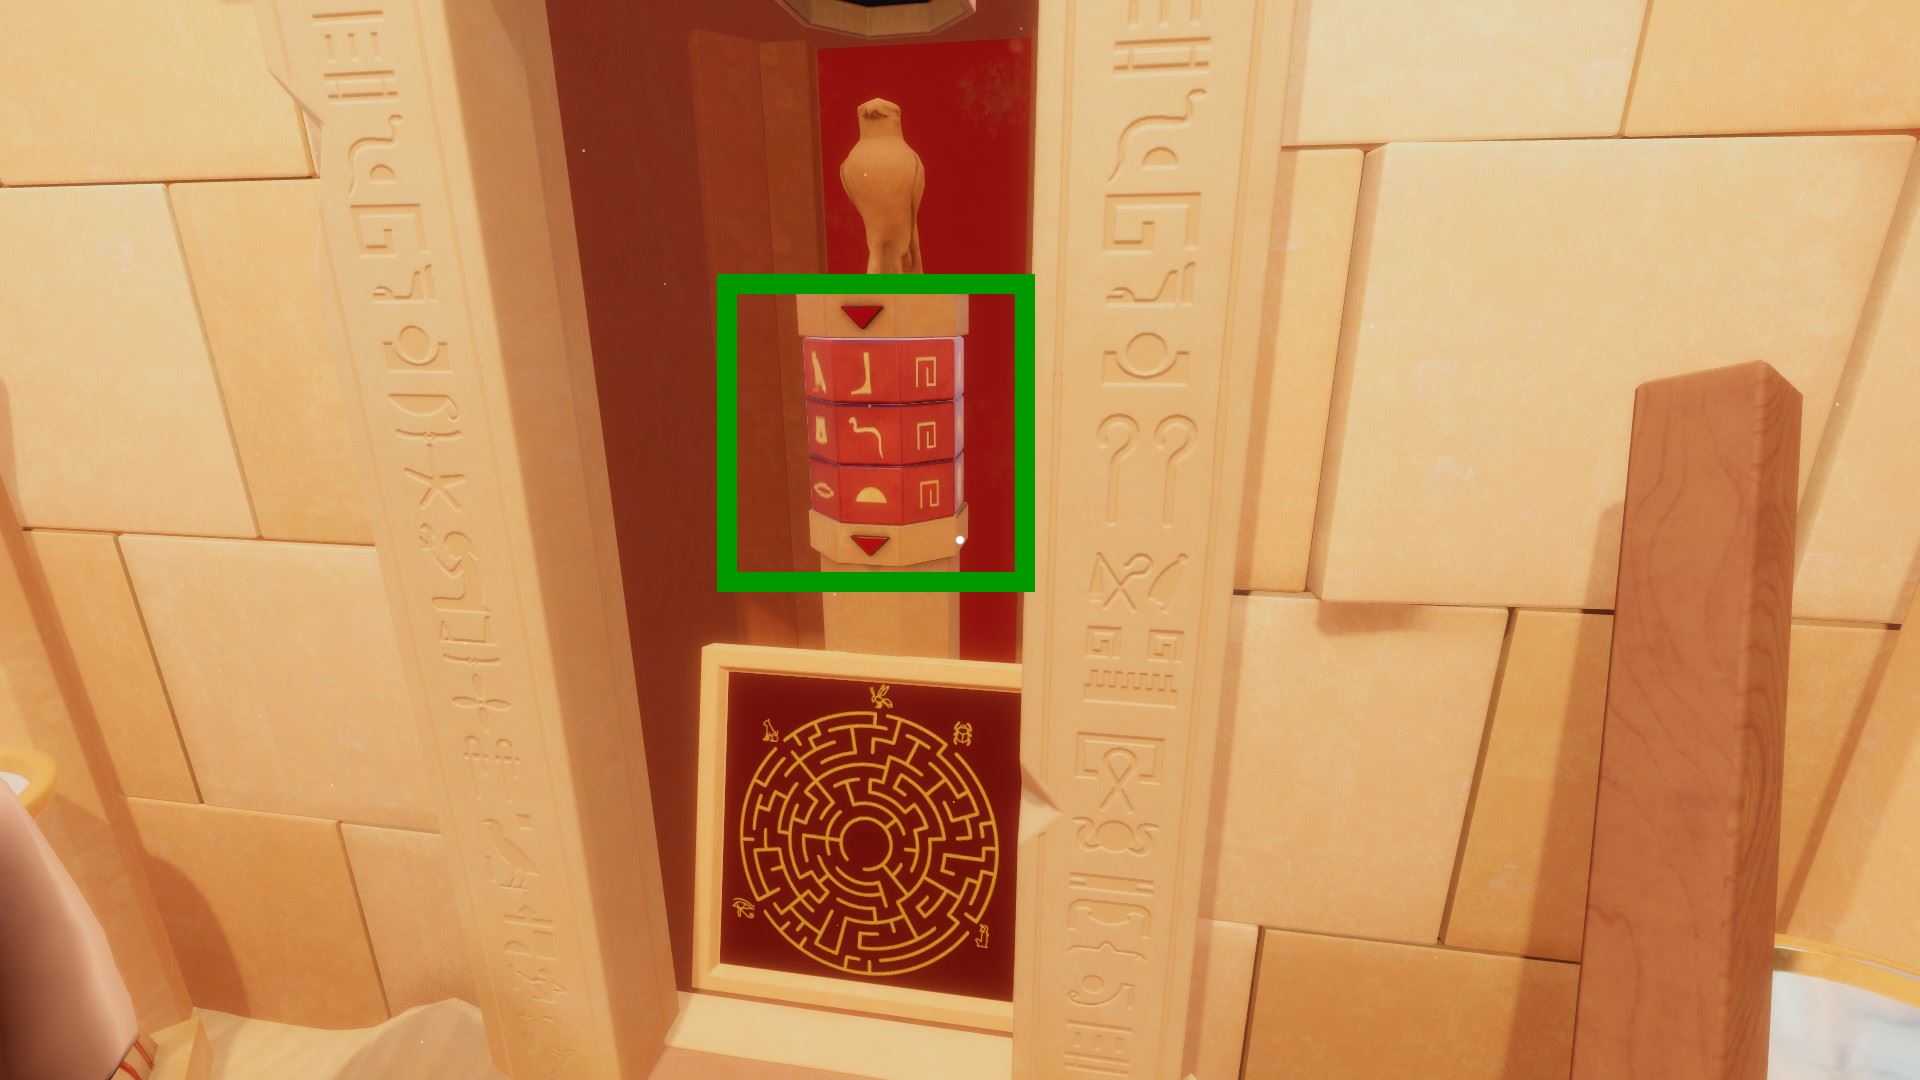
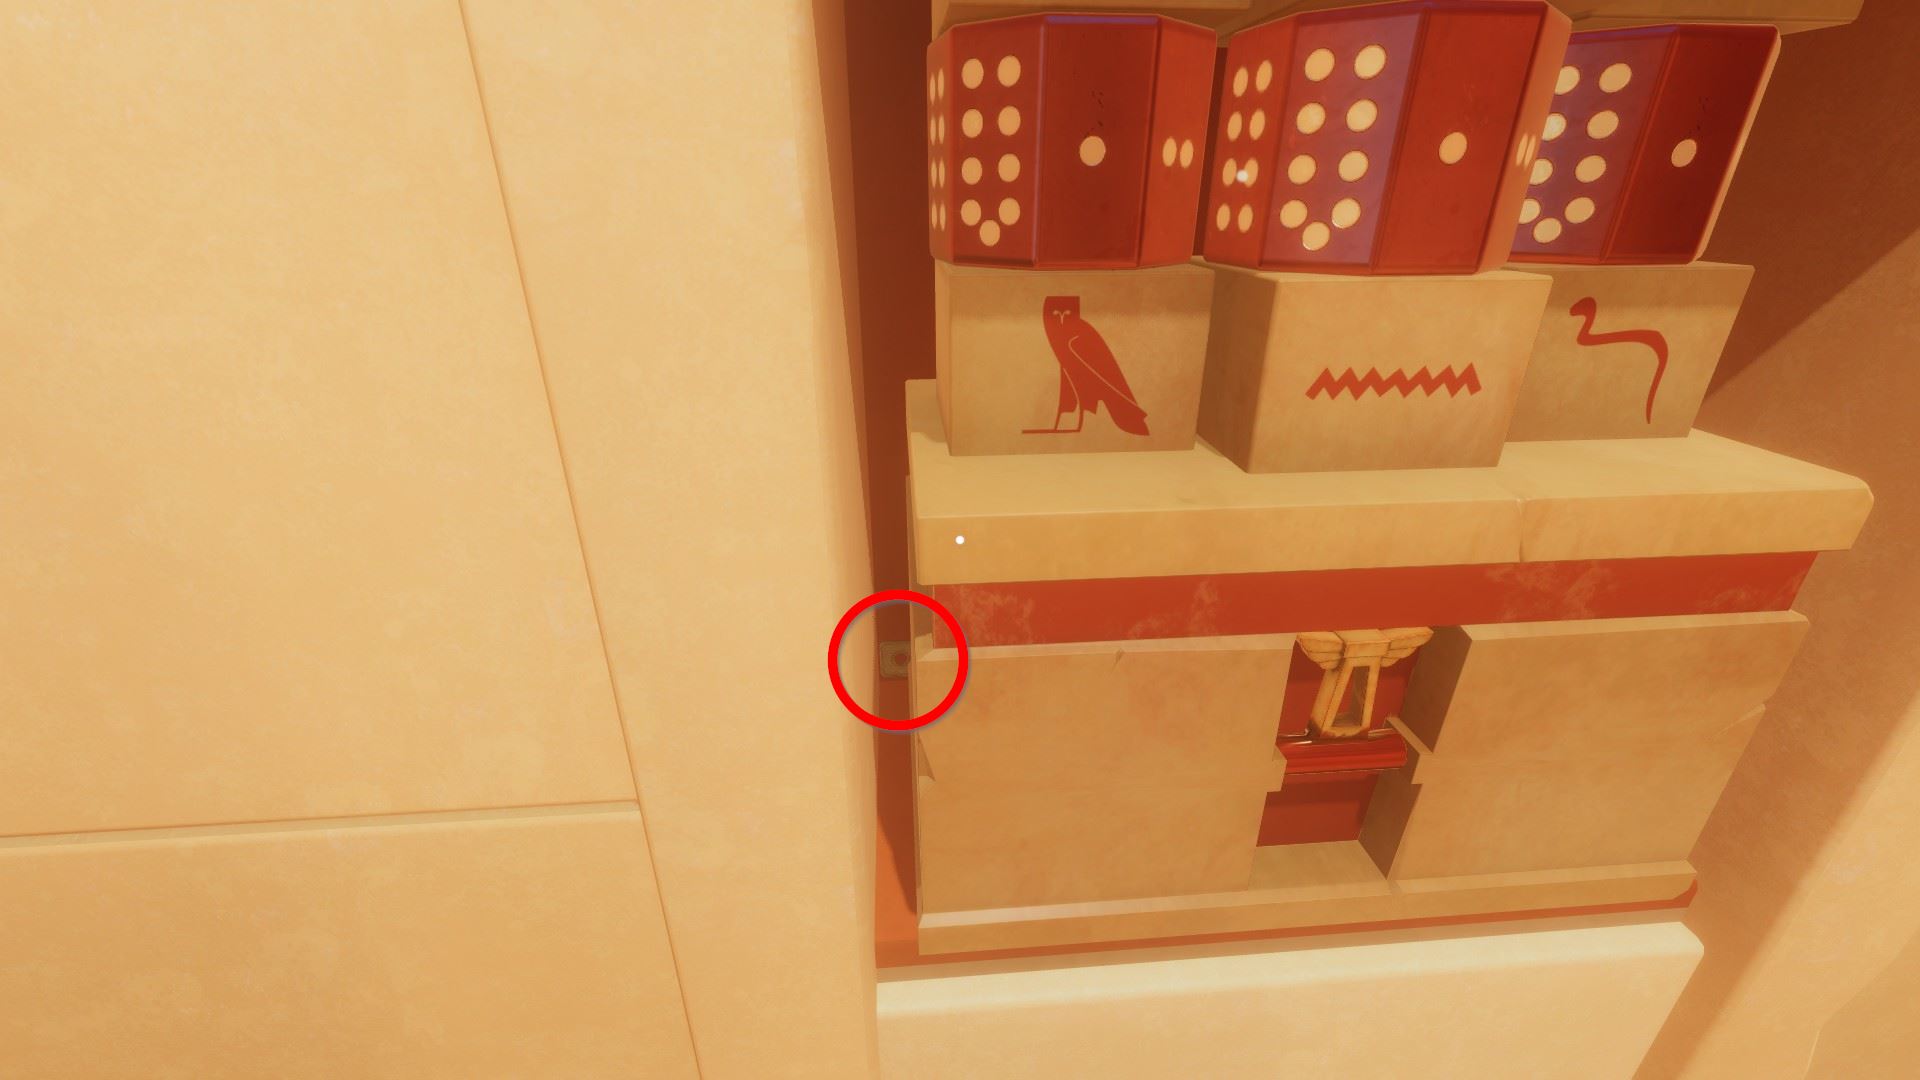
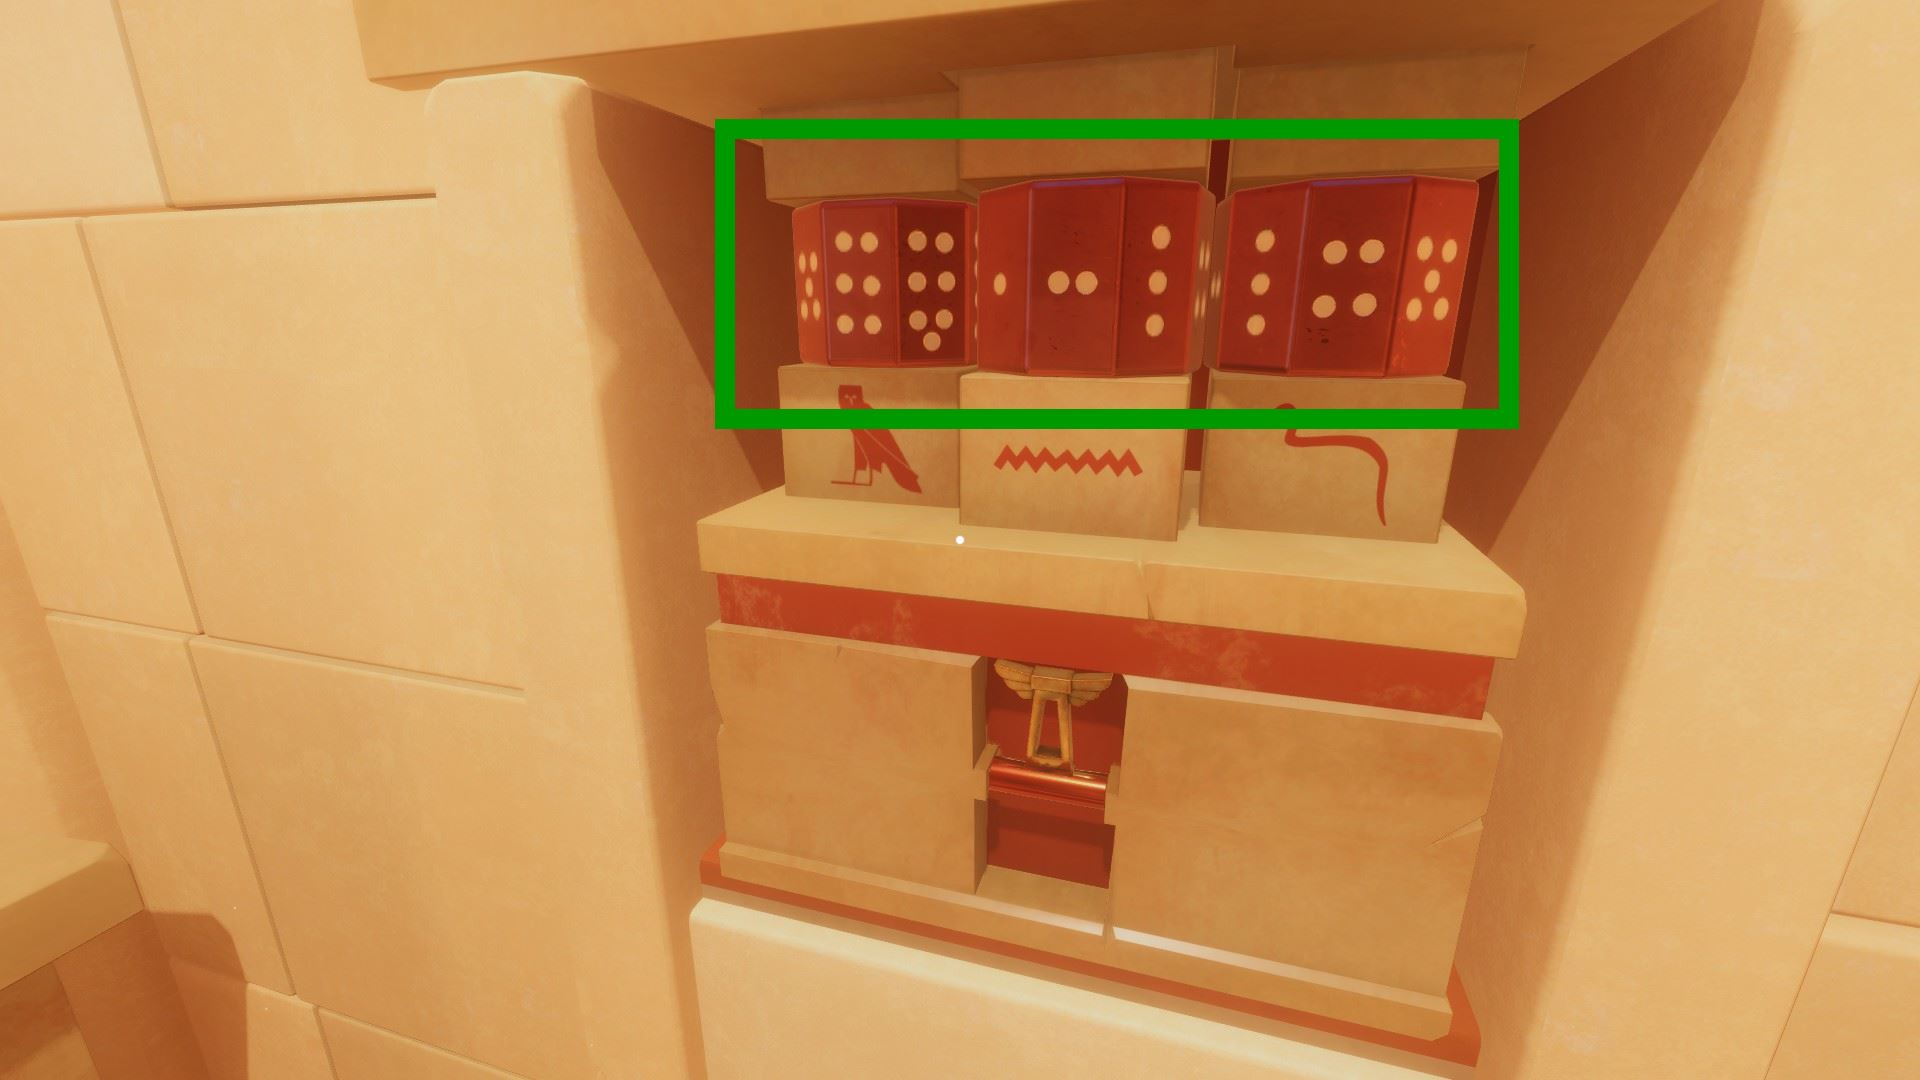
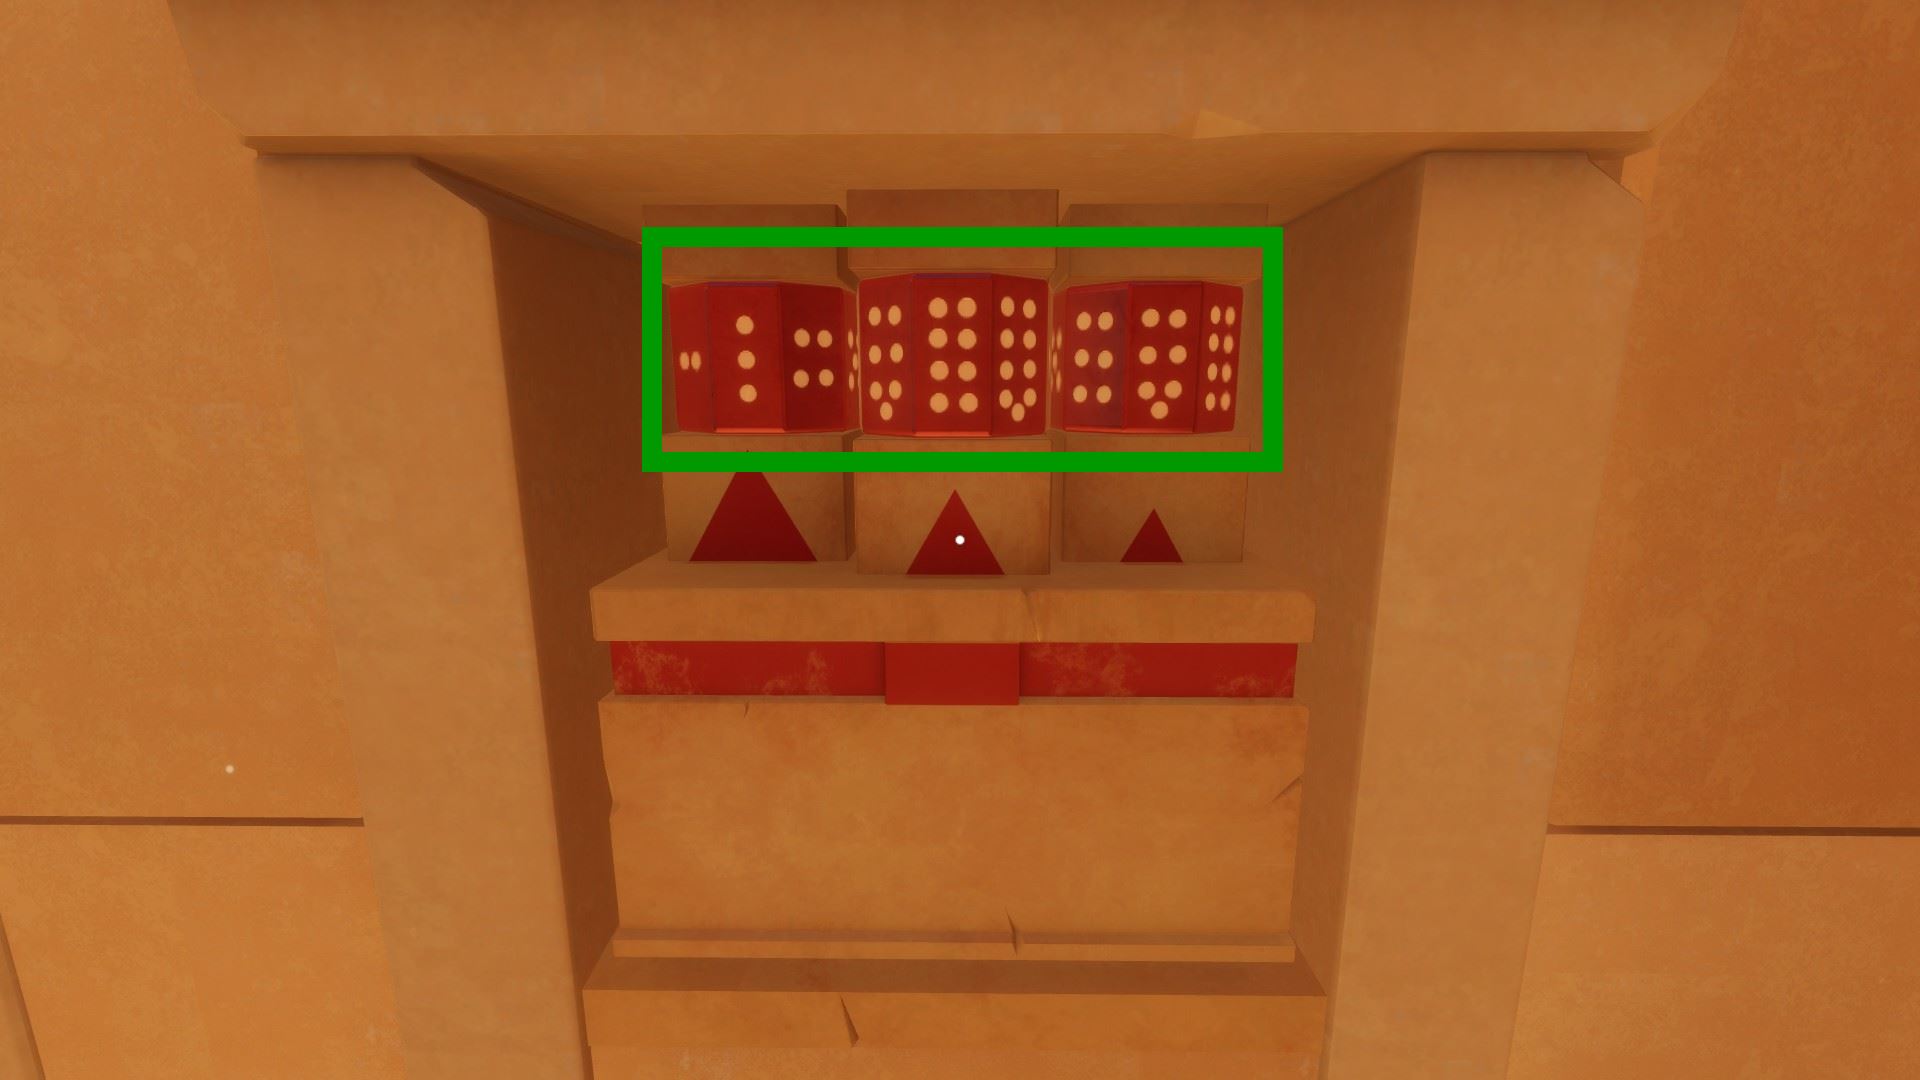
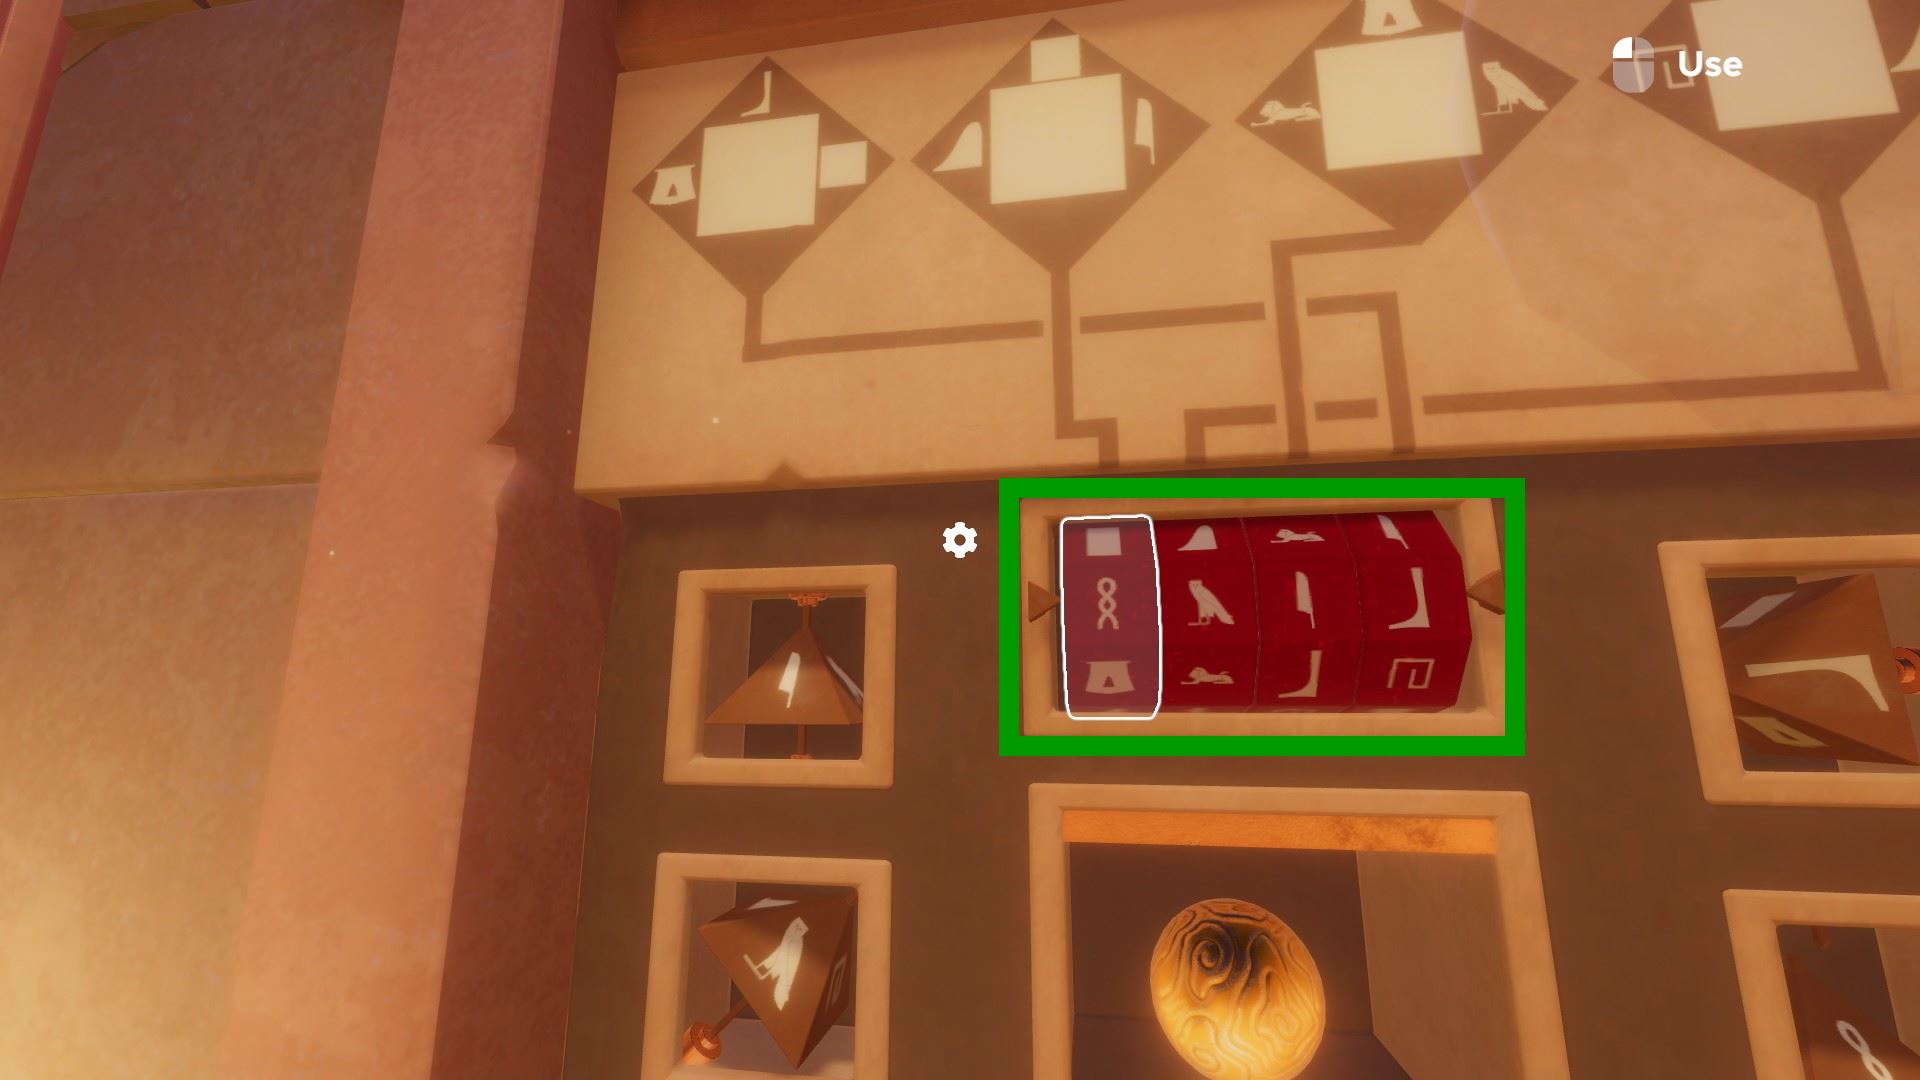
⏹ Token ii / 8 - fix the dials to 2-2-half-dozen-three to reveal the token (hint from the comprehend of the bluish book):
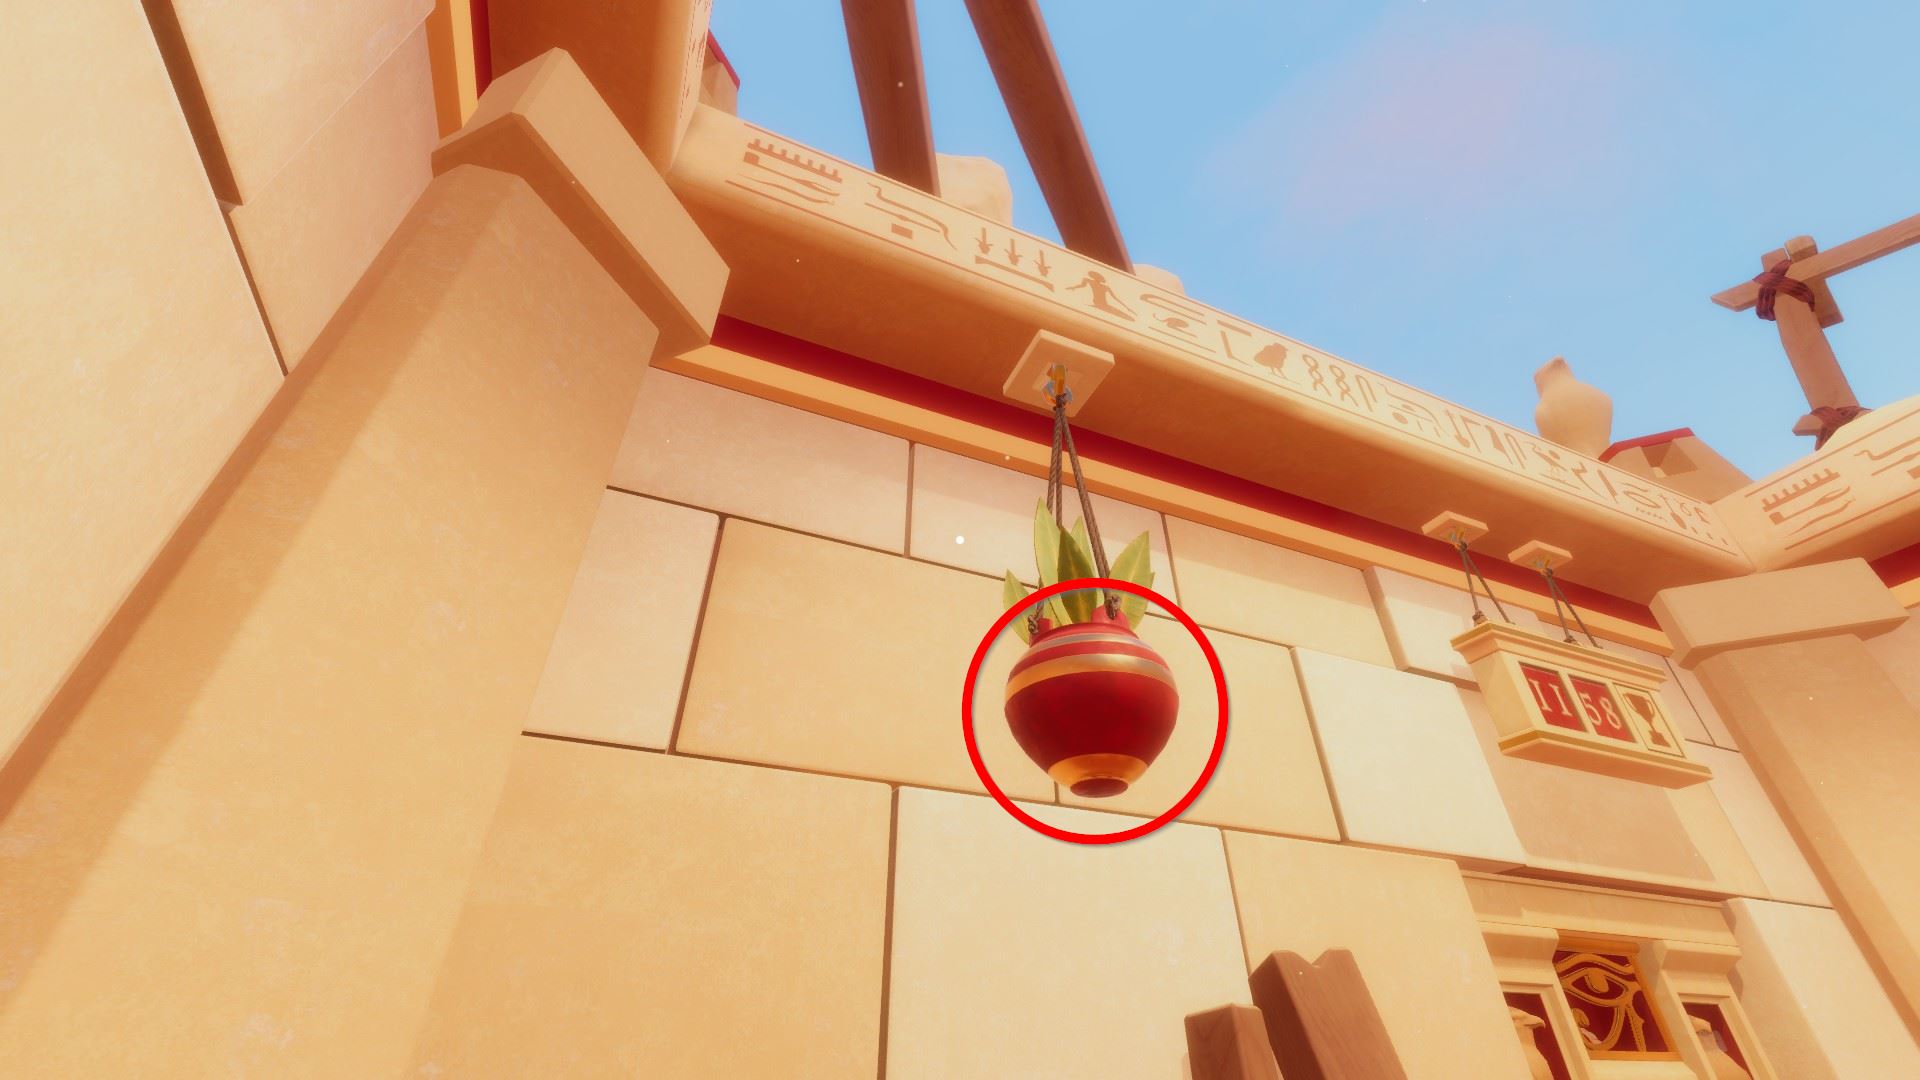
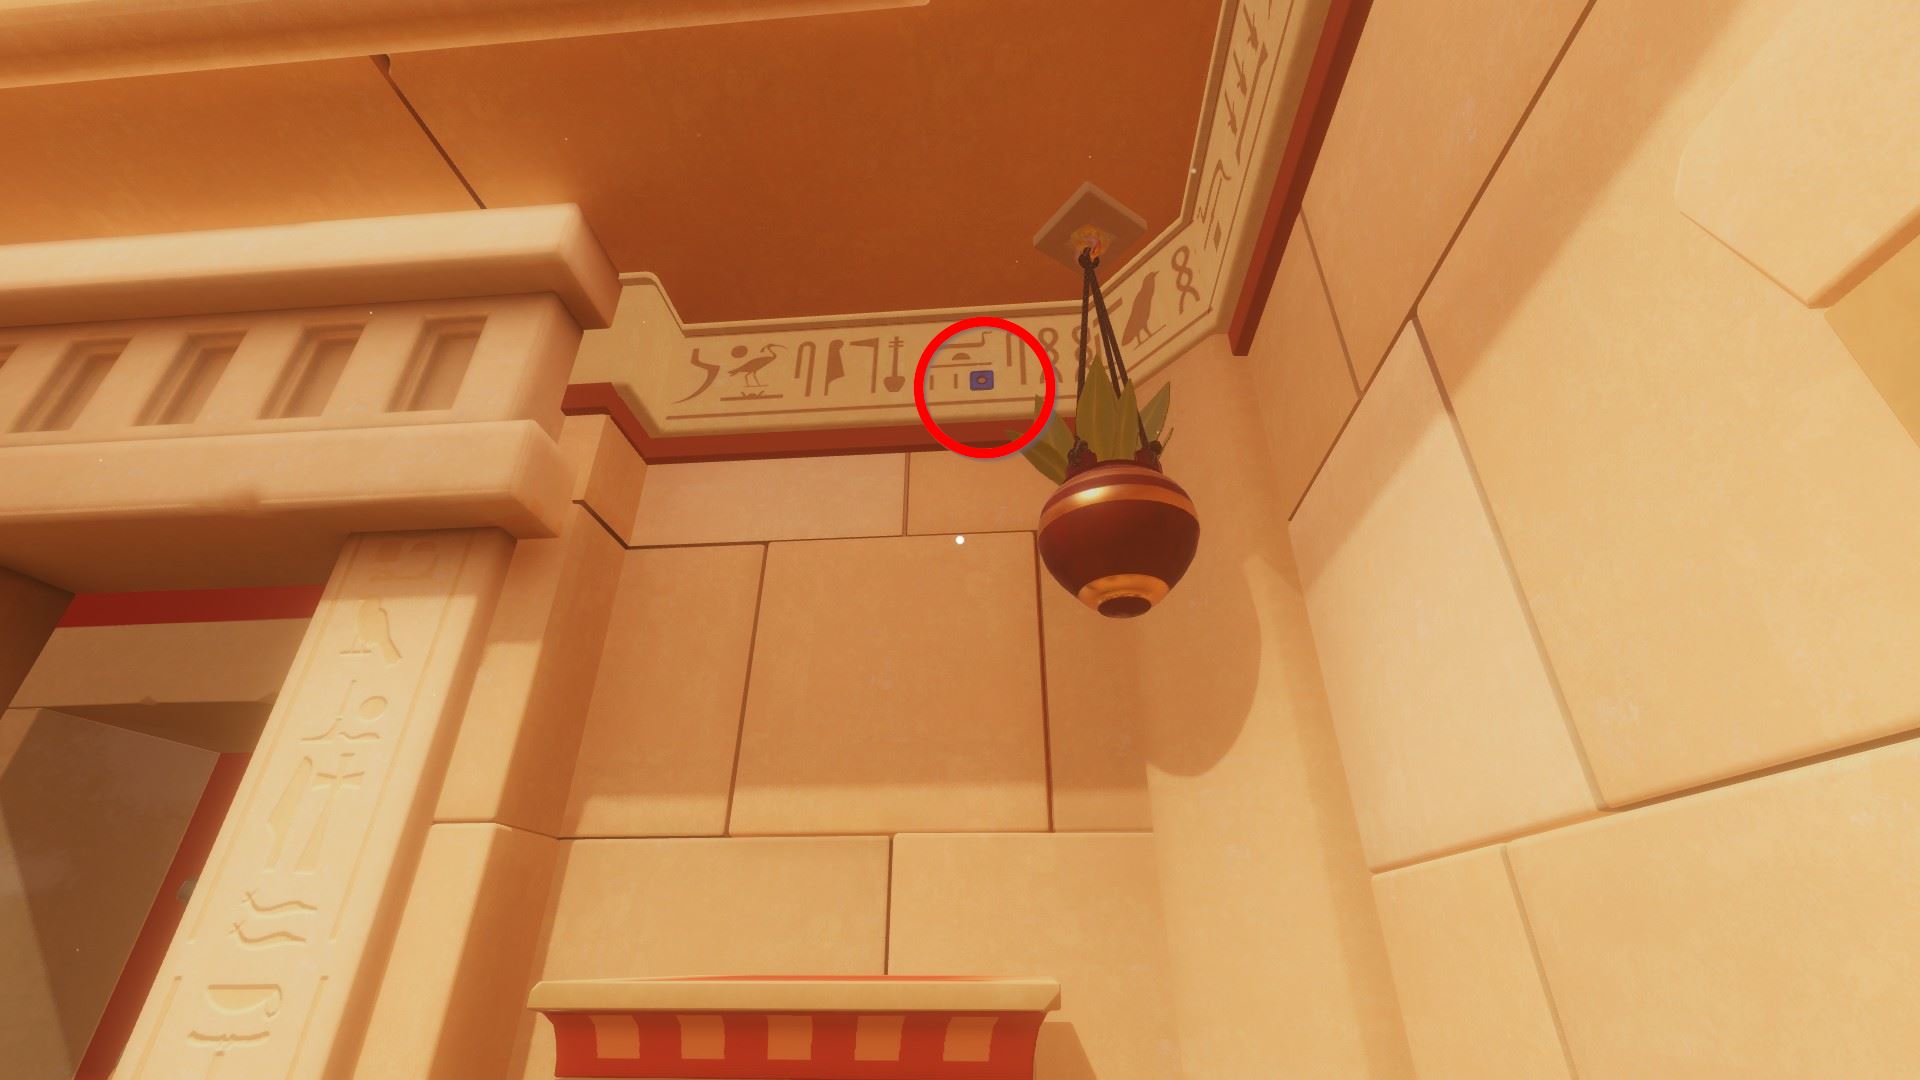
⏹ Token 3 / 8 - movement the leftmost hanging plant pot, and the token will autumn downwards:
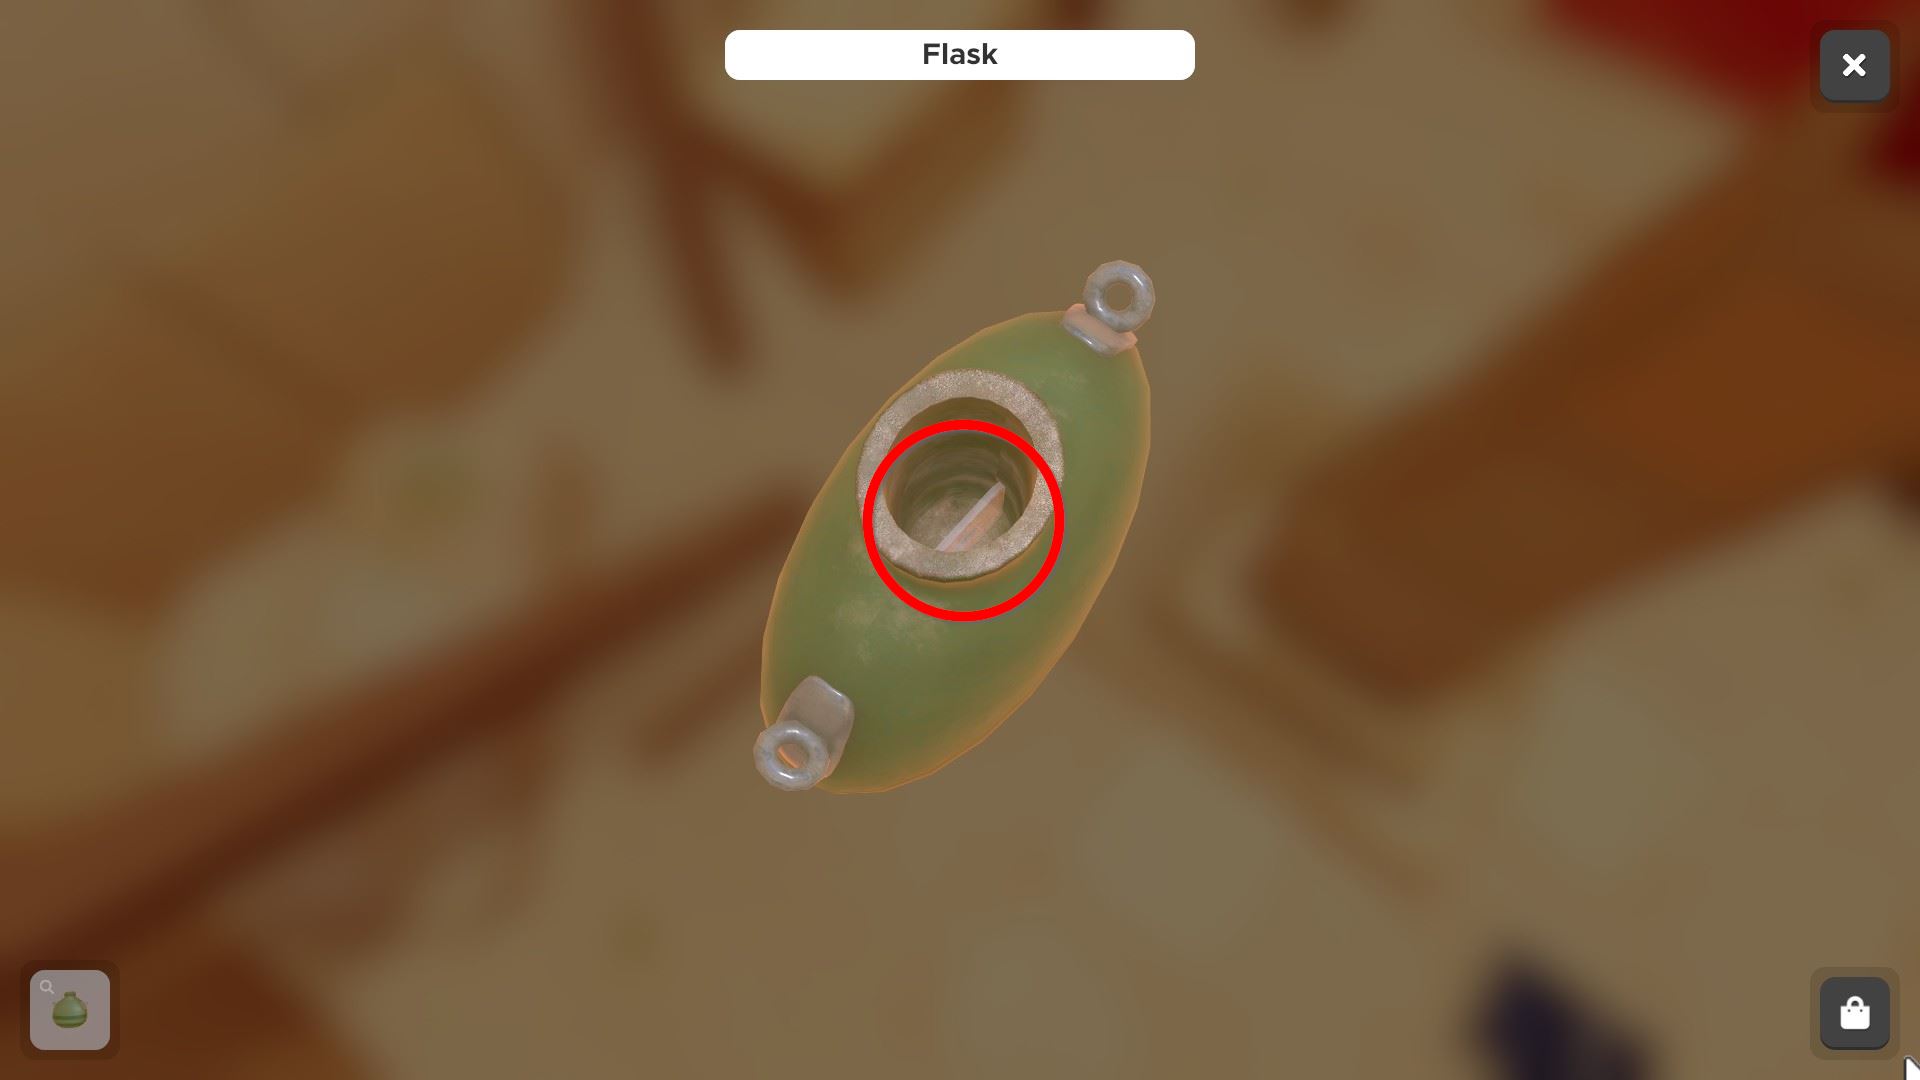
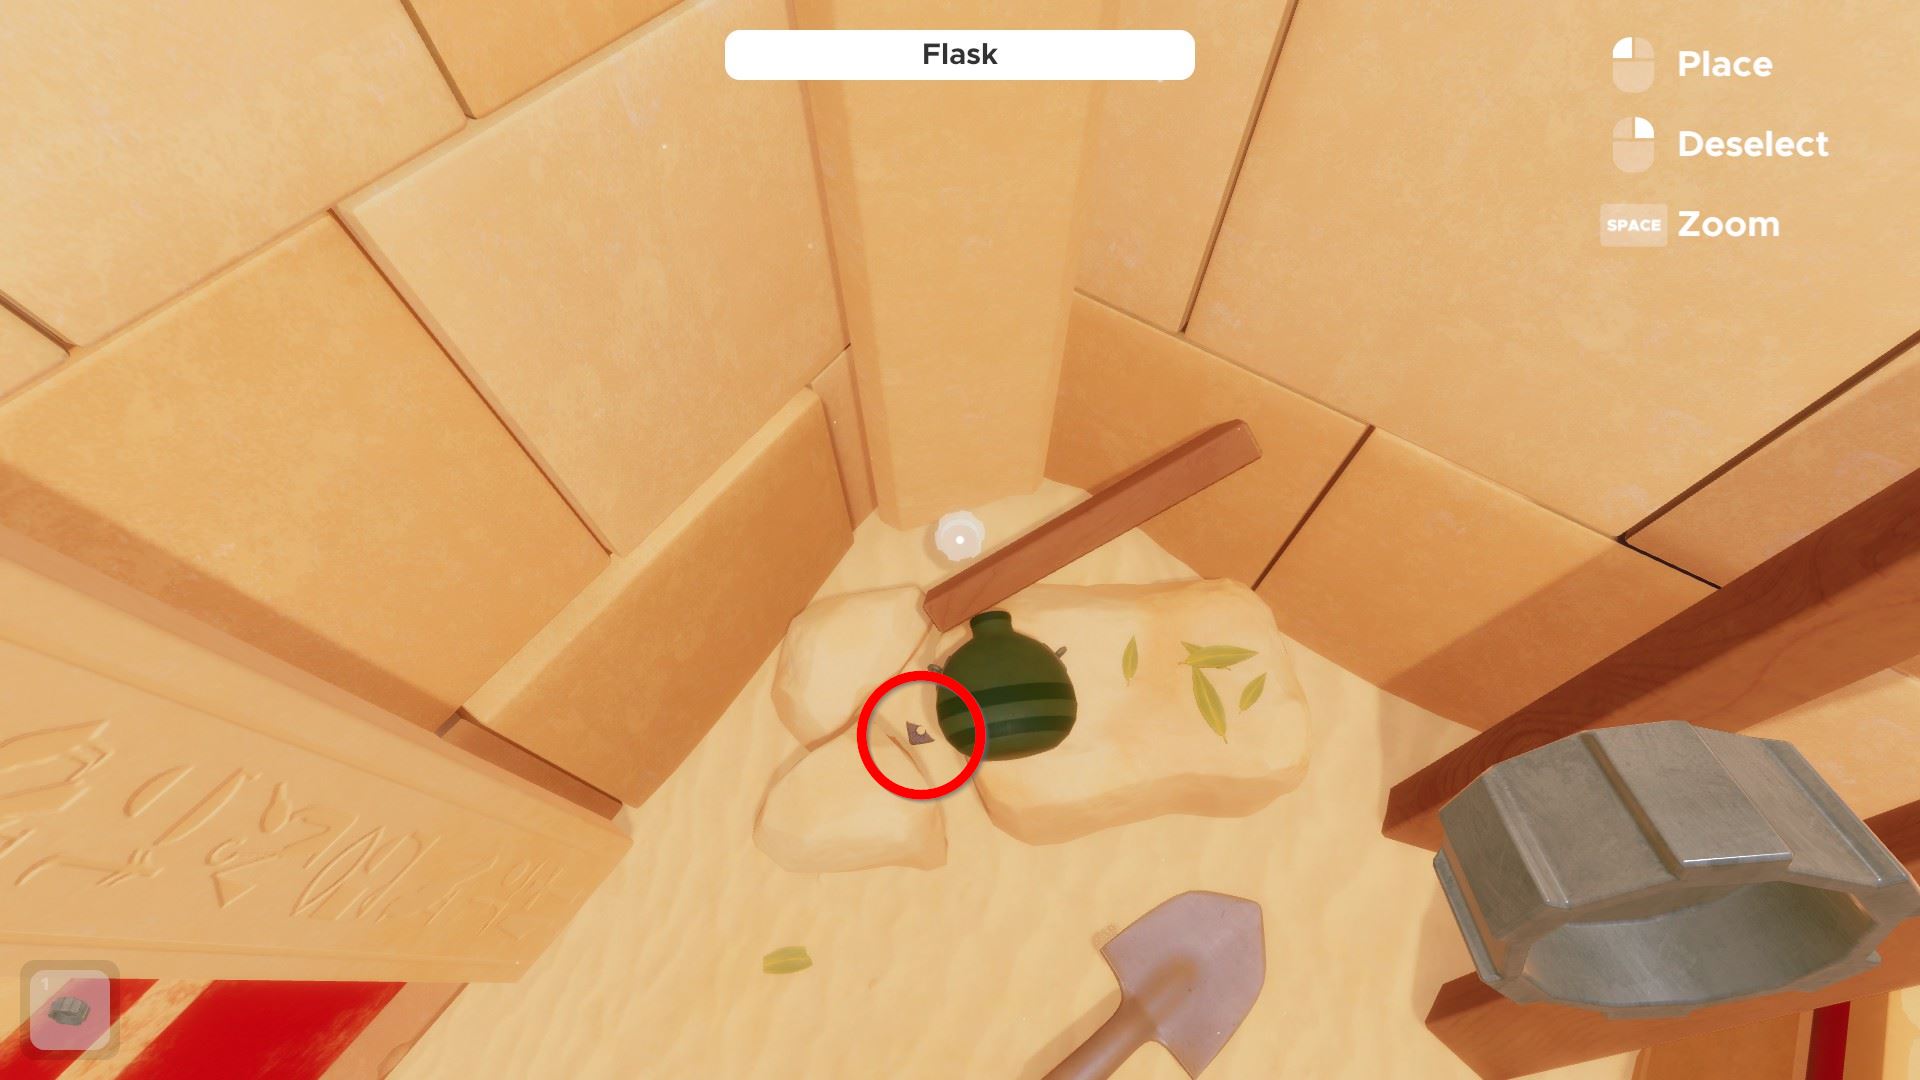
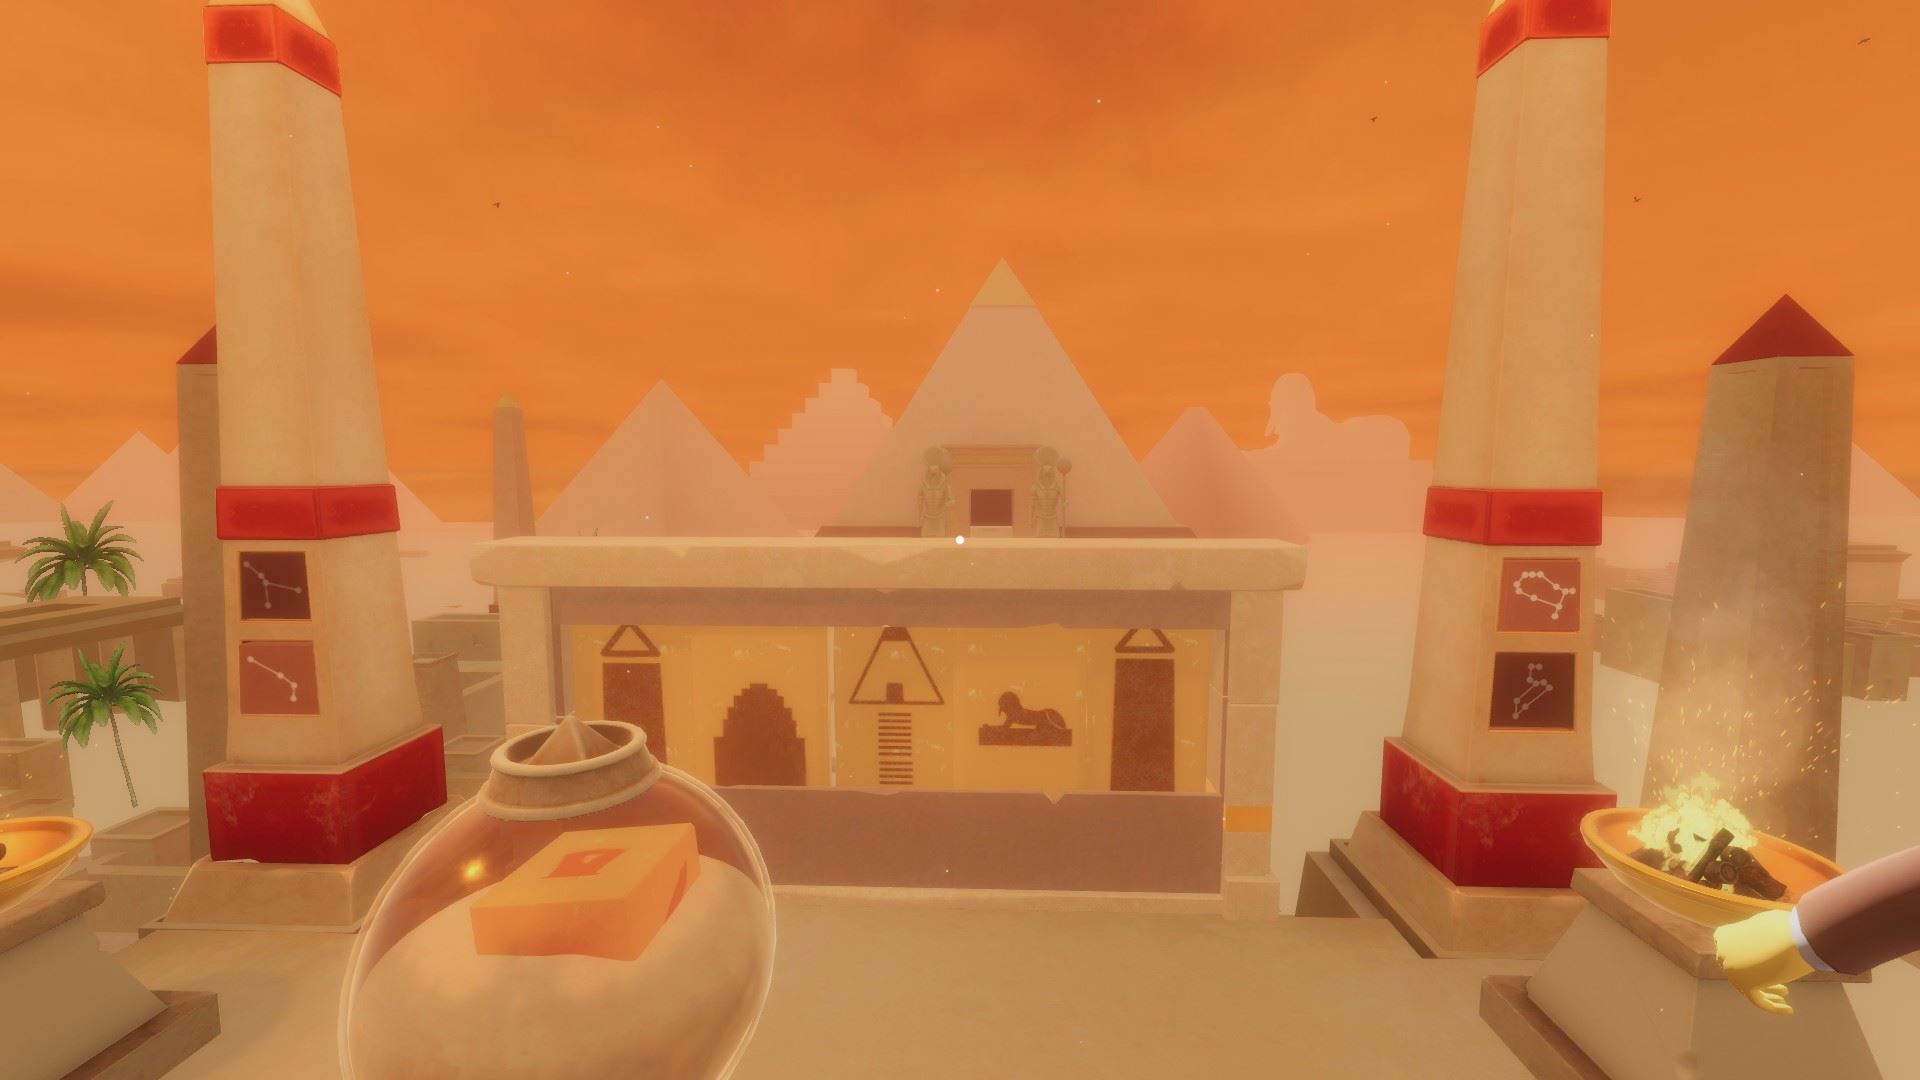
⏹ Token 4 / 8 - inspect the flask, remove its hat, then rotate the flask to find a token inside. It requires either filling the flask with water, or another player rotating the flask to be able to click it:
⏹ Token 5 / 8 - using the shovel, break the left office of the stone to reveal a token:
⏹ Token half-dozen / 8 - motion the piece on the flooring (between the rightmost ii bloom pots) to reveal a token:
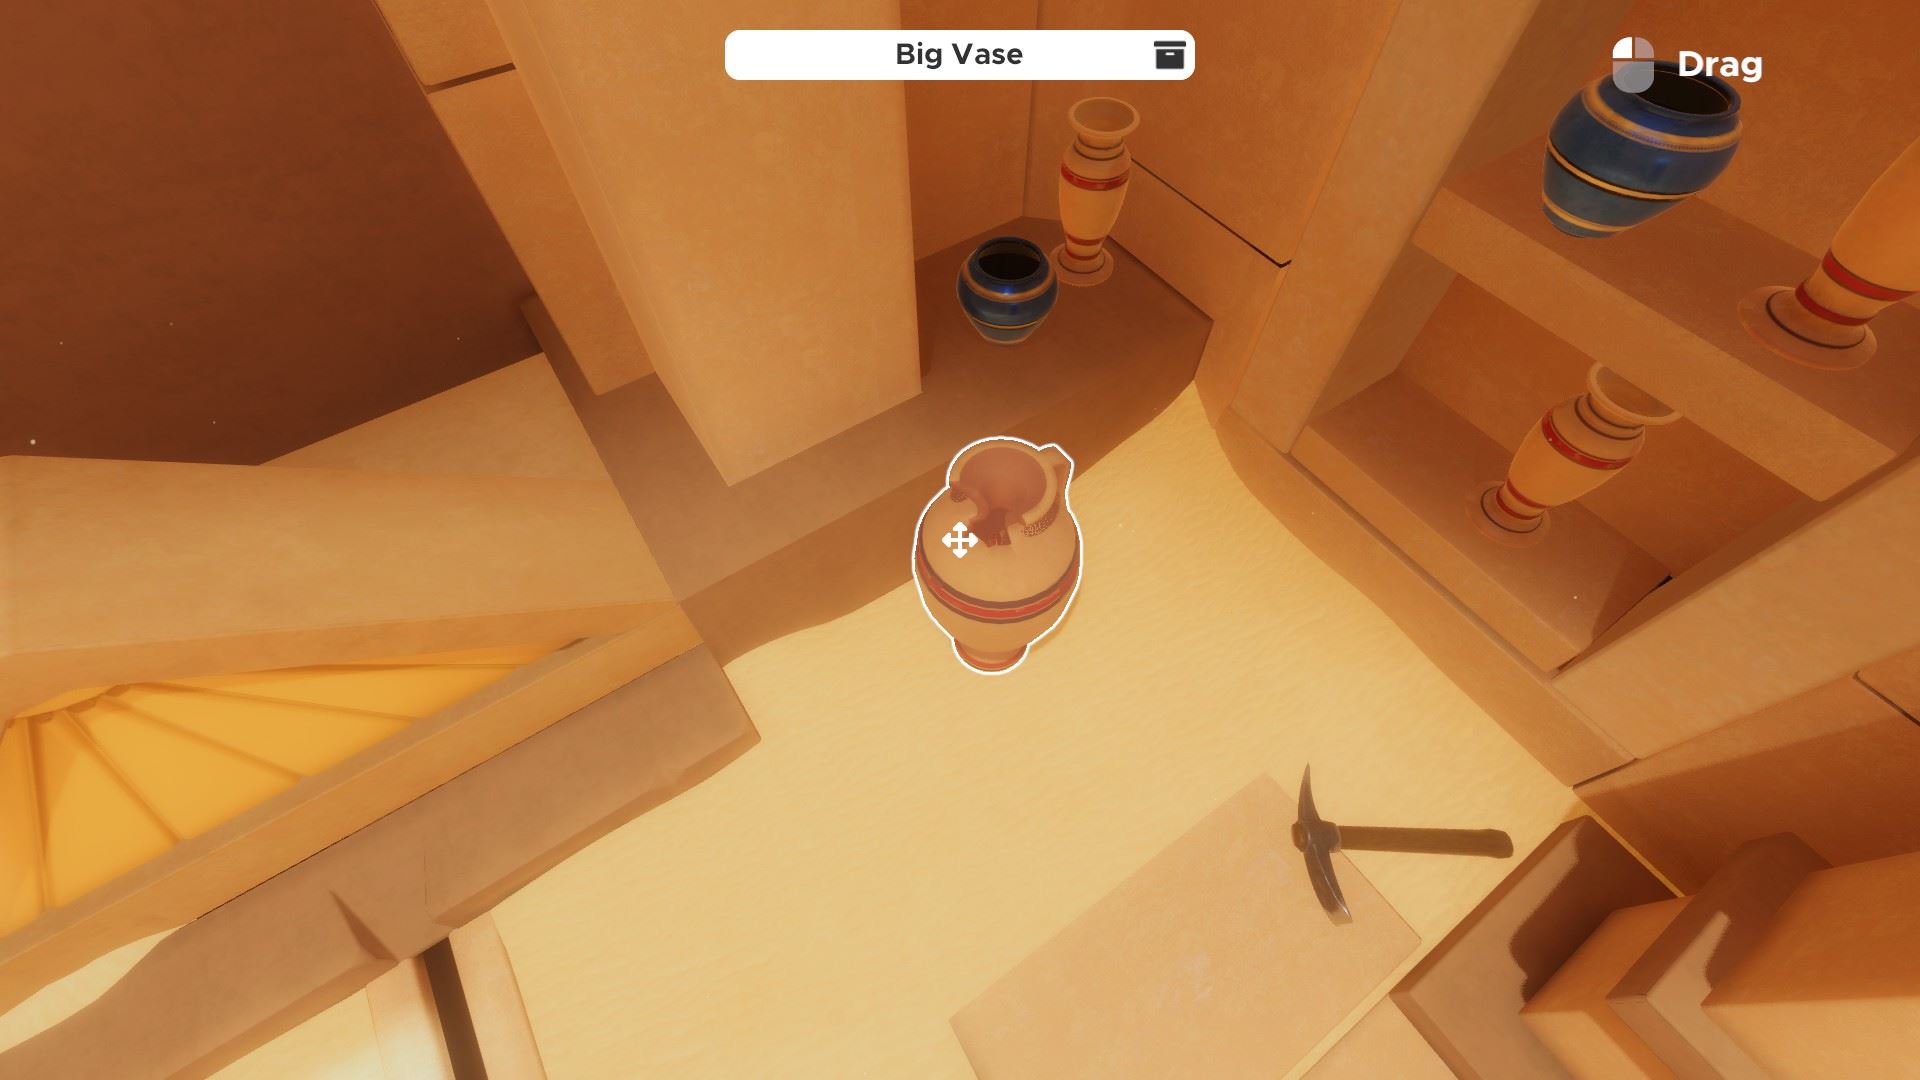
Break this vase to reveal a red base of operations pyramidion office:
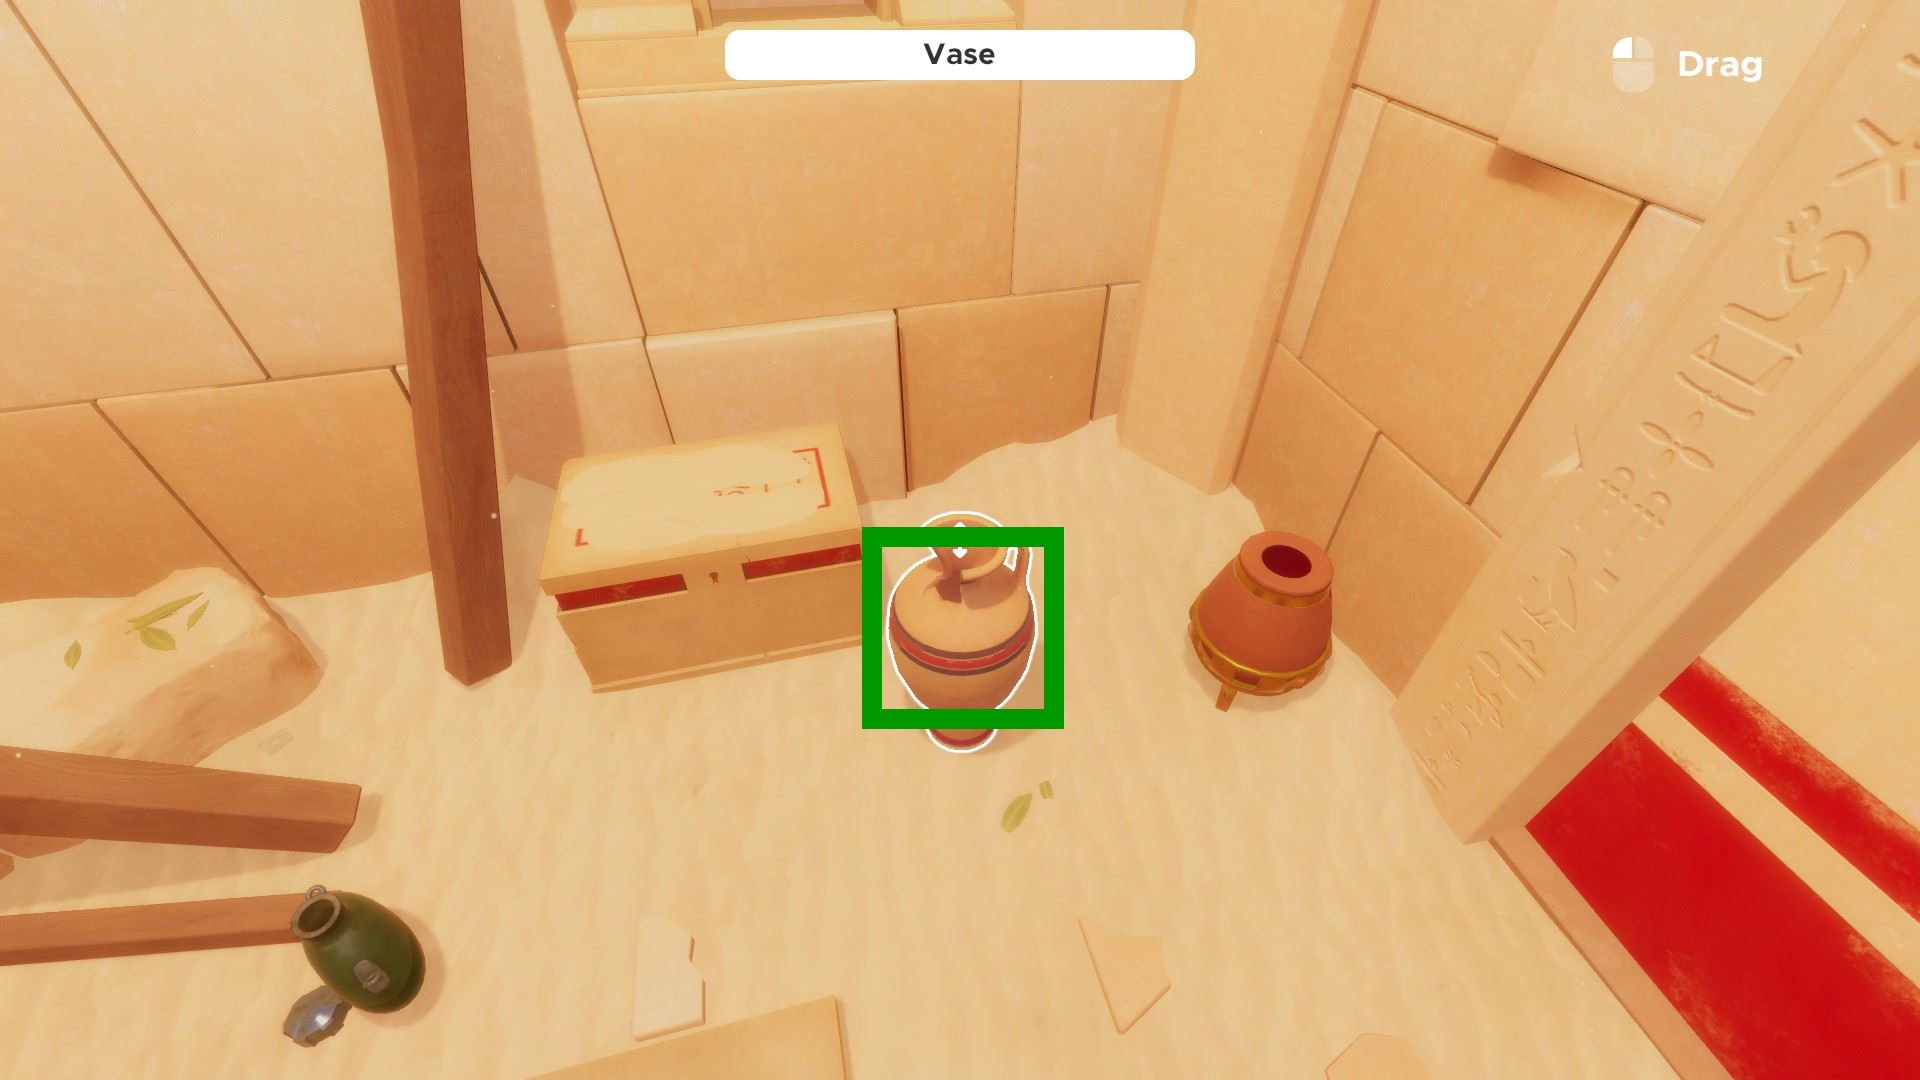
Interruption the other vase as well for an achievement:
🏆 Destroyer - Destroy everything in room
Open the suitcase, pick up the brush.
Employ the brush to remove the sand on the stone box, revealing Egyptian numerals. Using the red volume from the suitcase, you can come across the number is 3x 1000 + 4x 100 + 2x 10 + 6x one = 3426.
Enter 3426 on the wall lock to get a key.
The cardinal opens the stone box. Inside, there is a red pyramidion part and a number of coins.
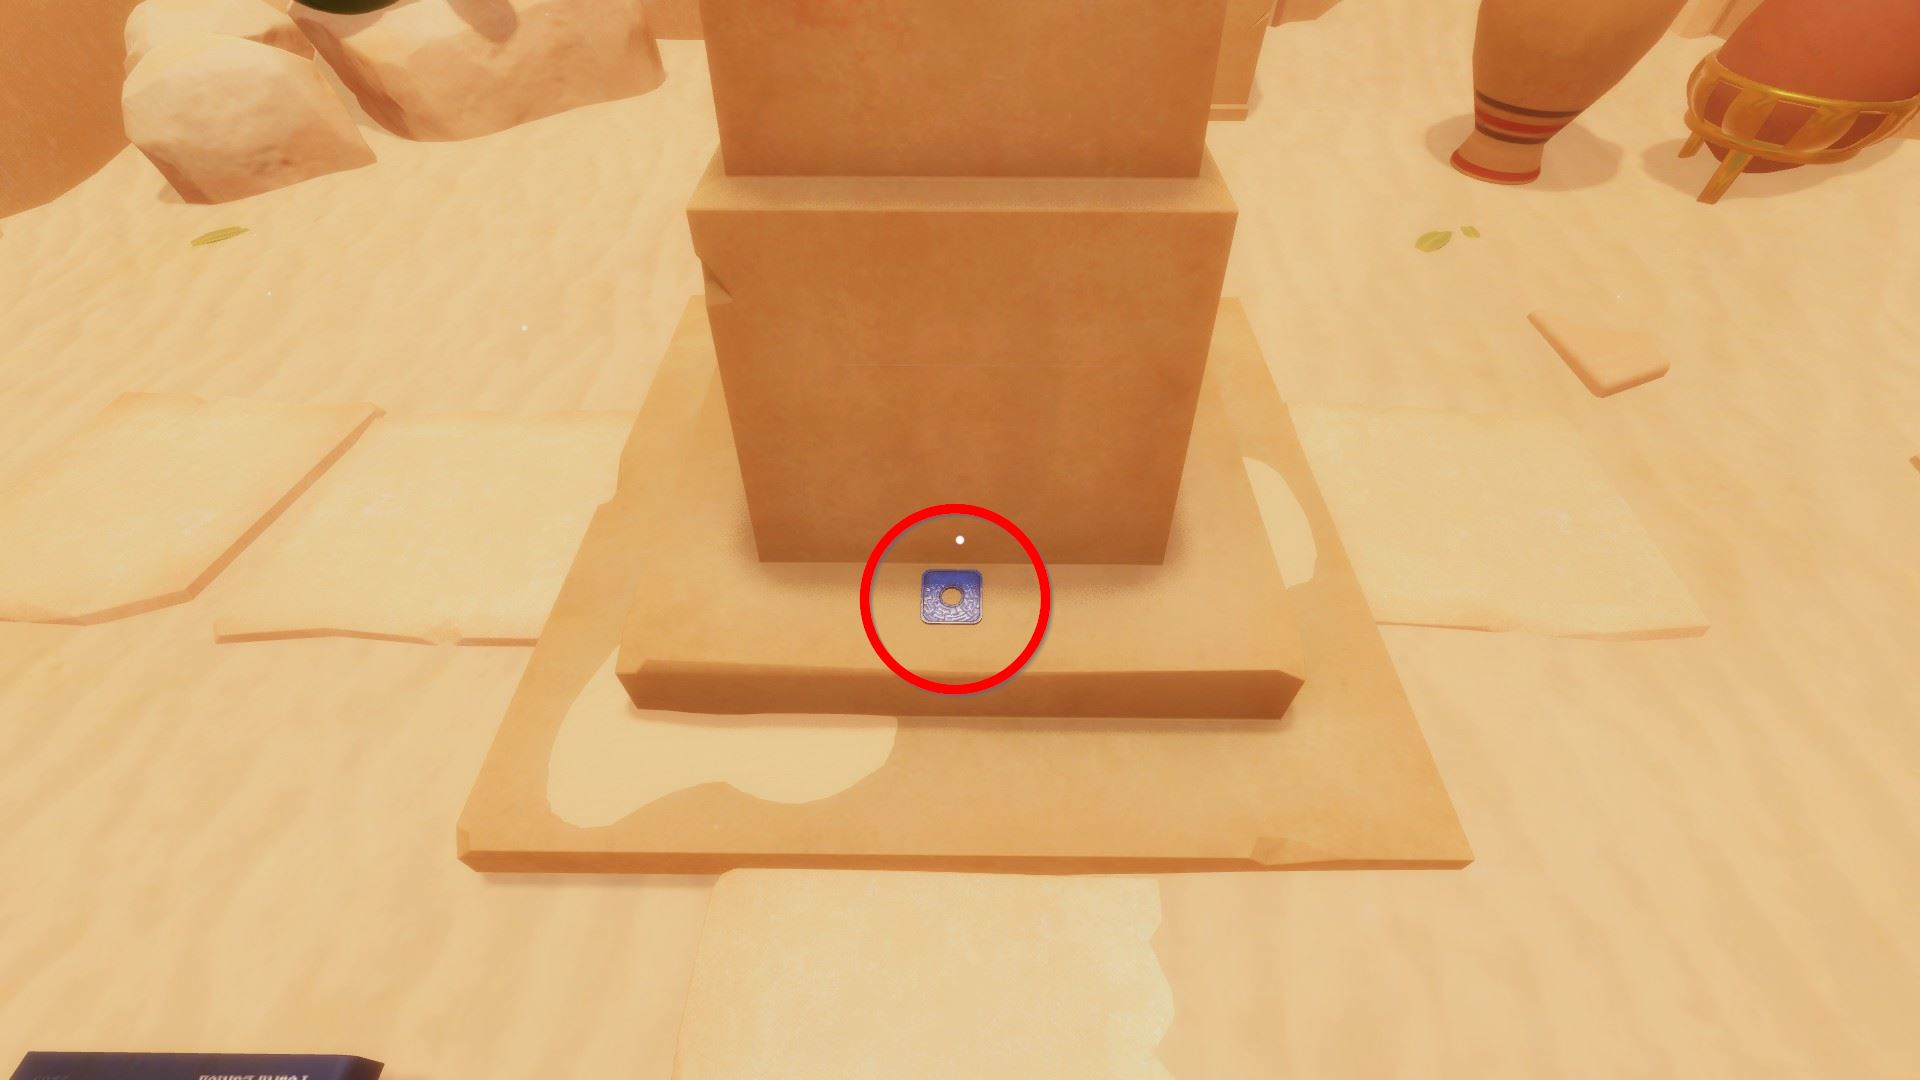
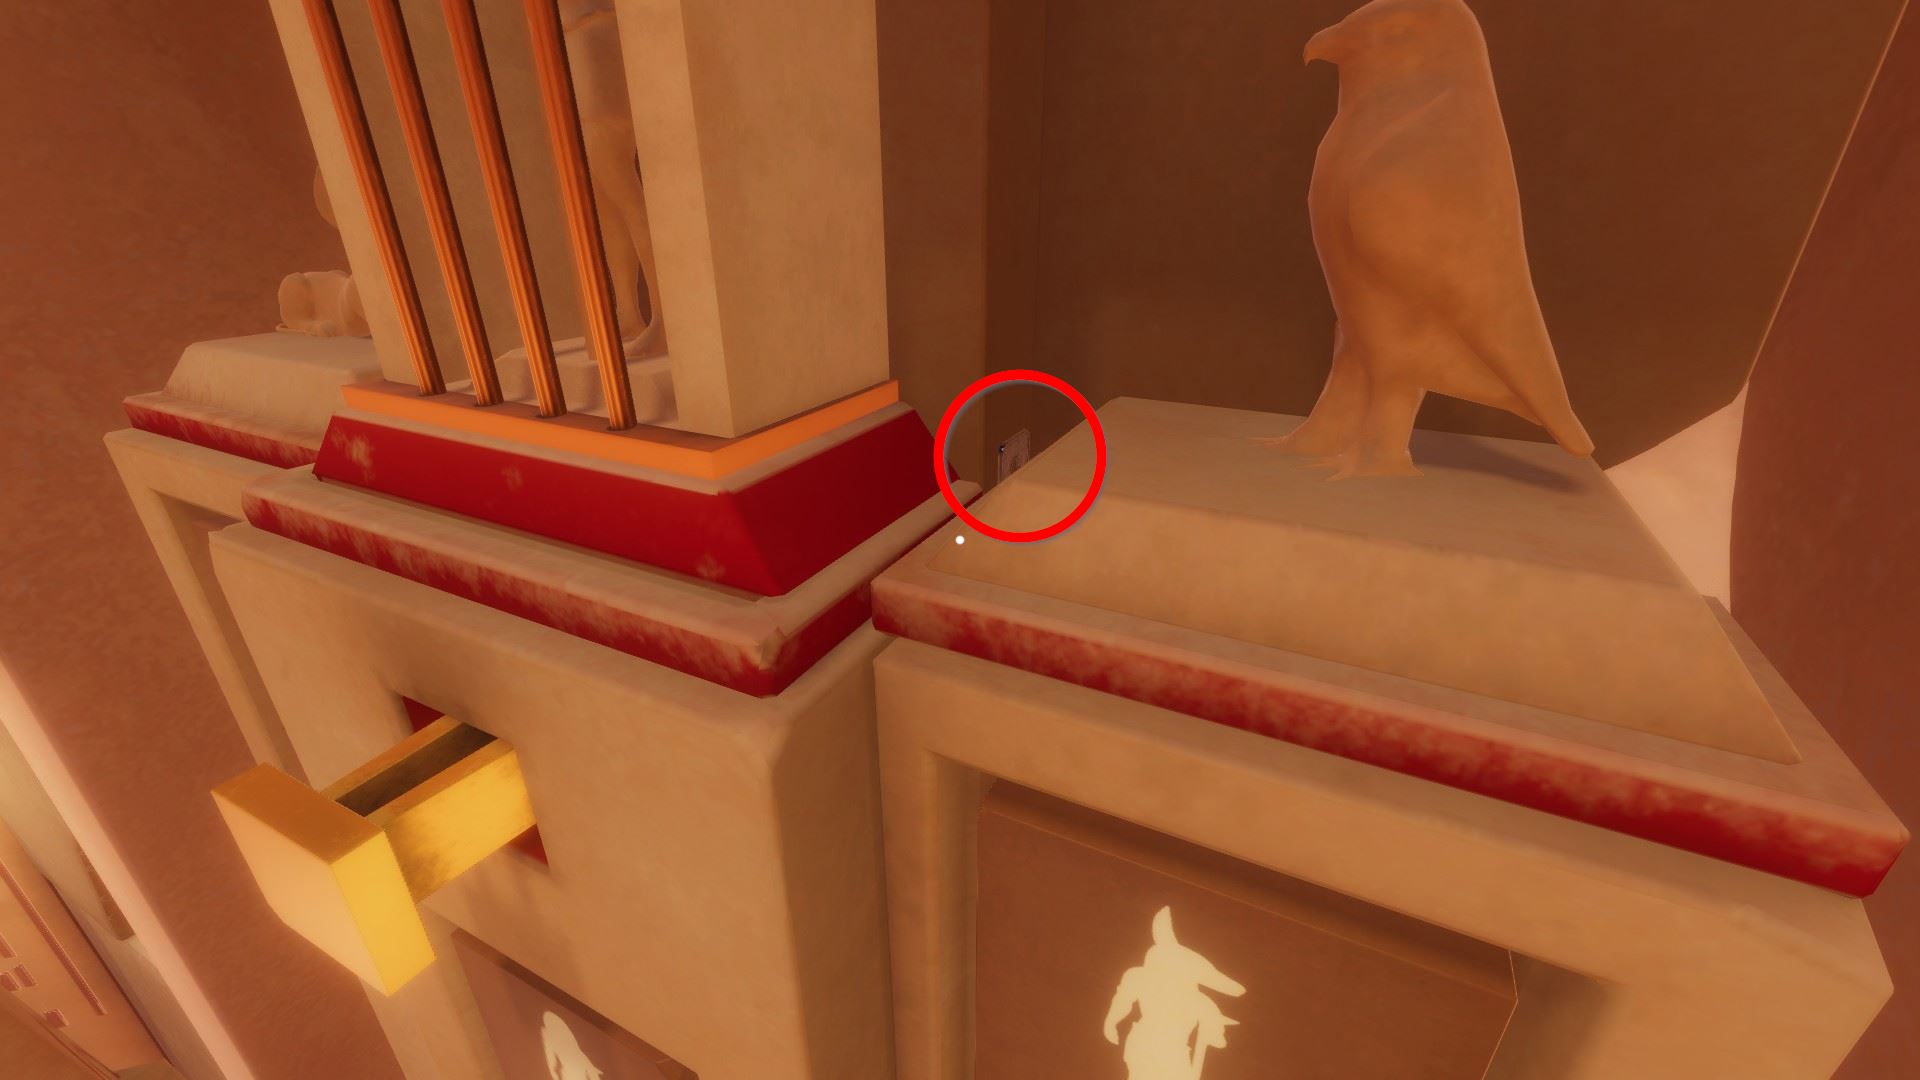
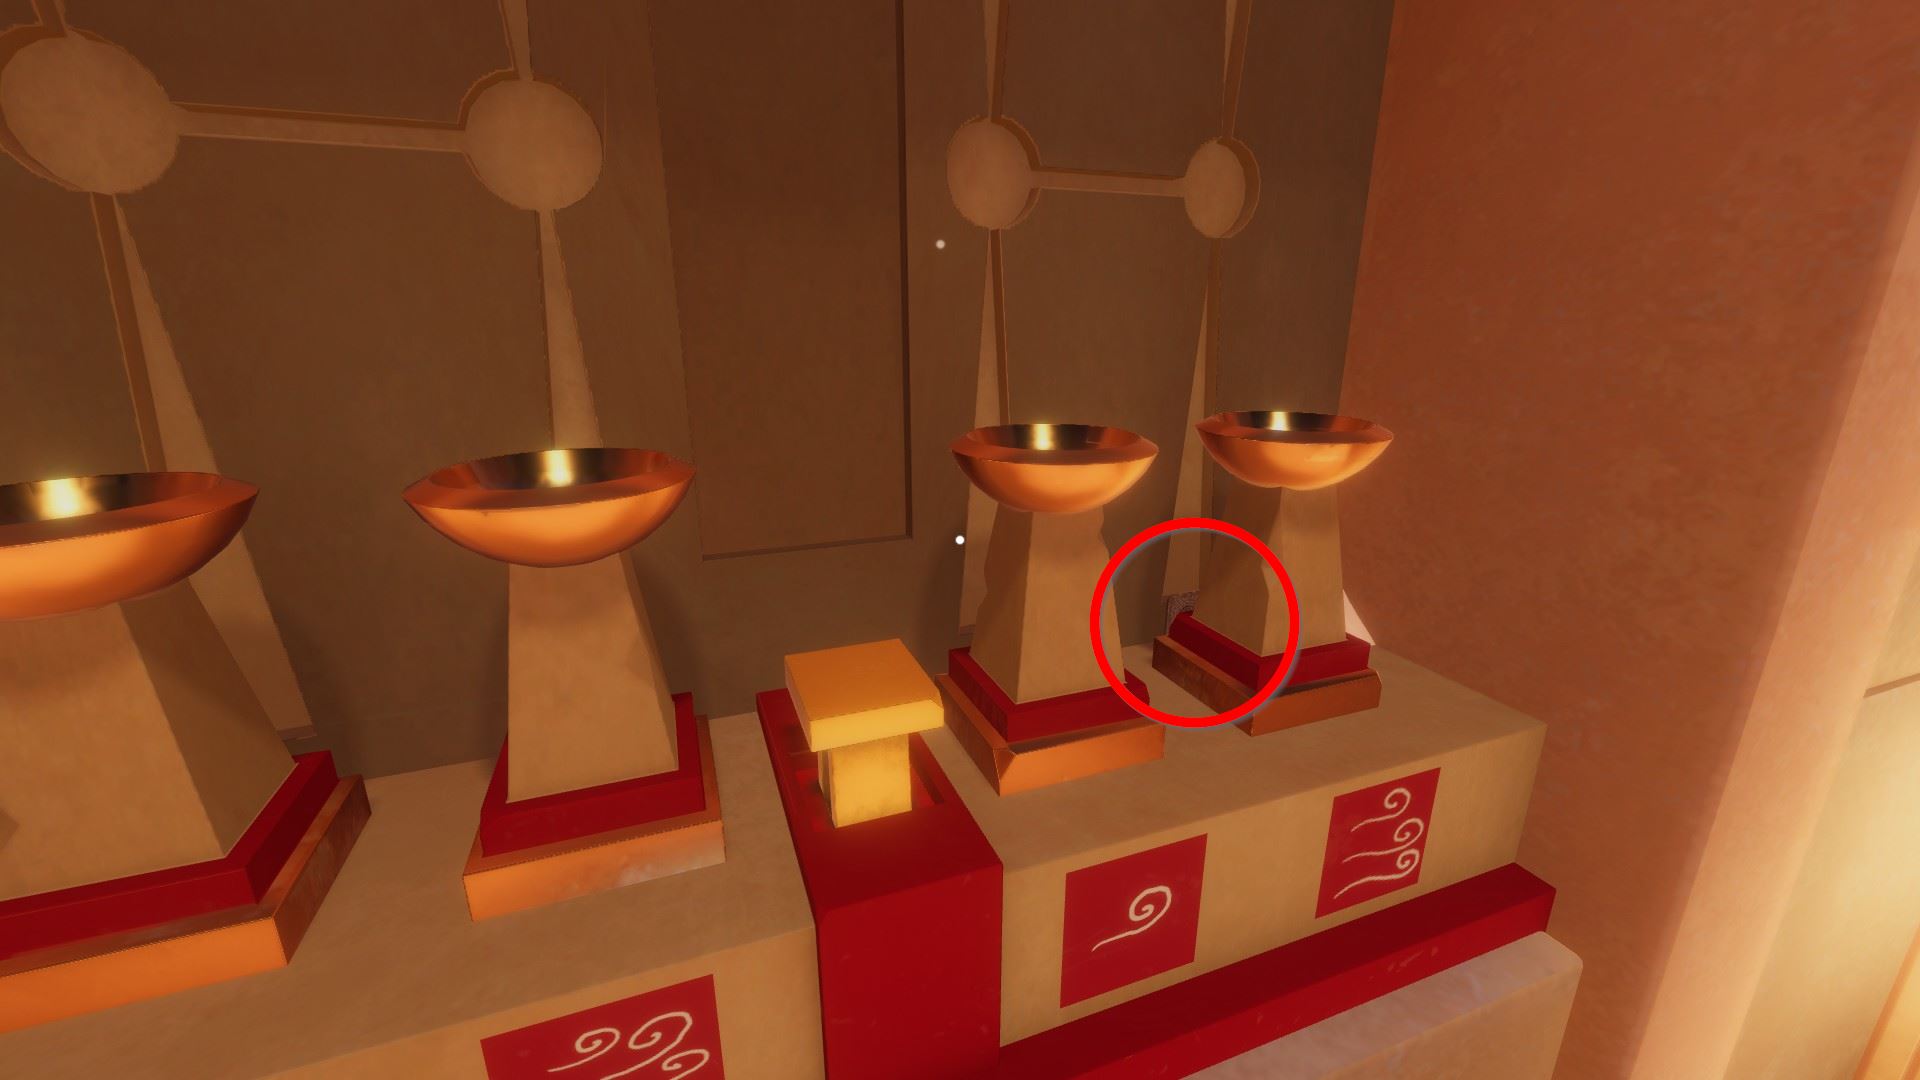
⏹ Token 7 / viii - employ the brush on the base of the primal pillar to reveal a token:
⏹ Token 8 / 8 - pick up a coin from the stone box and throw it into the water:
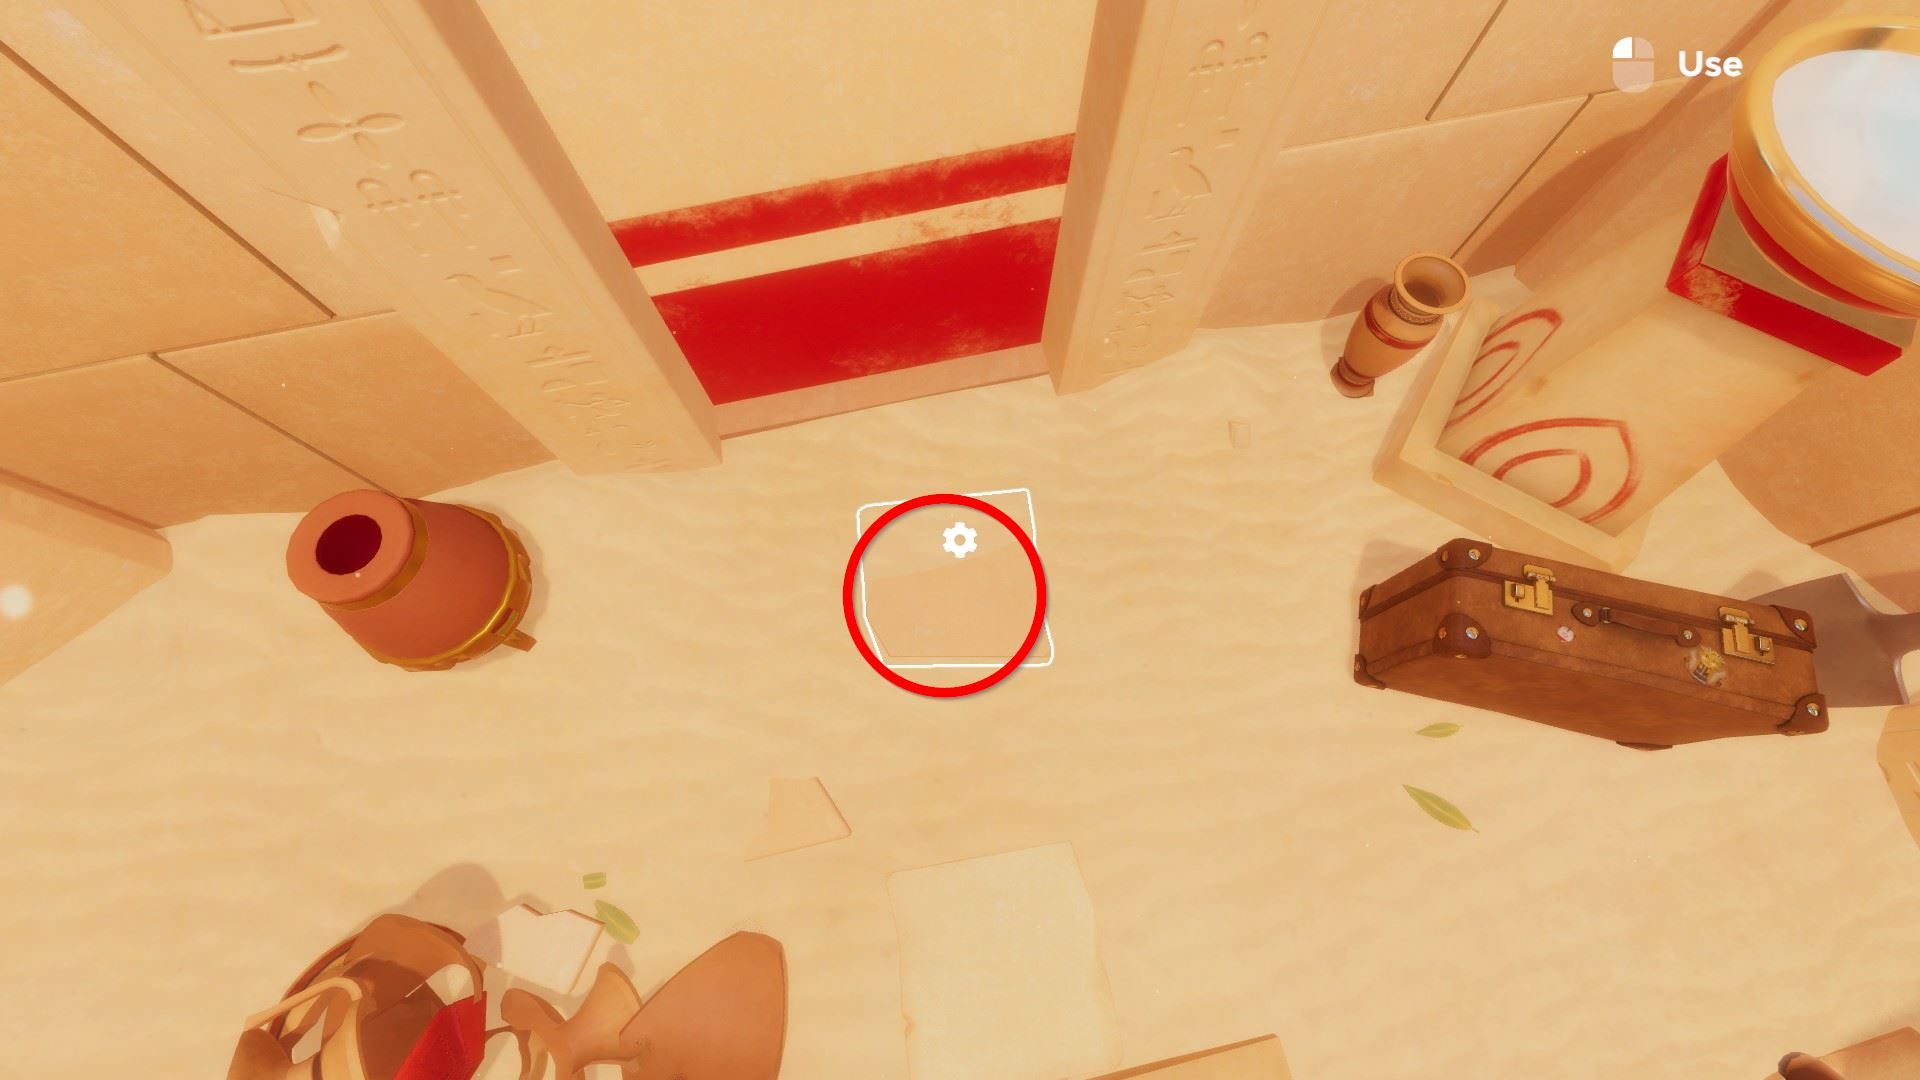
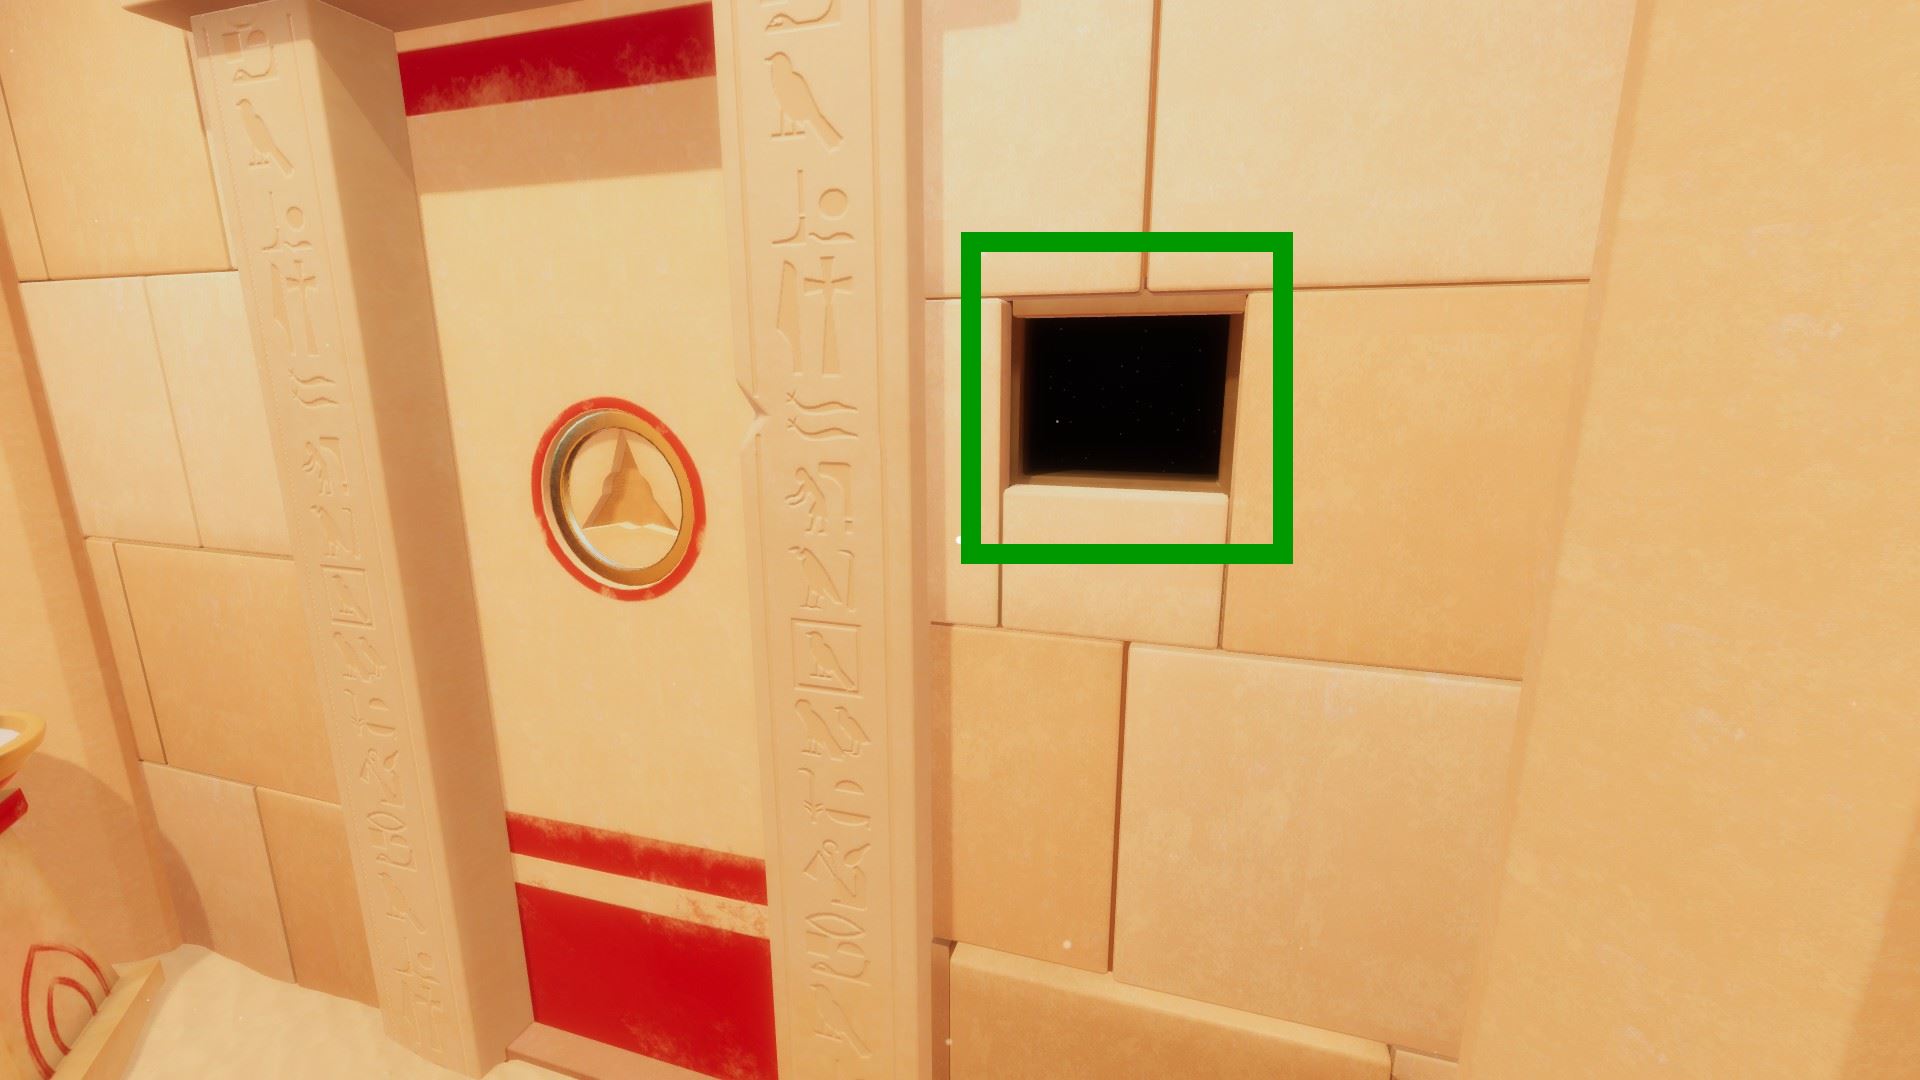
Press this tile to open up a niche, so place the Sphinx within. the Sphinx transforms.
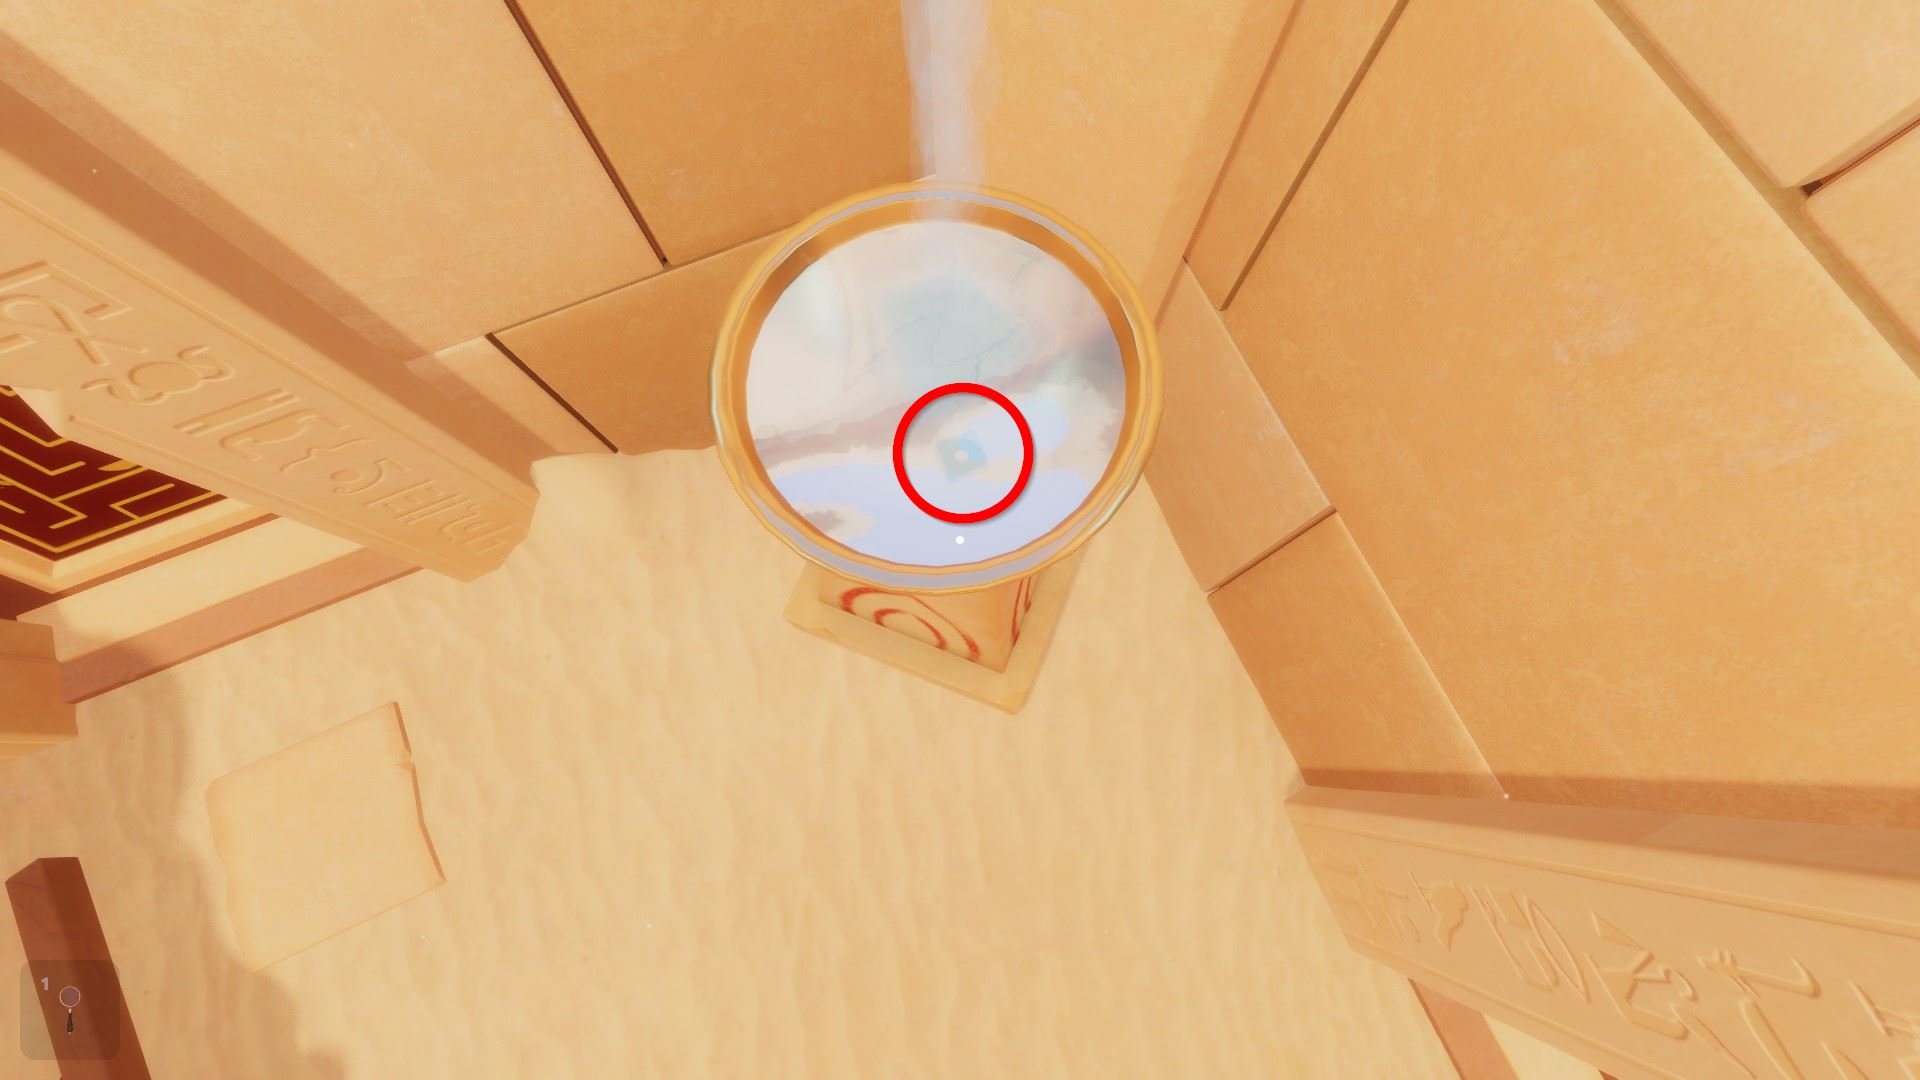
Identify the golden Sphynx in the water bowl to obtain the 4th pyramidion part.
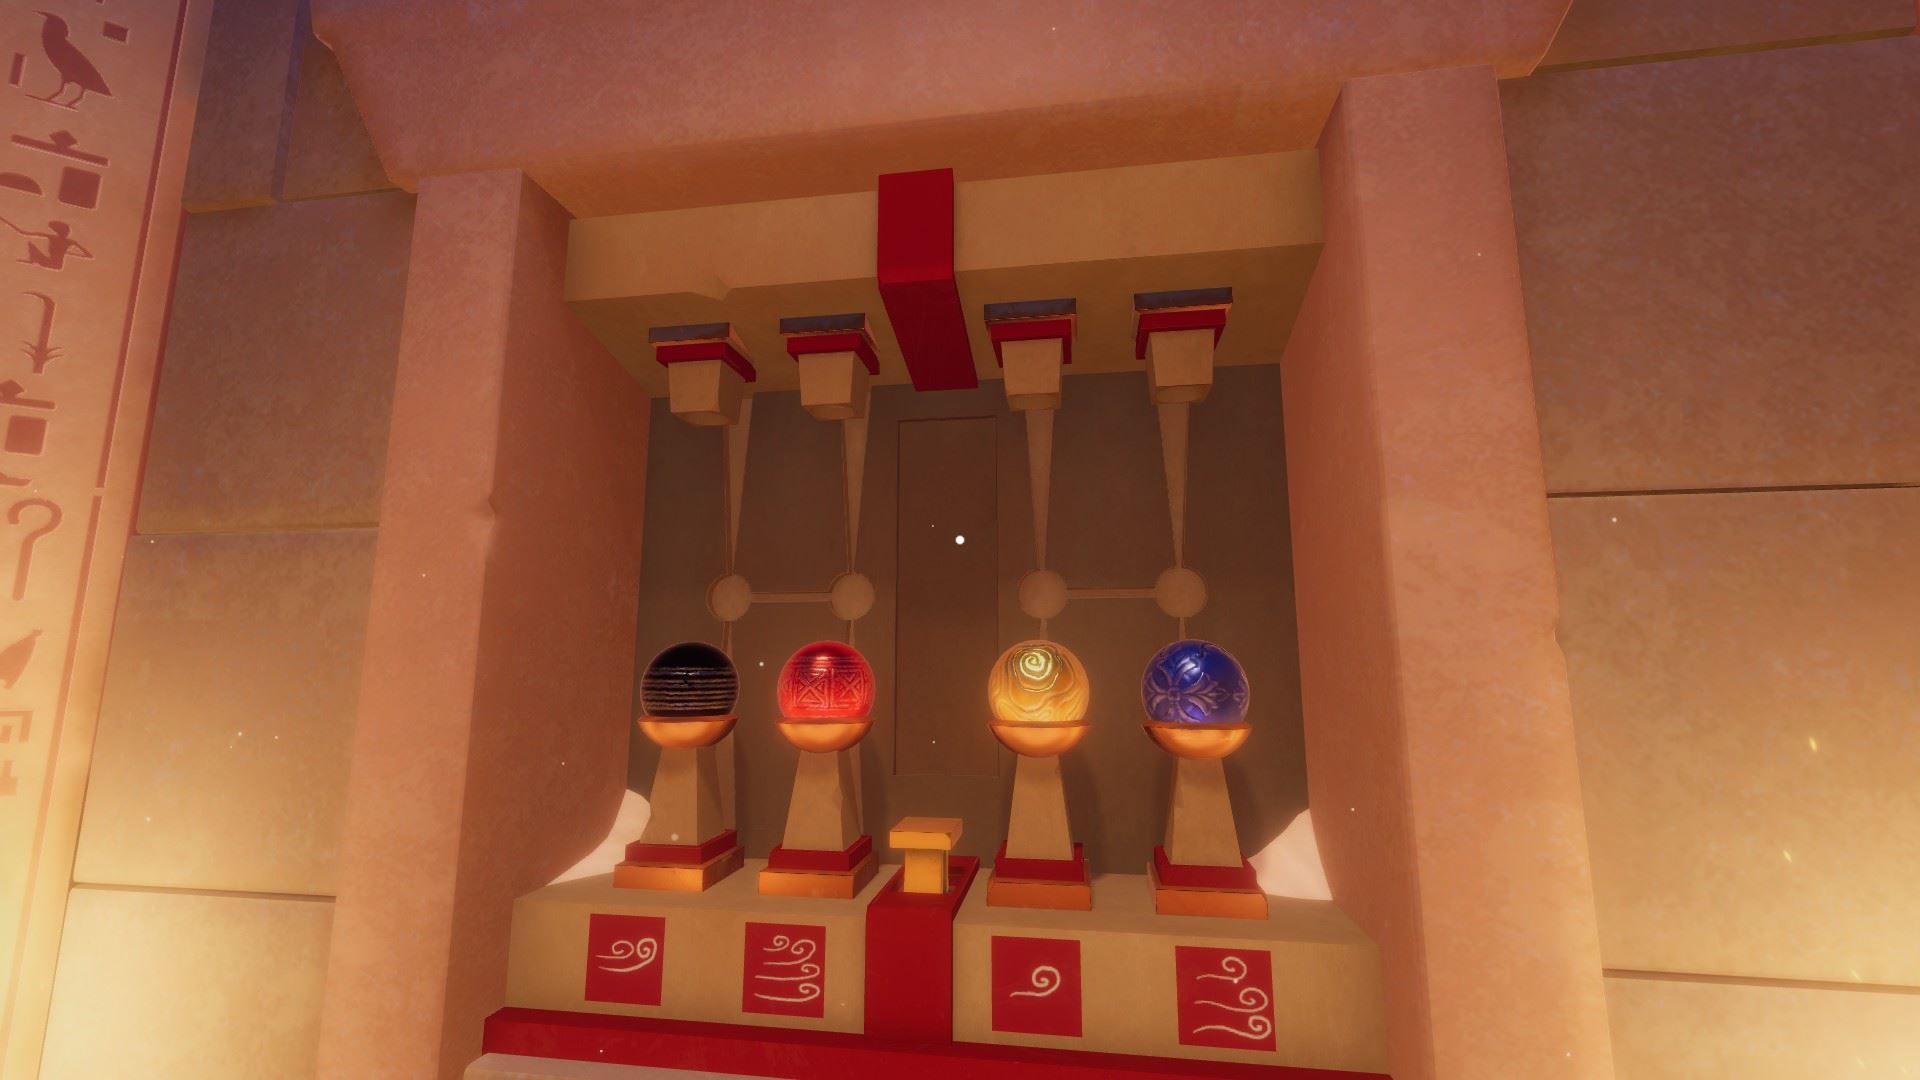
Connect the 2 base pyramidion parts and place them on the central pillar. Add together the two others on top. This reveals a door key.
Insert the door key into the leftmost (or any) door.
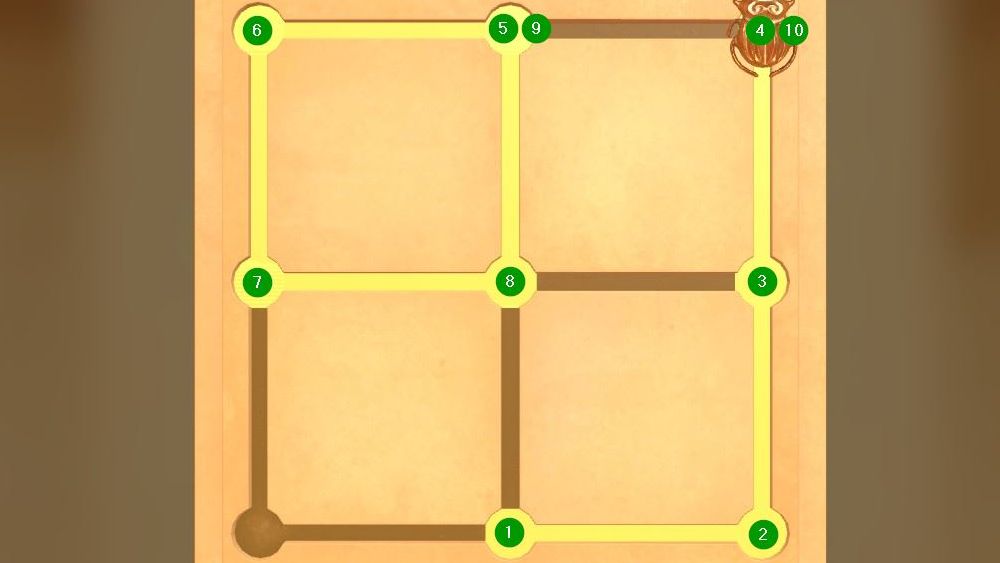
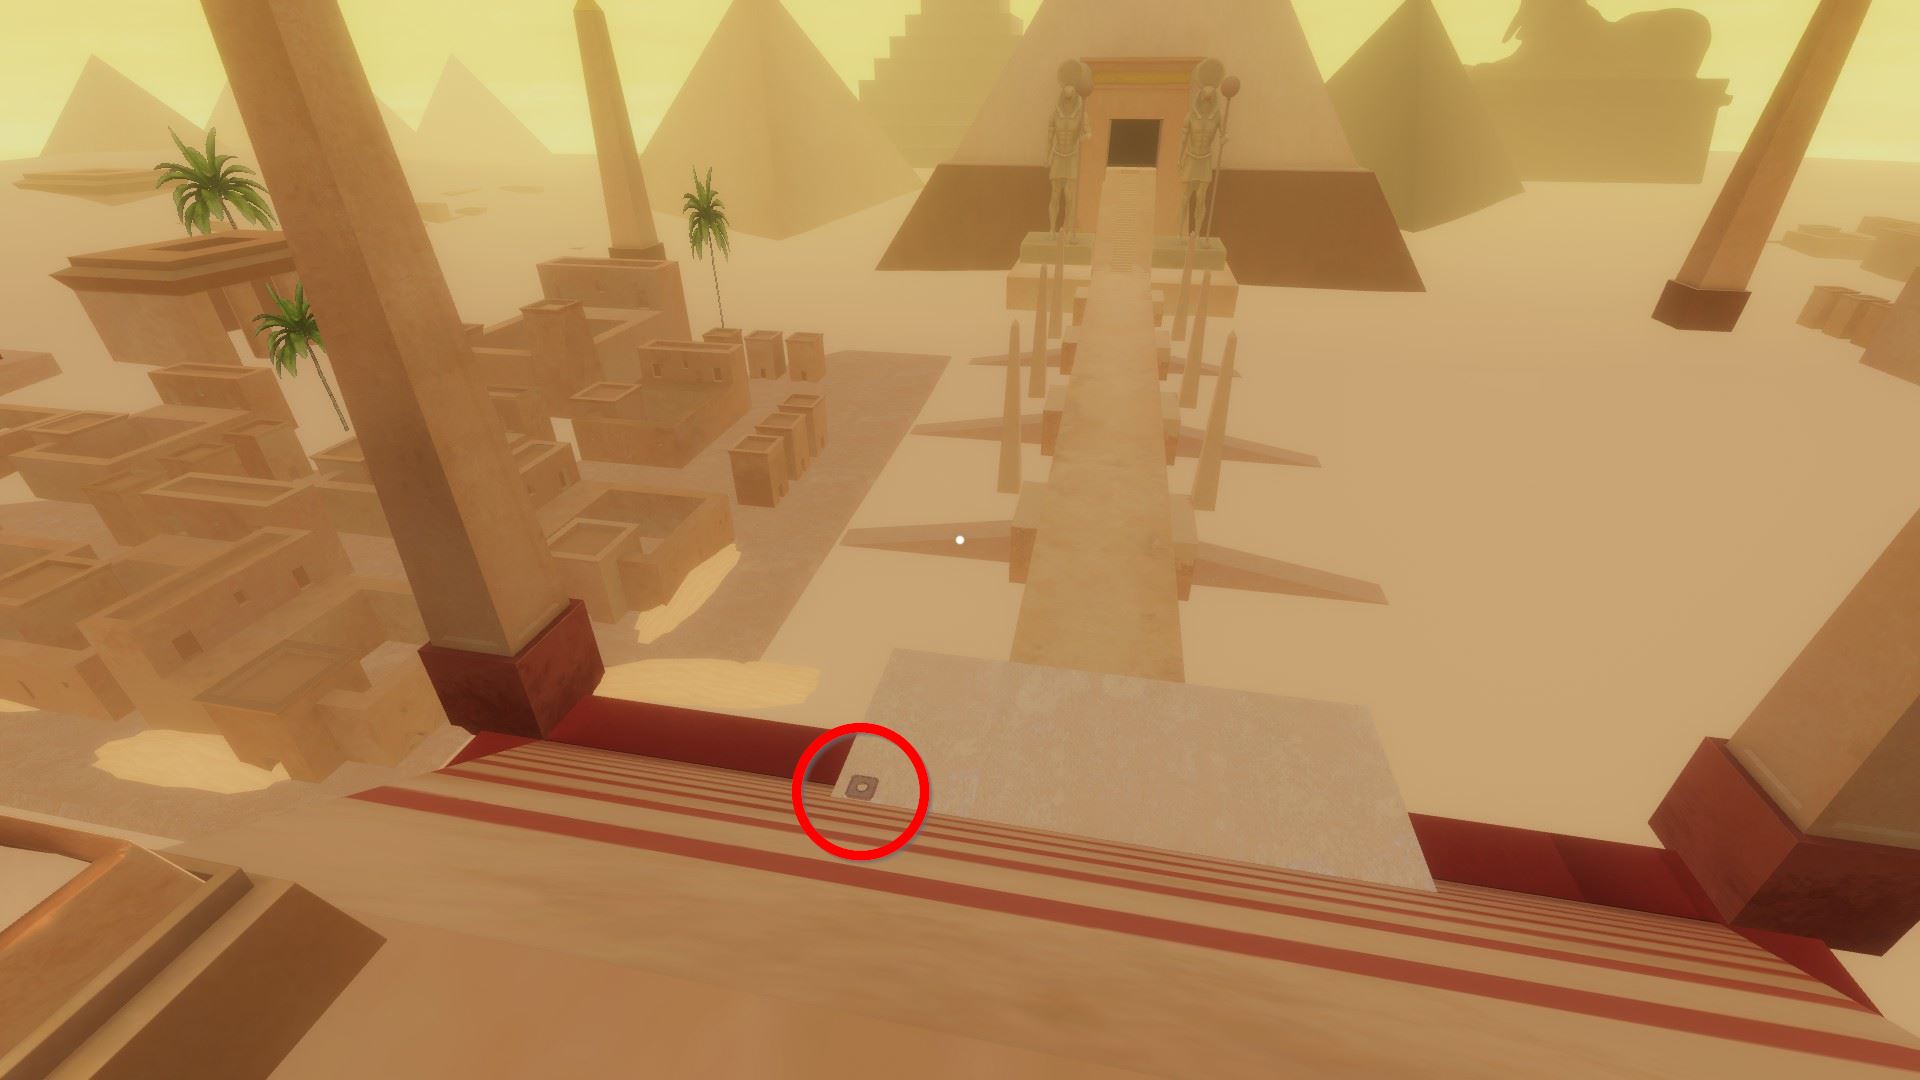
Puzzle (path to the leave):
Insert the door key into the center (or whatever) door.
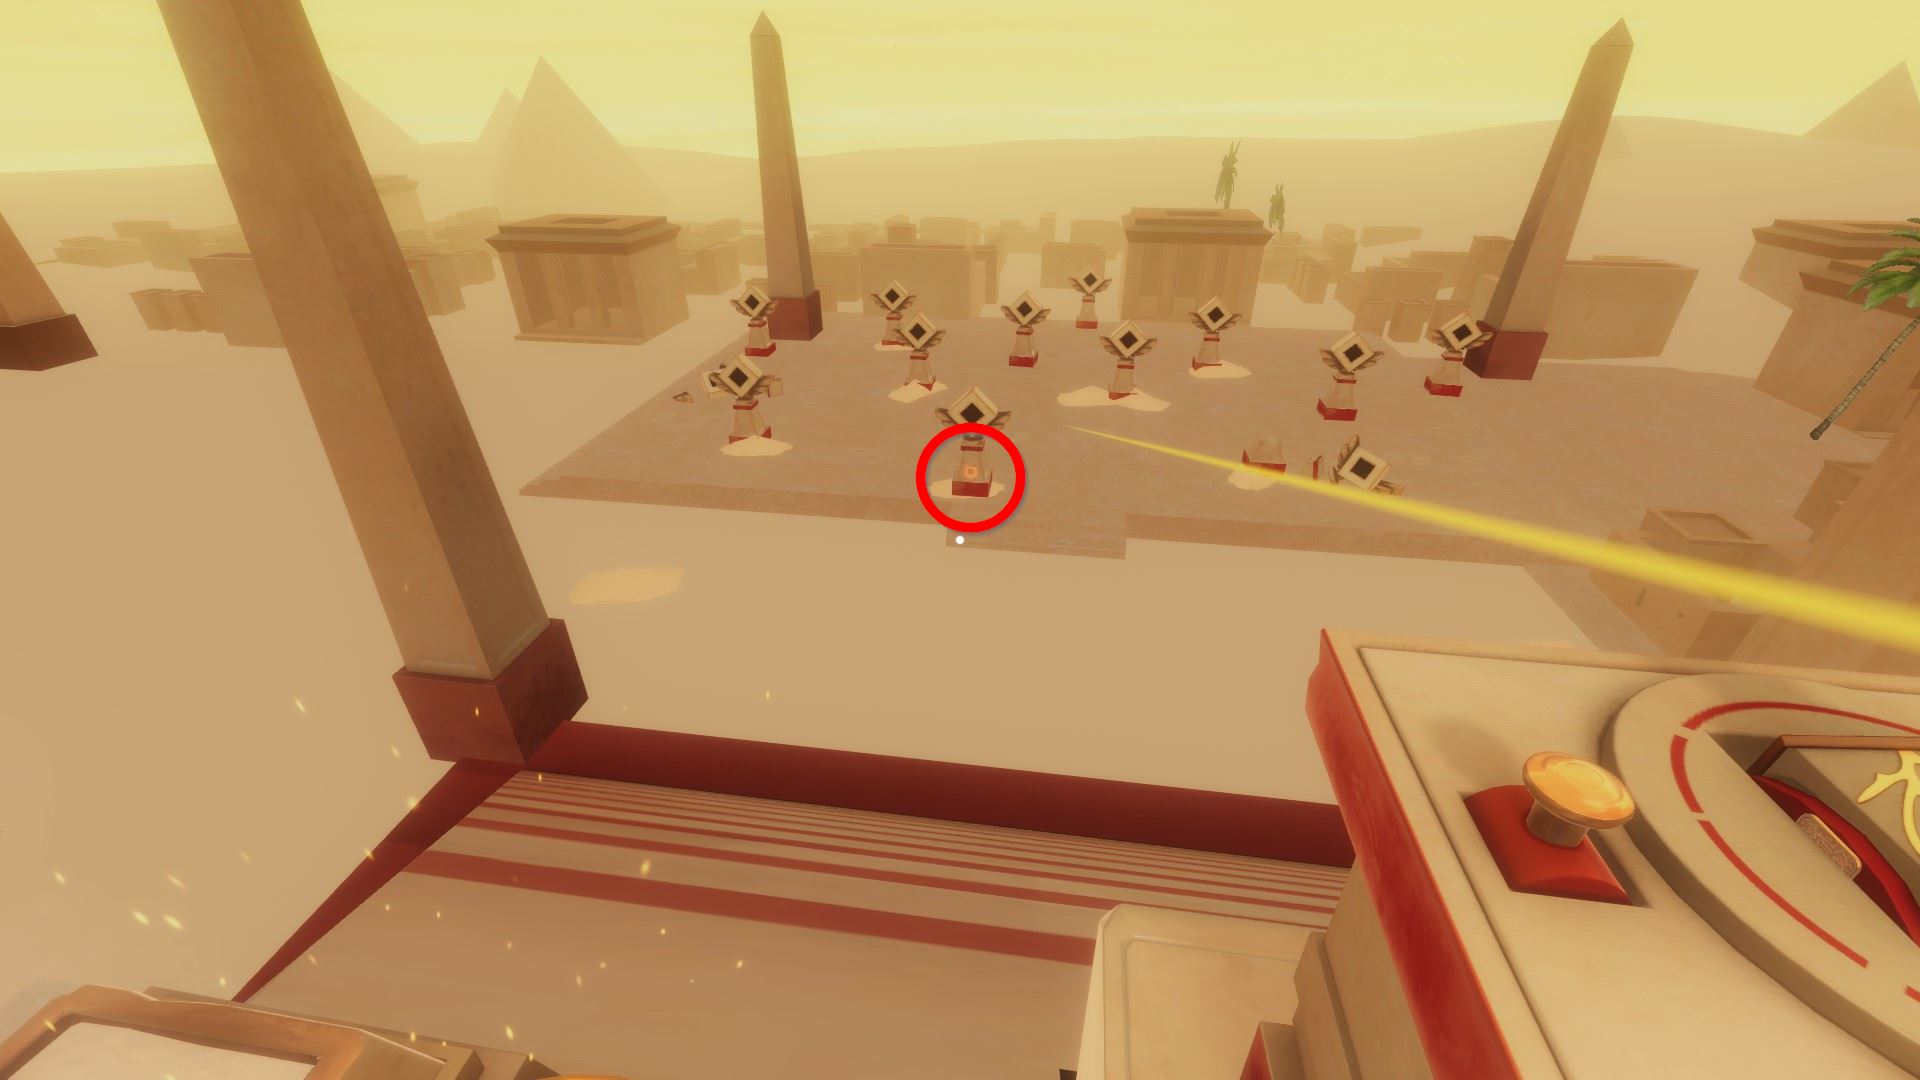
Puzzle (spell symbol that tin reach the centre):
Insert the door fundamental into the right (or last remaining) door to exit the level.
Labyrinth of Egypt: Bedchamber of Dead
⏹ Token 1 / 8 - motion the whorl to reveal a token in the sand behind it:

⏹ Token two / 8 - above the previous coil, the top left scroll contains a token (inspect, double-click to unroll, and so take the token):

⏹ Token 3 / viii - further above next to the blossom pot is the third token:
Solve the scarab puzzle at the sarcophagus to receive a middle:
Put the heart on the left manus of the jackal statue.
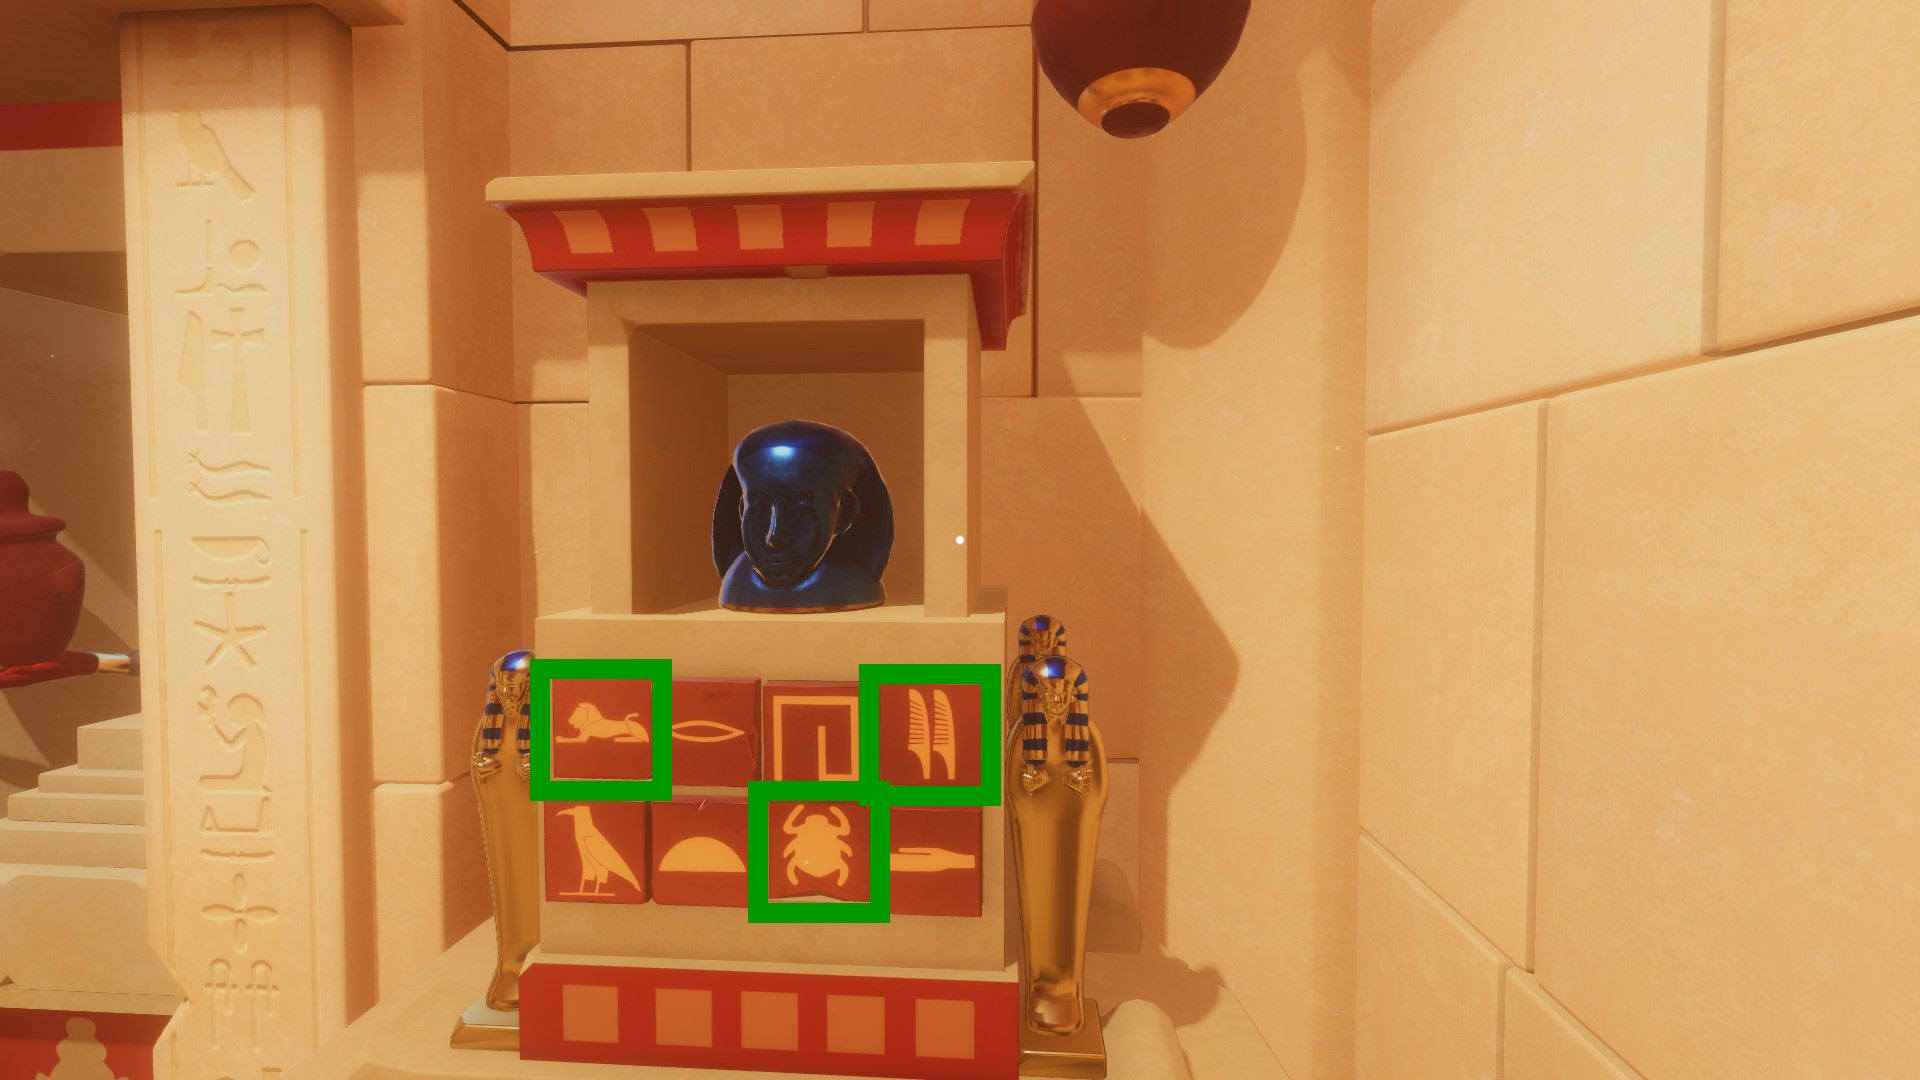
Press the buttons with the symbols shown inside each sarcophagus (yous tin can open the vertical ones with the crowbar) on the box surrounded by iv aureate sarcophagi. You receive a human-headed chapeau
⏹ Token 4 / viii - subconscious on the elevation part of the rightmost sarcophagus:
⏹ Token 5 / eight - on the bottom of this plant pot:

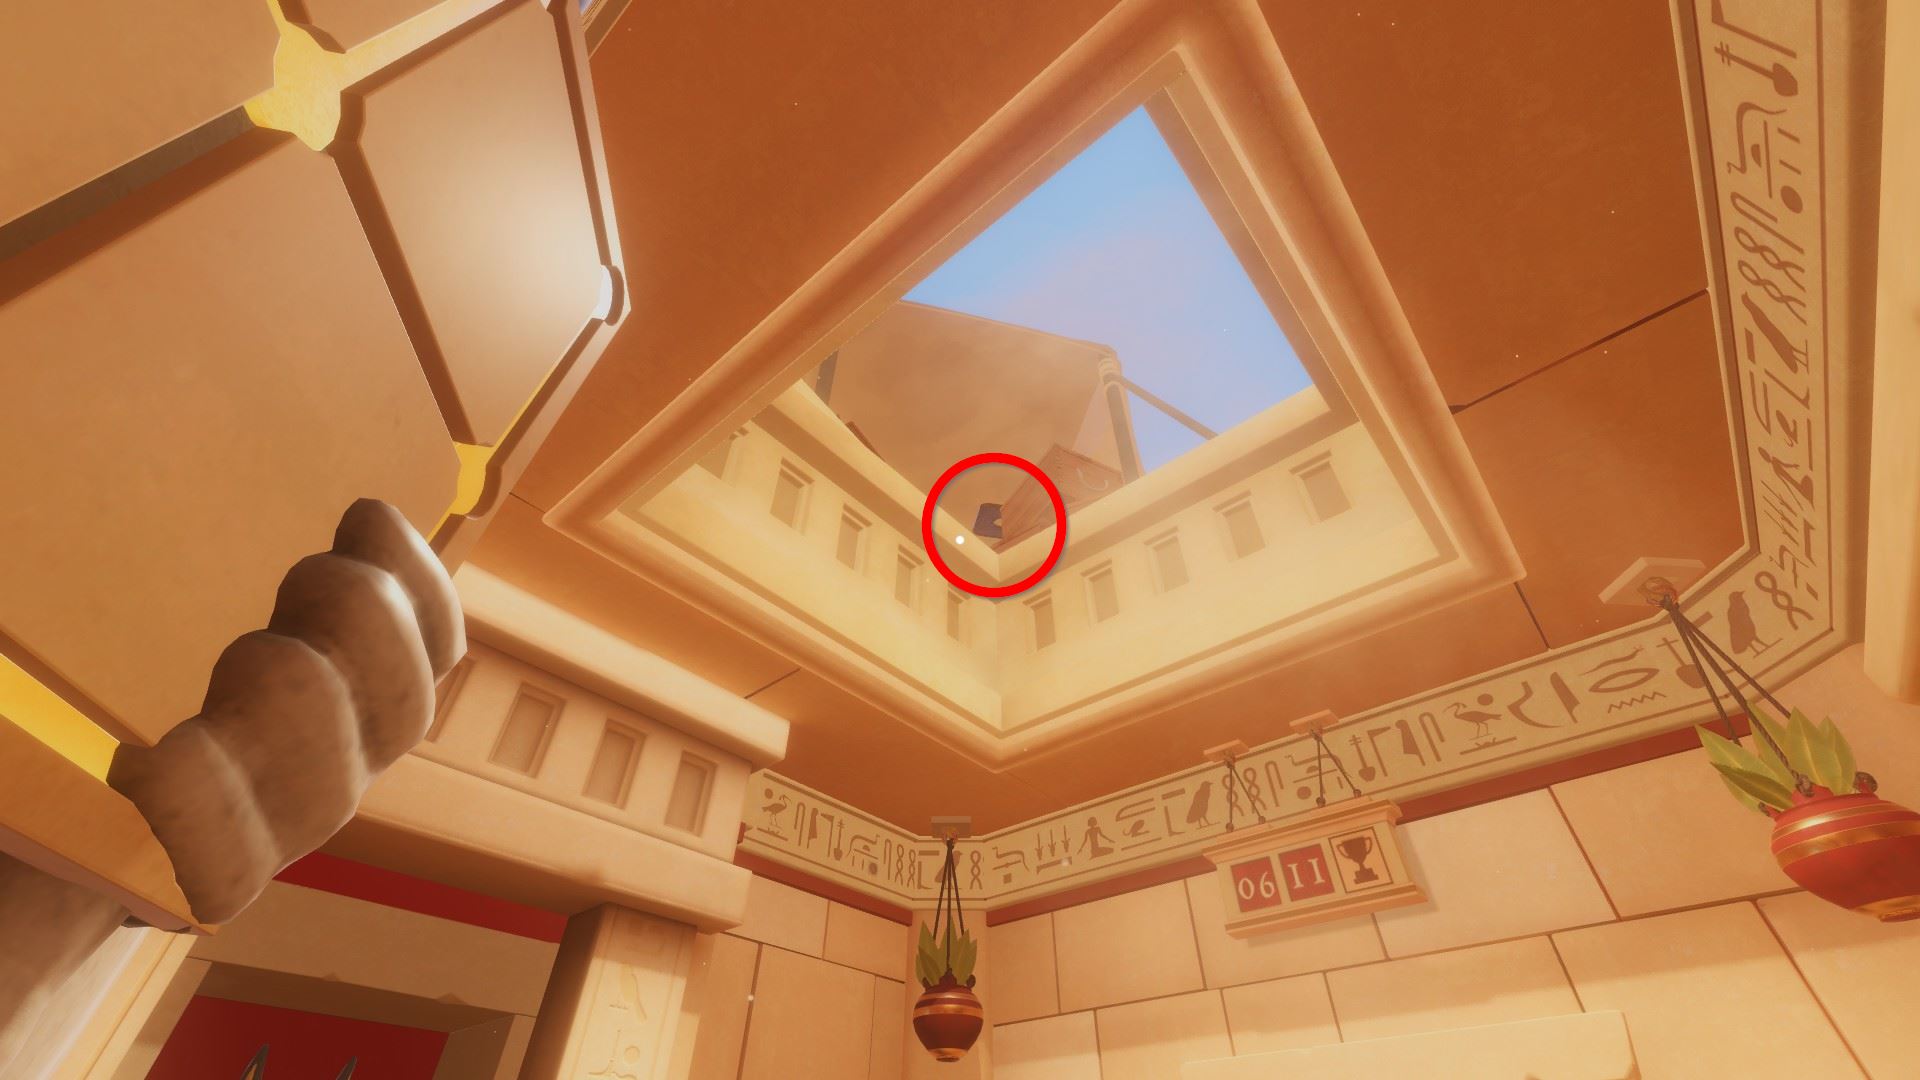
⏹ Token 6 / 8 - on the top area of the level:
The scroll near the scales contains a cardinal. (Inspect, double-click to unroll, then take the key)
Insert the key into the stone box to receive a Baboon-Headed lid.
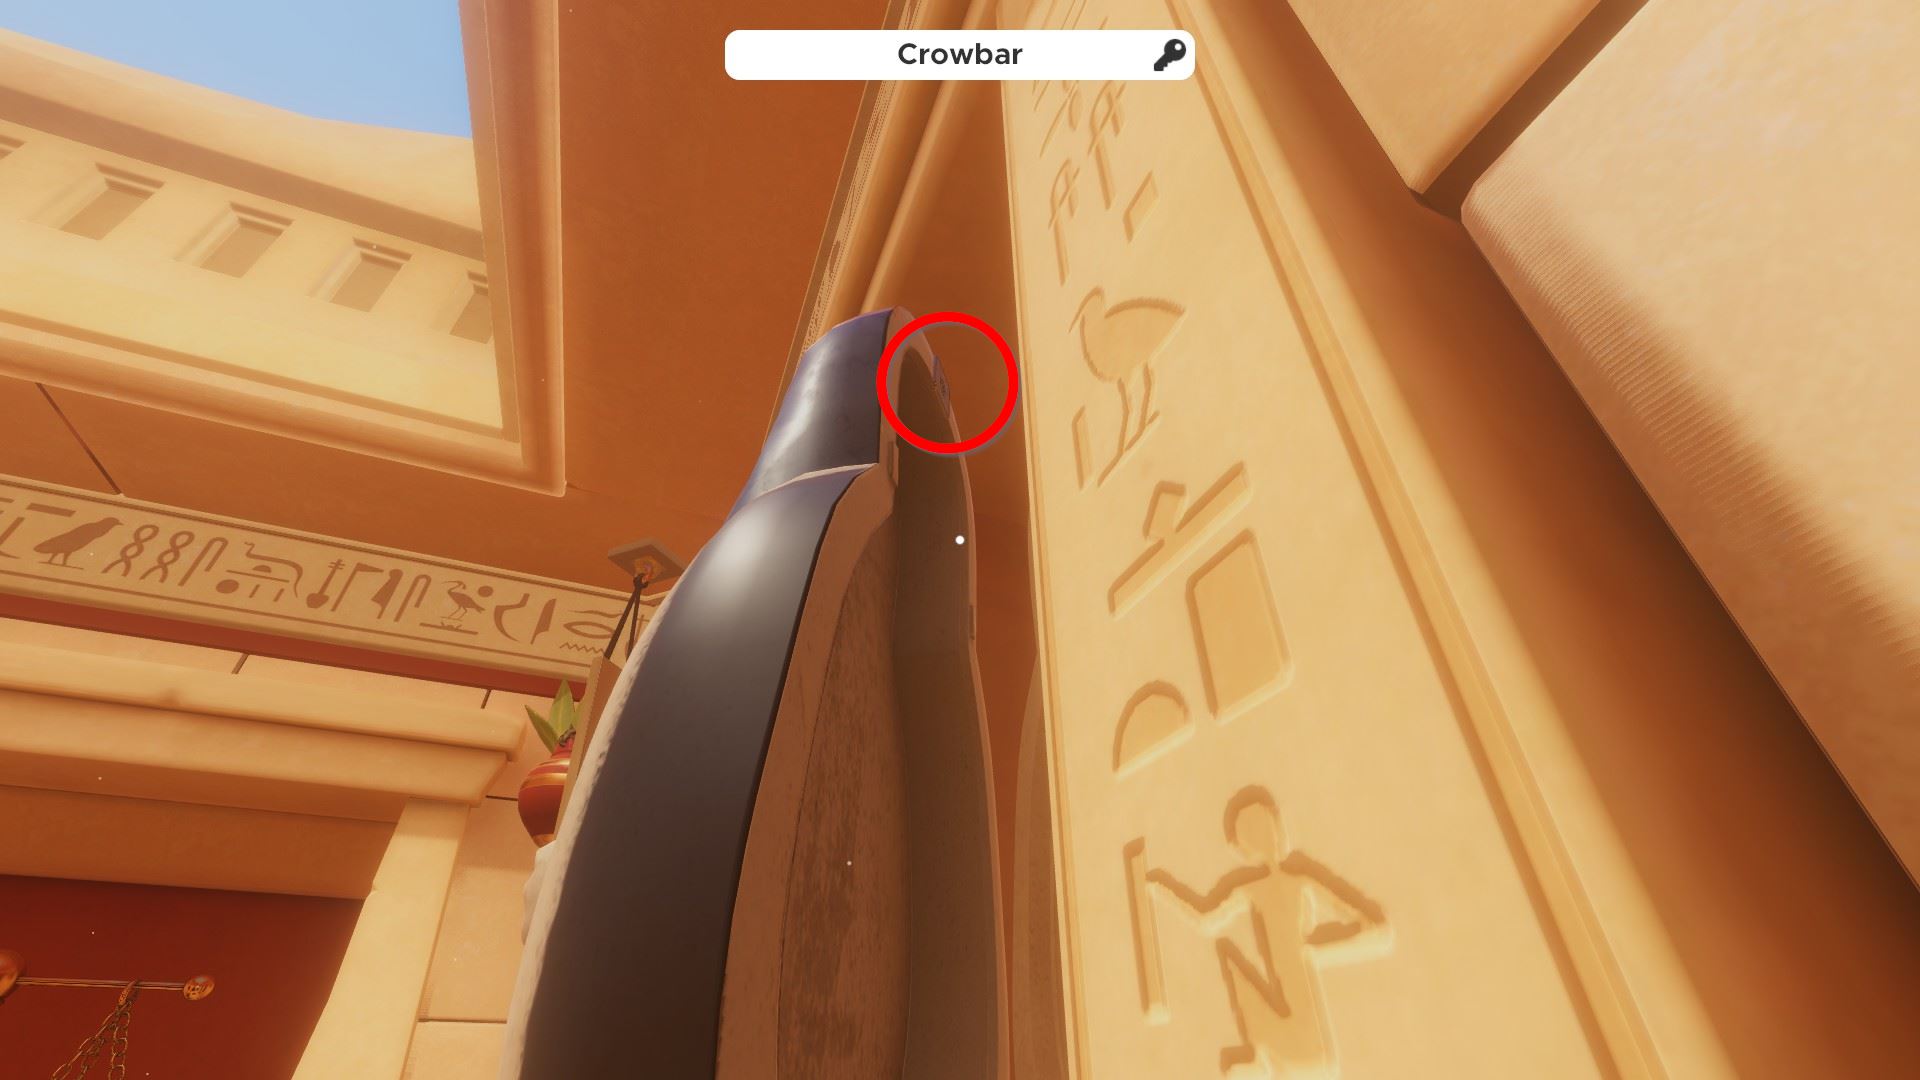
⏹ Token 7 / viii - use the crowbar to open the wooden boxes:
⏹ Token 8 / 8 - between the wall and the puzzle area:
You lot tin can use the scale to deduct the numbers corresponding to the red round stones.
H2o = 2
Snake = iv
Bird = 6
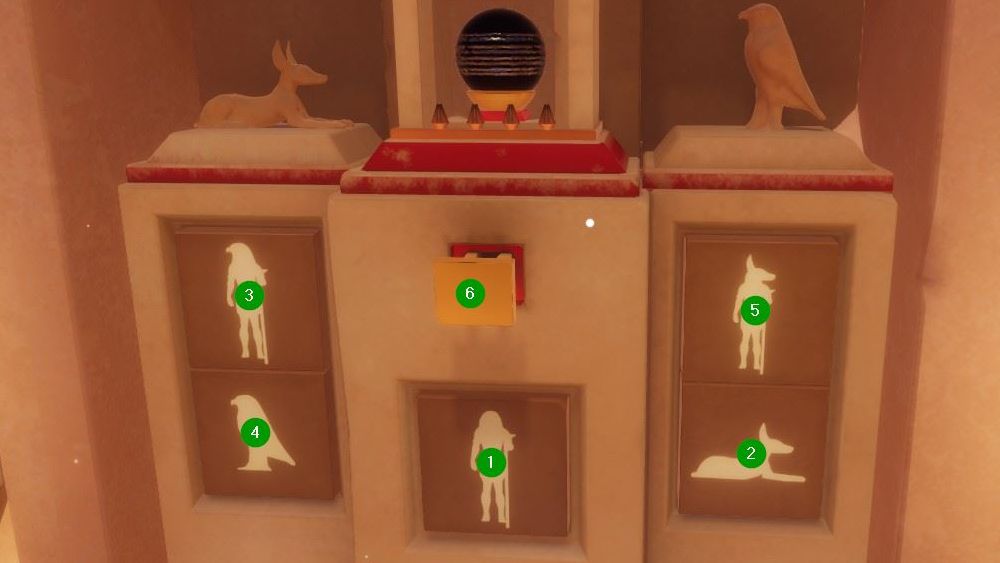
Use the numbers obtained to a higher place to solve the puzzle (6-2-4) & get a jackal head:
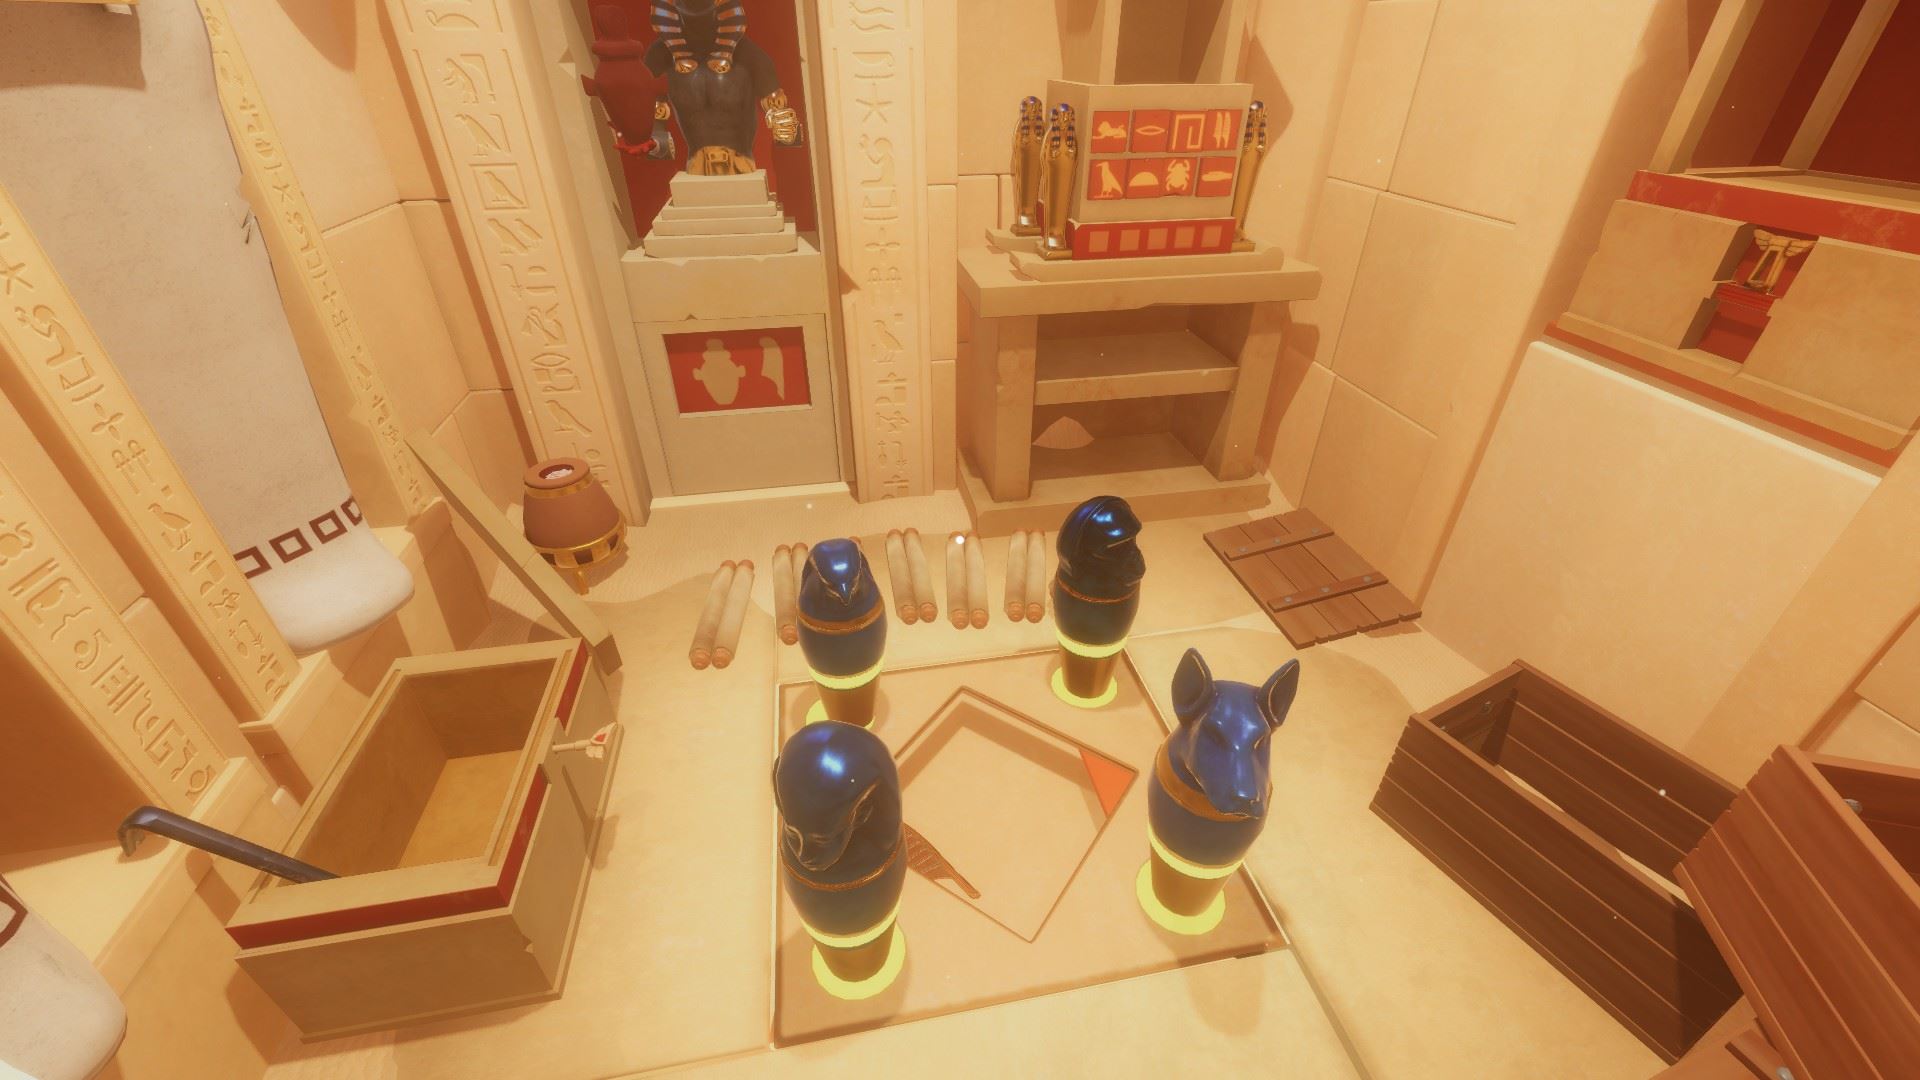
Place the jar lids on the corresponding jars and and then place the jars in the correct circles:
Baboon - Lungs jar - Due north circle
Falcon - Intestines jar - West circle
Jackal - Tummy jar - East circumvolve
Human - Liver jar - South circumvolve
Pick up the feather and put it on the correct hand of the jackal statue to cease the level.
Labyrinth of Egypt: Aureate Chamber
🏆 You can easily go the Clumsy Escapist achievement here by throwing at least 7 of the vases within five seconds.
⏹ Token 1 / 8 - on the frame to a higher place the door:
⏹ Token two / 8 - inside the bean can at the rotating discs puzzle:

⏹ Token 3 / 8 - inspect the radio and set it to about 97 MHz (flip the switch to plough information technology on, the move the punch on the correct side upwardly)

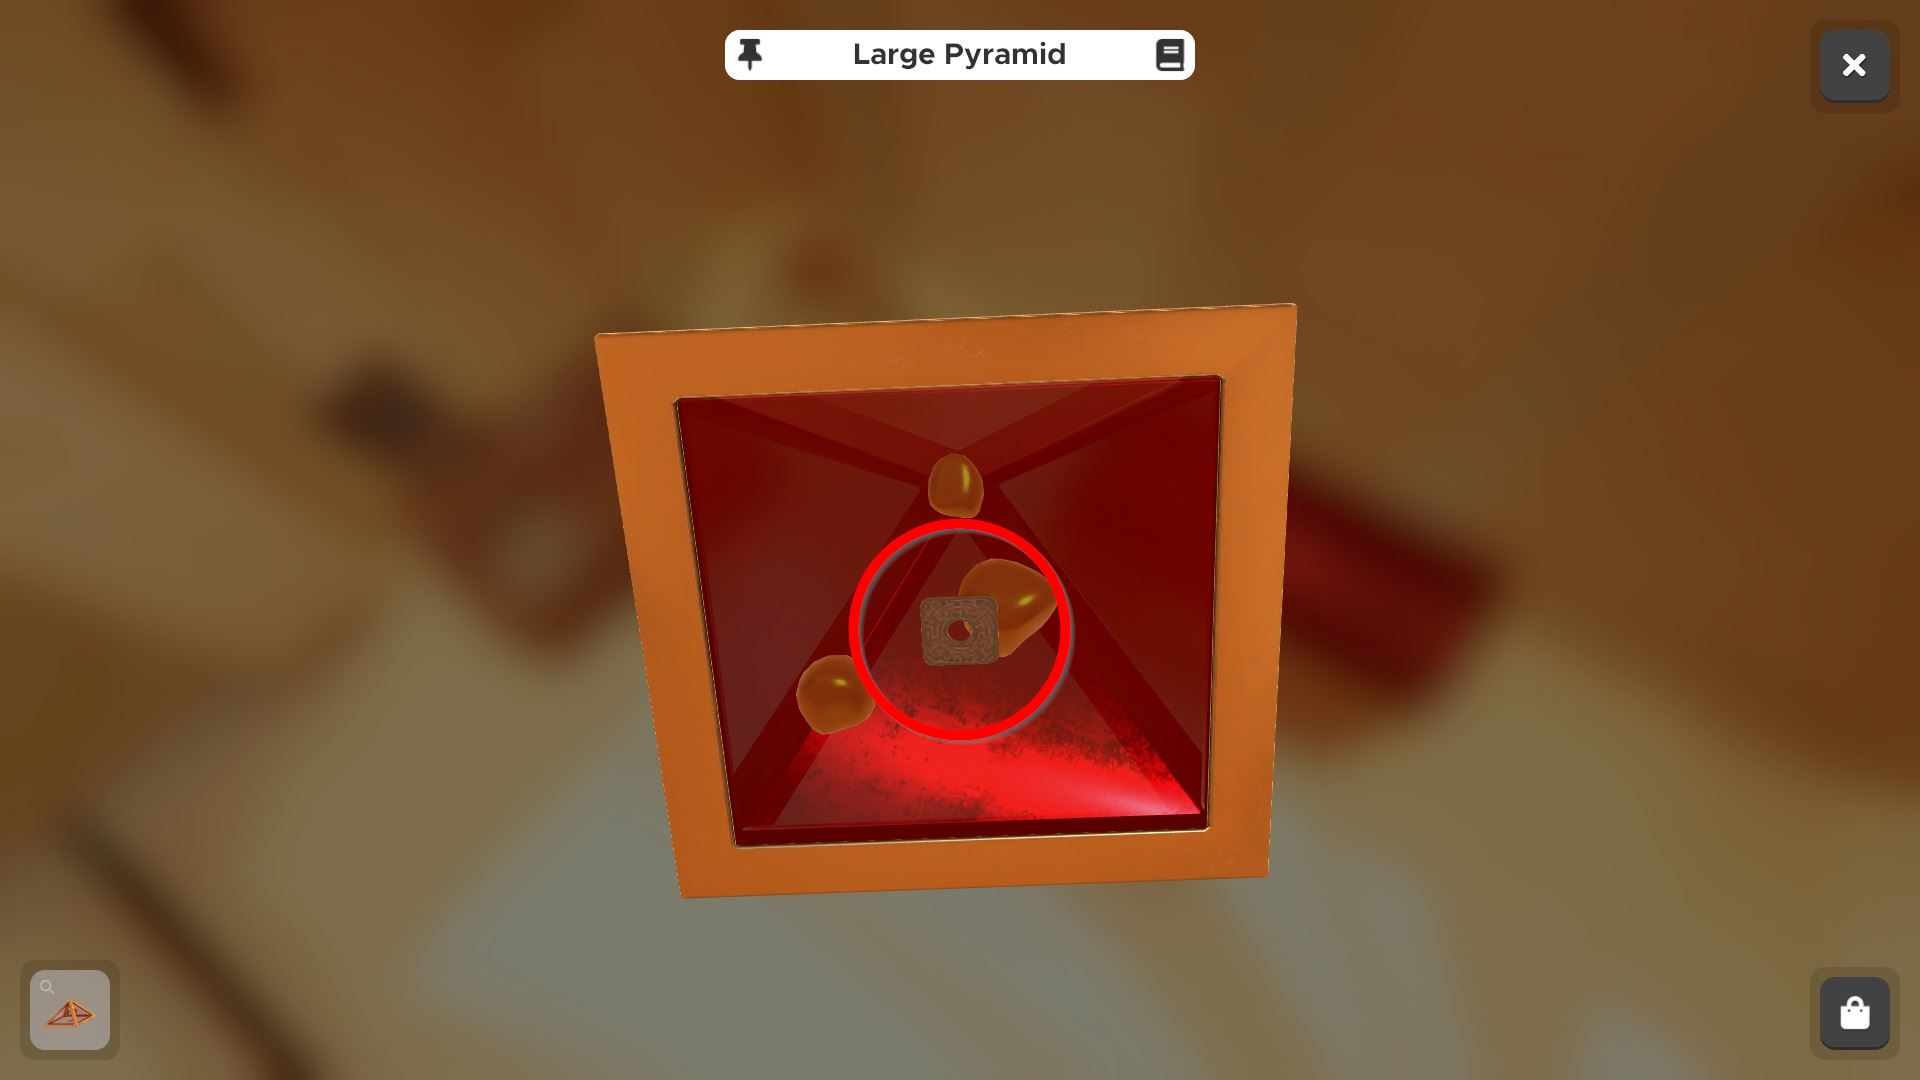
⏹ Token four / viii - on the bottom of the large pyramid:
⏹ Token 5 / 8 - on the back of the ruby-red chest at the pyramids puzzle:

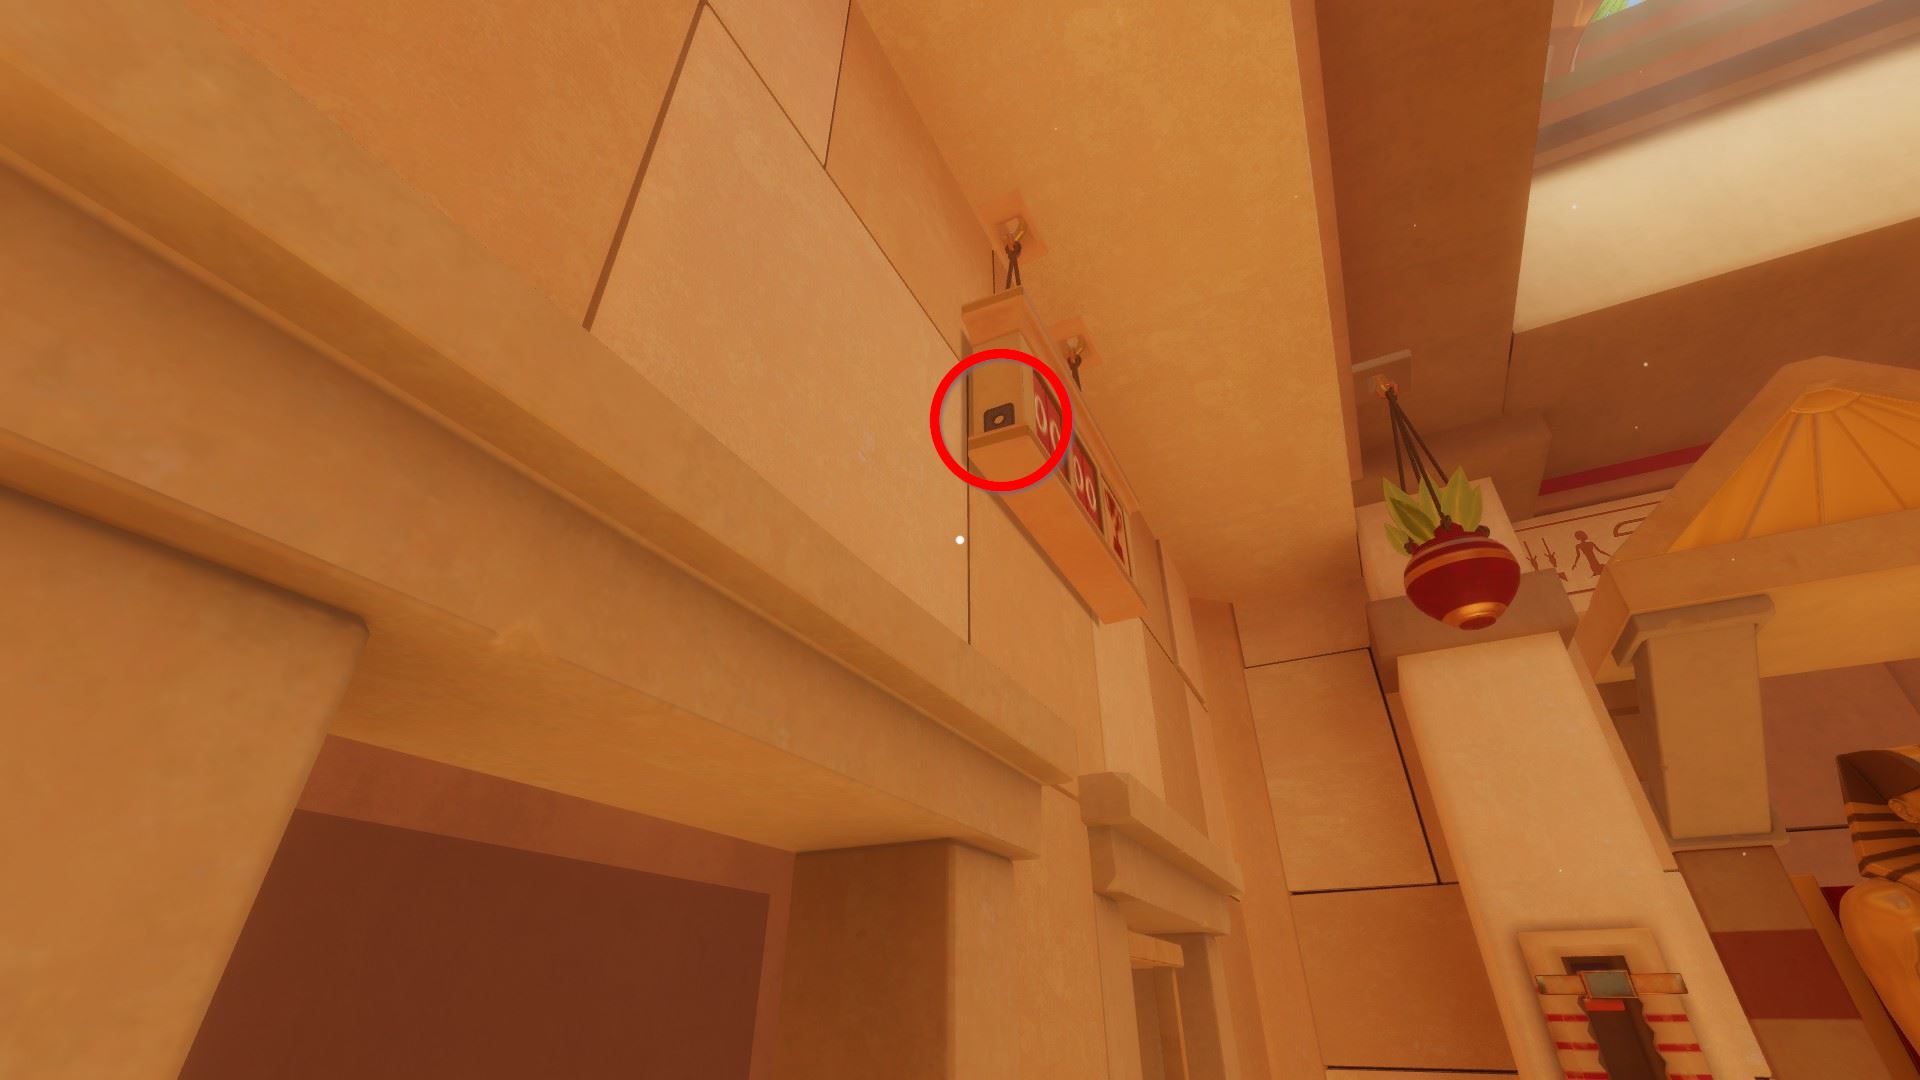
⏹ Token 6 / 8 - on the side of the timer:
Smash the vase to reveal a aureate artefact (ankh):
Place the disks like and so (the hint for the correct combinations is on the red chest with inscriptions) and pick up the key:

Utilize the key on the blood-red chest with inscriptions. Pick up the golden artifact (bird).
Pull out the pivot from this chest to reveal a fundamental.
Use this 2d key to open up the other cherry-red chest, revealing another gilt artifact (chalice).
Pyramid size/balls puzzle: count the golden balls within the iii small pyramids on the level. From biggest to smallest, the puzzle solution is:
3 - eight - seven
This provides another gilt artifact (horned animate being head).
Rotating discs with falcon caput:
The number of coloured gems within the first cerise breast:
two blueish - 5 clear - three red
This gives a golden antiquity (falcon head).

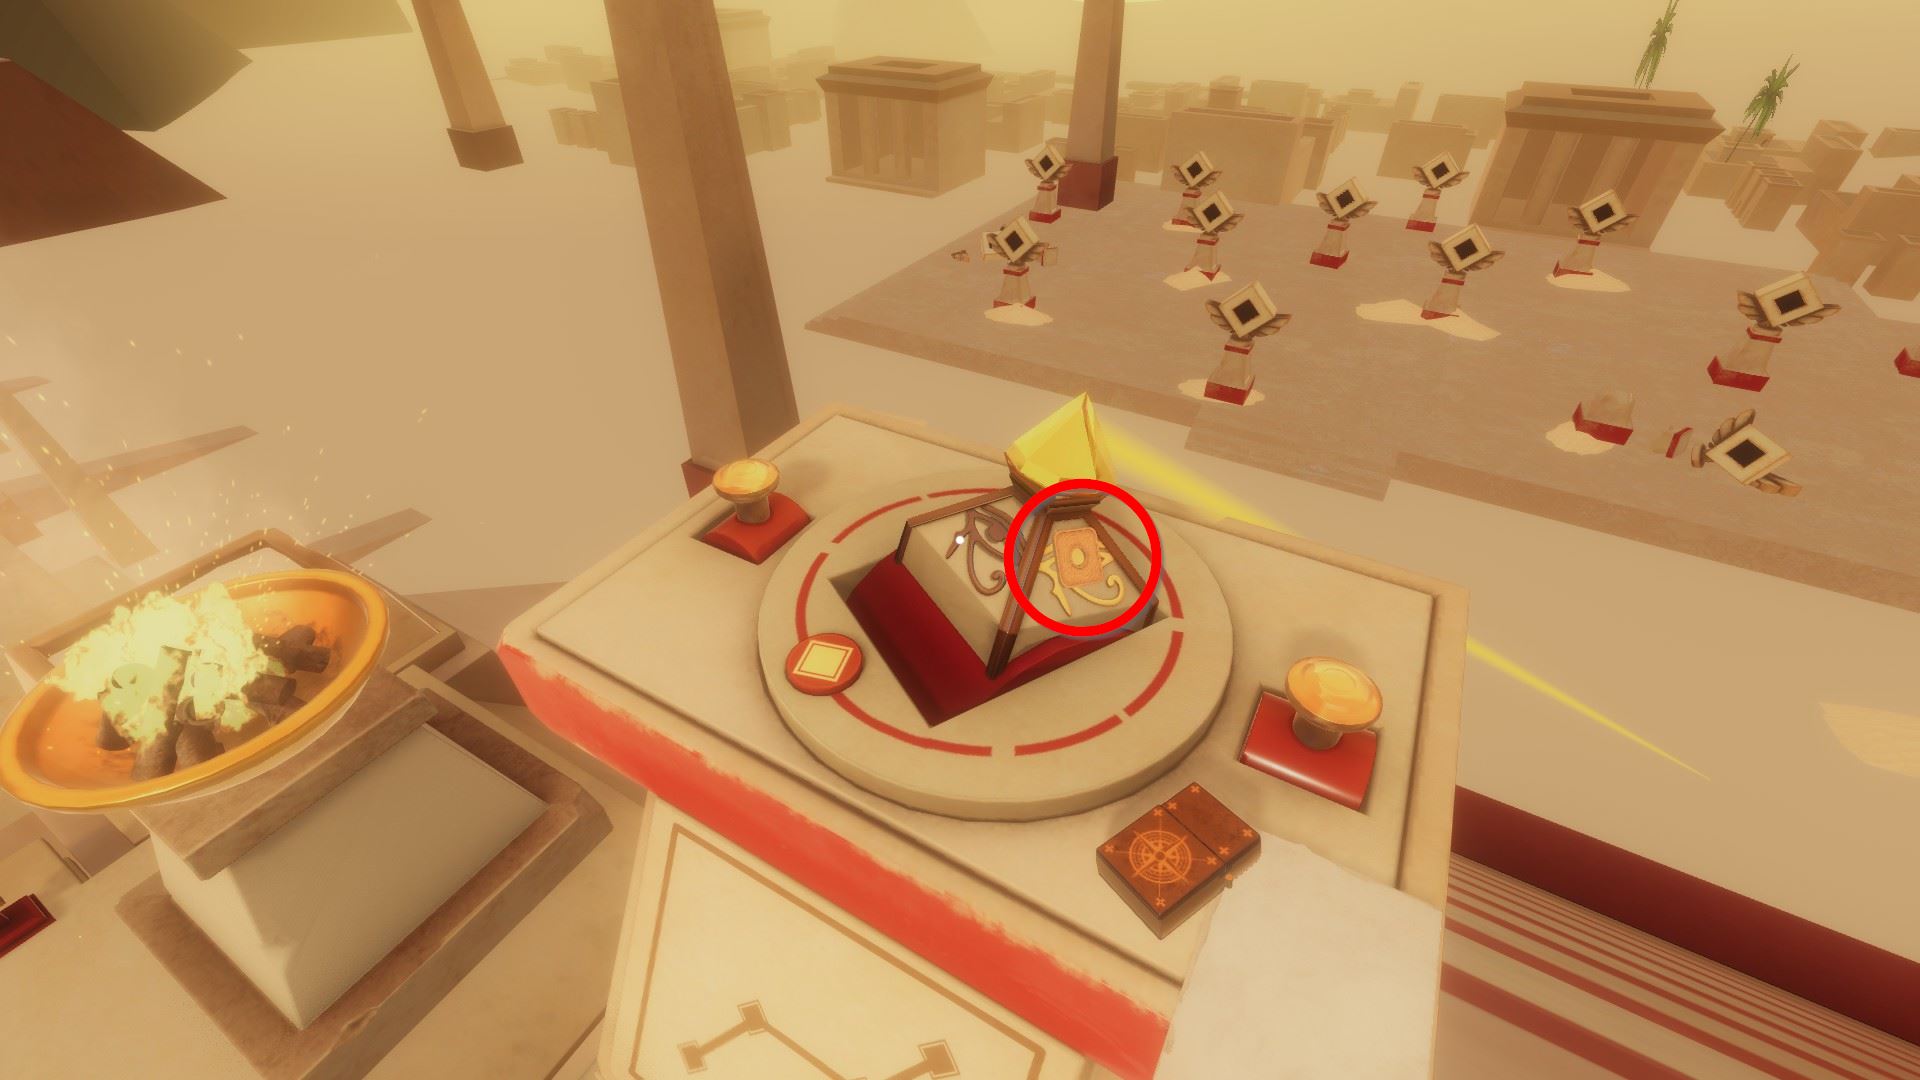
⏹ Token 7 / 8 - inside the previous puzzle socket:
Now you can pull the 2 levers (left all way down to the 4th position, right at the 2d position), giving you access to the peppery bowl into which you must deposit the five golden artifacts.
In co-op, two players agree them in those positions.
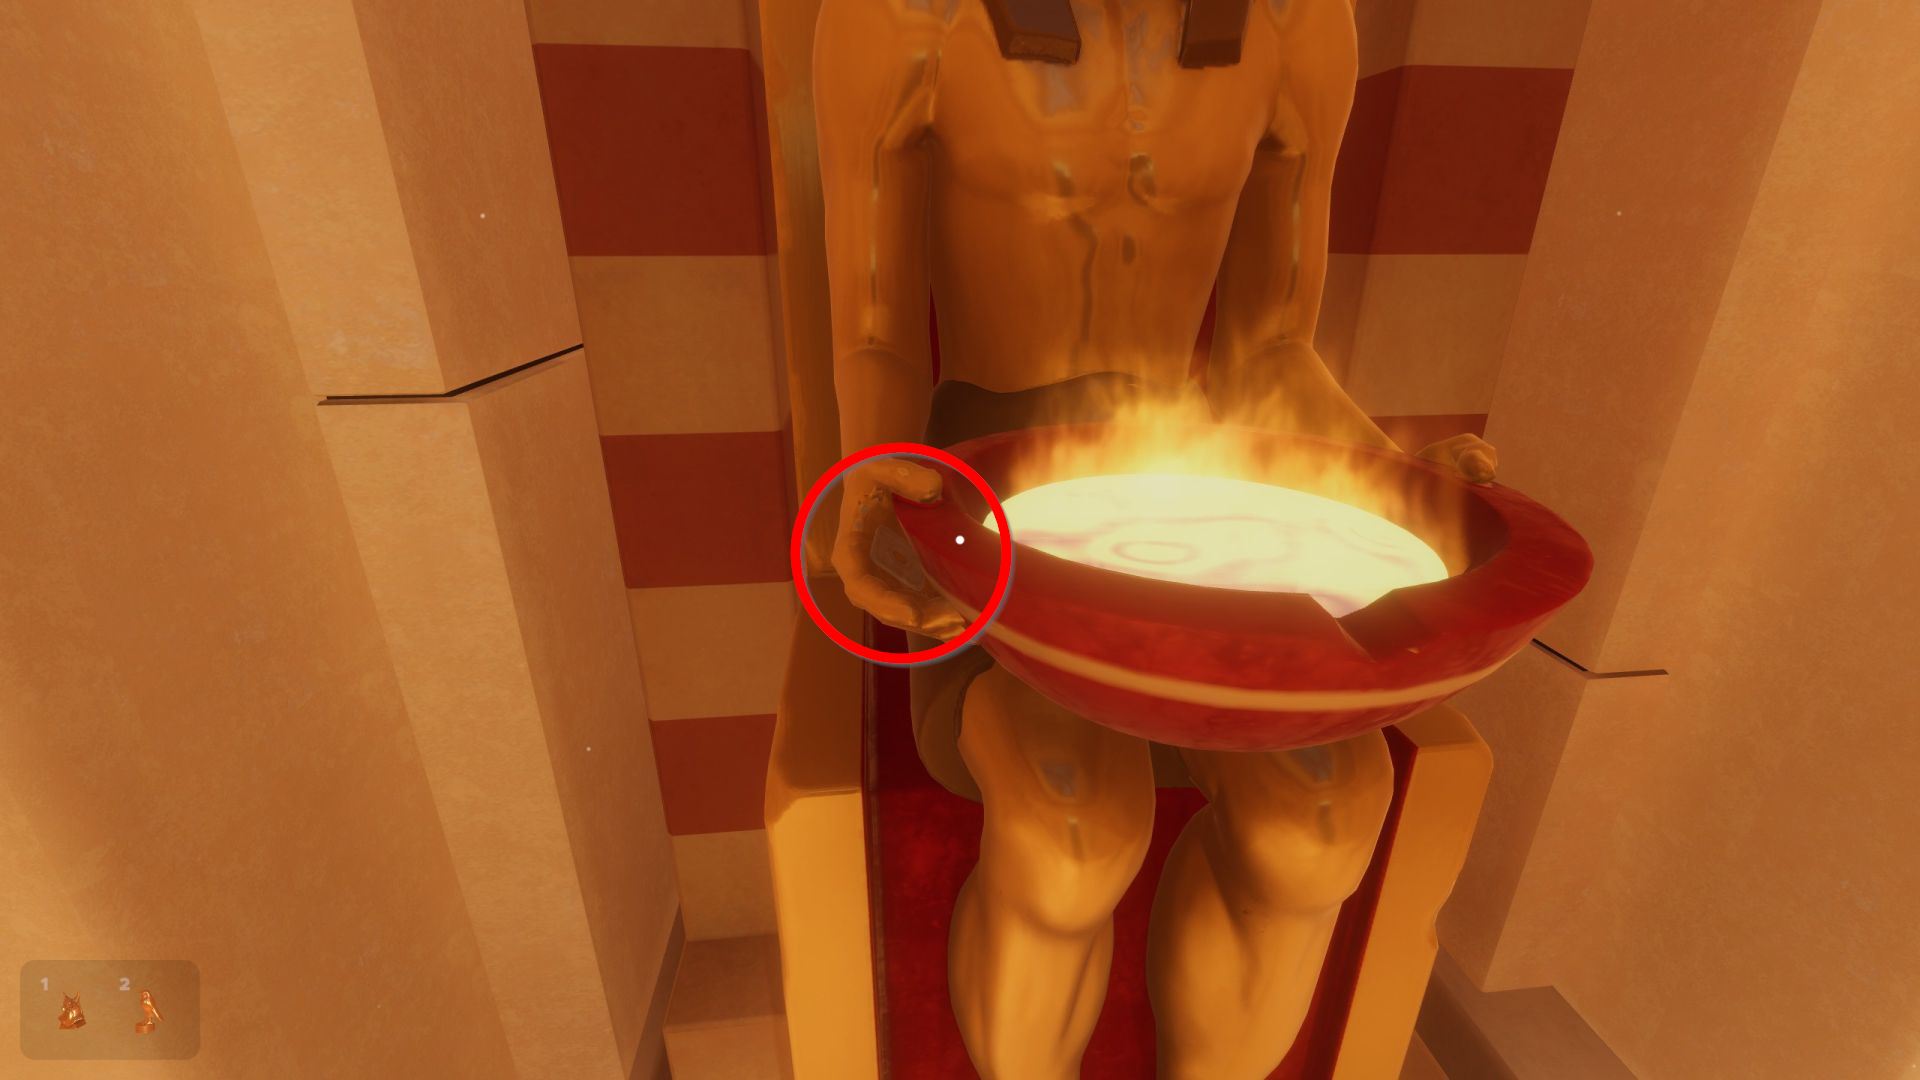
⏹ Token 8 / 8 - on the statue'due south right palm:
Labyrinth of Arab republic of egypt: Sleeping accommodation of Danger
🏆
Level-specific achievement: Uber Skull
Accept the skeleton'southward skull and chuck information technology into one of the fires.
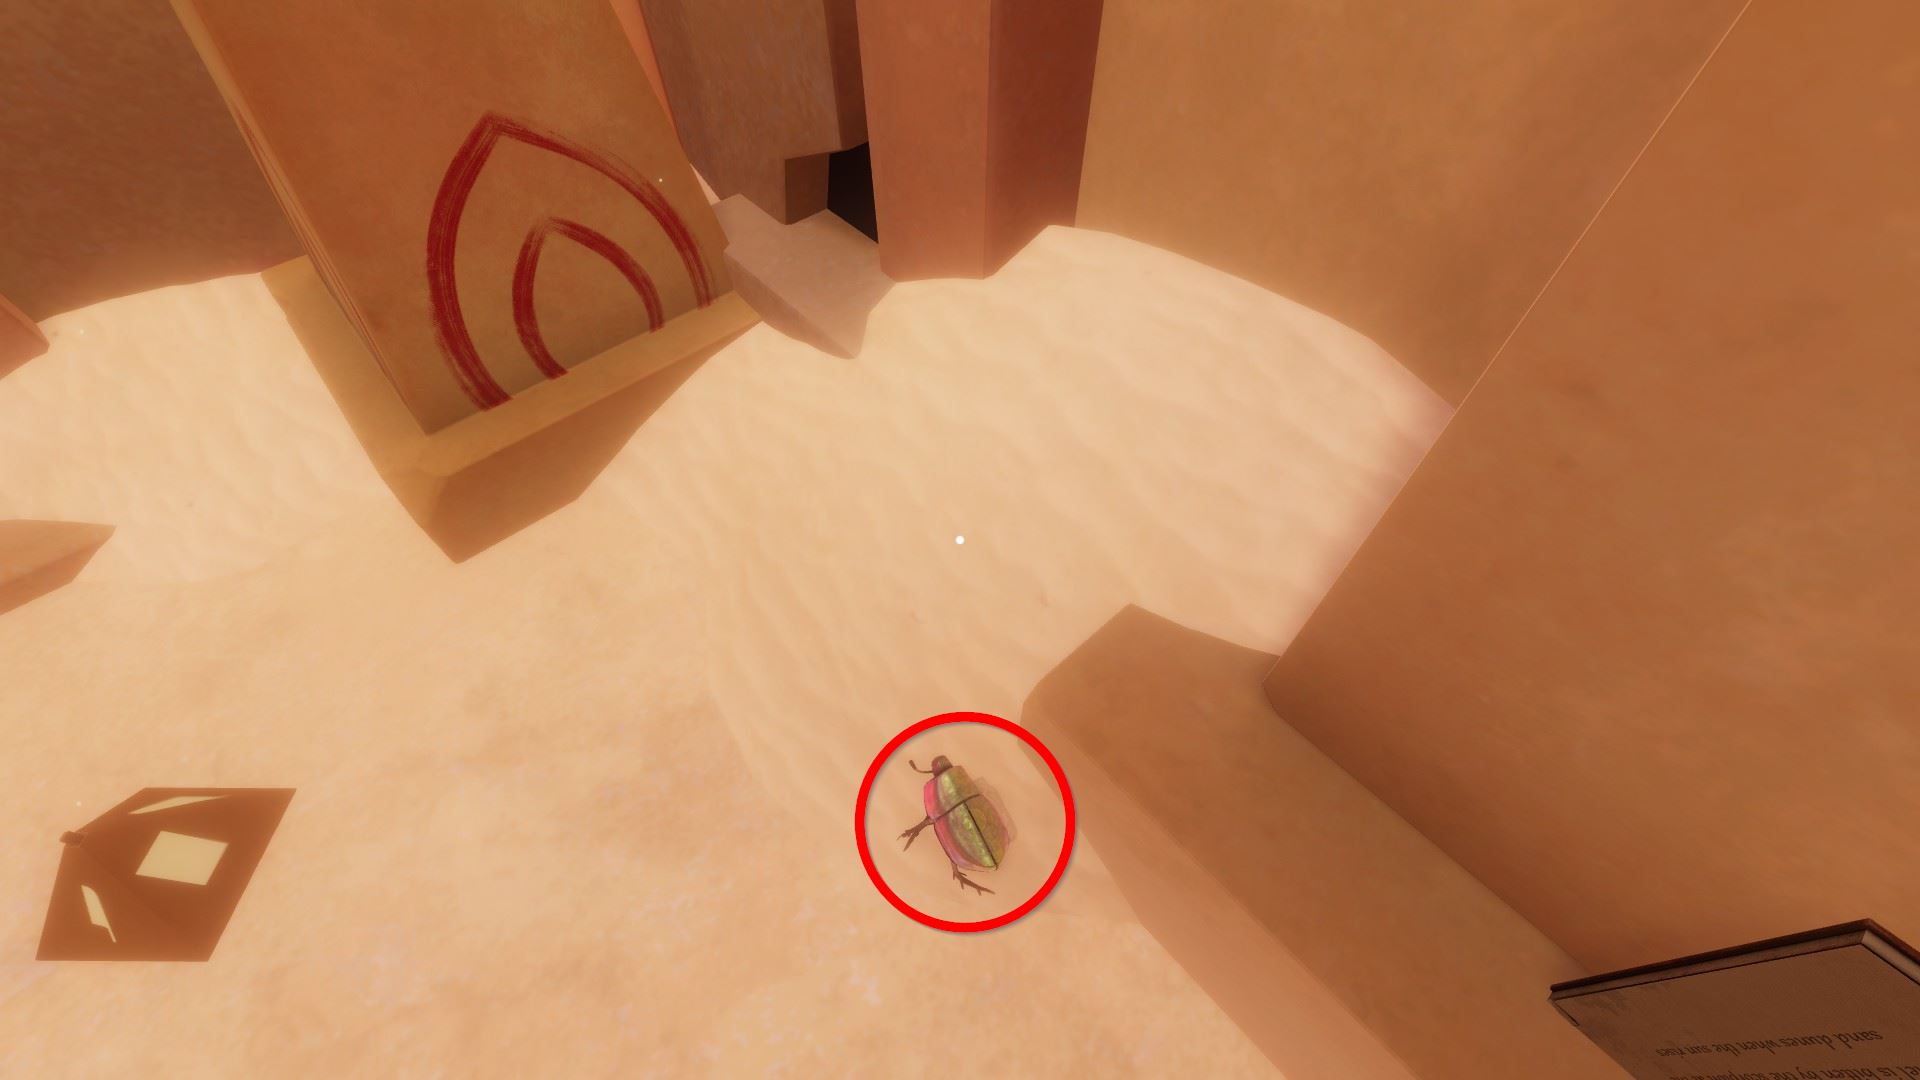
⏹ Token 1 / viii - on the beetle:
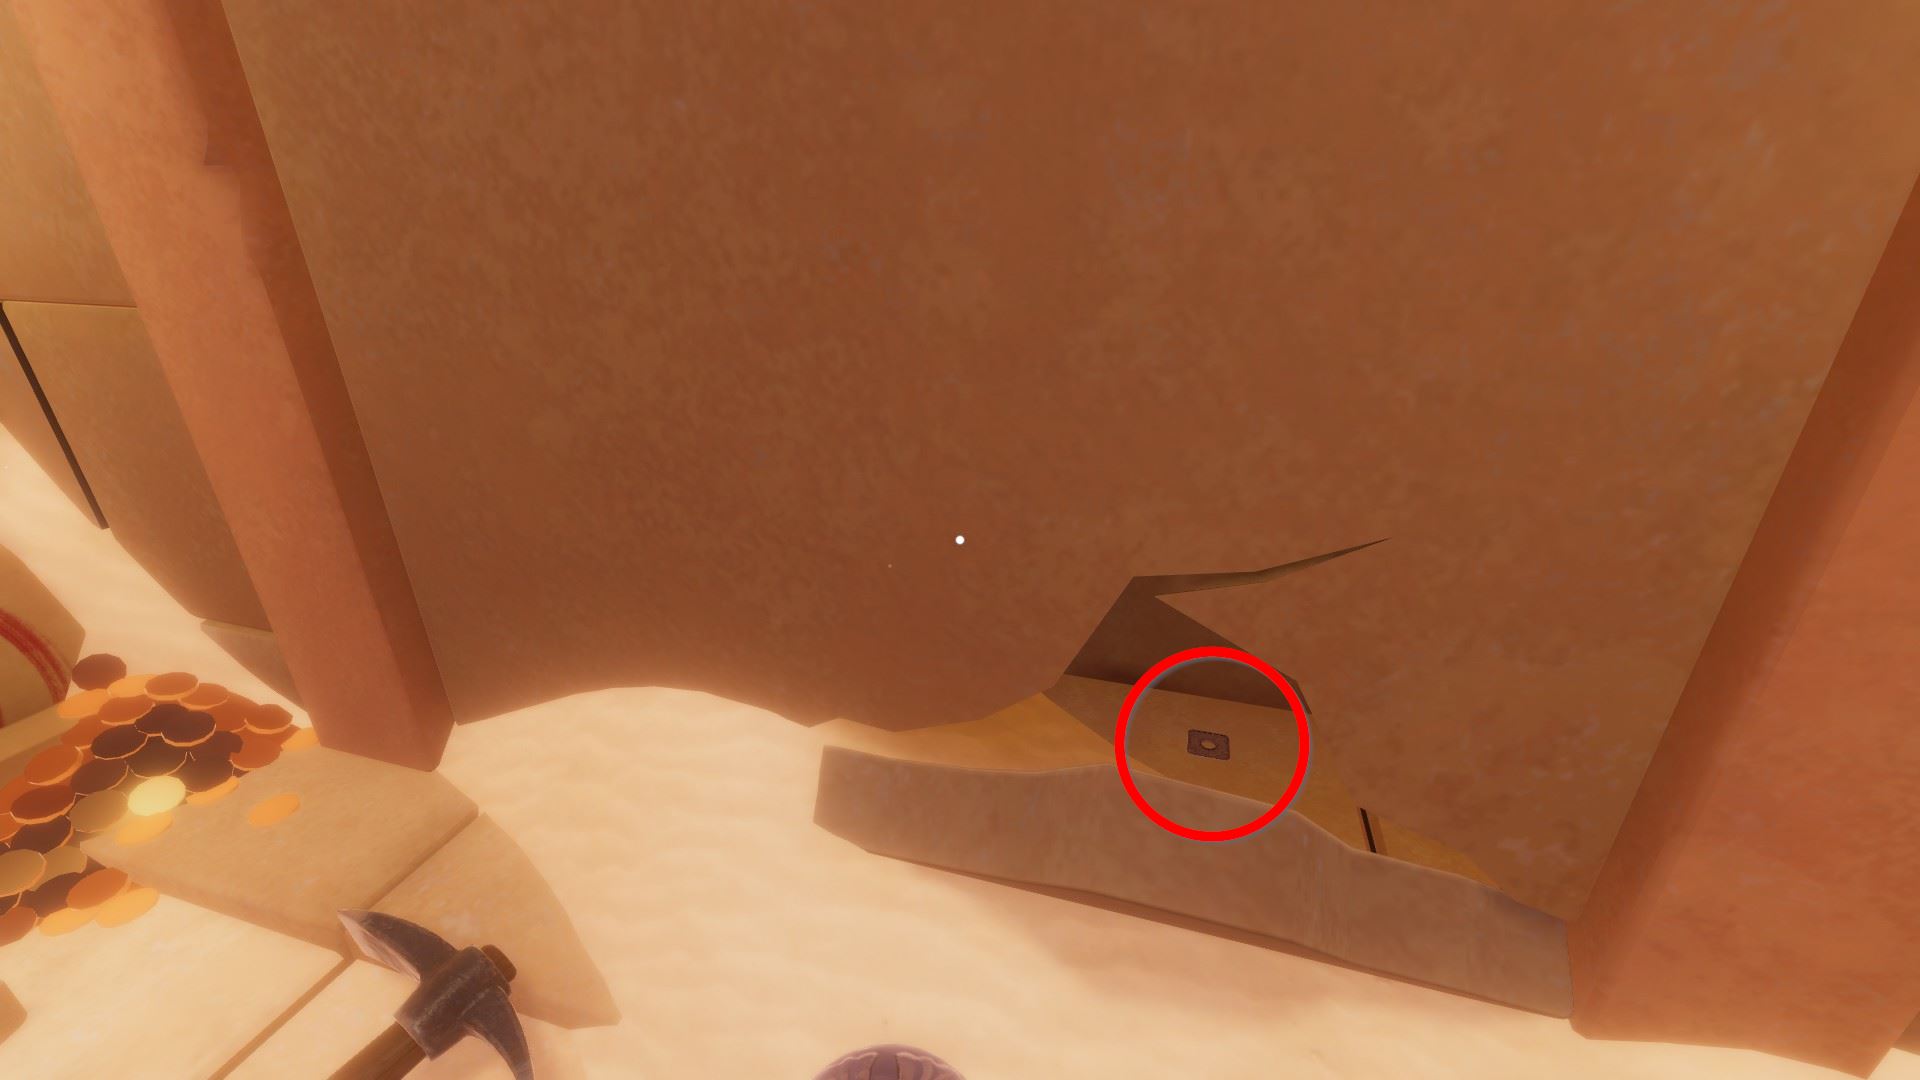
⏹ Token 2 / 8 - apply the pickaxe to break the bottom of the wall in guild to reveal the token:
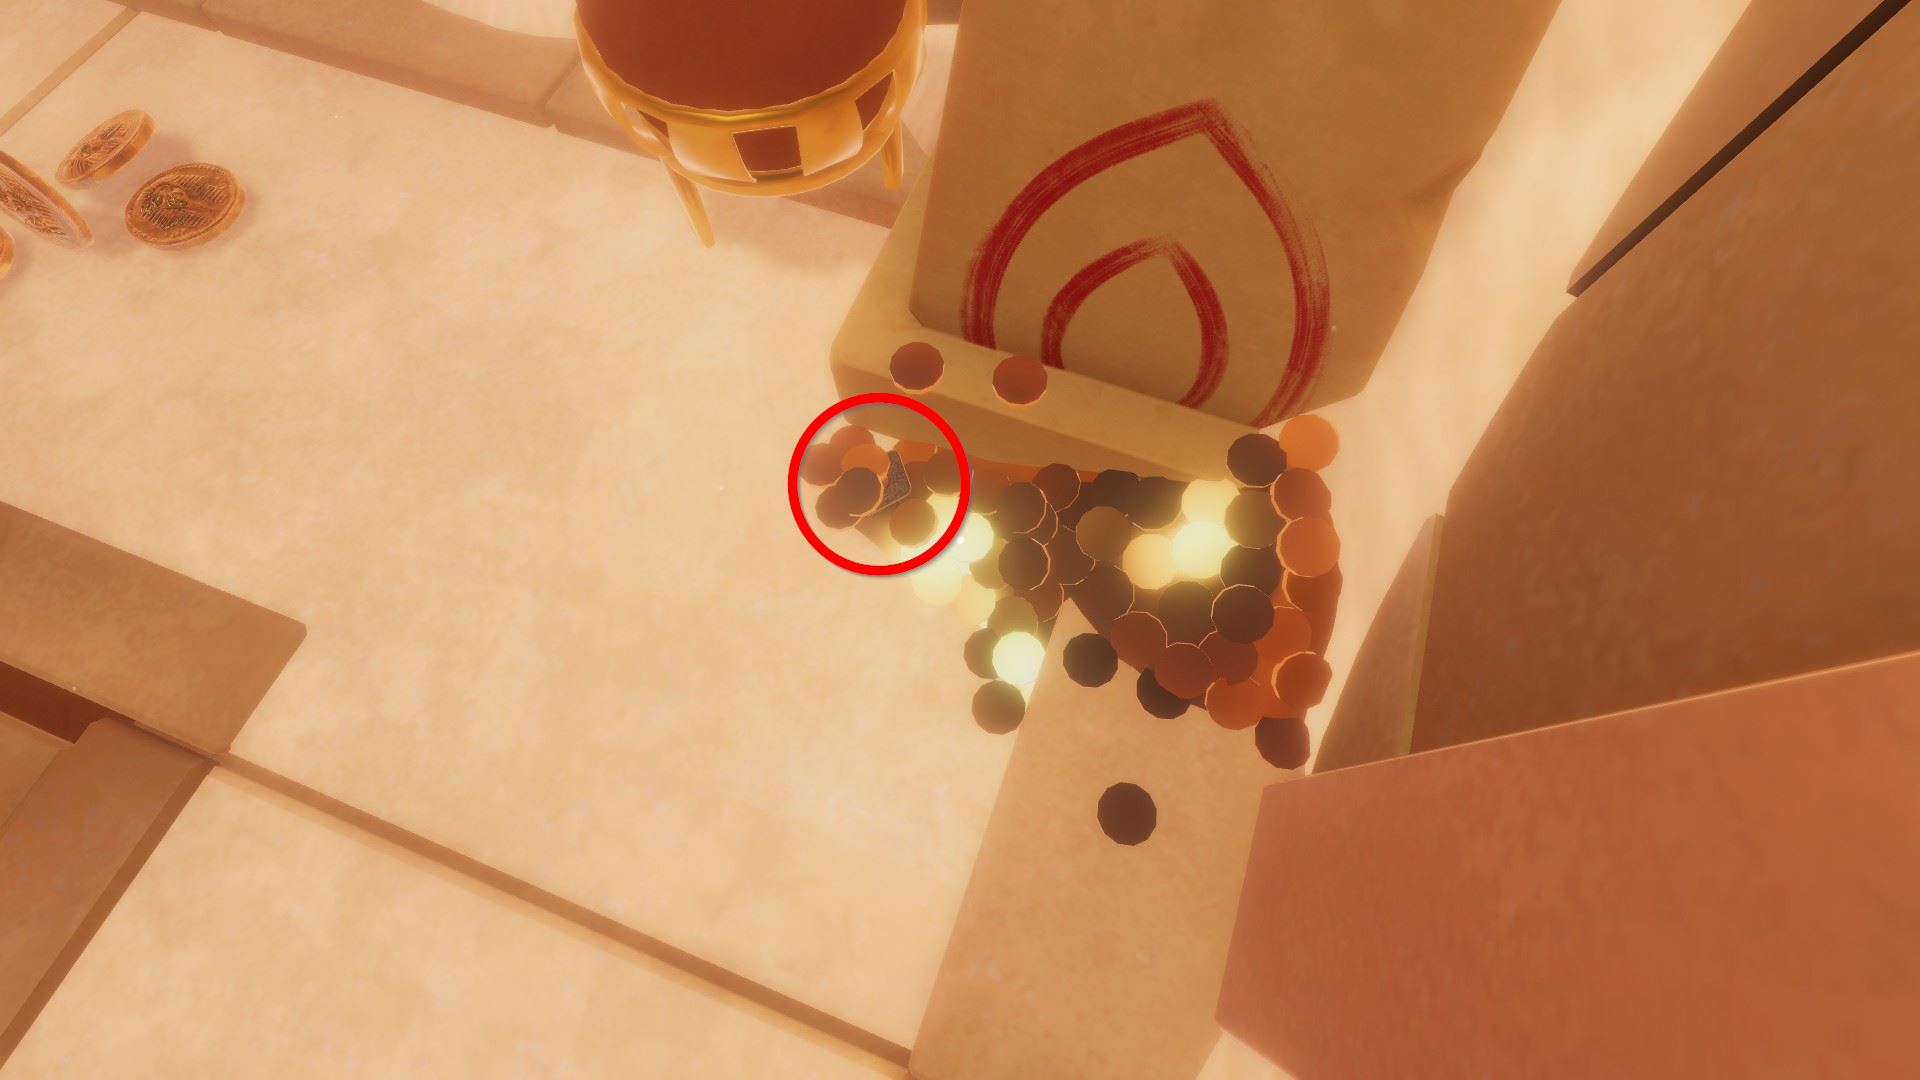
⏹ Token 3 / 8 - inside the scattered coins:
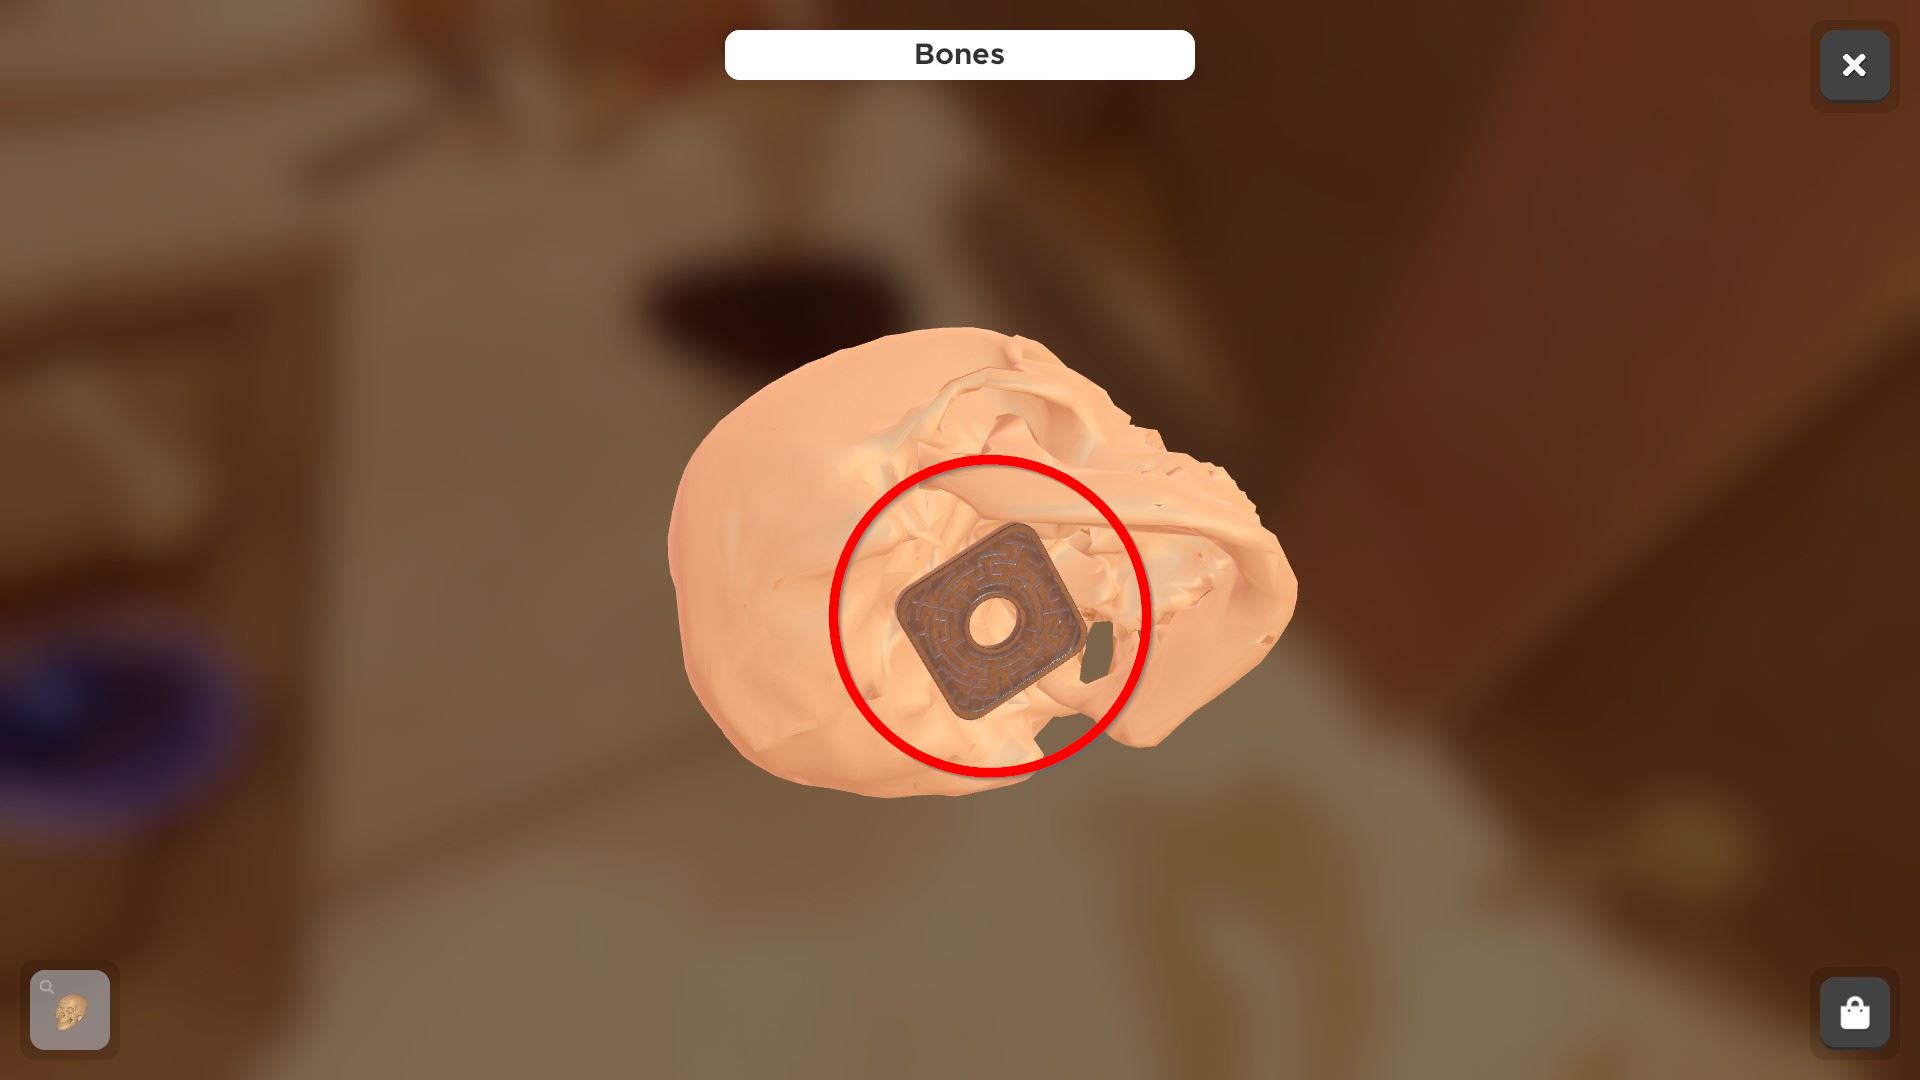
⏹ Token iv / 8 - inside the skull:
Camel / scorpion / sun puzzle (the 3 have to be moved according to the notes below):
Phase 1:
Move the red lever to the right side.
Press the camel button twice.
Move the red lever to the left.
Printing the scorpion button once.
Stage ii:
Press the camel button one time.
Move the red lever to the correct.
Press the sun button.
Press the scorpion button once.
Stage 3:
Move the crimson lever to the left.
Press the sun button twice.
Printing the camel button once.
Press the scorpion button twice.
You receive a red ball.
⏹ Token v / 8 - on the sun:
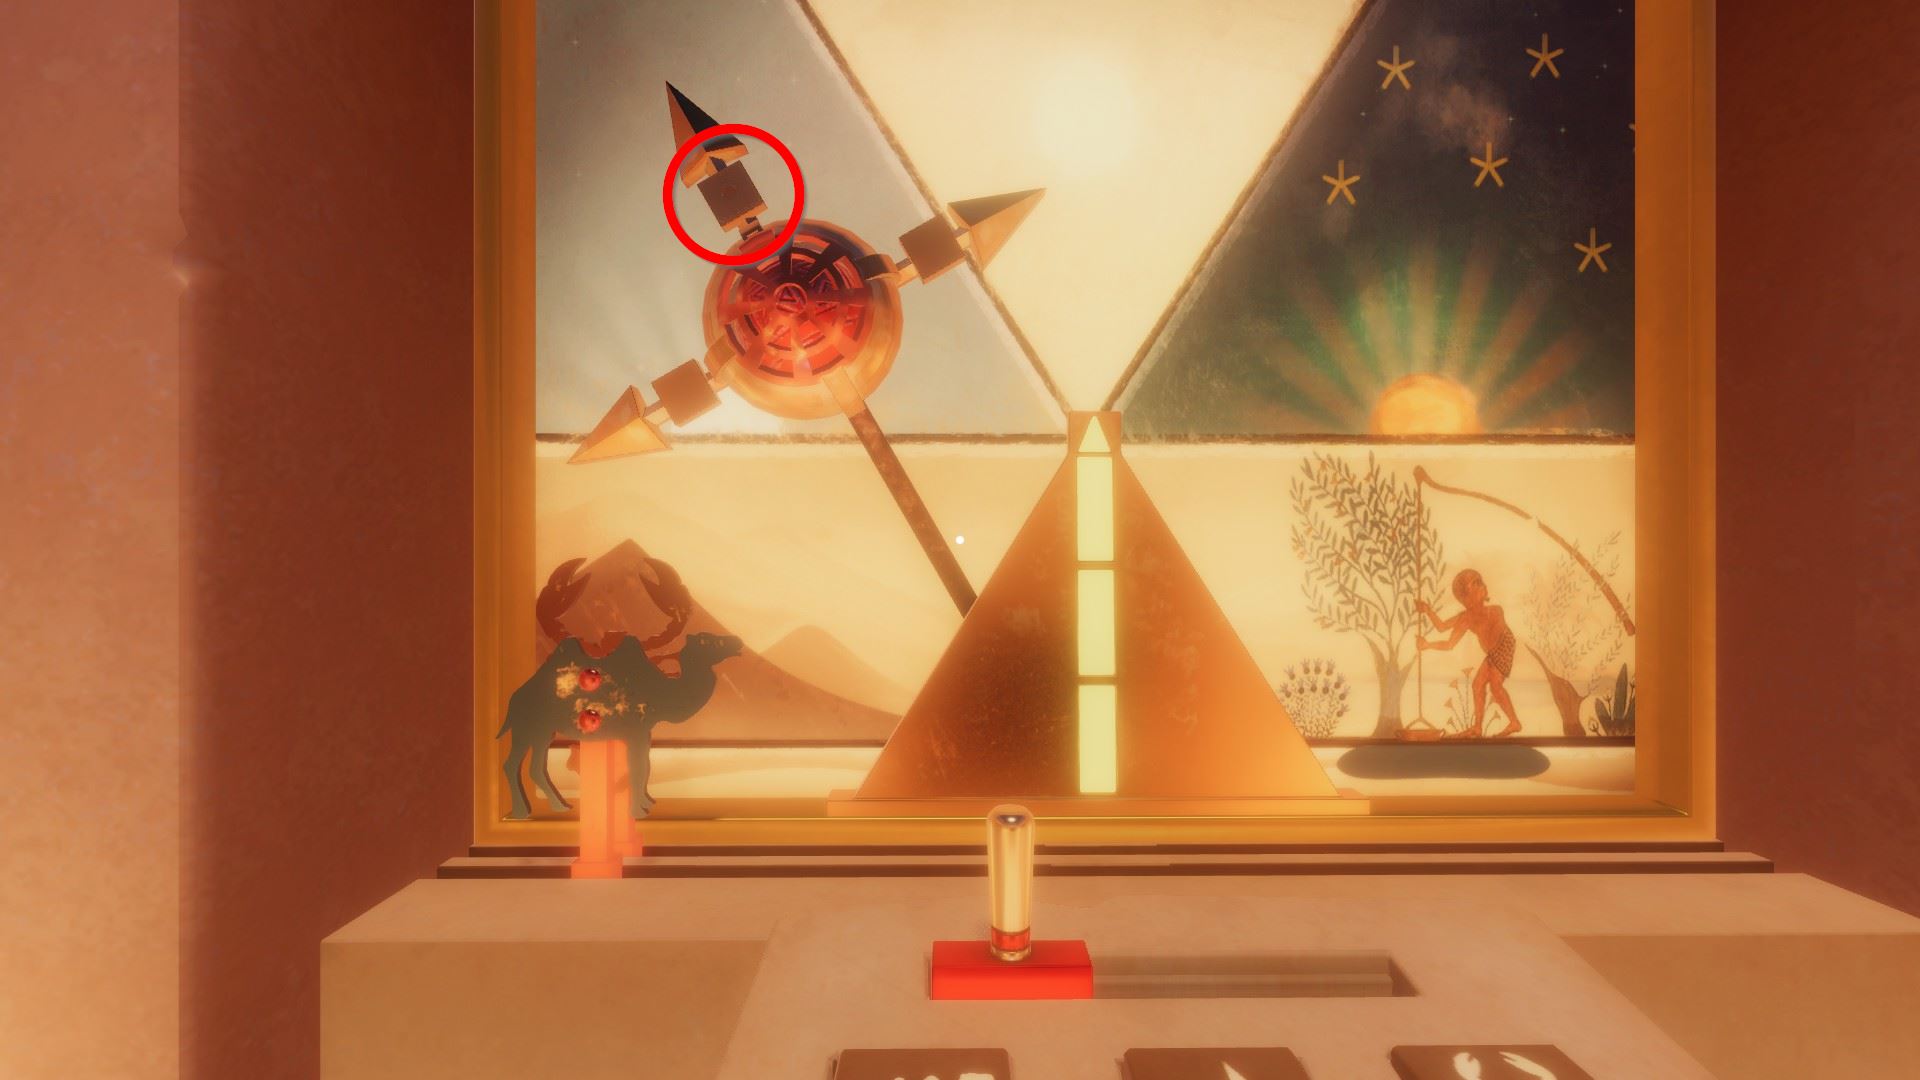
Rotate the dials similar and then to receive a golden ball:
⏹ Token 6 / viii - crouch where you took the golden ball:
⏹ Token 7 / 8
Character puzzle
The lights that appear when you printing the yellow push button show you in which gild to press the buttons. Two lights actualization together means a human being-fauna hybrid.
You receive a black brawl.
⏹ Token eight / 8 - behind the rightmost pedestal:
Place the iv balls like this:
Choice up the mirror and place it in the central hole. Solve the maze puzzle from the outside ring.
Labyrinth of Egypt: The Peak
🏆 You can easily get the Interruption Out accomplishment here if you throw the flask (or another heavy object) over the side with the lights pillars and permit it slowly roll outside the level.
⏹ Token i / 8 - on a platform below:
⏹ Token 2 / 8 - on ane of the light pillars:
⏹ Token three / 8 - on the side of the beam'southward pyramidion:
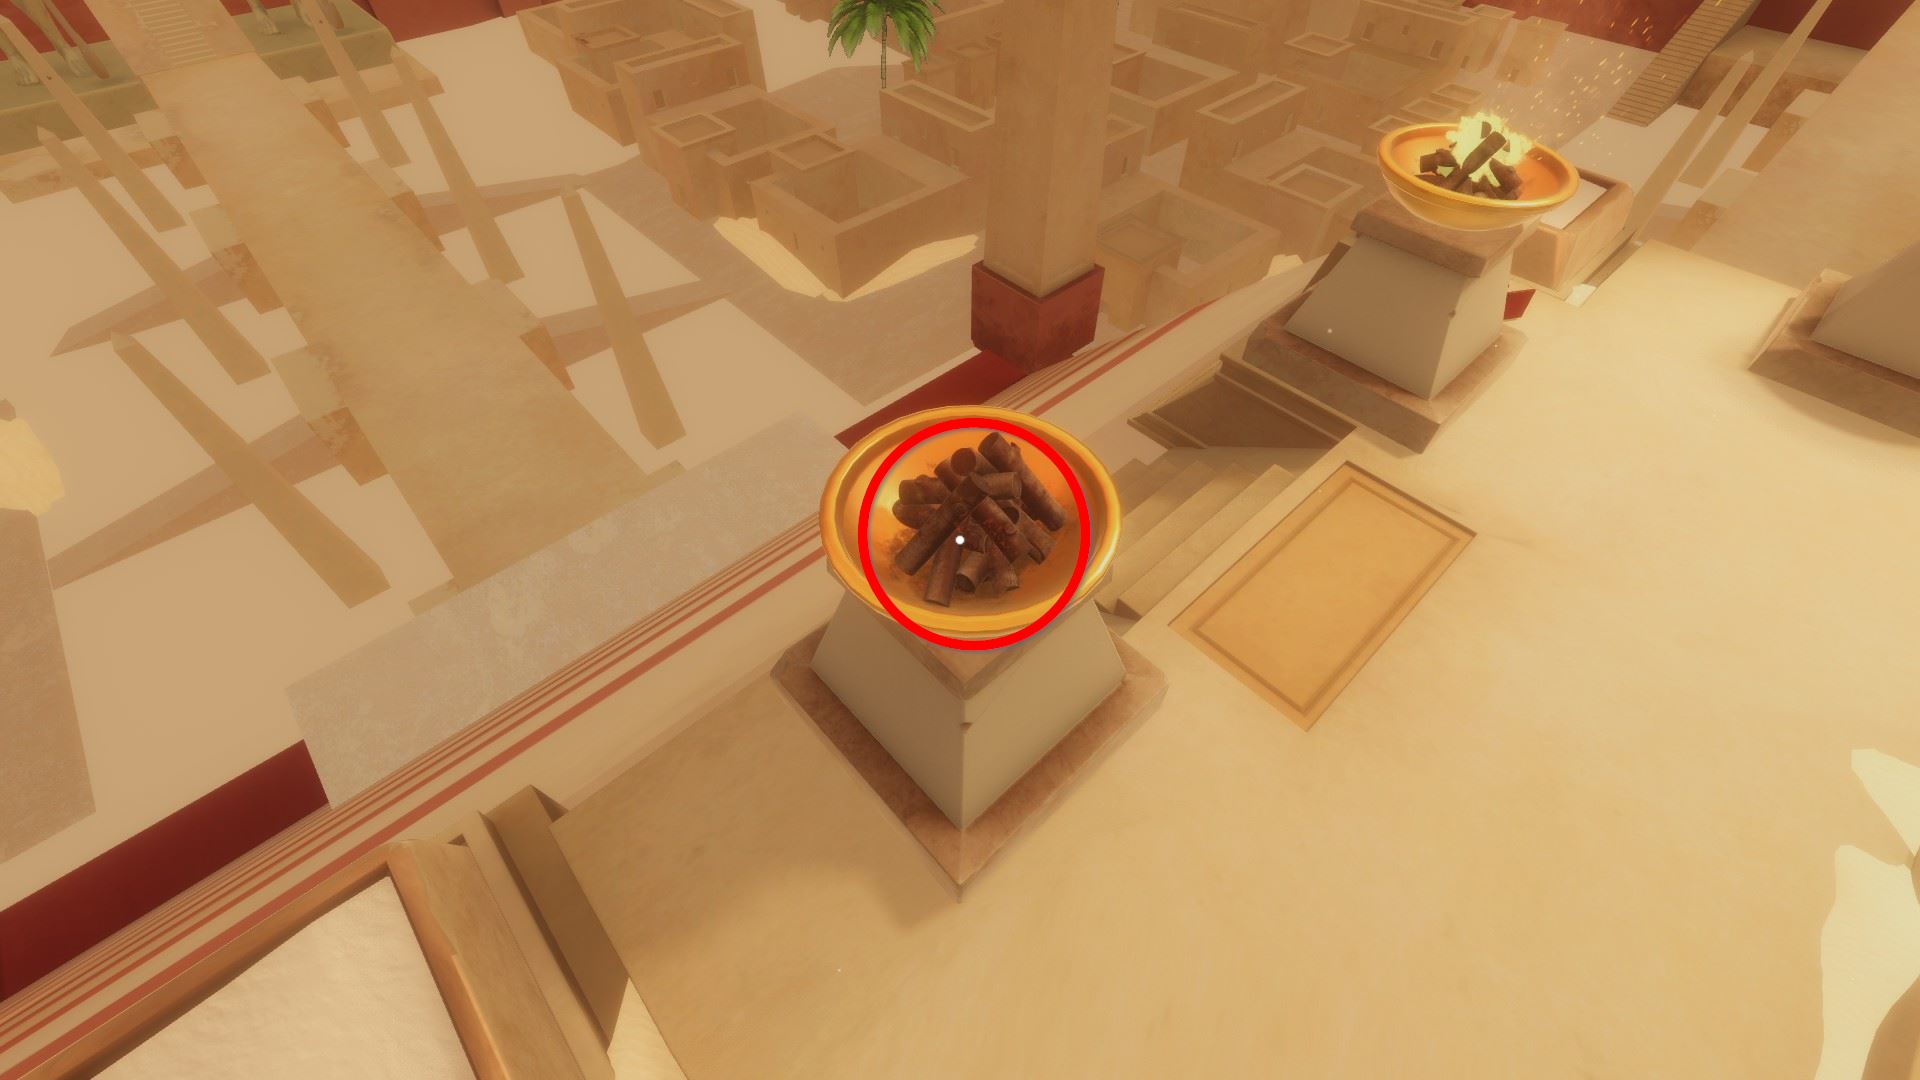
⏹ Token 4 / 8 - selection up the lighter and turn information technology on, then use it on the unlit fire to reveal a token:
⏹ Token v / 8 - behind another fire colonnade:

⏹ Token 6 / viii - on the caput of this statue:

⏹ Token 7 / 8 - in the sand, next to the statues puzzle:
Low-cal up the following pillars:
Centre pillar puzzle:
top disc - sideways lines & circles below
bottom disc - ankh
Rotate the cubes in the centre like then (matching the left solution):
from top to bottom, facing up: bird - firm - h2o bowl
At present rotate the cubes like this (matching the right solution):
from tiptop to lesser, facing up: house - business firm - lion
This opened boxes at the base of the pillar containing a square knob for the left and a round know for the correct outside colonnade – insert these.
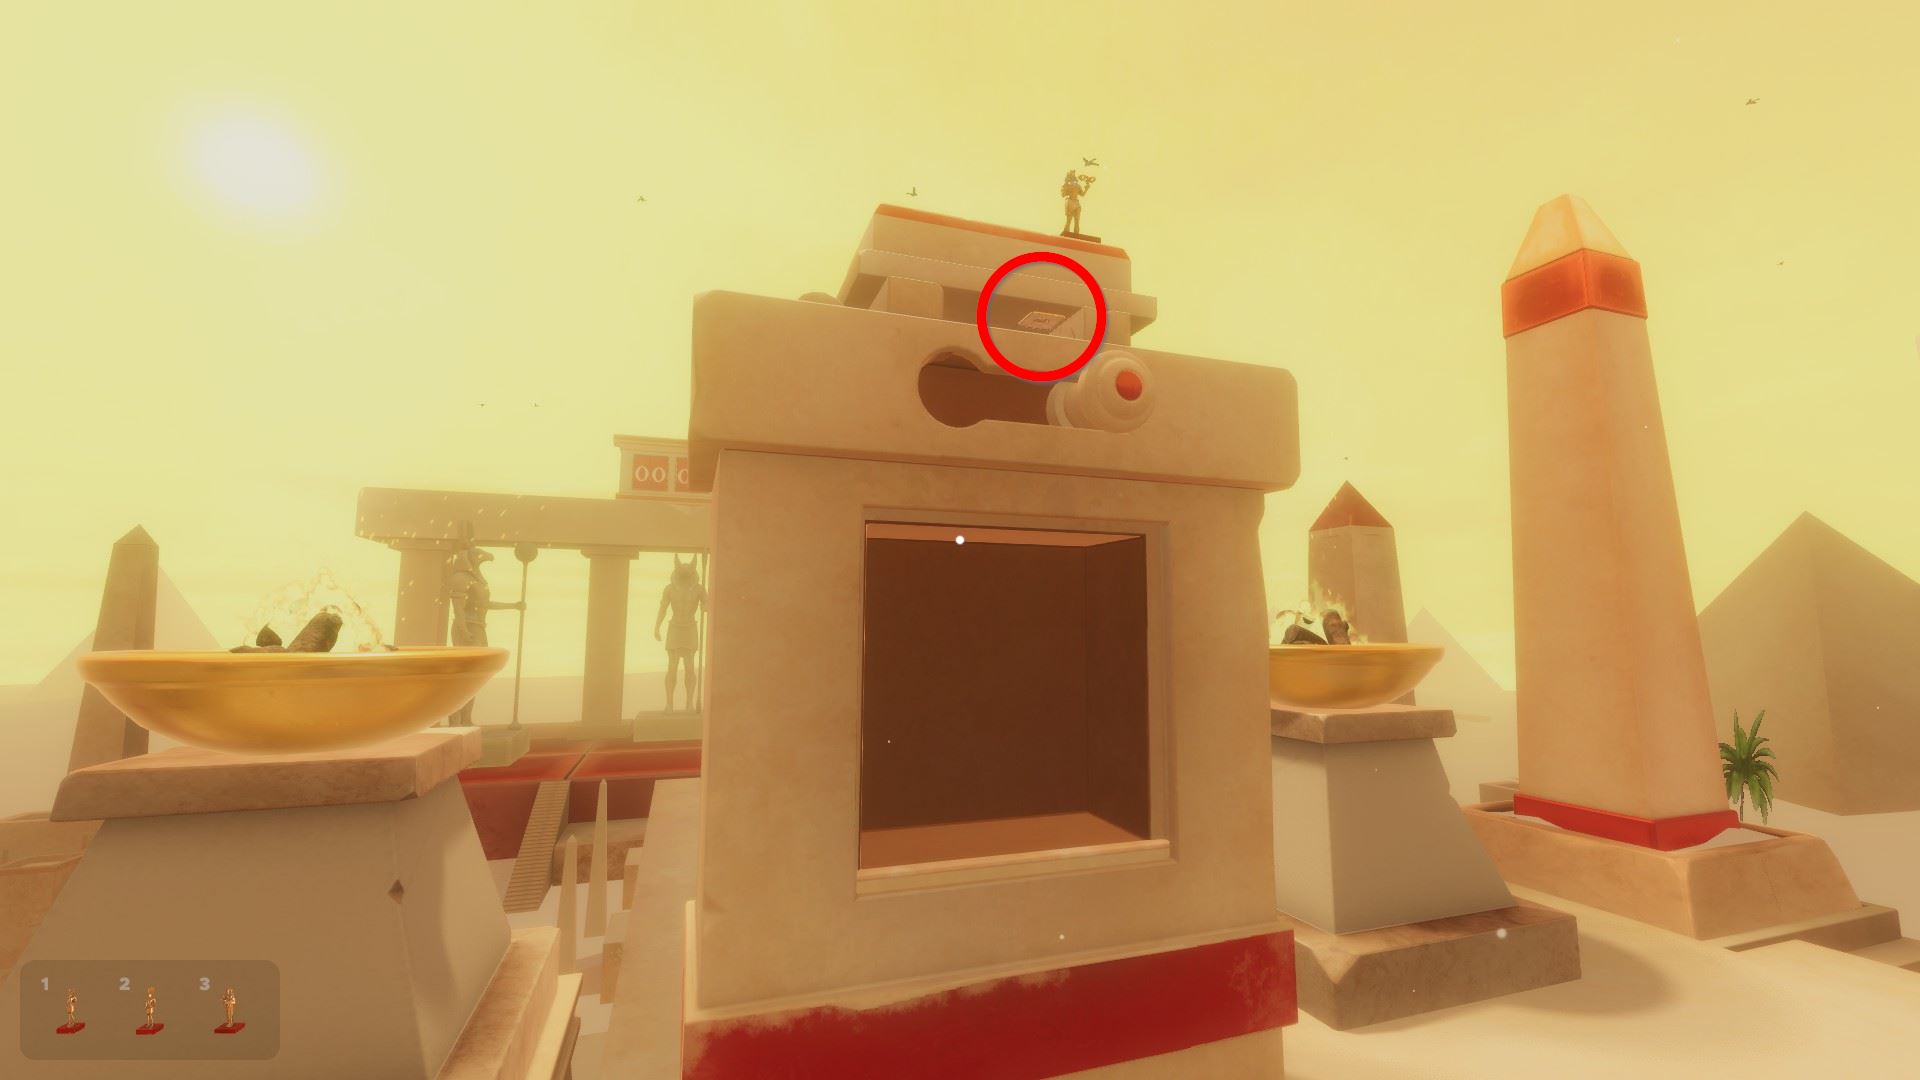
Moving the knobs, you get two more pyramid statues and three more statuettes.
Insert the pyramid statues like the towers of the edifice in the background:
Insert the statuettes like the large statues in the groundwork, afterward rotating with infinite as needed:
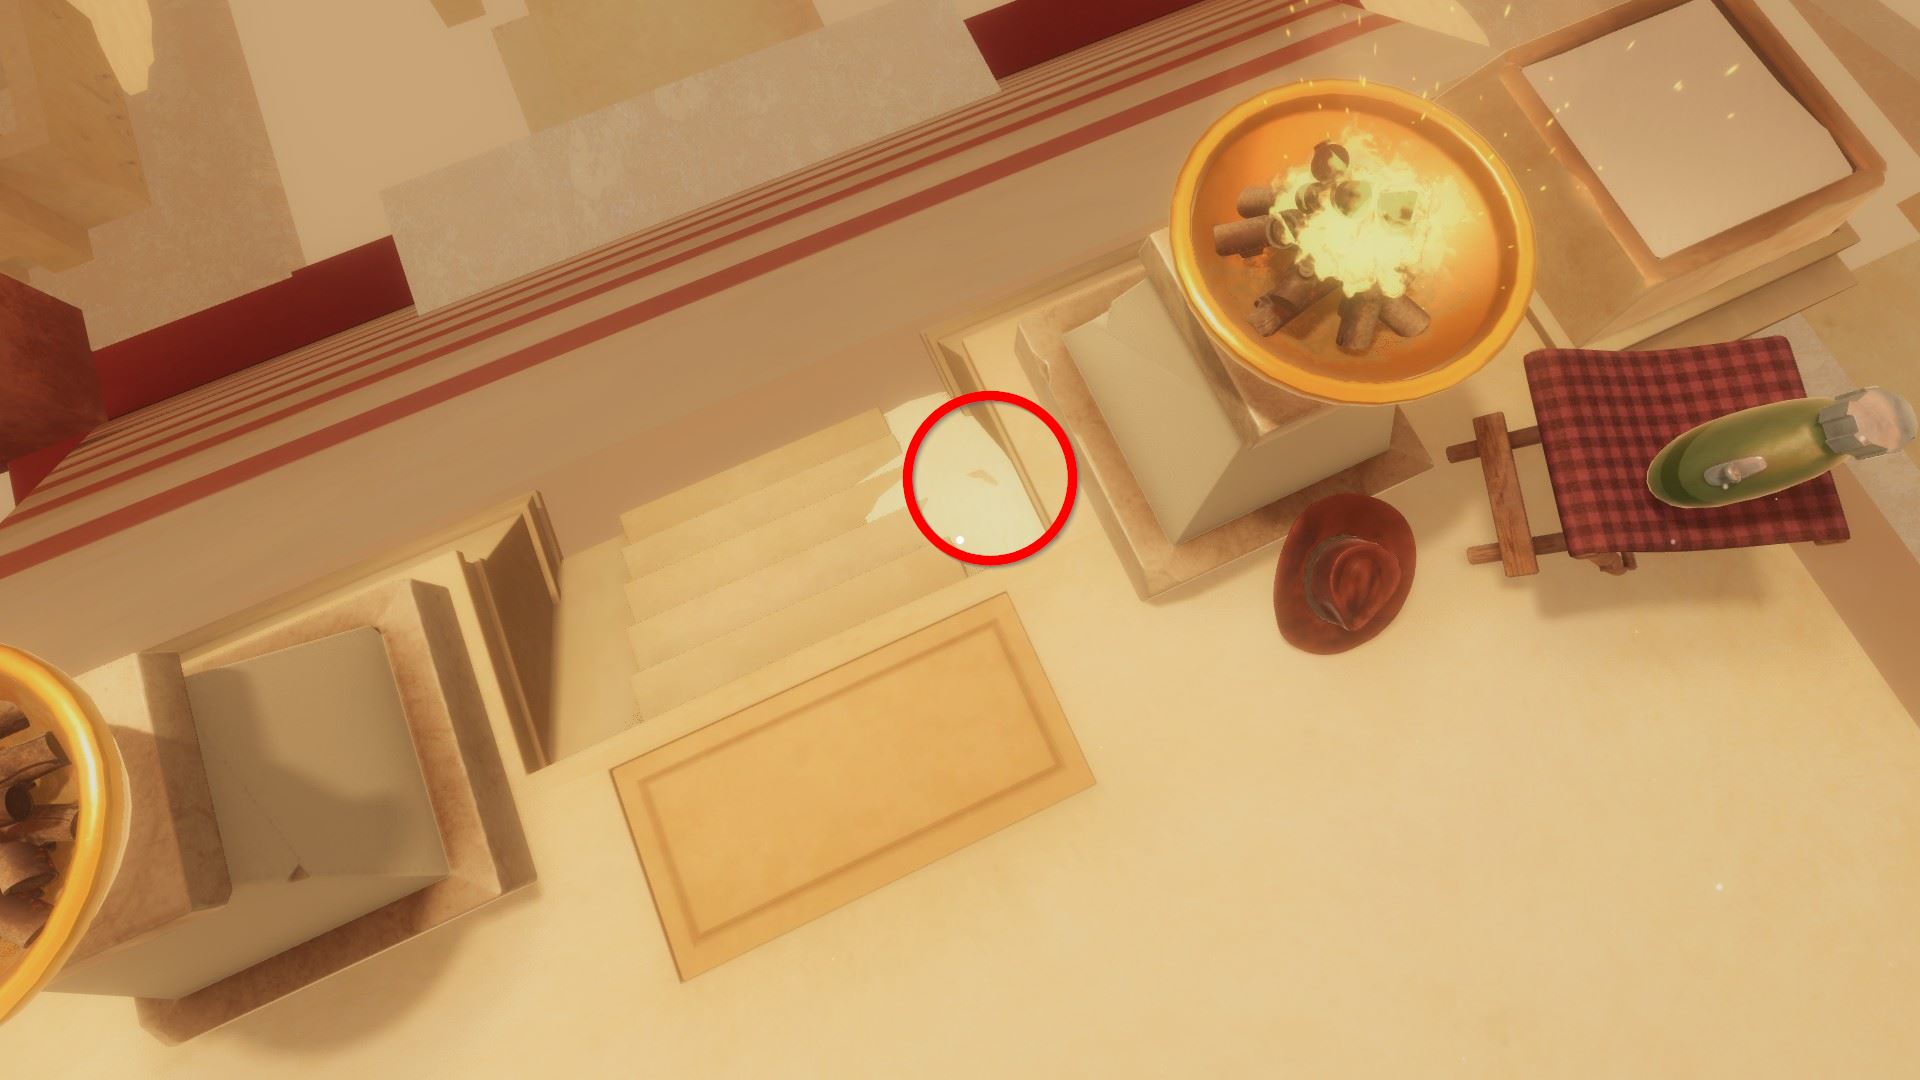
(if y'all are missing a statuette, i of them is slightly hidden backside the folding chair)
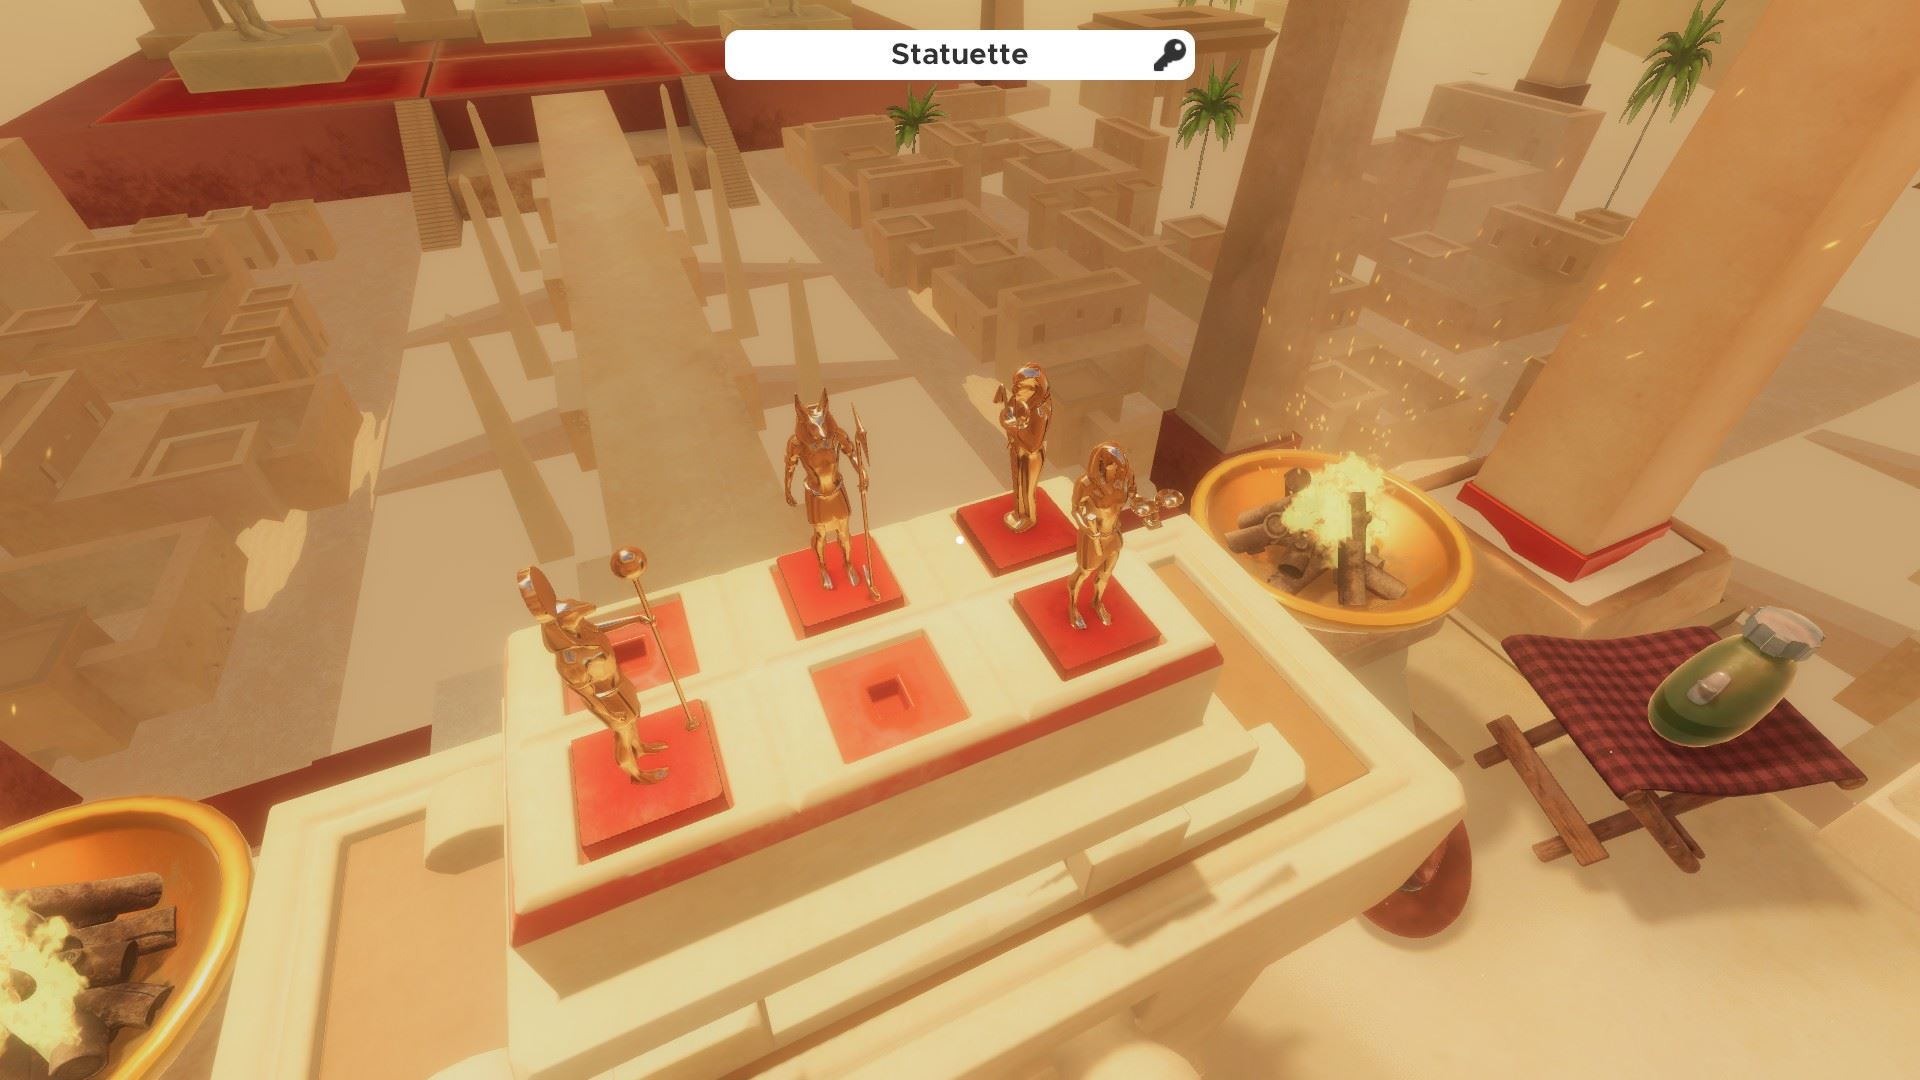
⏹ Token 8 / 8 - under the drawer of the statues puzzle:
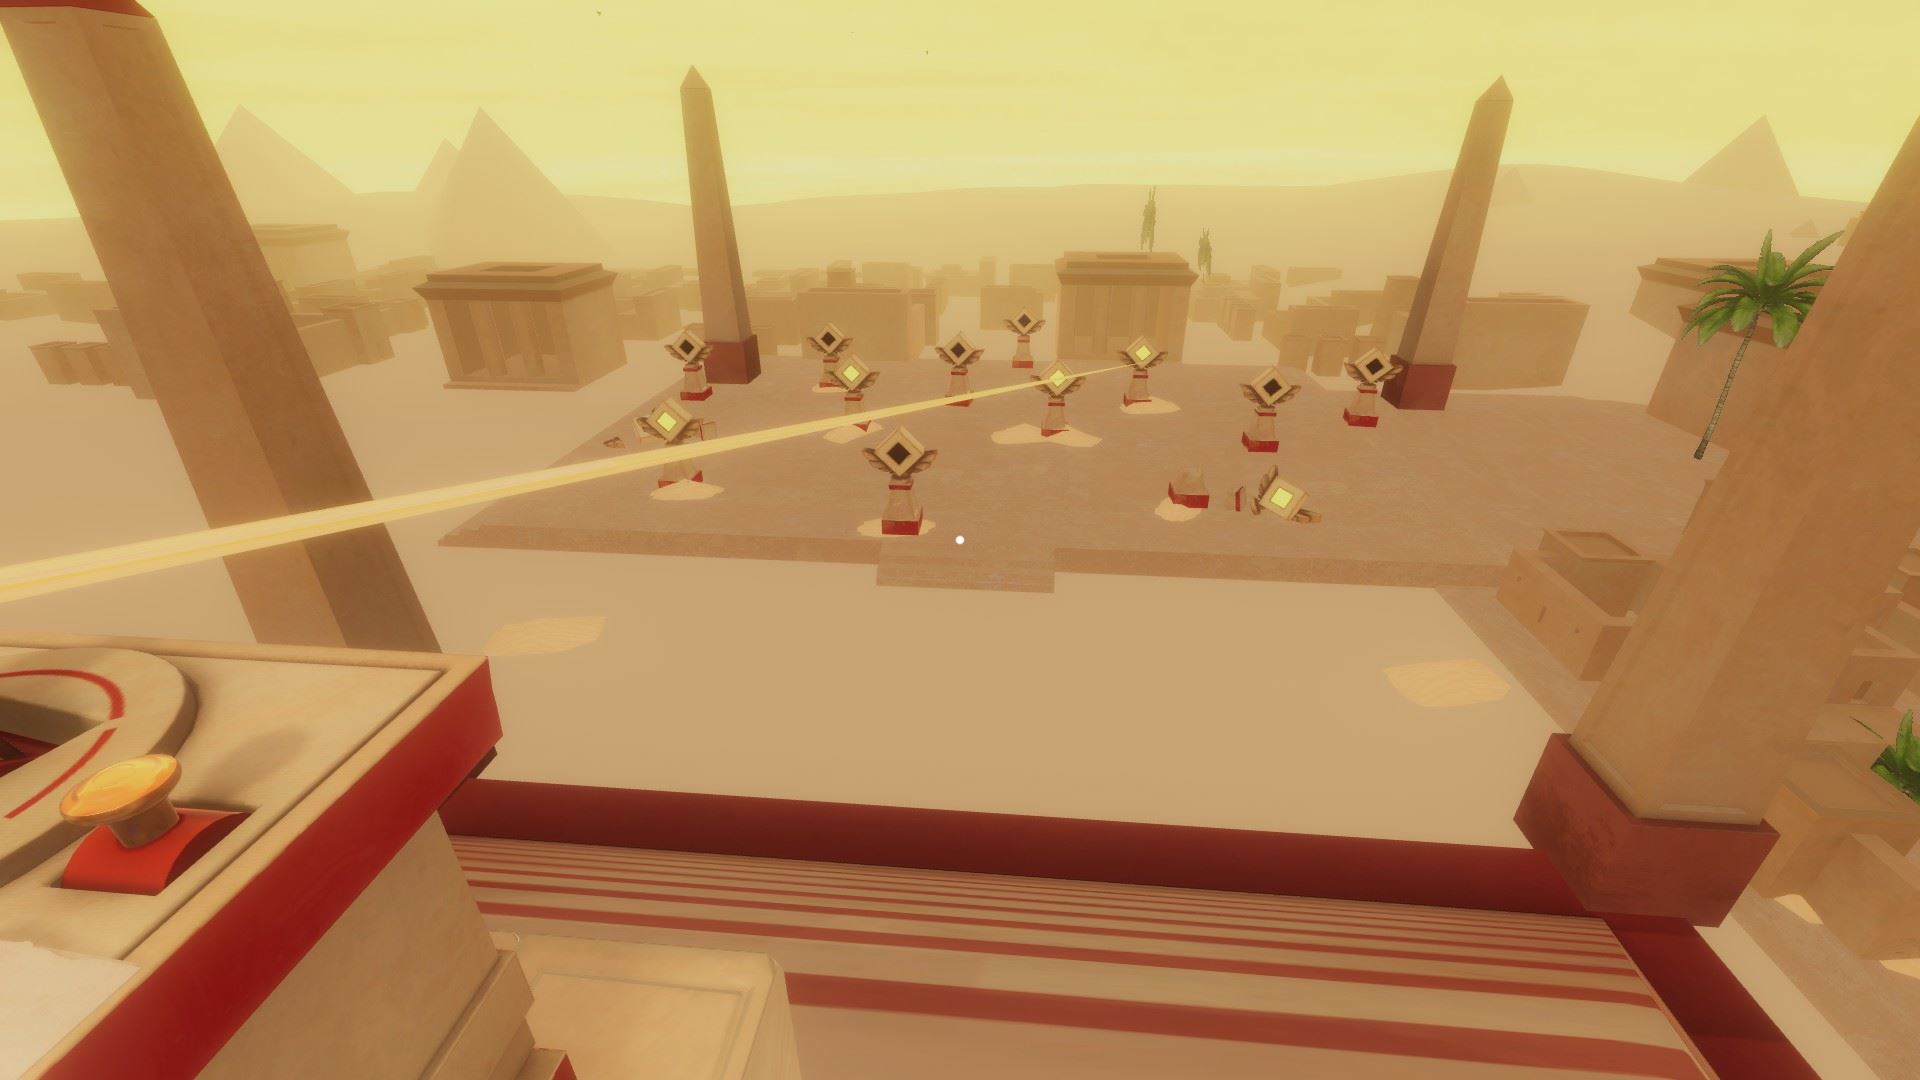
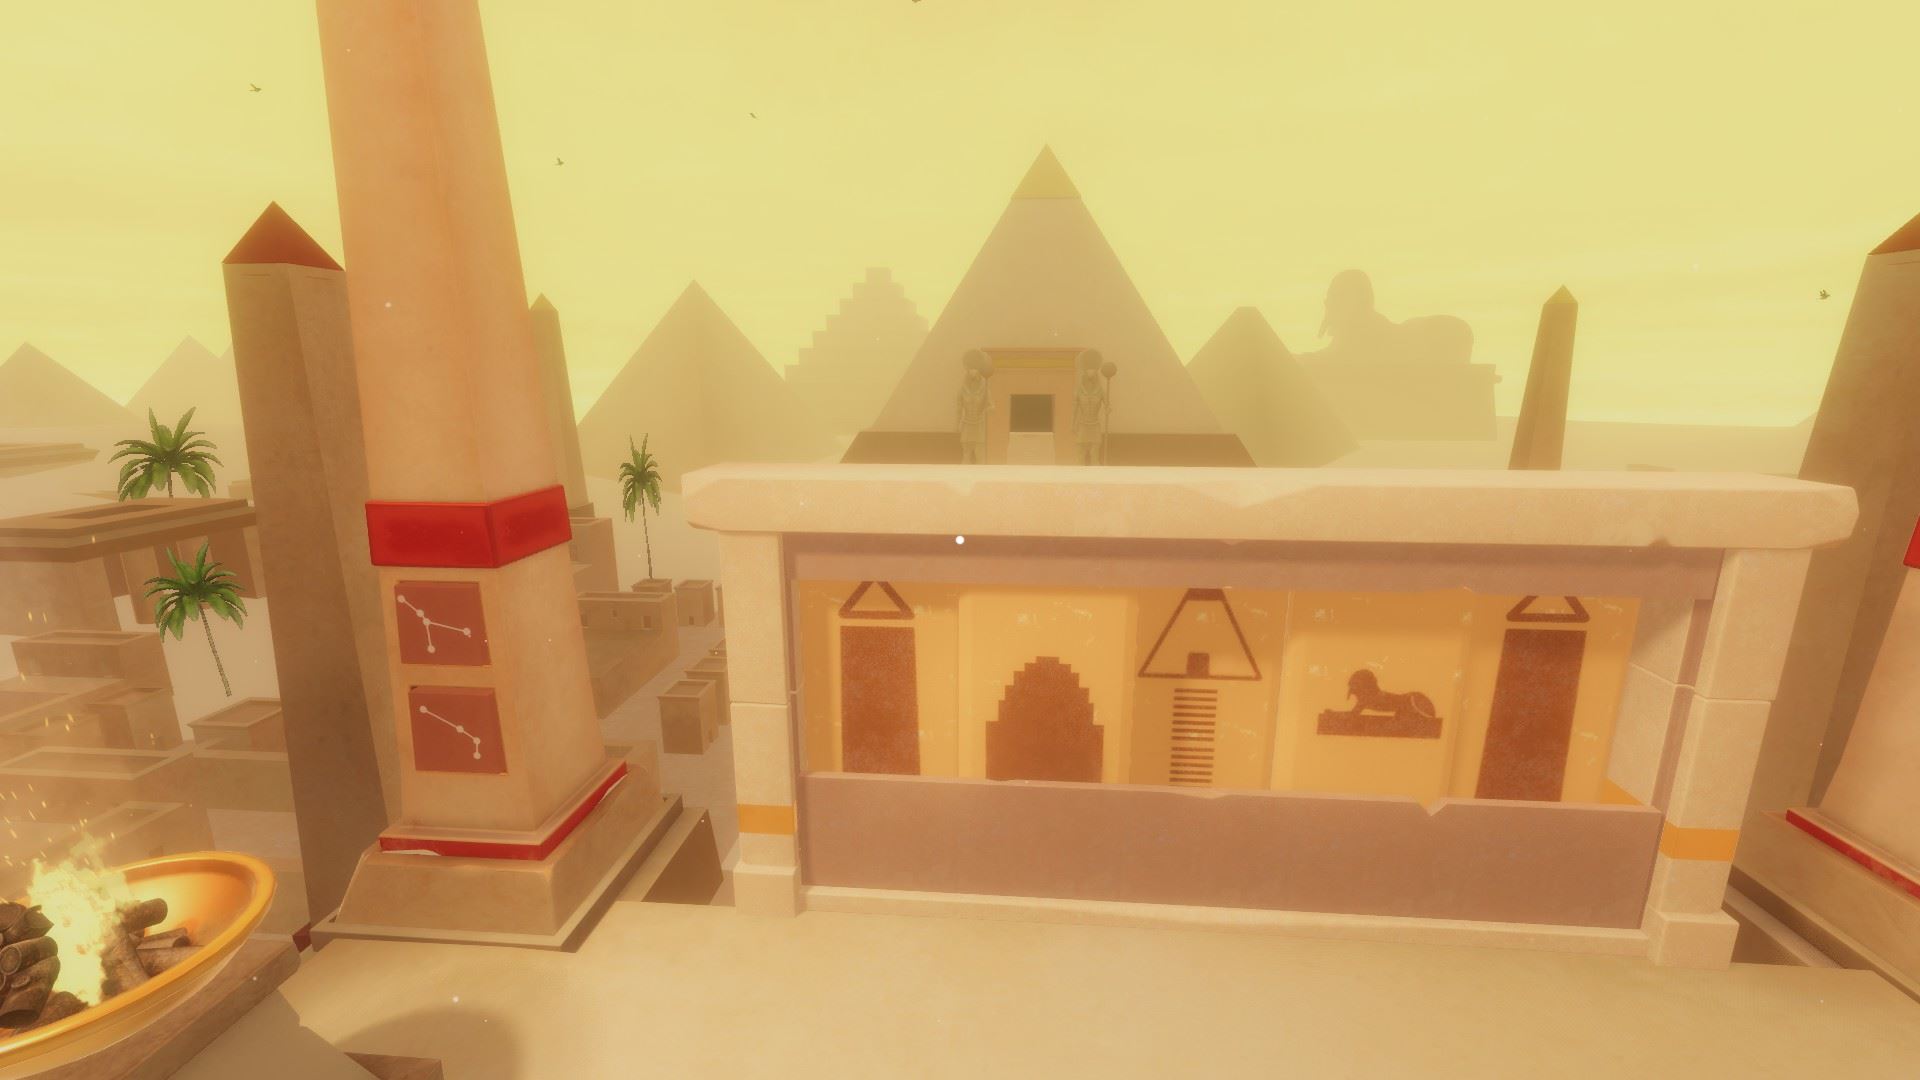
Order the stone plates similar the buildings in the background surrounding the pyramid:
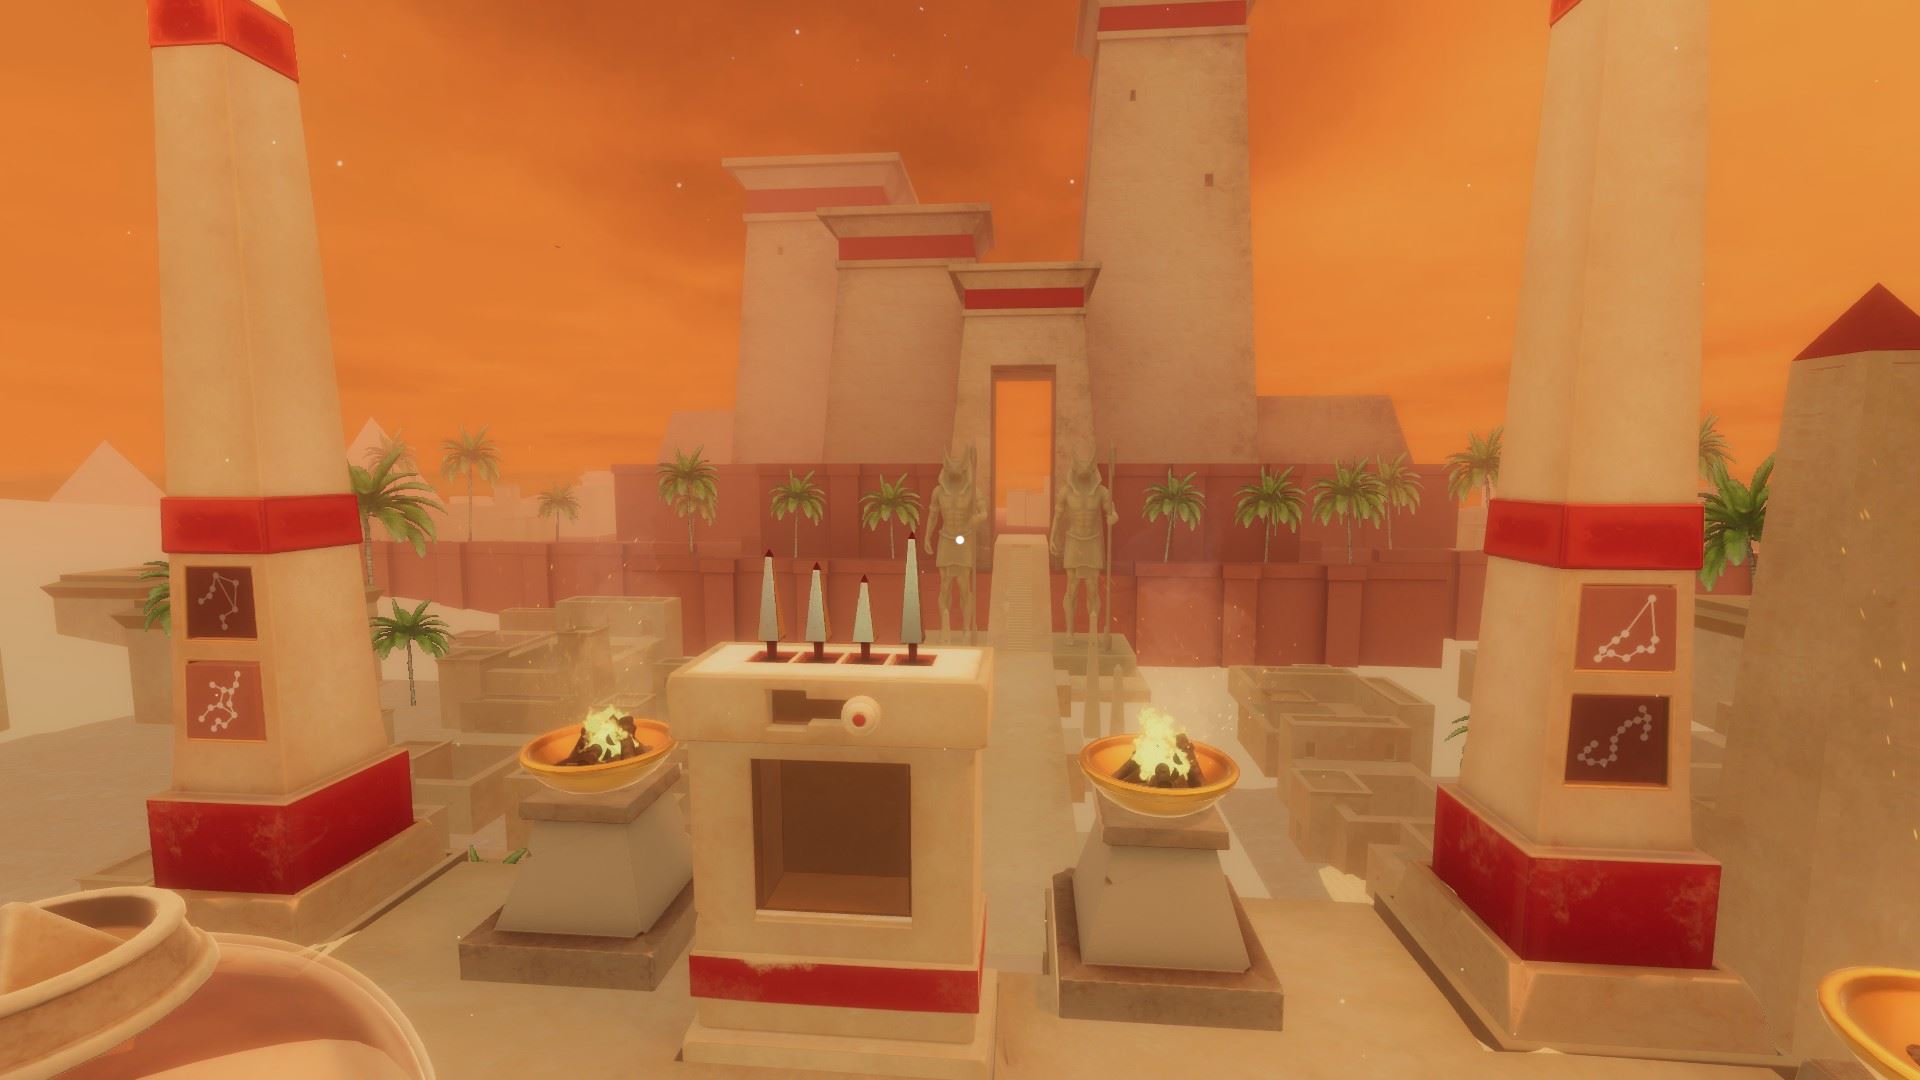
Press the following plates on the pillars matching the star constellations in the heaven to finish the level:
Adrift in Infinite: Emergency Awakening
🏆
Level-specific accomplishment: Holy Mug
There'south 3 floating mugs in this level: initially two of them are on the left of the PC and i on the right side of the screen. You earn this achievement if you lot finish the level with all of them still intact. You tin save them from possible destruction by hiding them in the trash bin (or your character inventory). If you just turn on gravity rapidly without moving the mugs or hitting them with other floating items, they besides don't break.
🏆
Level-specific achievement: Don't Look at the Sun
Only stare out of the open up window for a while.
Use the zooming in role (middle mouse primal).
Can also exist obtained in Adrift in Space: Space Walk.
🏆
Level-specific accomplishment: Mystic Toy
Supervene upon the corroded battery in the robotoy with a fresh ane, and press the power button a few times to hear a special line.
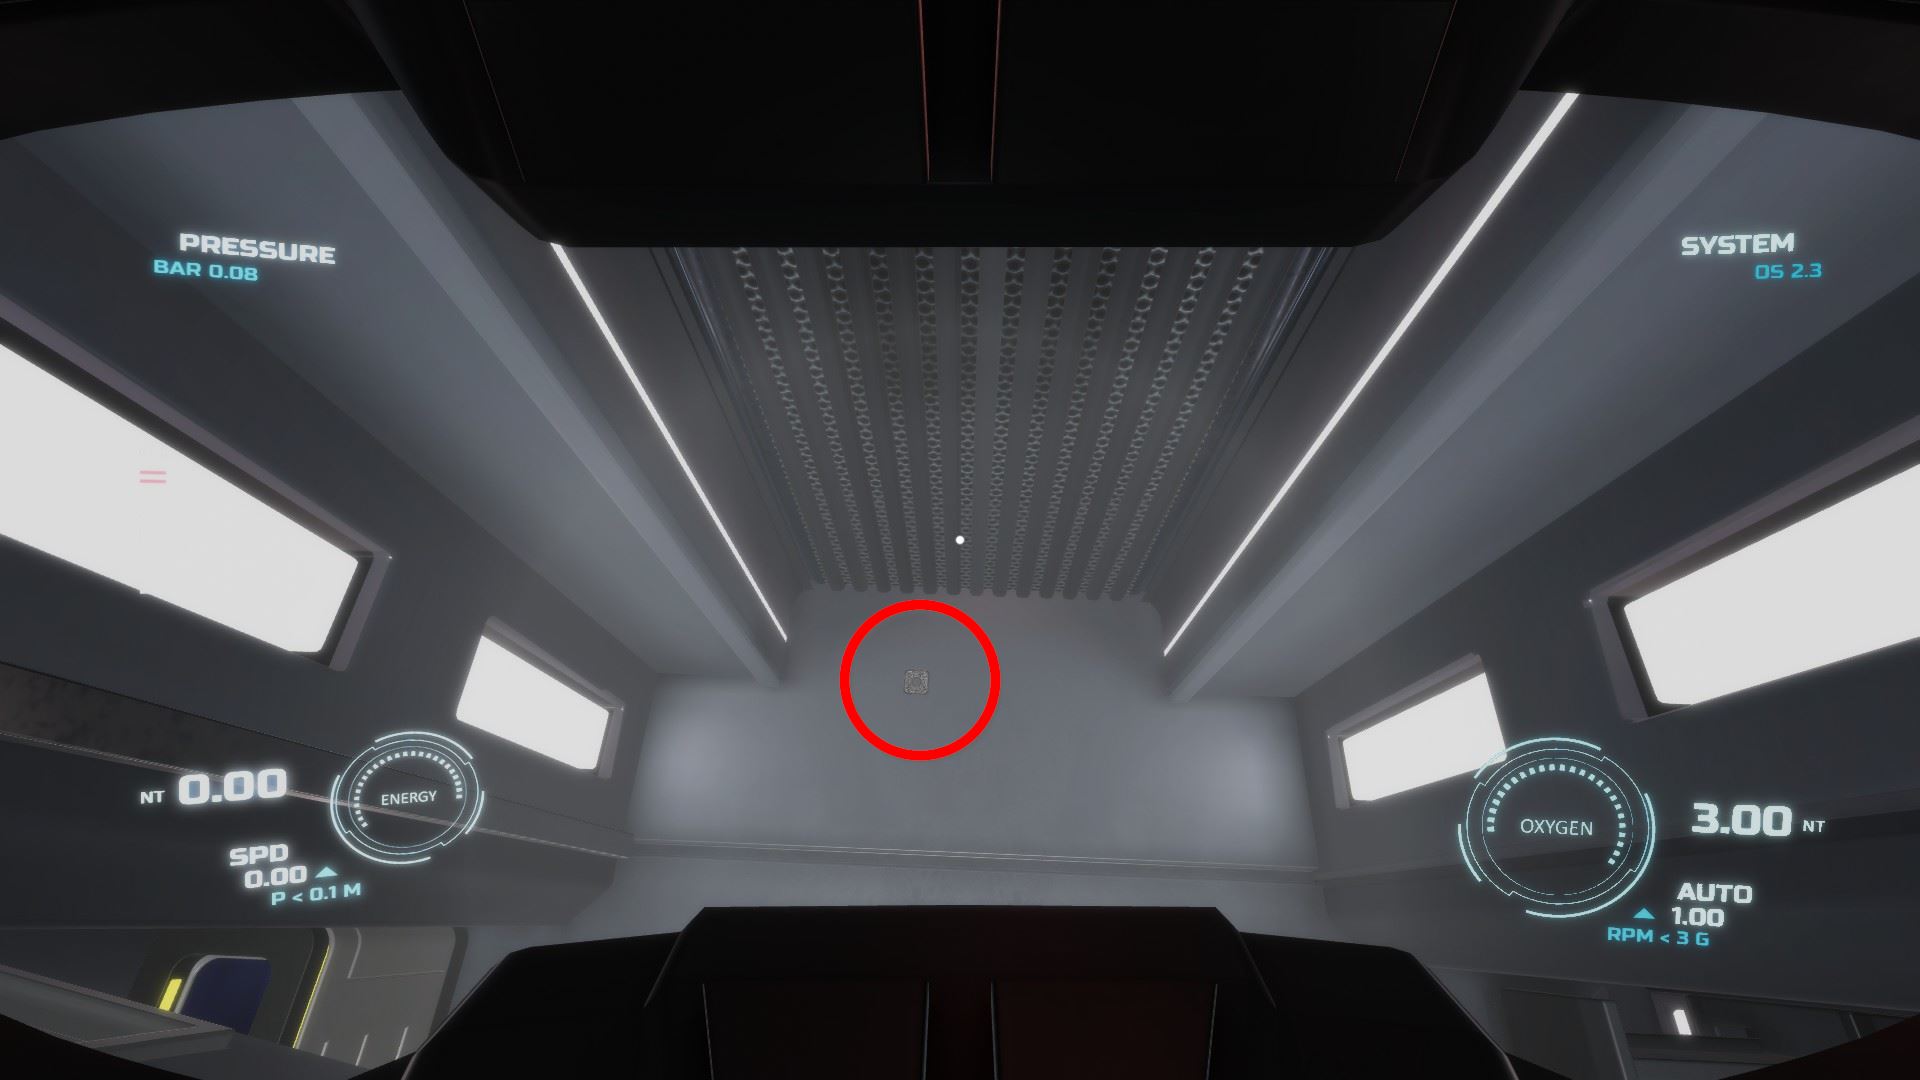
⏹ Token 1 / 8 - in a corner, on the right side of the main door:

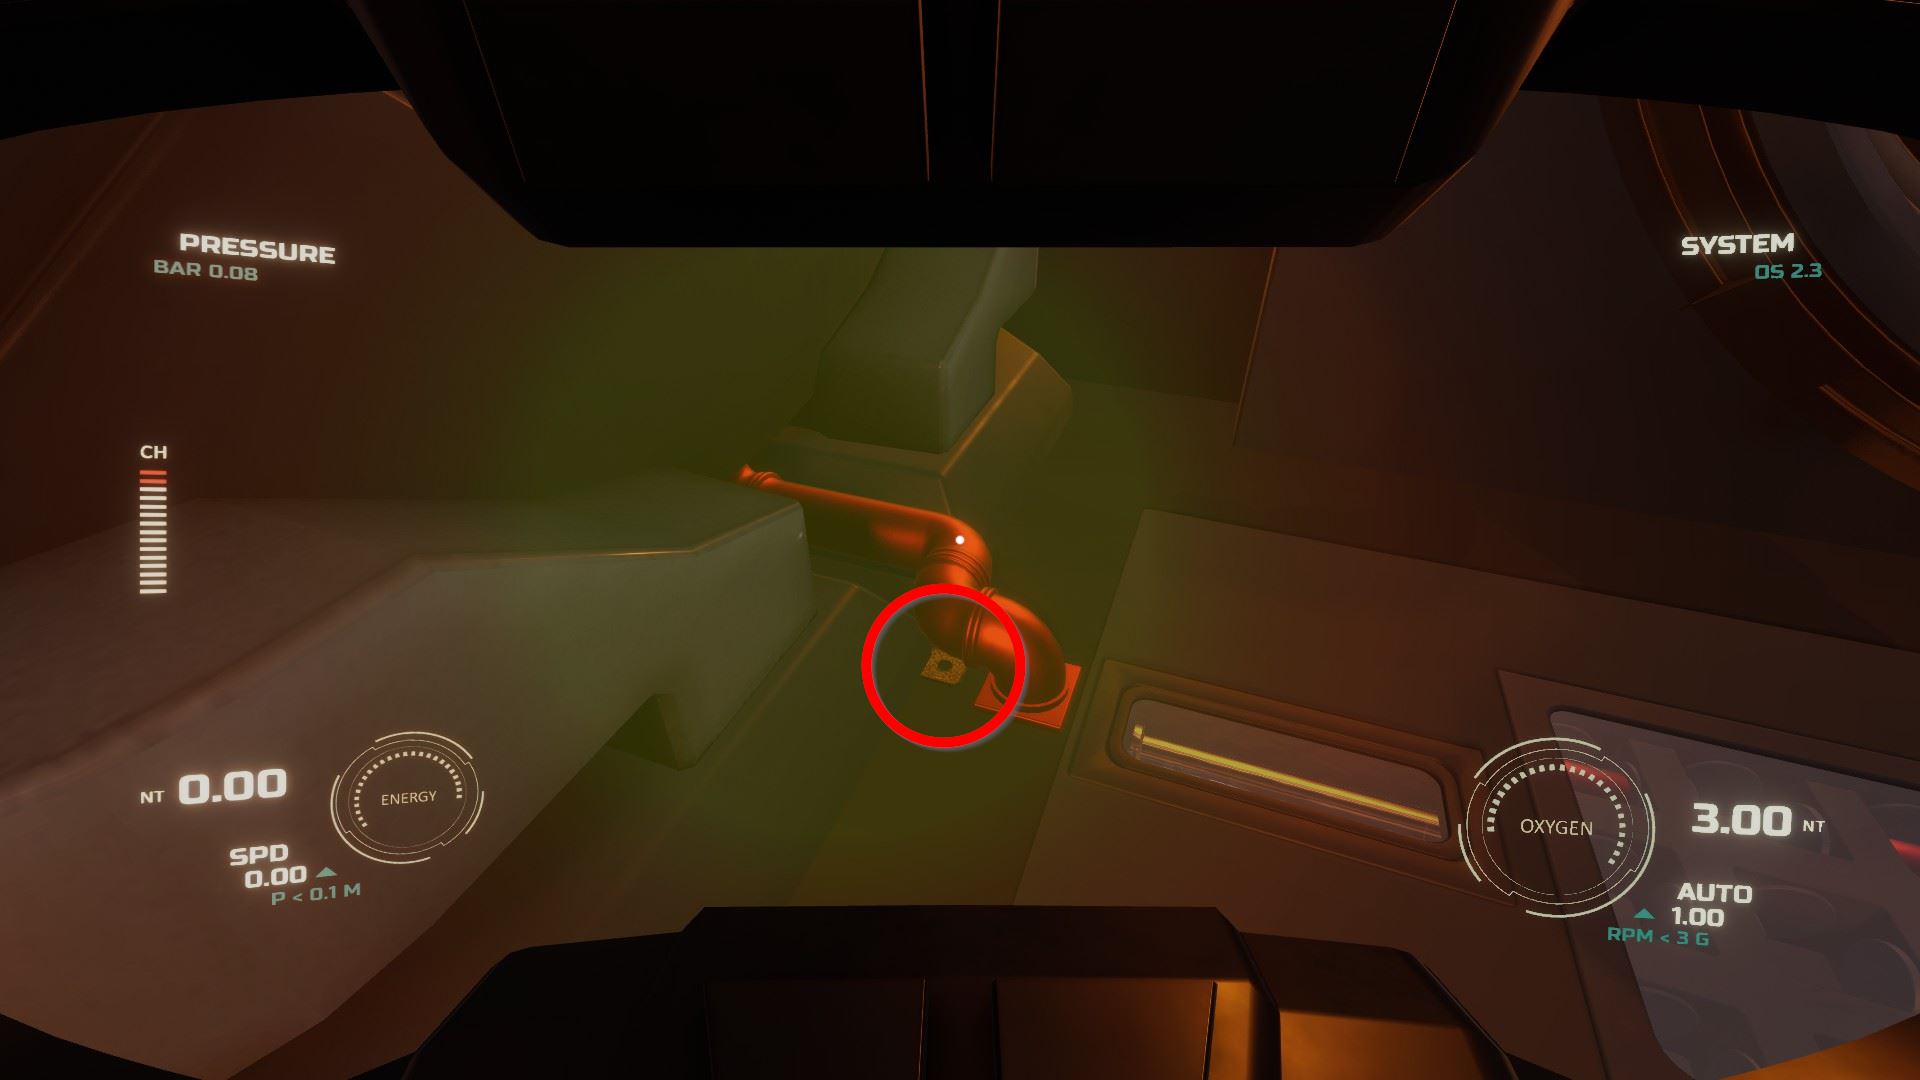
⏹ Token two / 8 - behind the trash can, under the desk-bound:
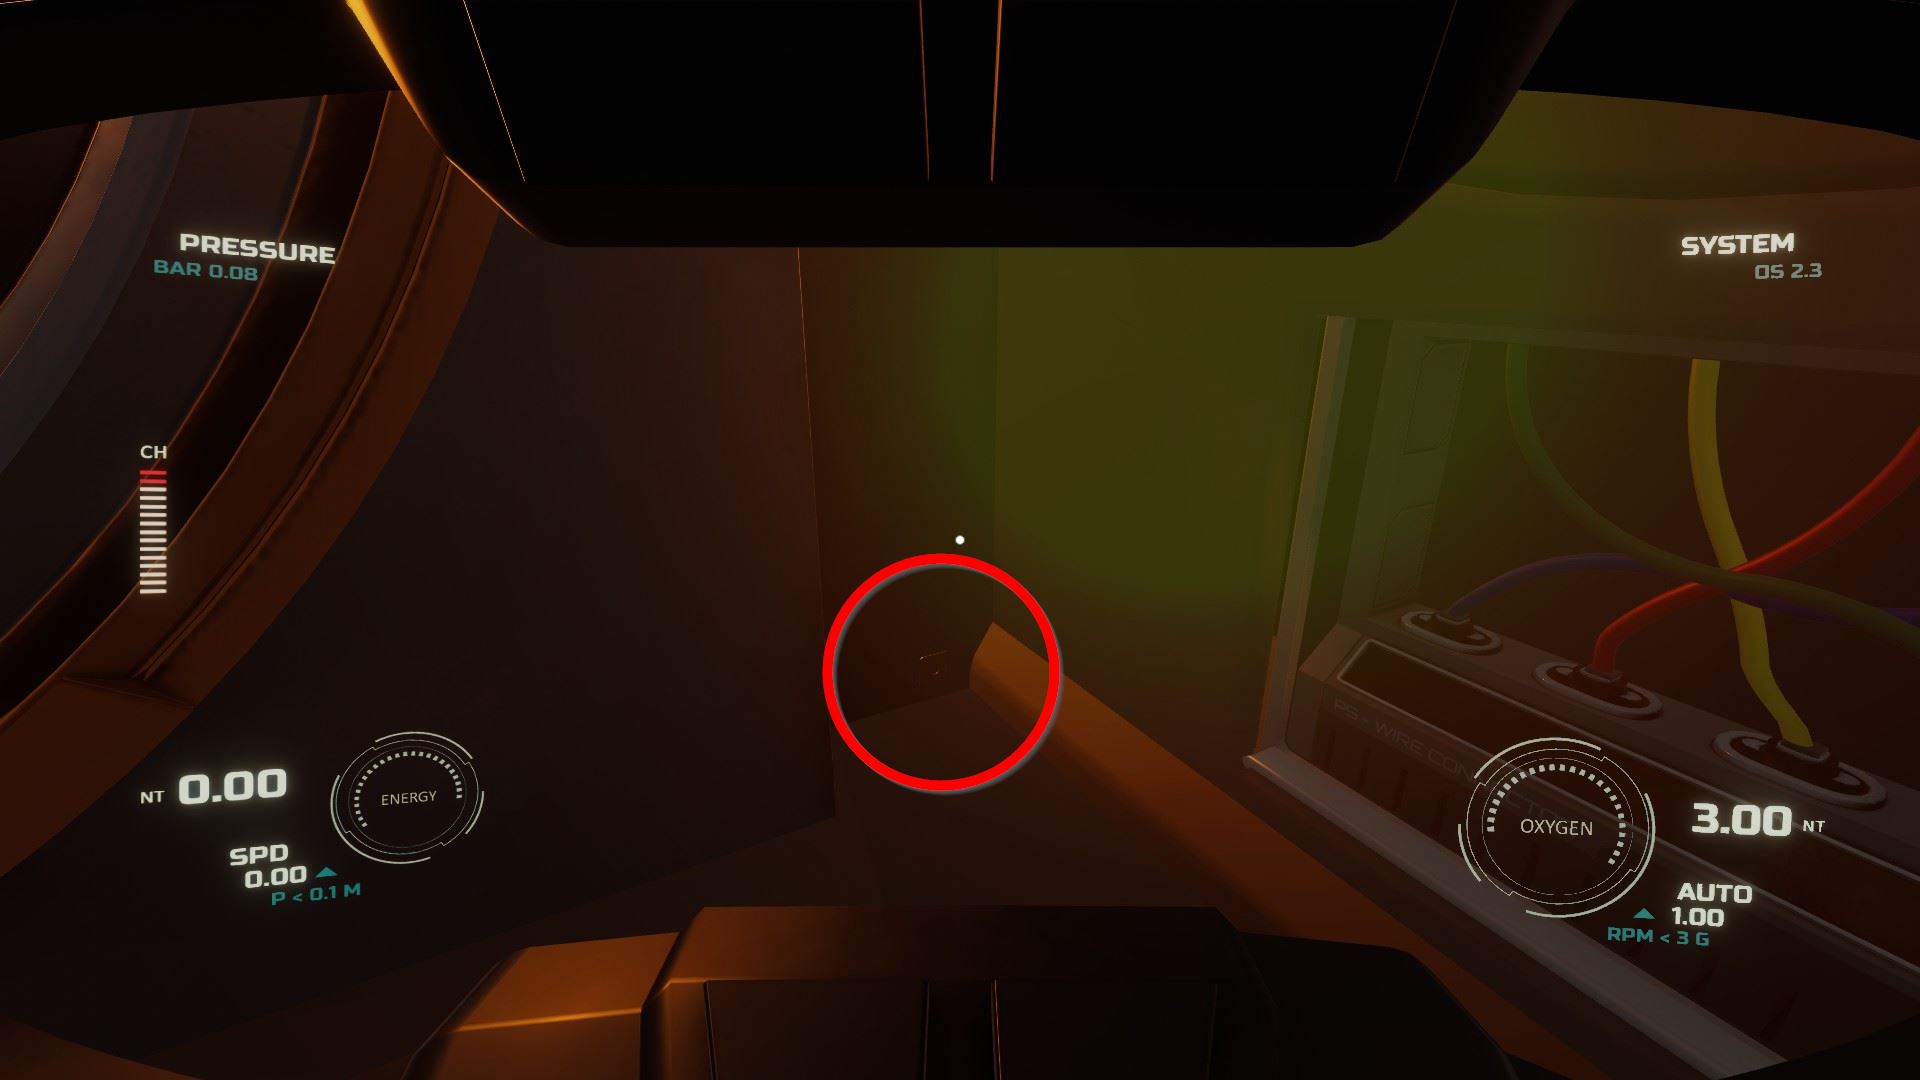
⏹ Token iii / viii - on the flight lid:
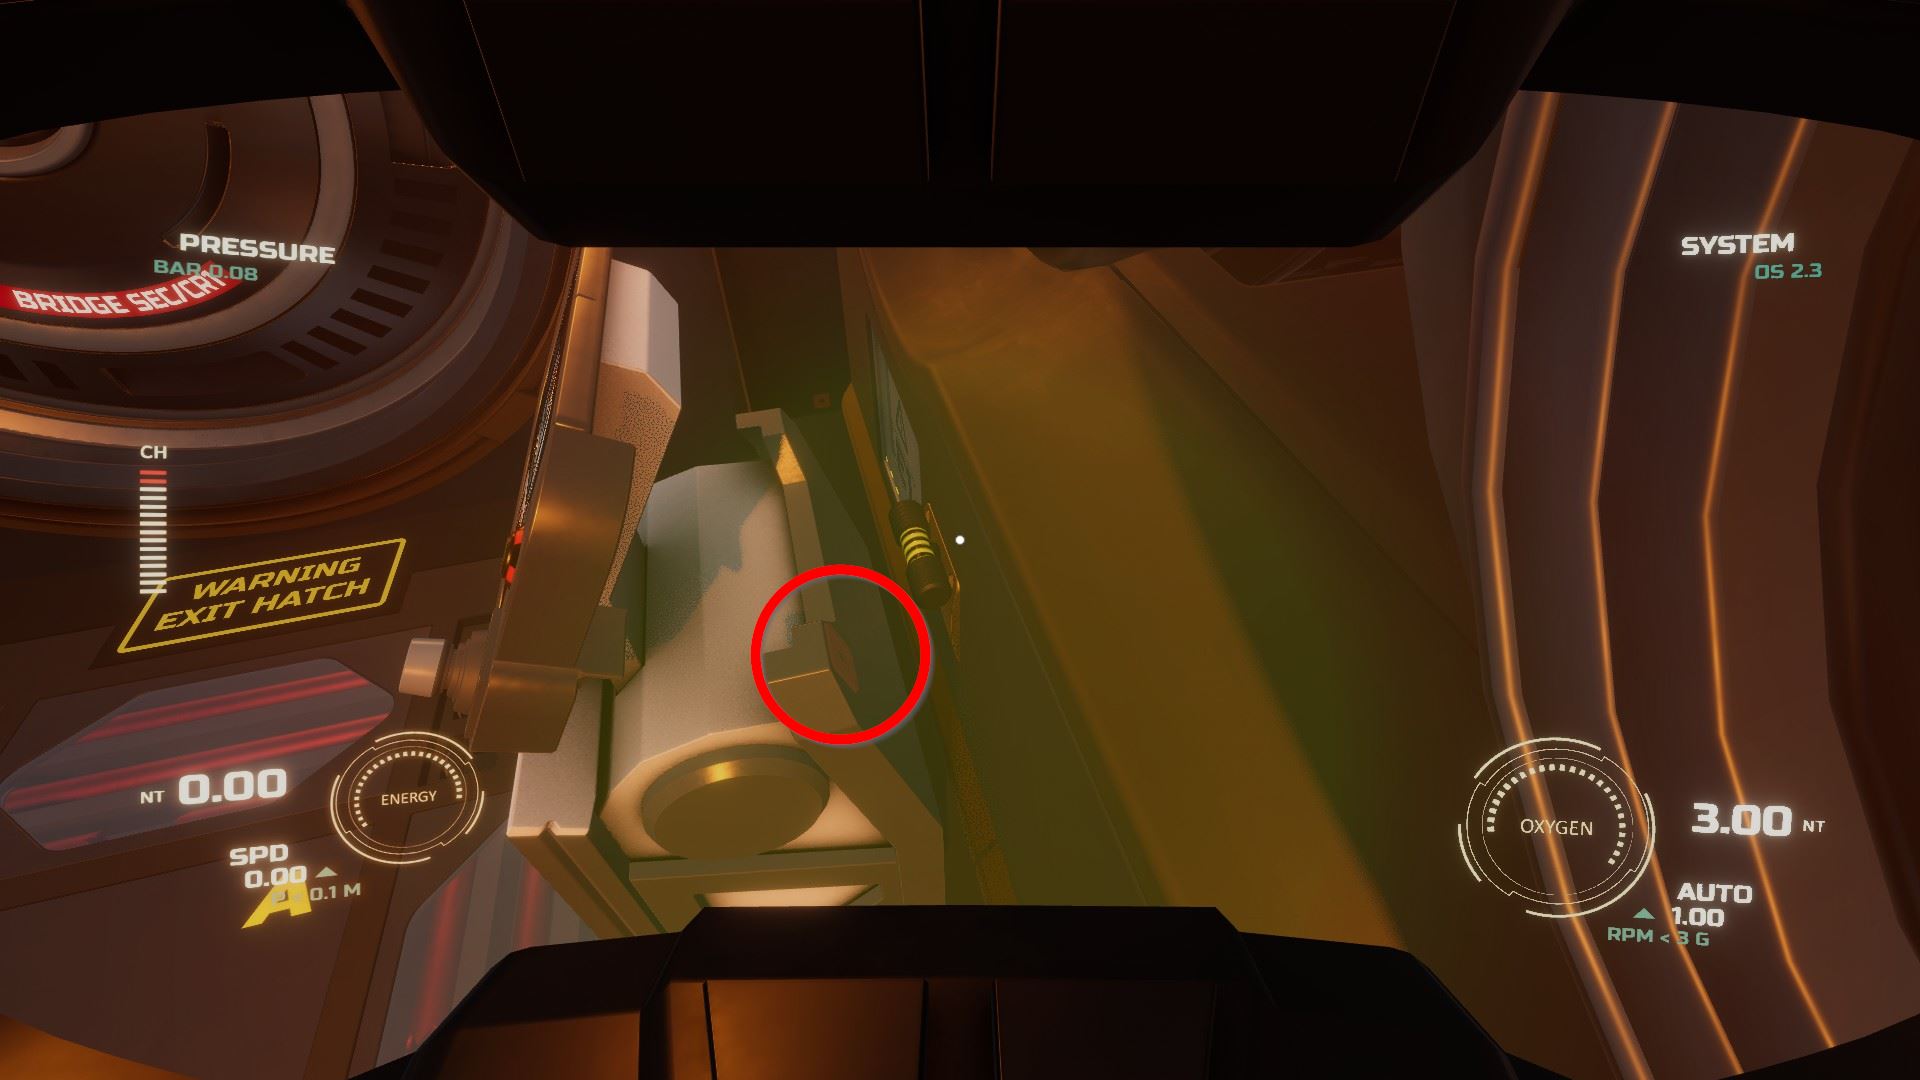
⏹ Token 4 / viii - on the top-left corner of the bed:

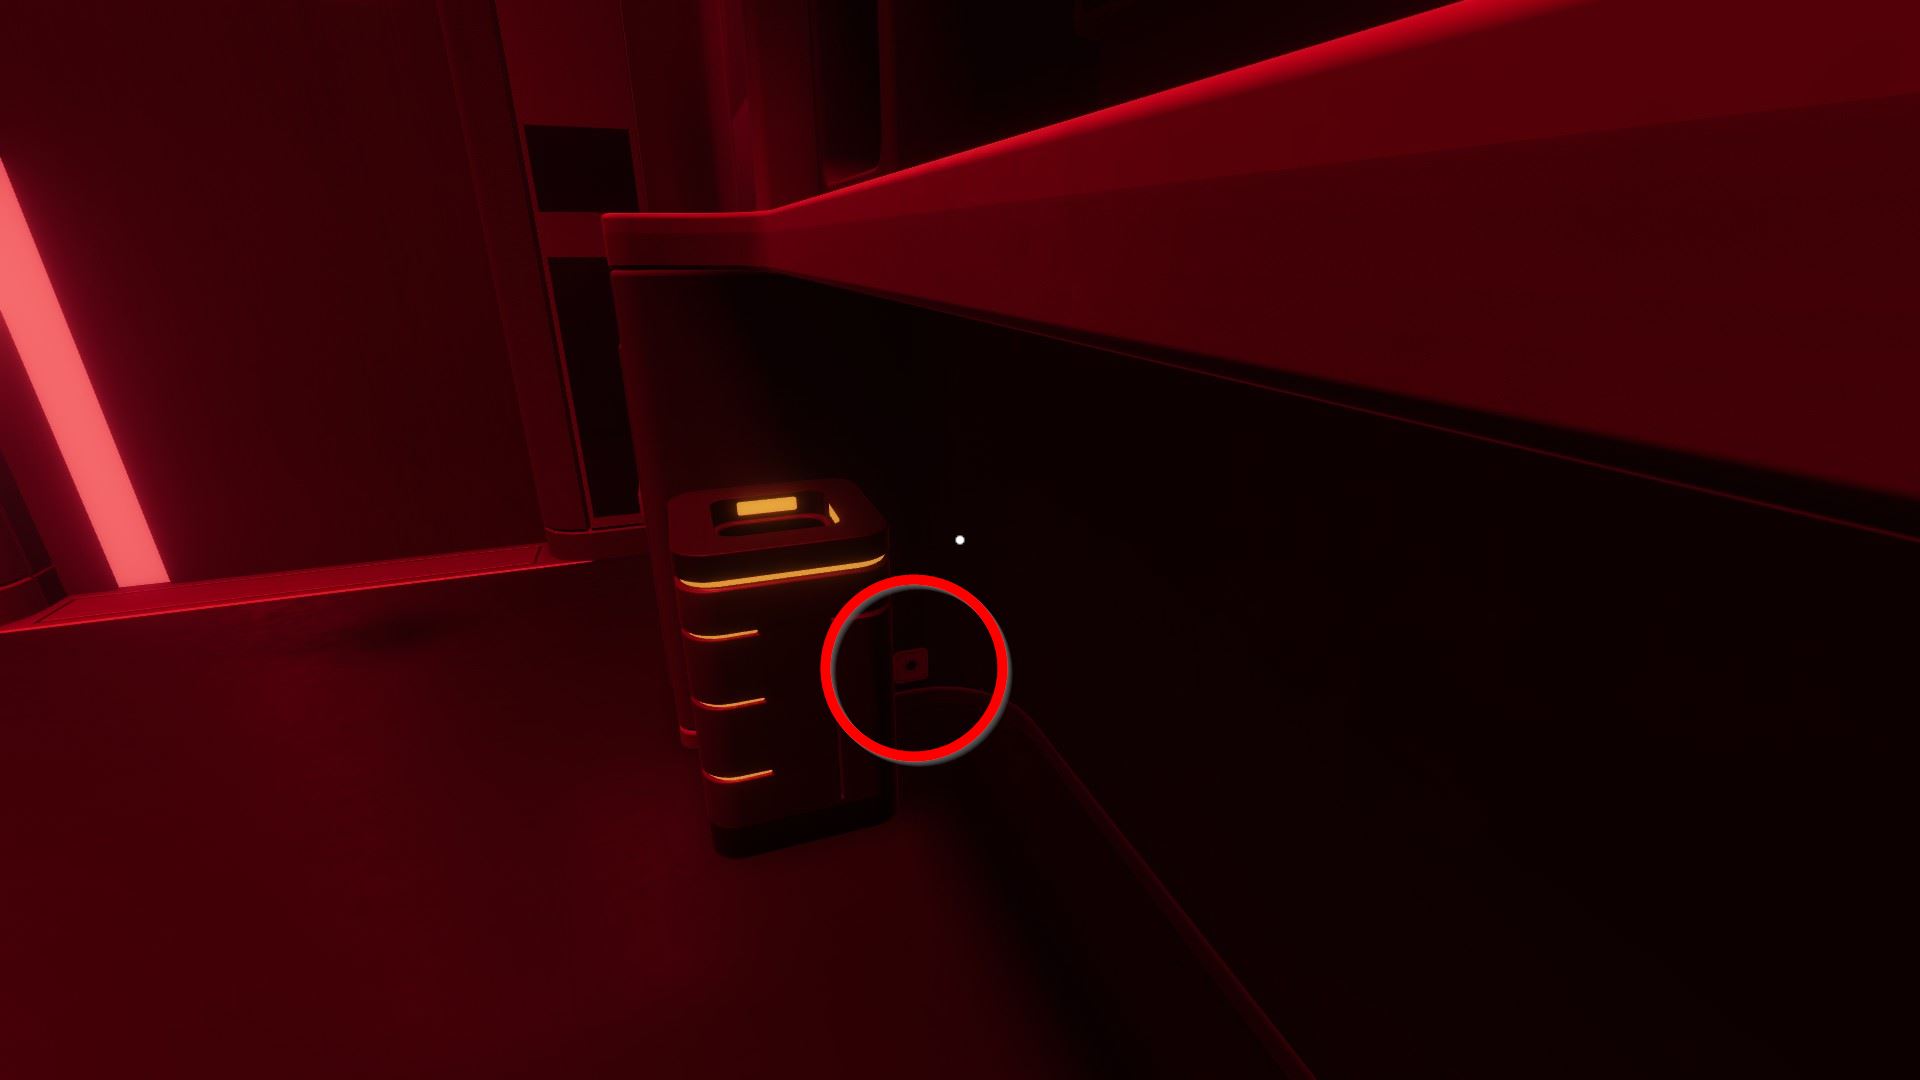
⏹ Token v / viii - inside the lock of the locker:
Suspension the drinking glass on the correct side of the door and option upwardly the wrench, then utilize it to remove the screws on the illuminated power panel on the floor.
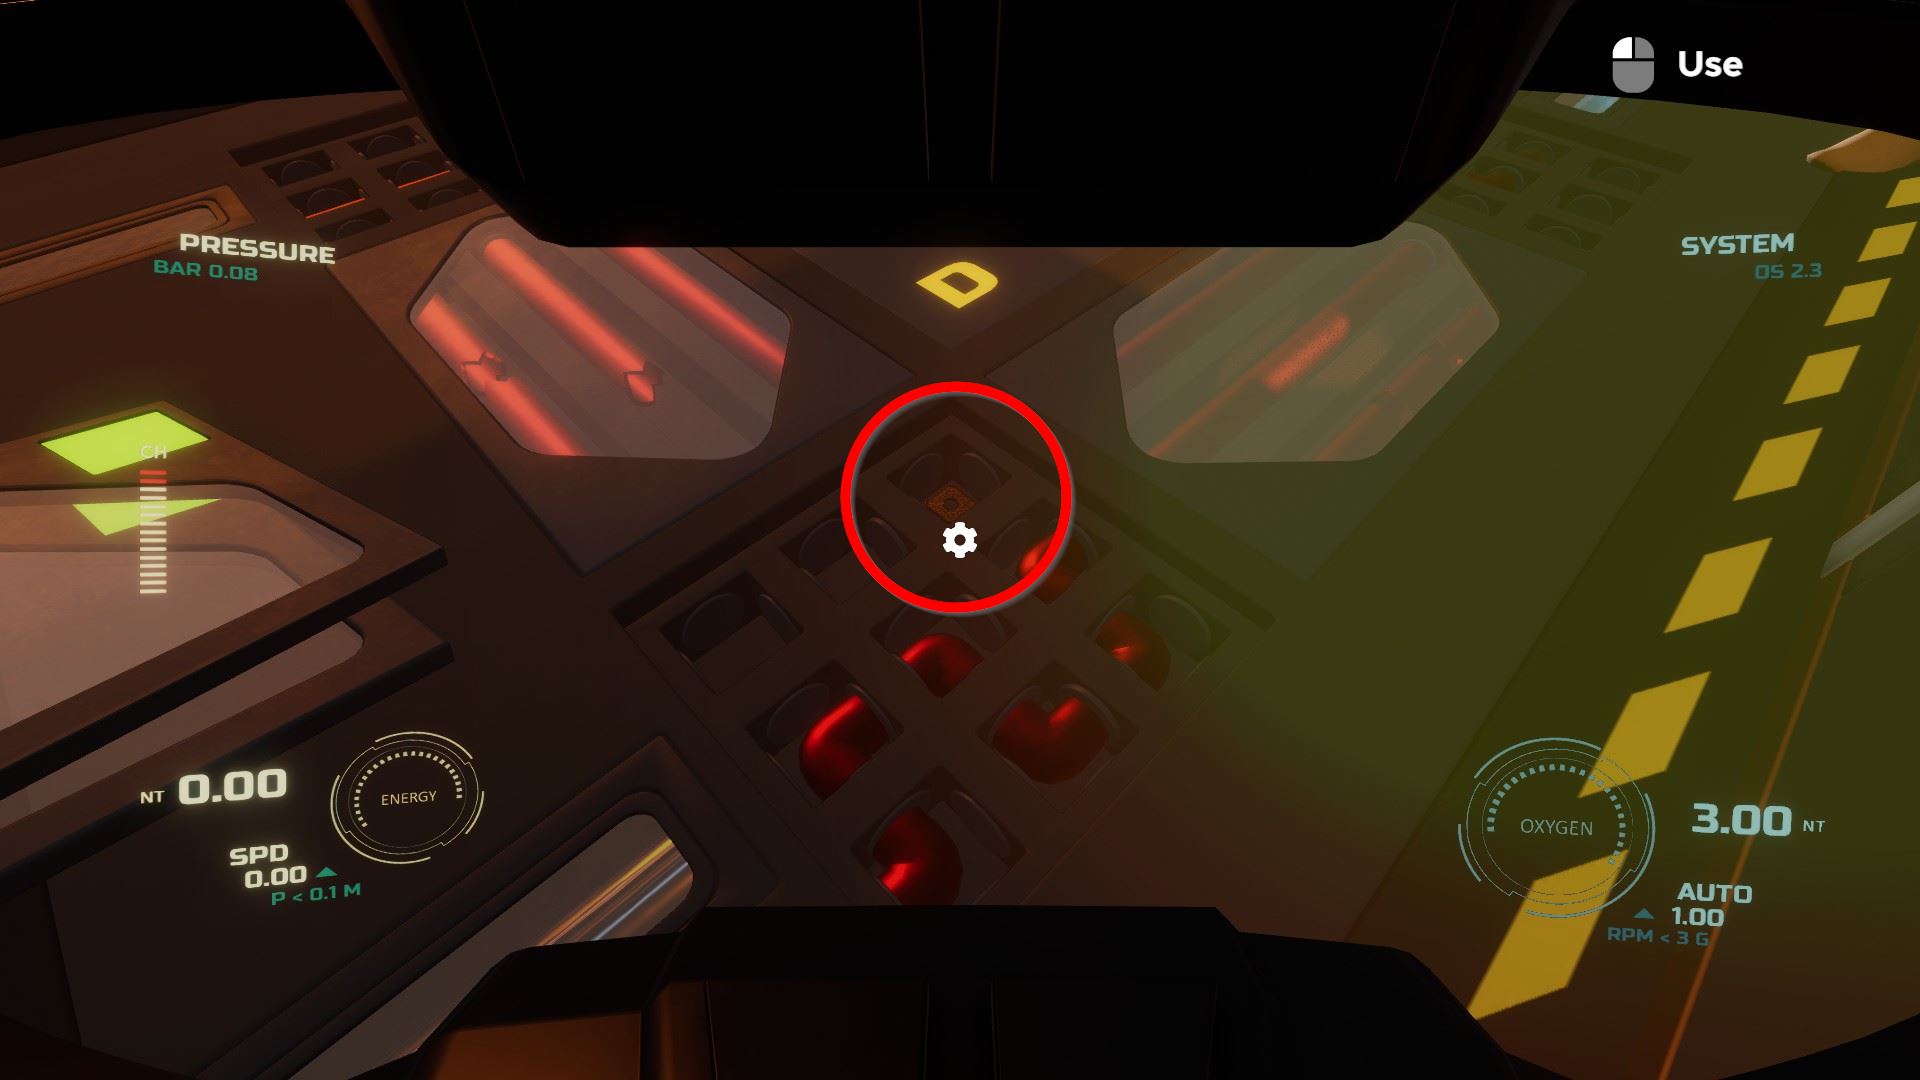
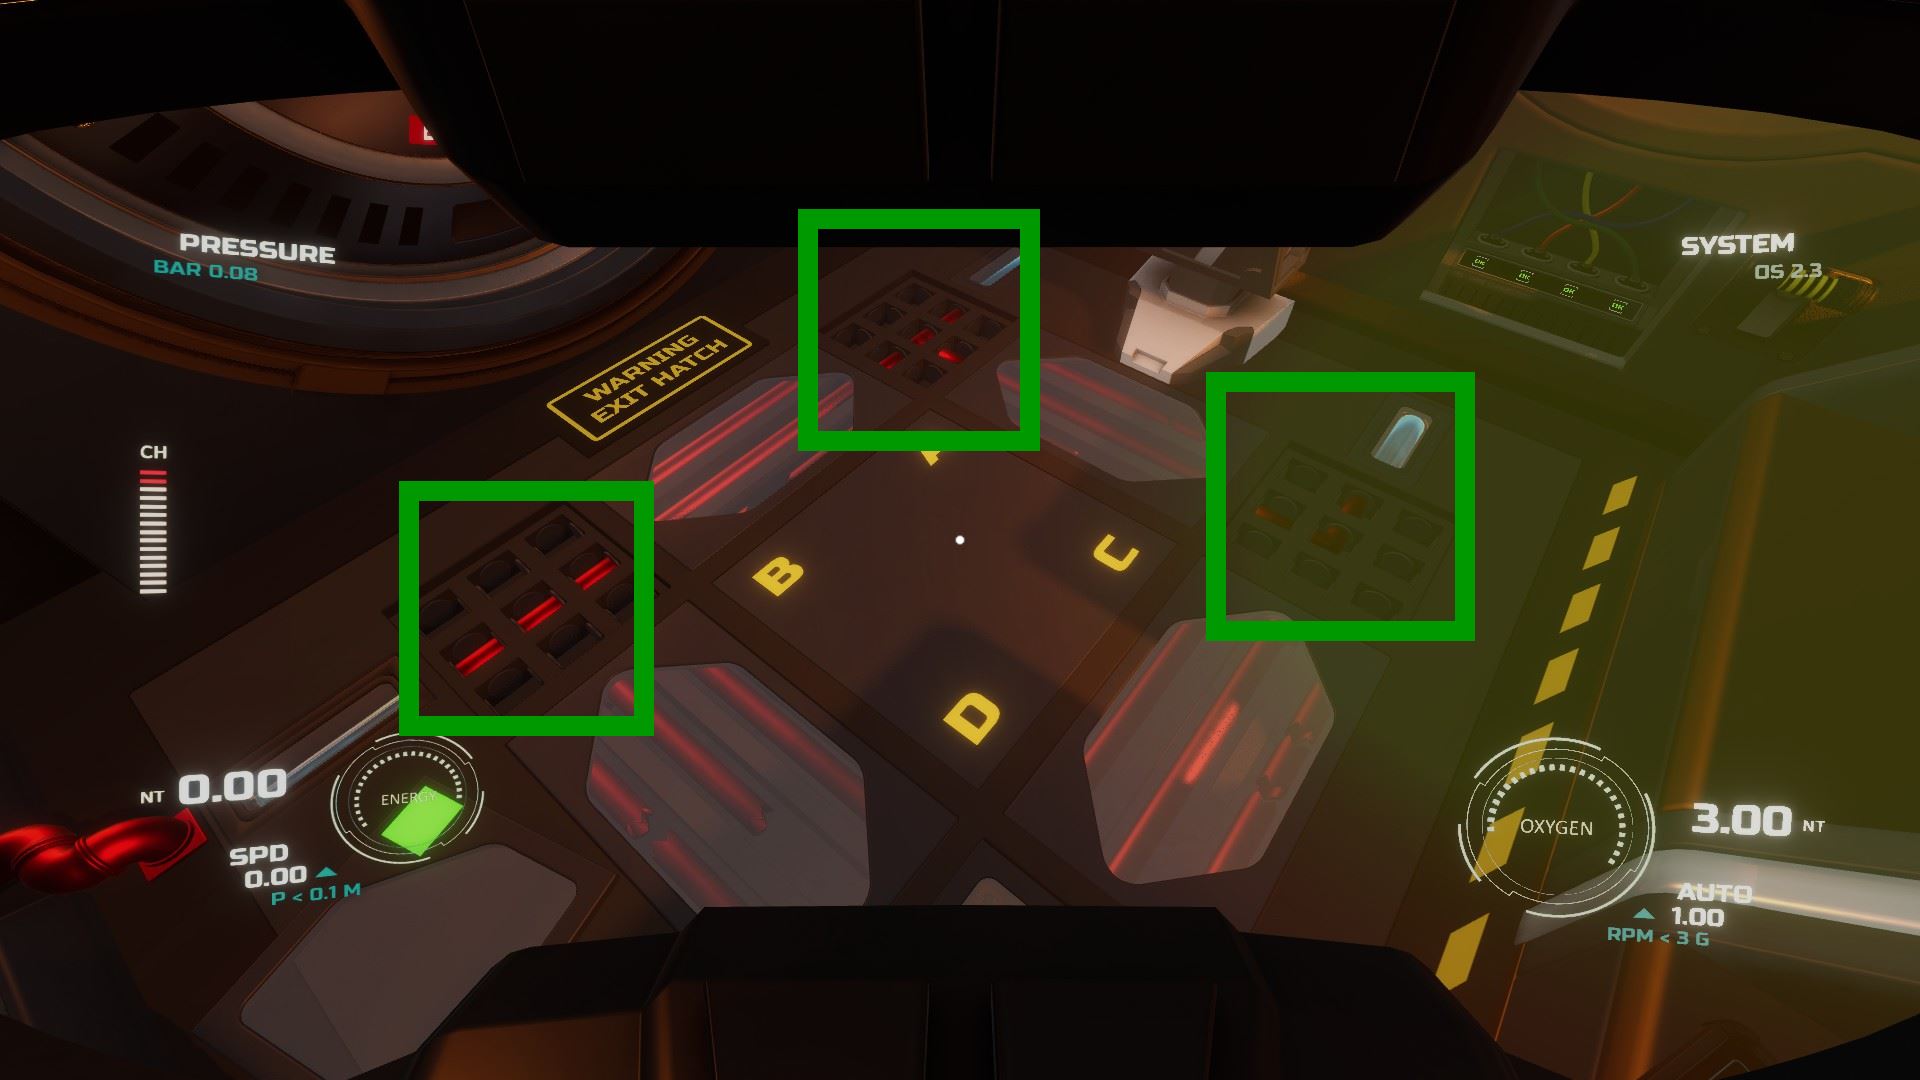
Rotate the power wheel so that it points to A - B - C - F positions at the same fourth dimension, and then pull the lever. (As explained in tablet PDA, to restore gravity)
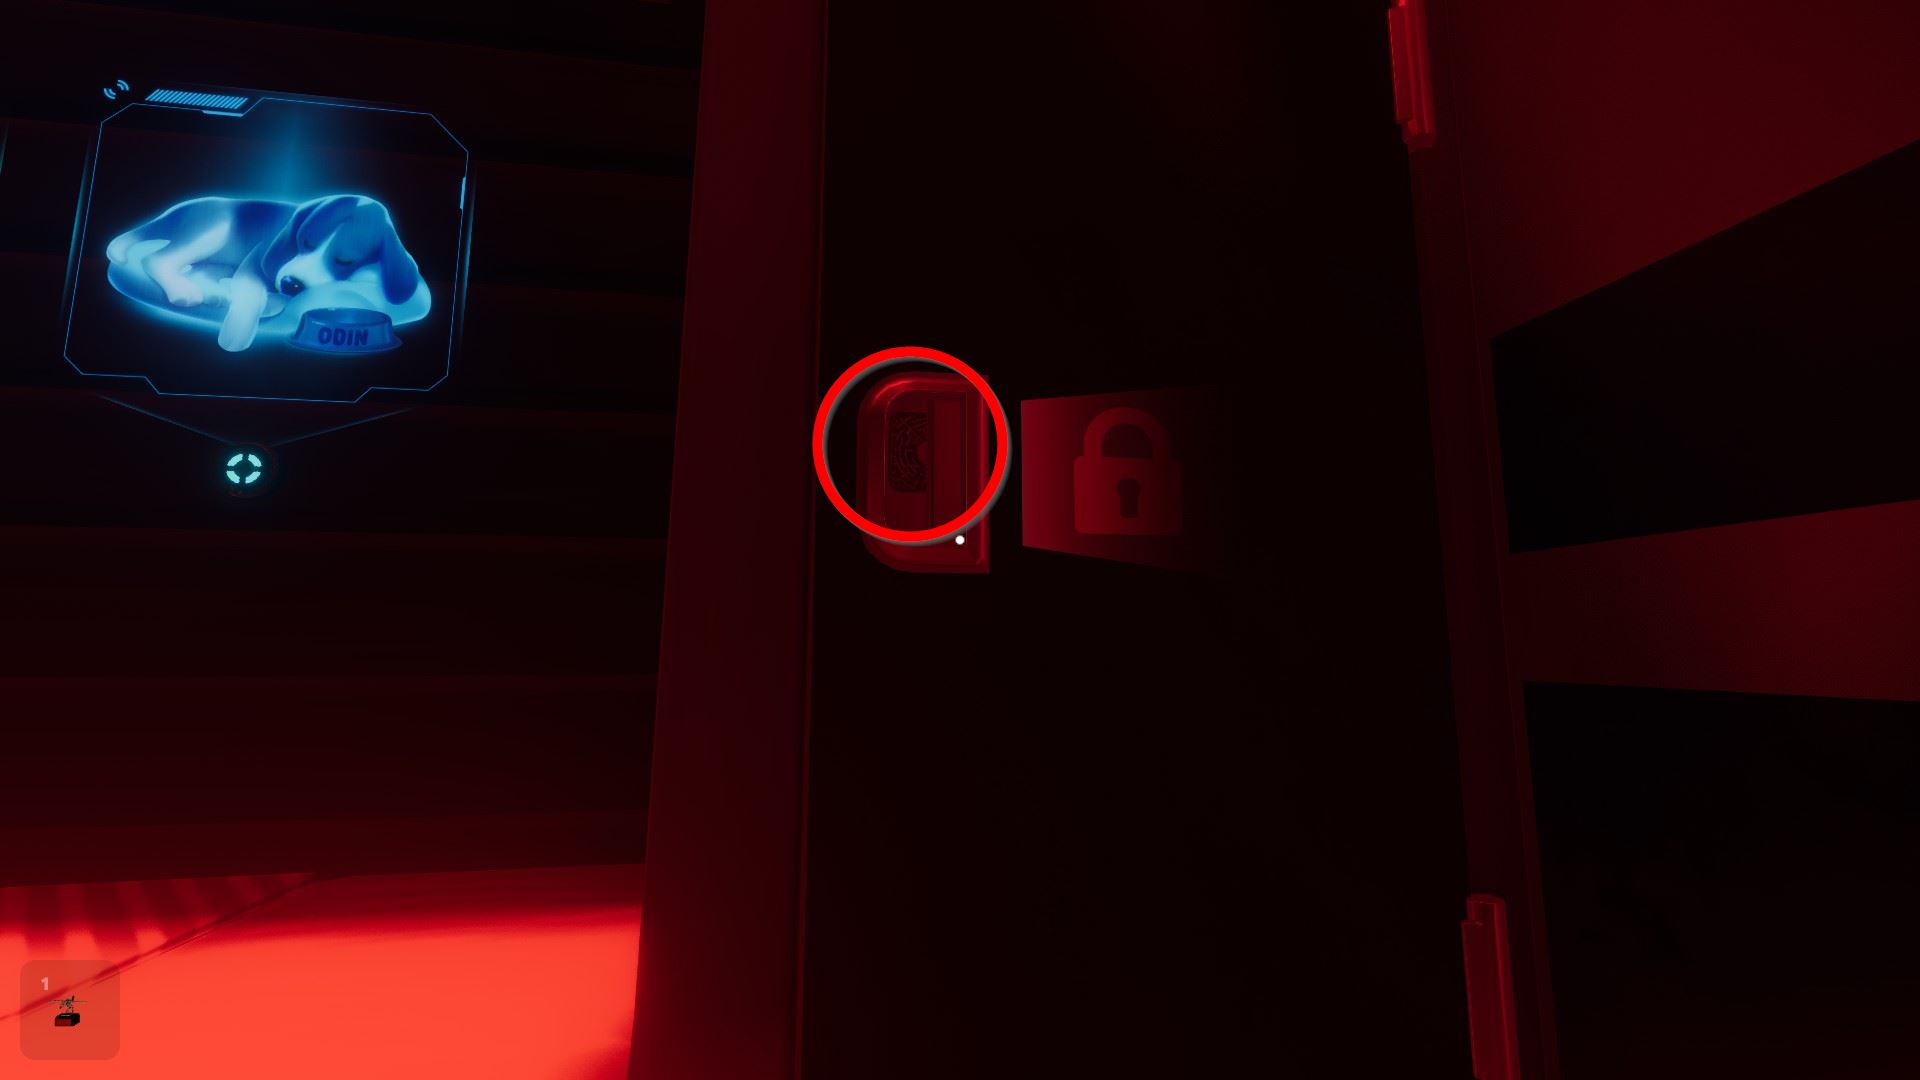
Access the computer using the security hints plant on nearby objects (Rocket with 7, trophy with star, dog projection 'ODIN')
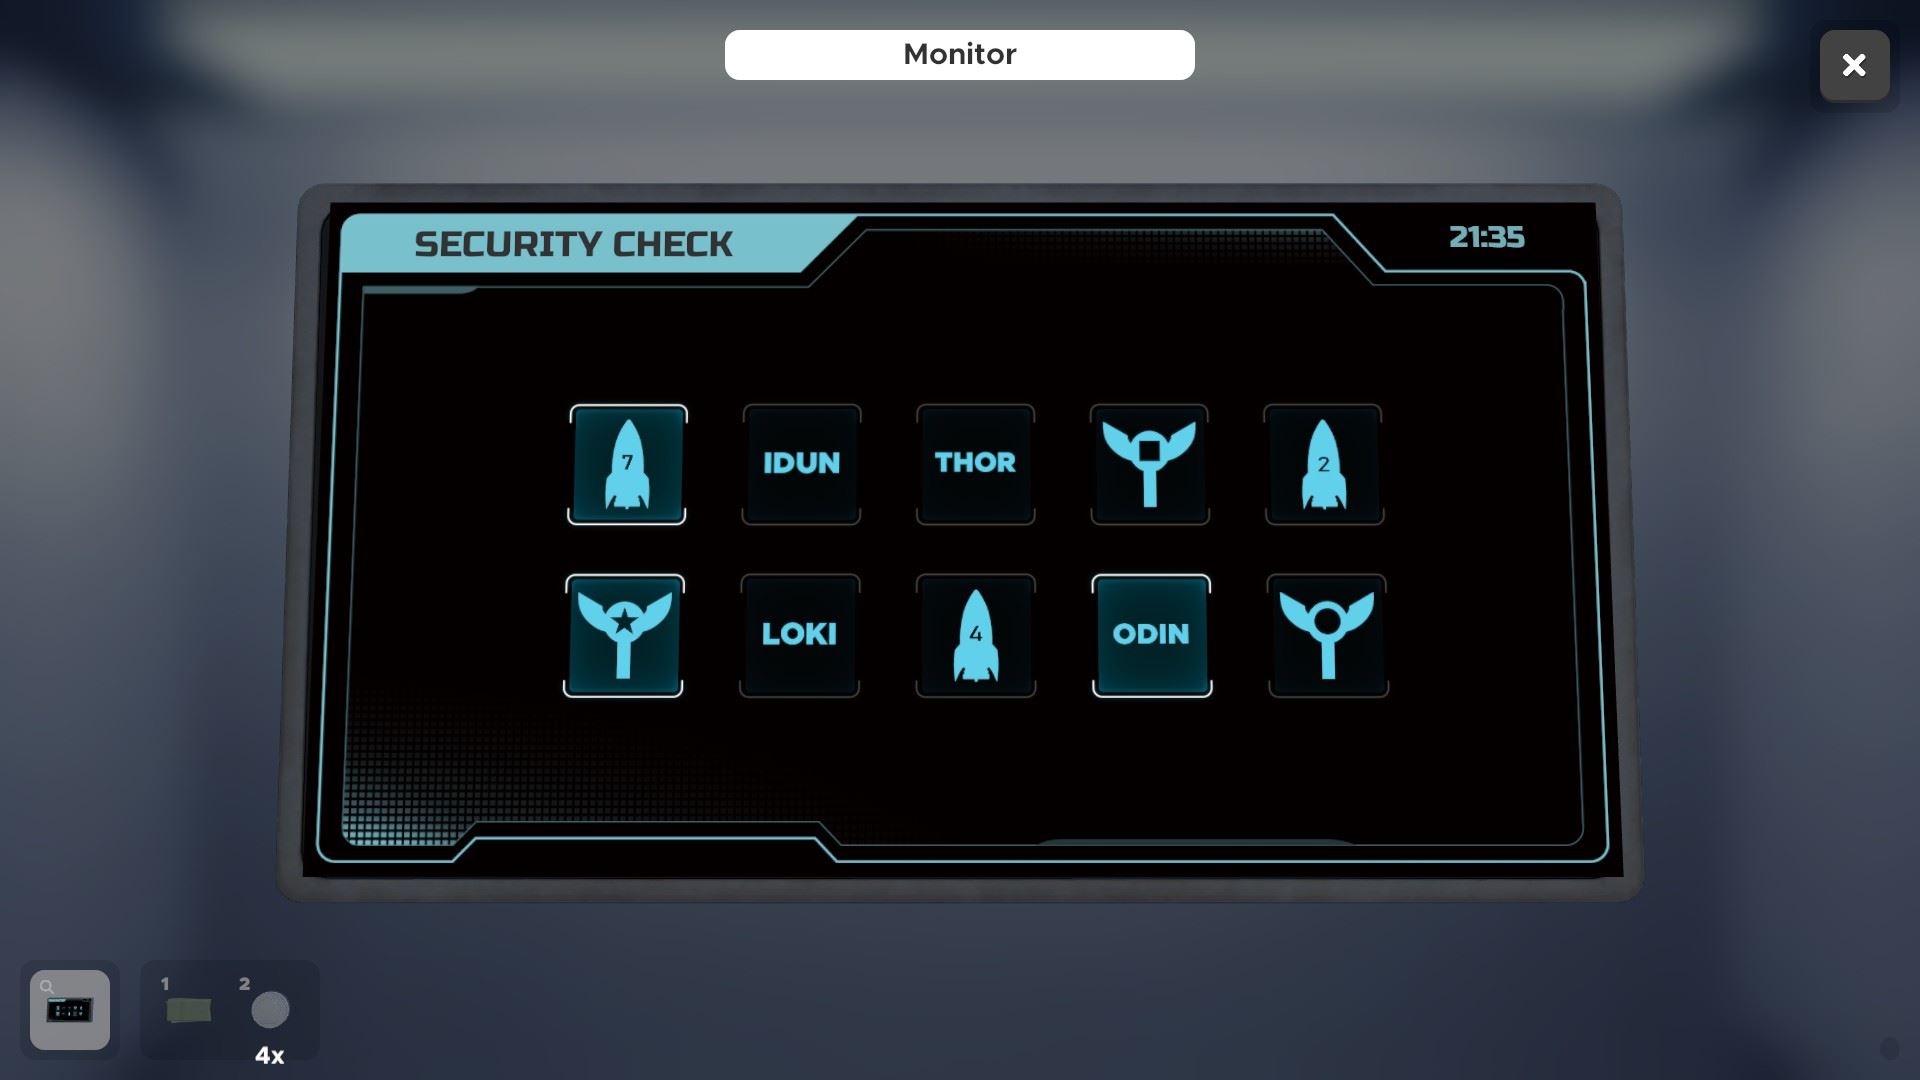
In the cogwheel menu, use the heart push to have the blinds come up down, every bit this will let u.s. access another token.
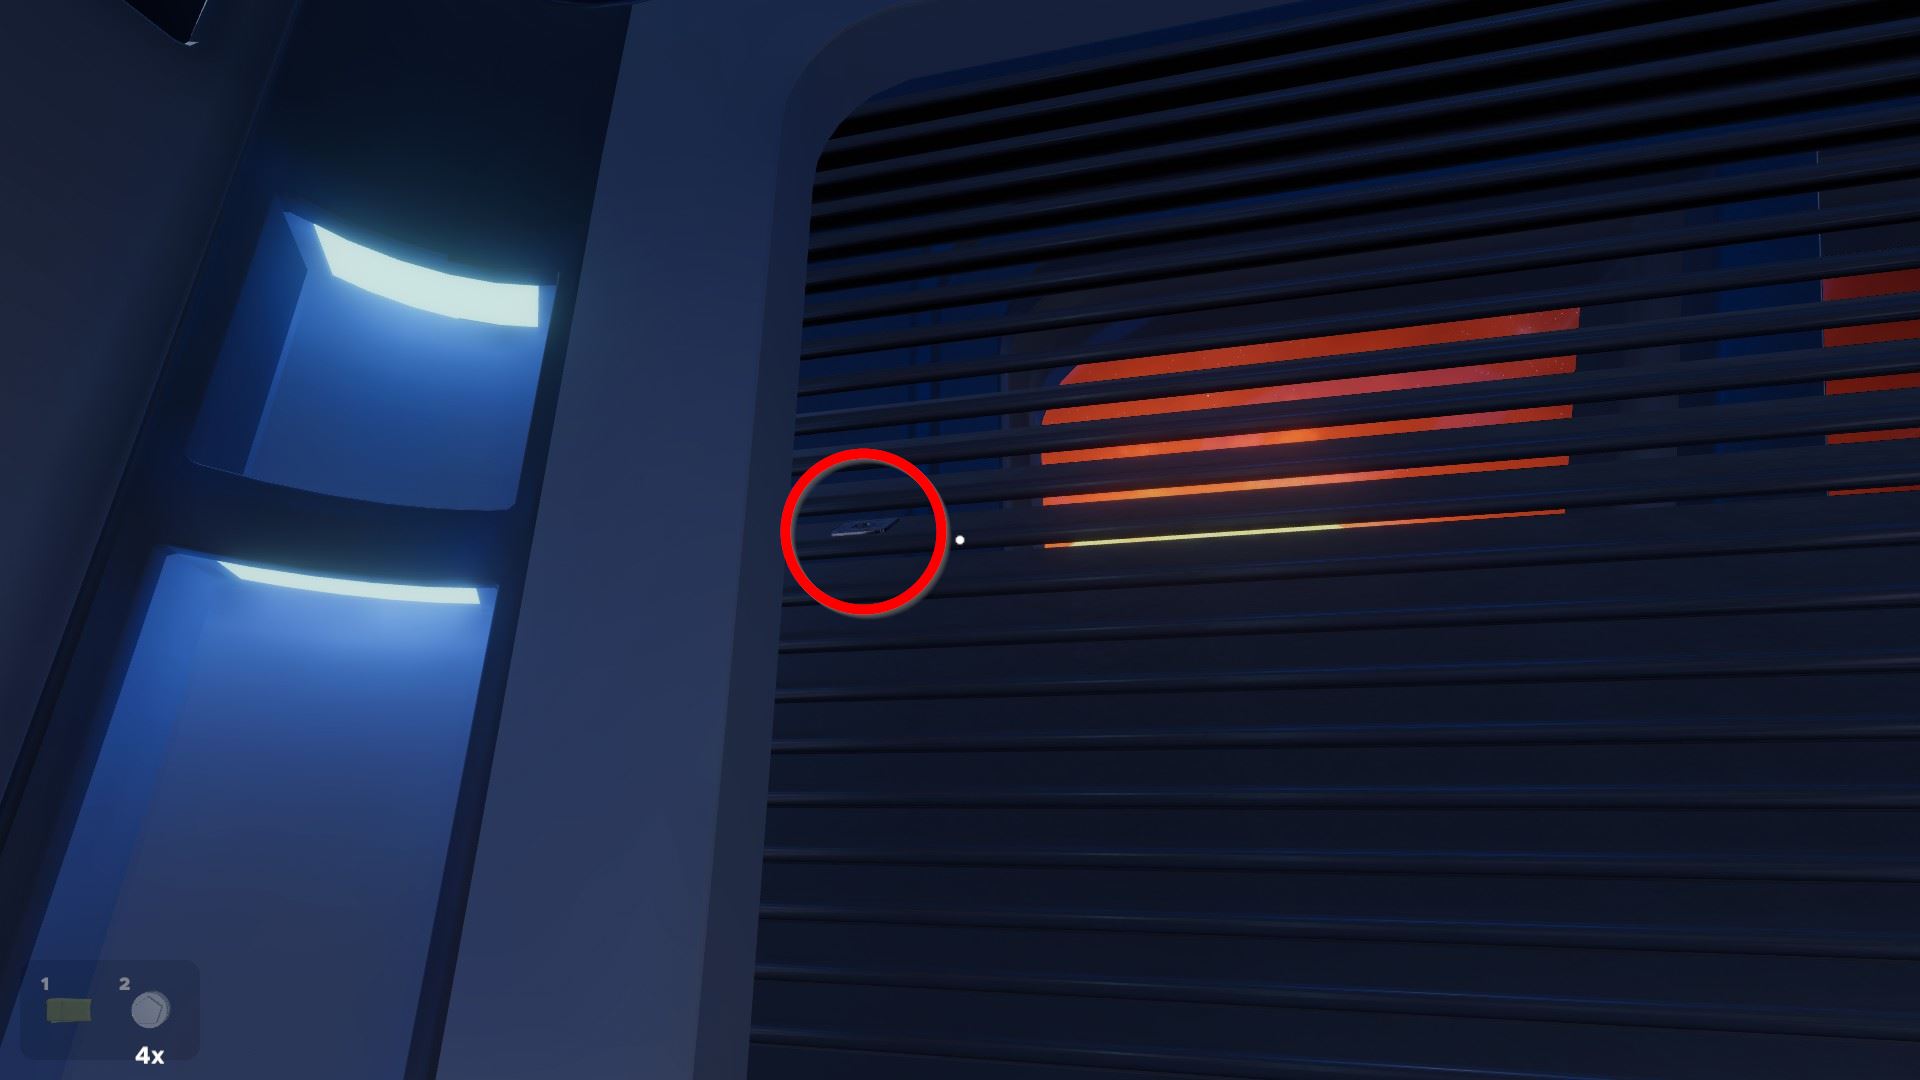
⏹ Token 6 / eight - on the left side of the window blinds:
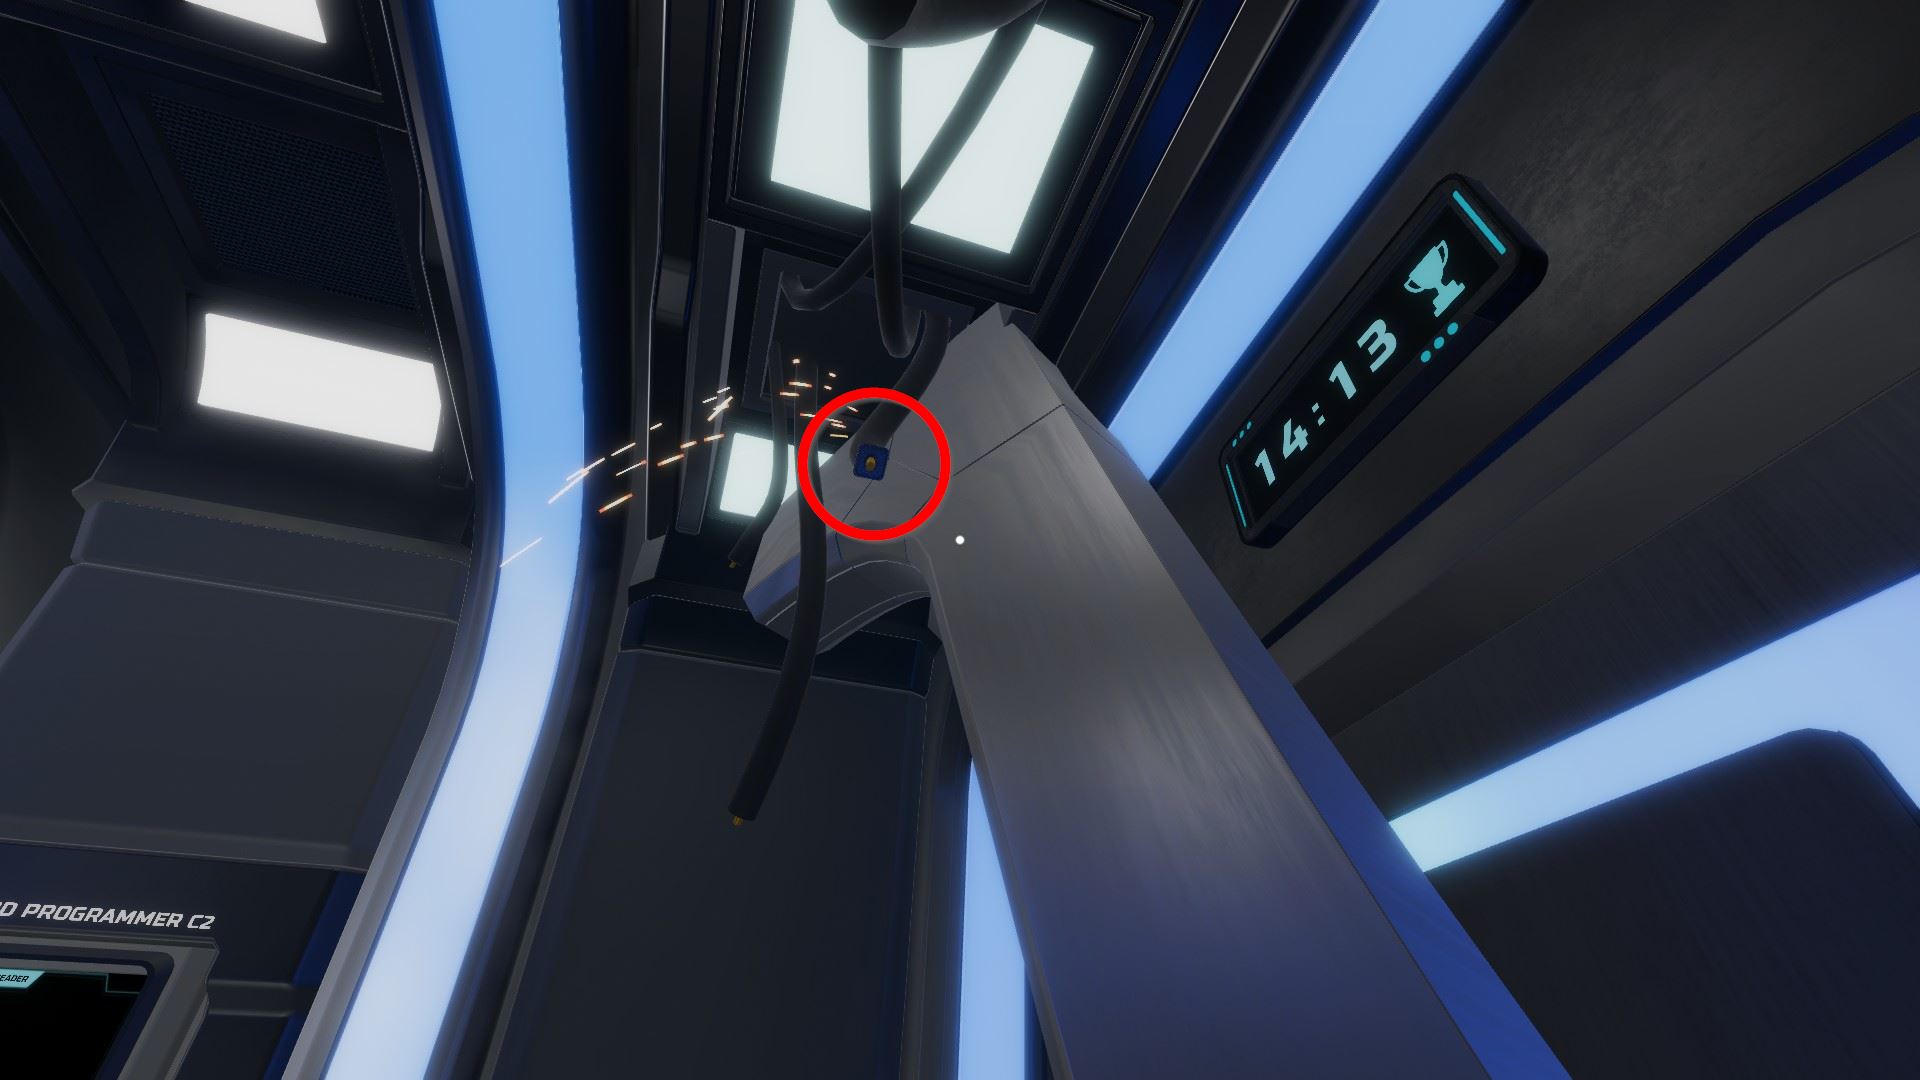
⏹ Token 7 / 8 - afterwards the calorie-free turns on, it's much easier to run across the adjacent token:

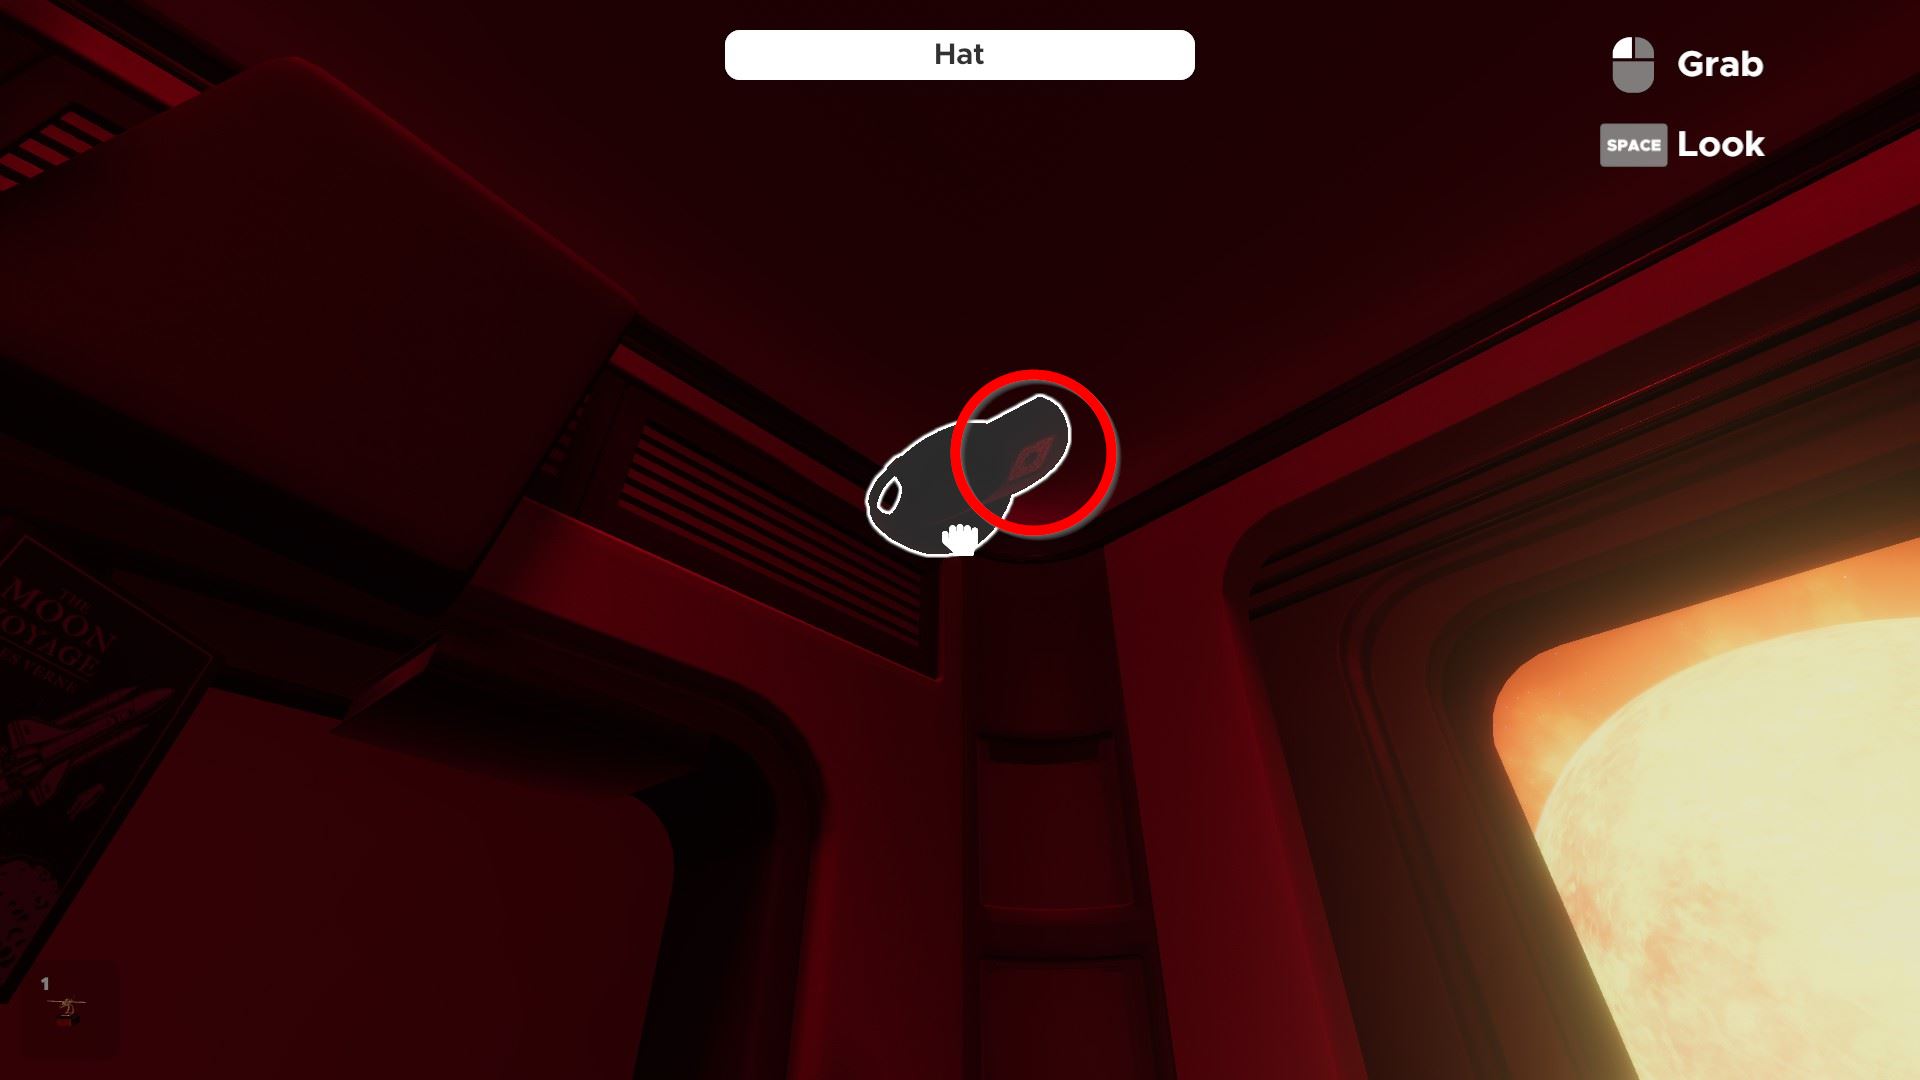
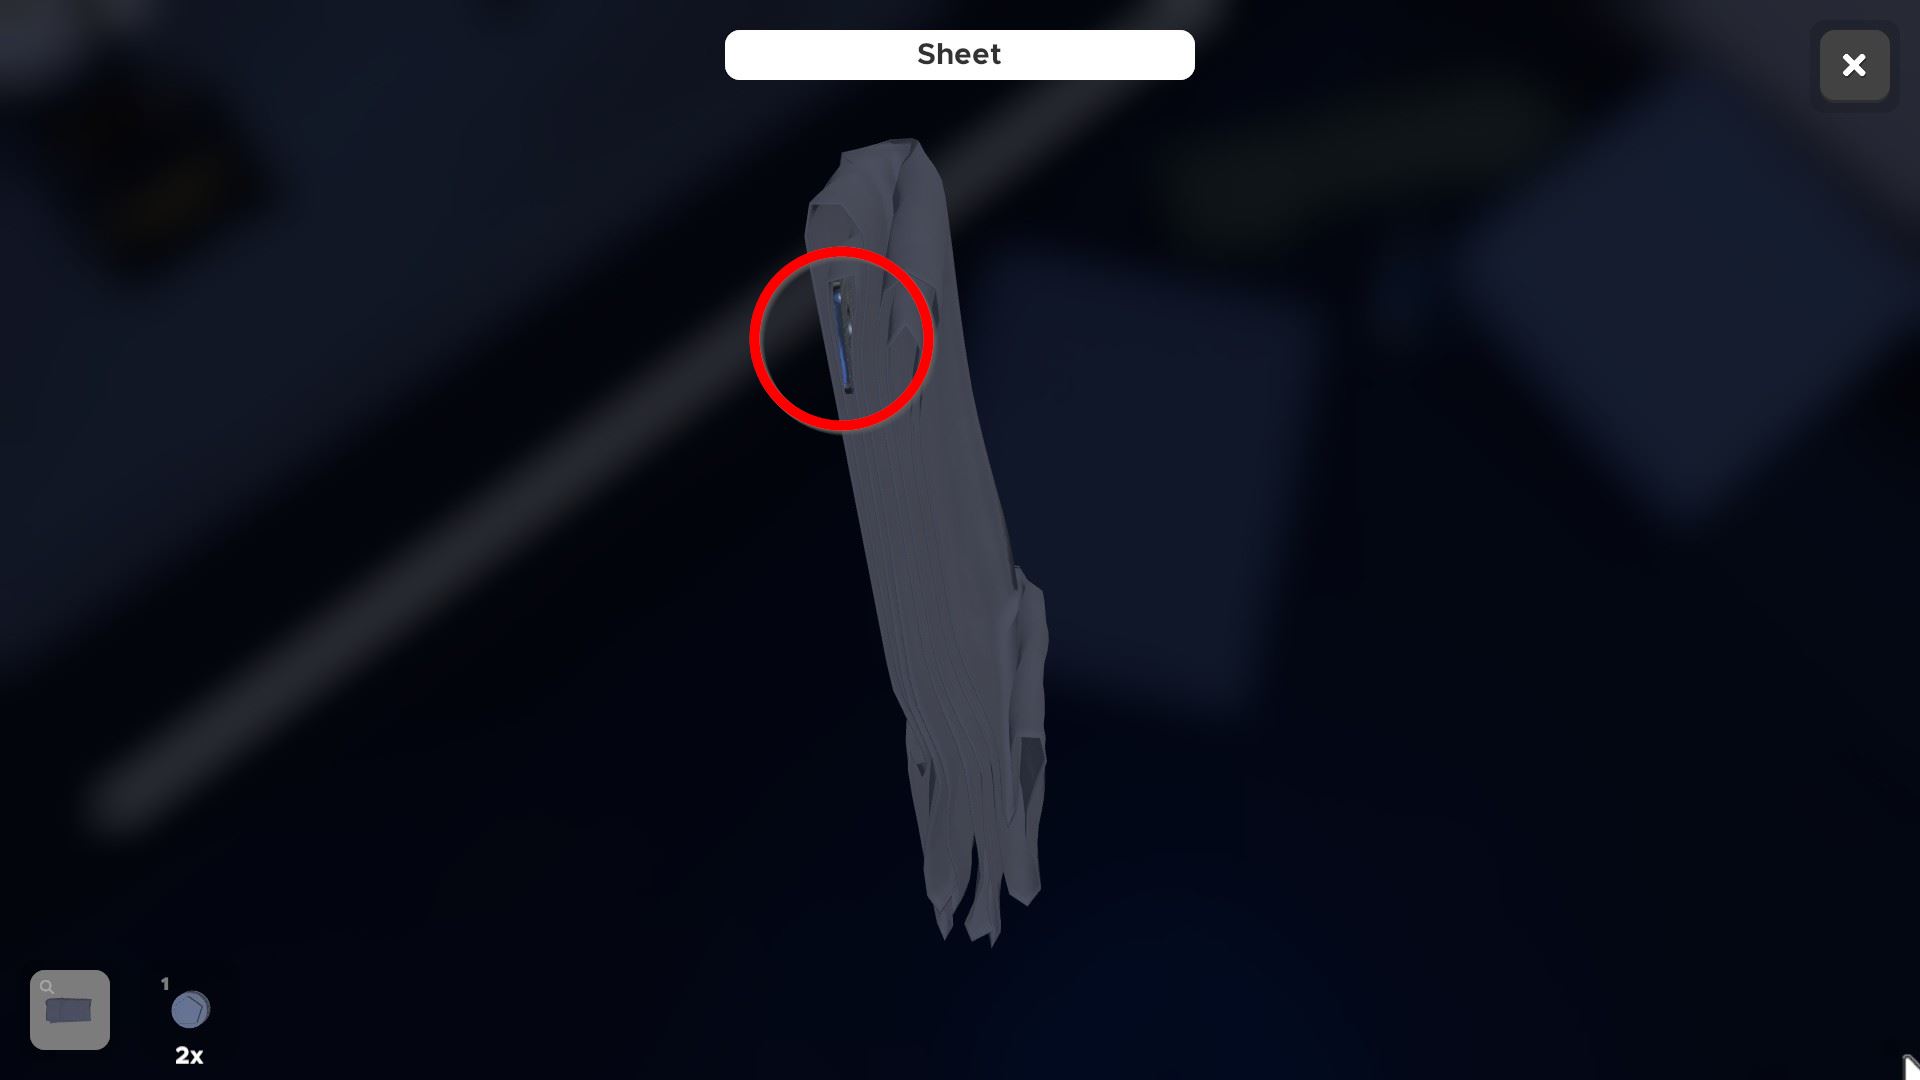
⏹ Token 8 / 8 - in the locker above the bed, within the gray sheet from the compartment in a higher place the dog picture:
On the computer cog menu, click the door button (leftmost) five times to activate the door override.
Open the toolbox, option up the triangle shaped tool. Insert this into the port on the left of the door. The chapeau opens and reveals space for iii batteries.
I battery is floating initially, one tin be constitute in the drawer on the right of the PC, while the 3rd has to exist taken from the battery compartment of the robotoy in the left drawer higher up the bed. Don't accidentally use the corroded battery.
Press on the fingerprint scanner to end the level.
Adrift in Space: Hallway Blow
⏹ Token i / viii - on one of the cables:
⏹ Token 2 / 8 - on the dorsum of the drone:
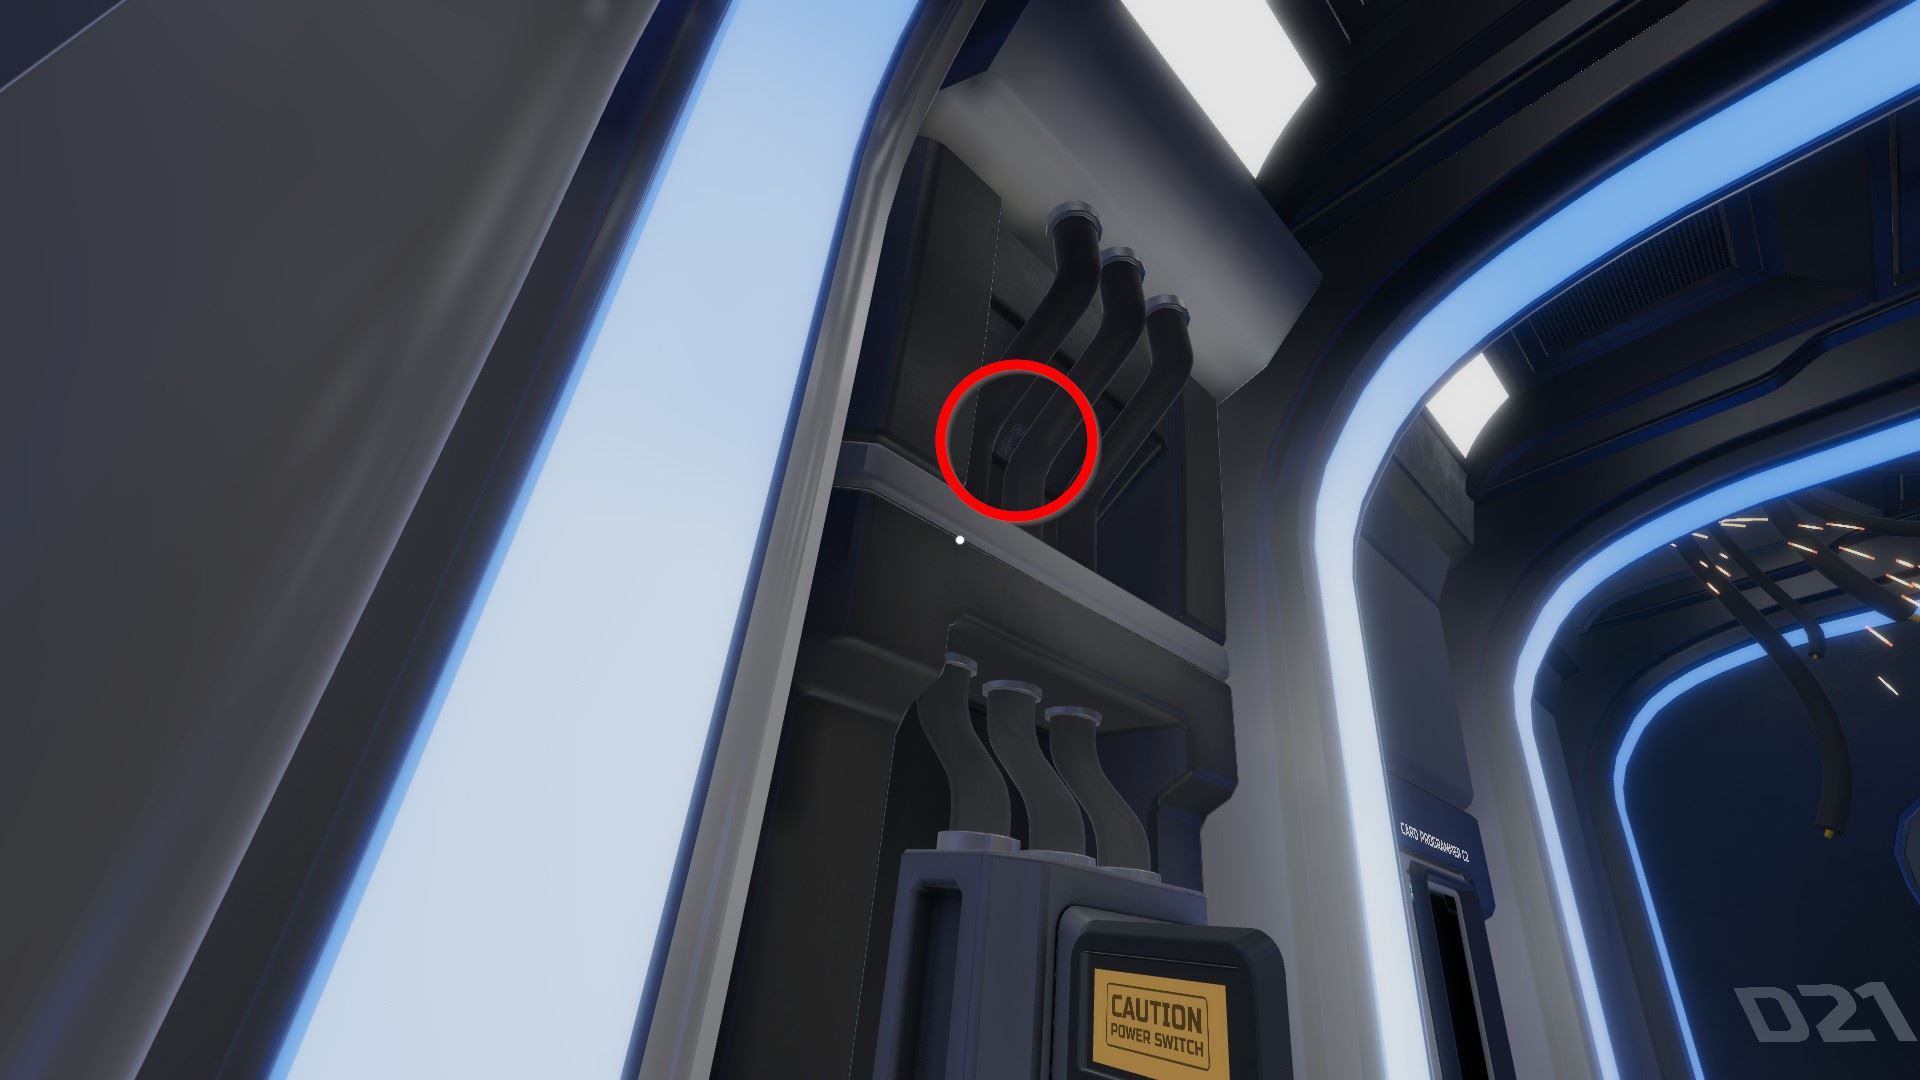
⏹ Token iii / 8 - behind the cables above the power box:
⏹ Token four / 8 - inside the fingerprint locked locker, at the height of the lowest shelf:
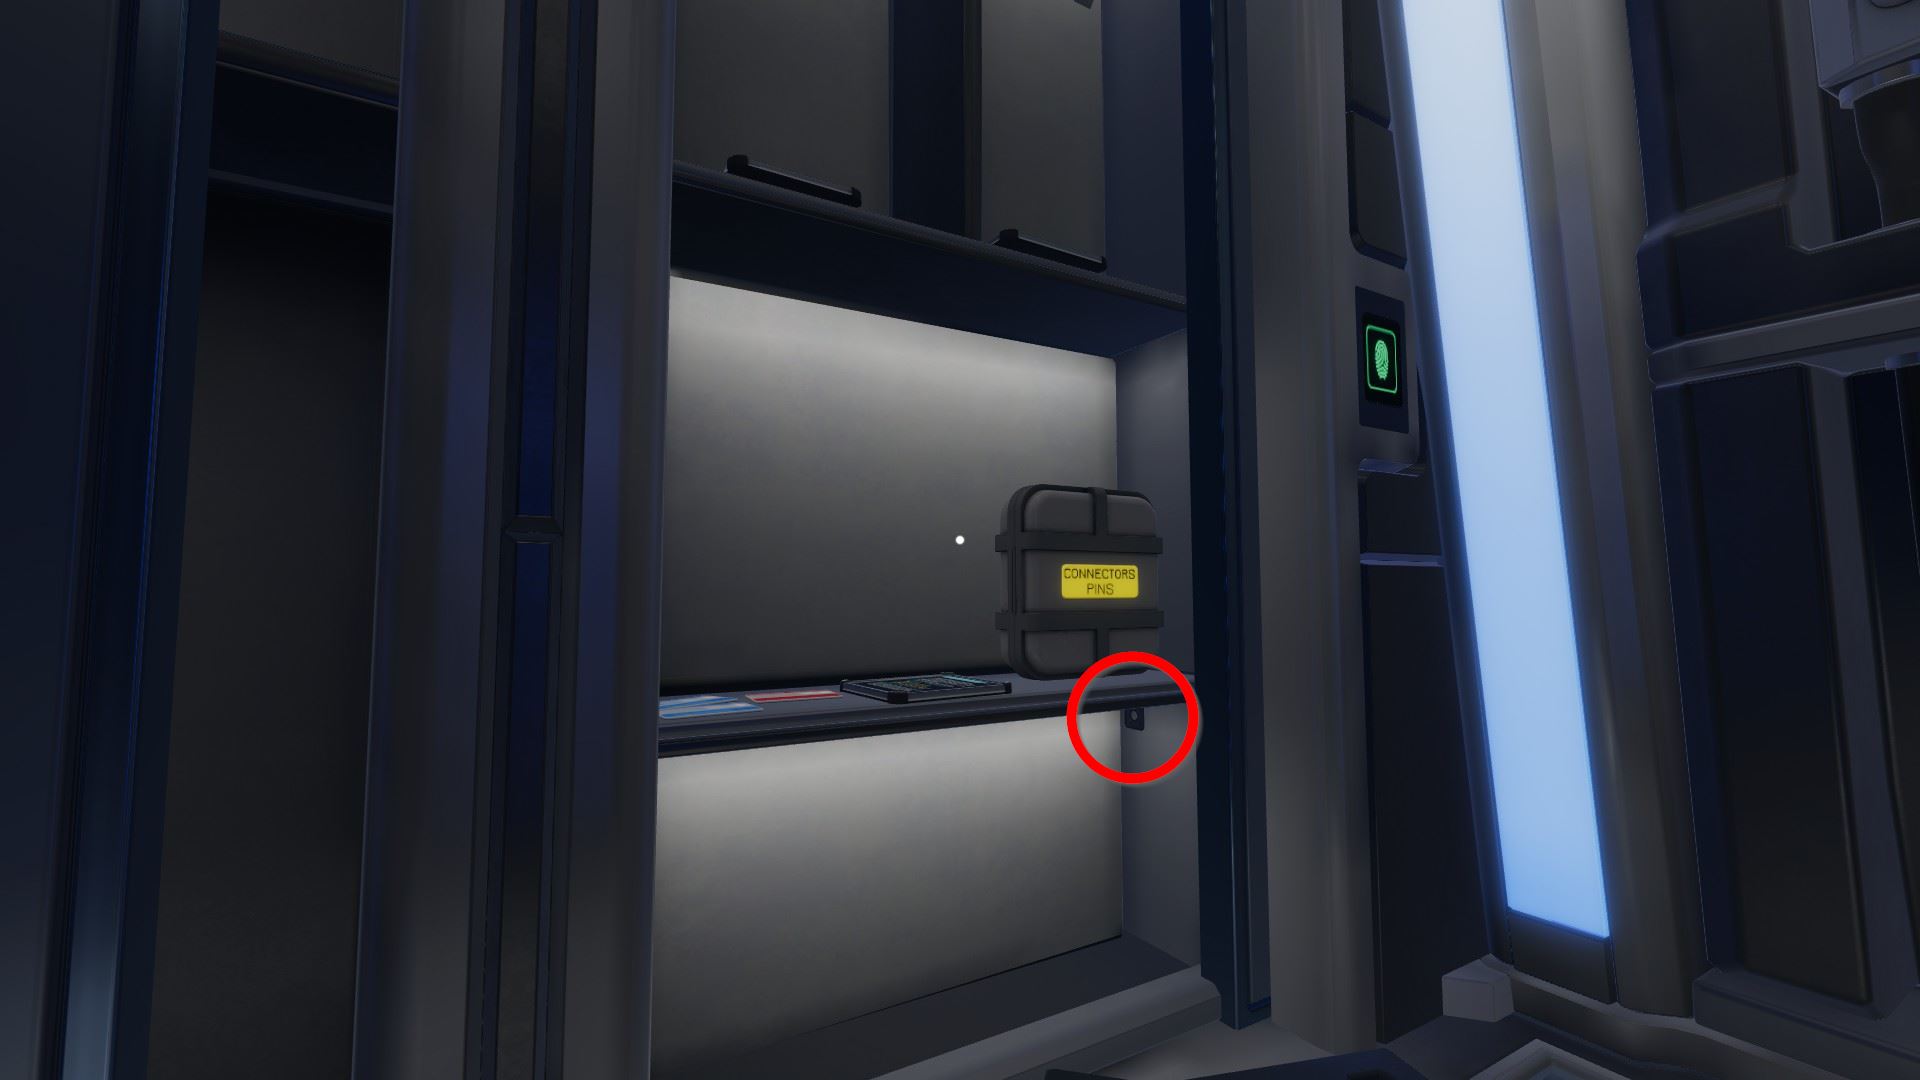
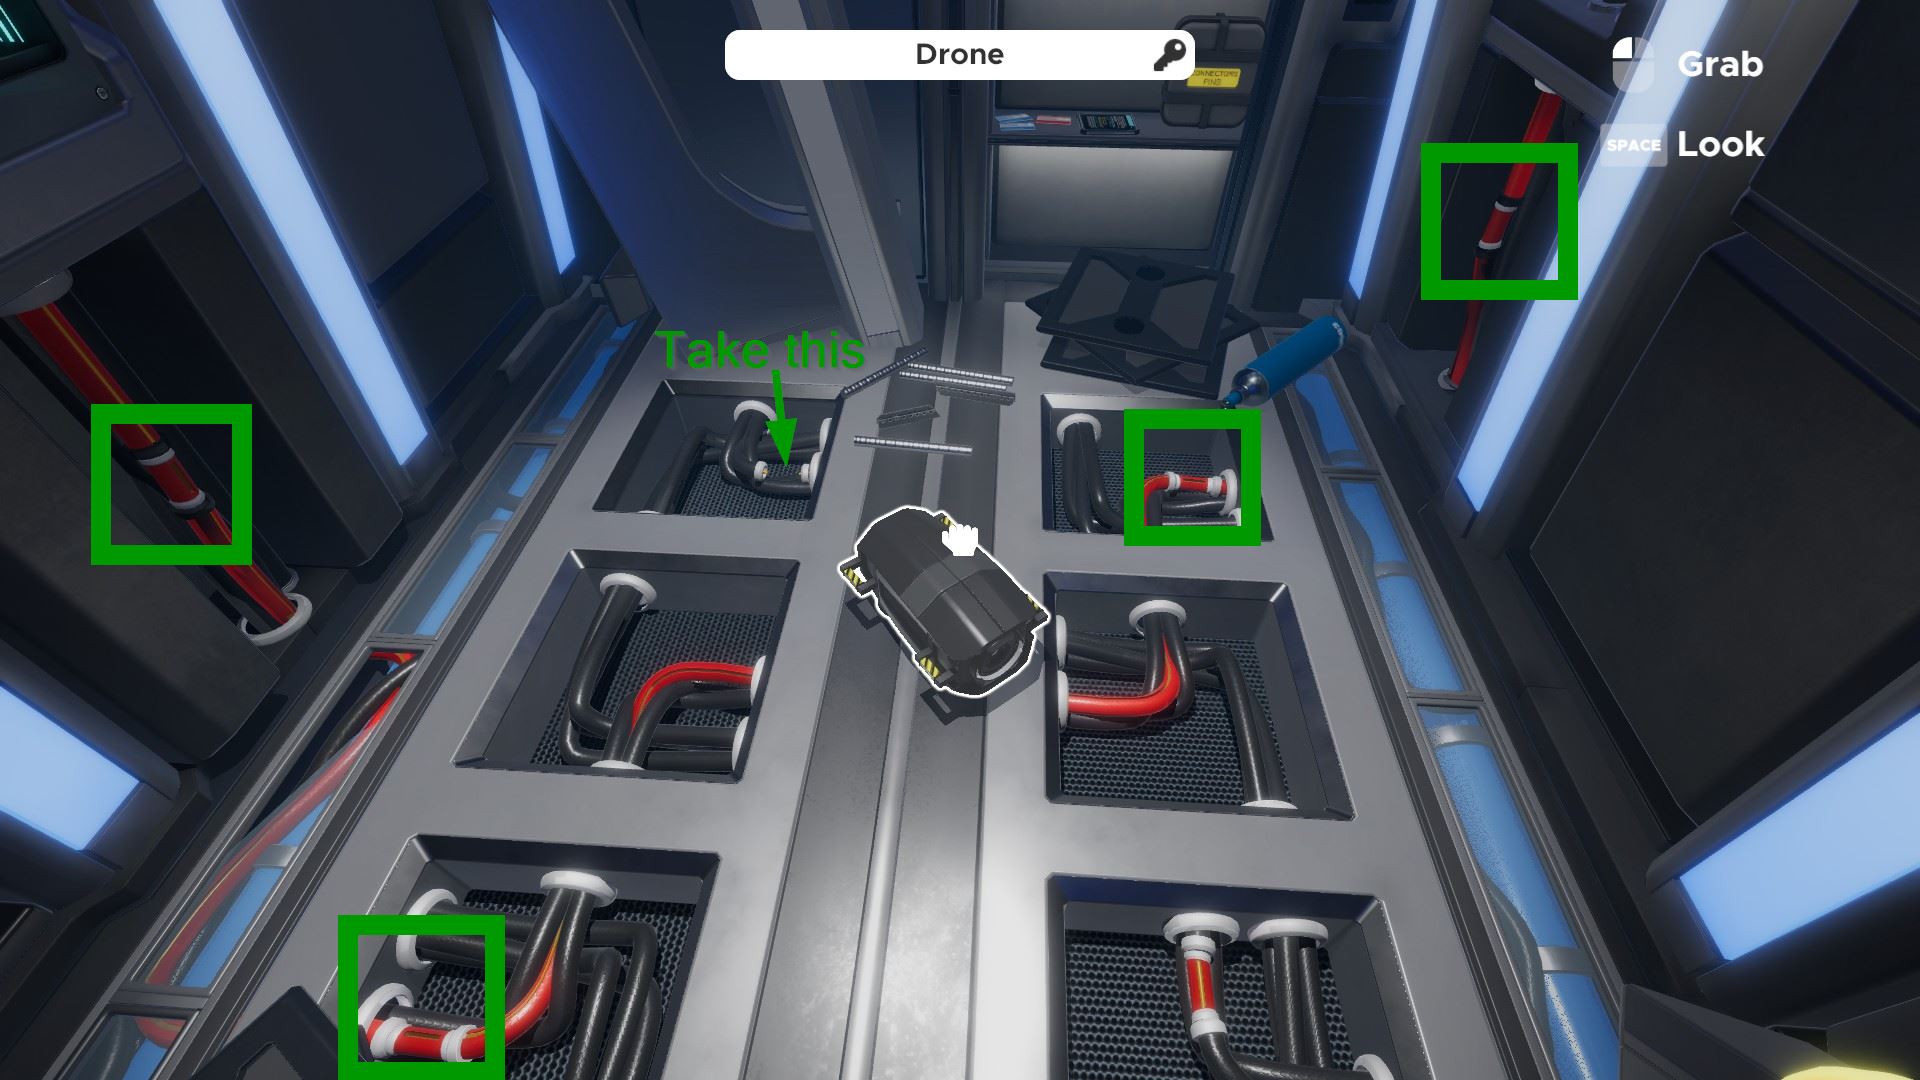
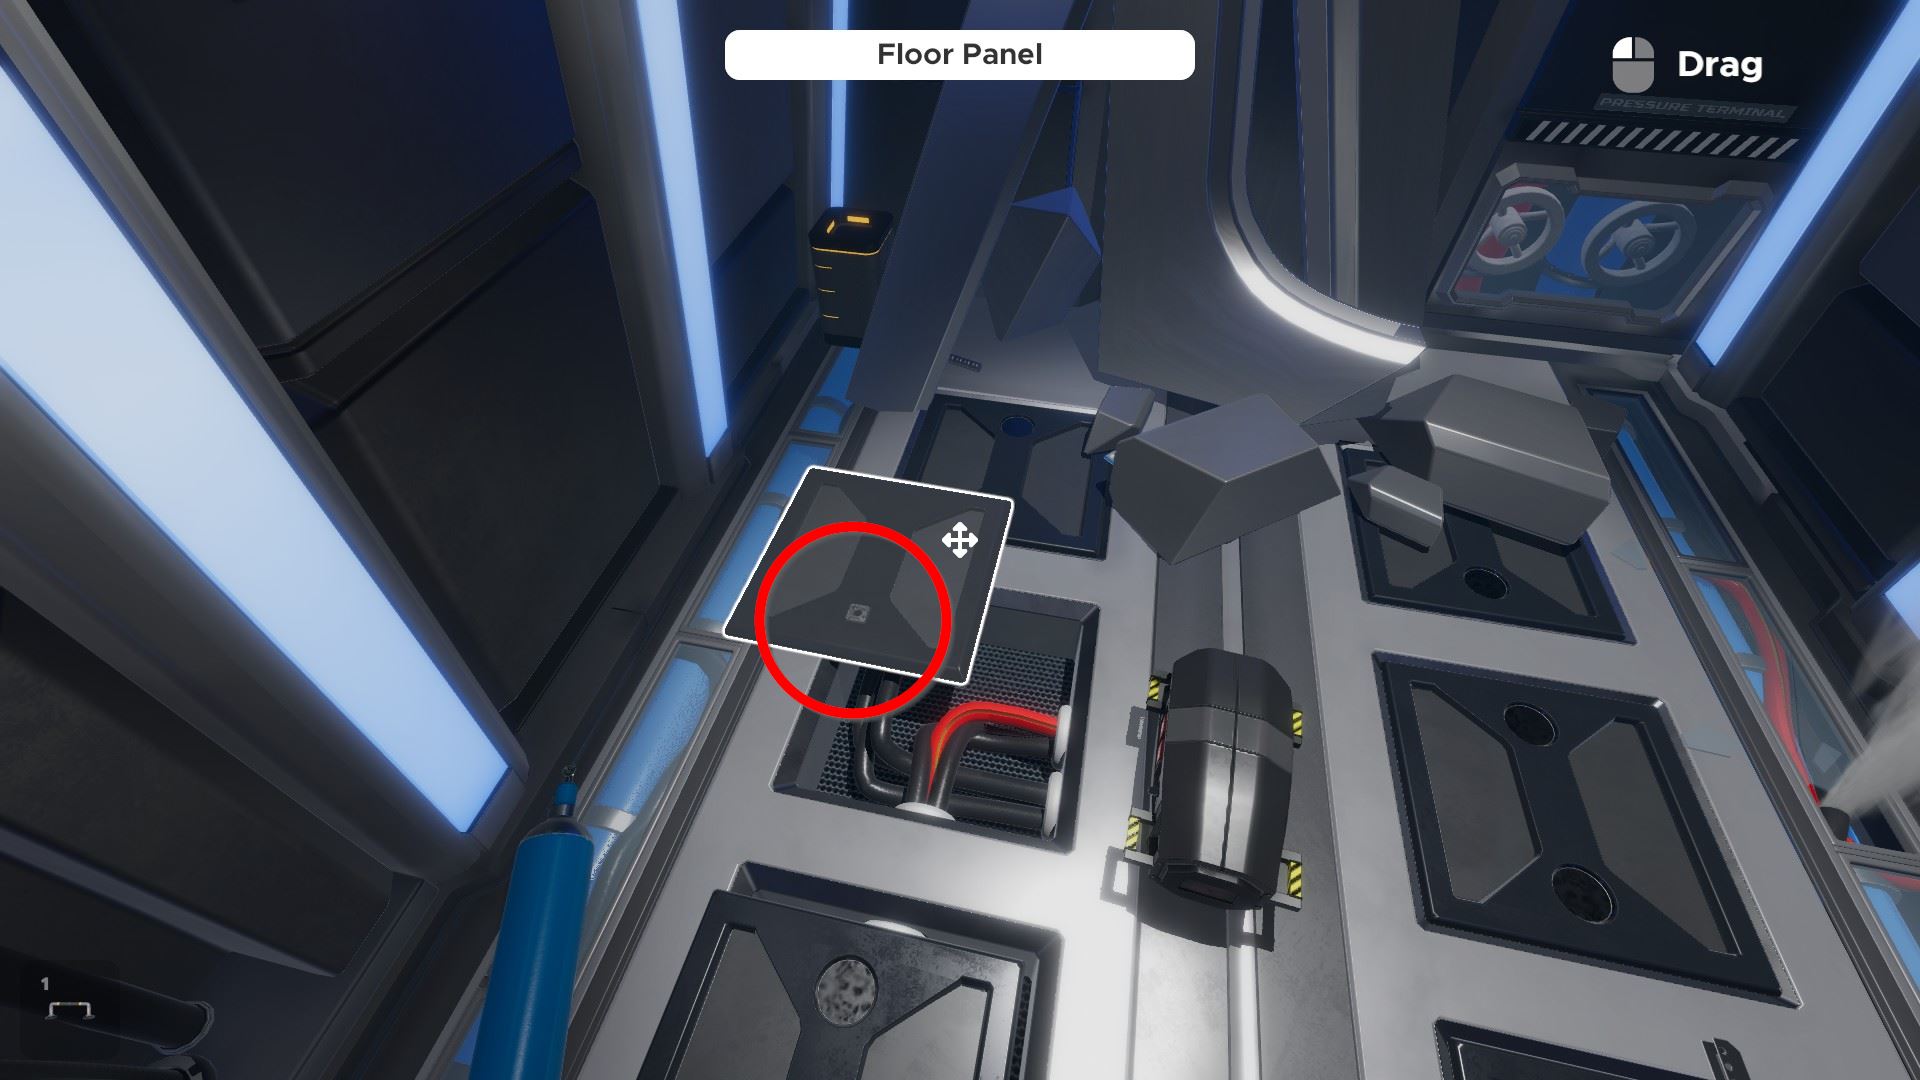
To repair the metal replicator, take a panel removal tool and 3 connector pins from the toolbox backside the fingerprint lock, removal all floor panels, and accept another connector pin from a connection nether a floor console.
Plow off the power, place them so that the cables connect from the power box to the metal replicator and so plough the ability on once again.
⏹ Token five / 8 - flip this panel to reveal a token:
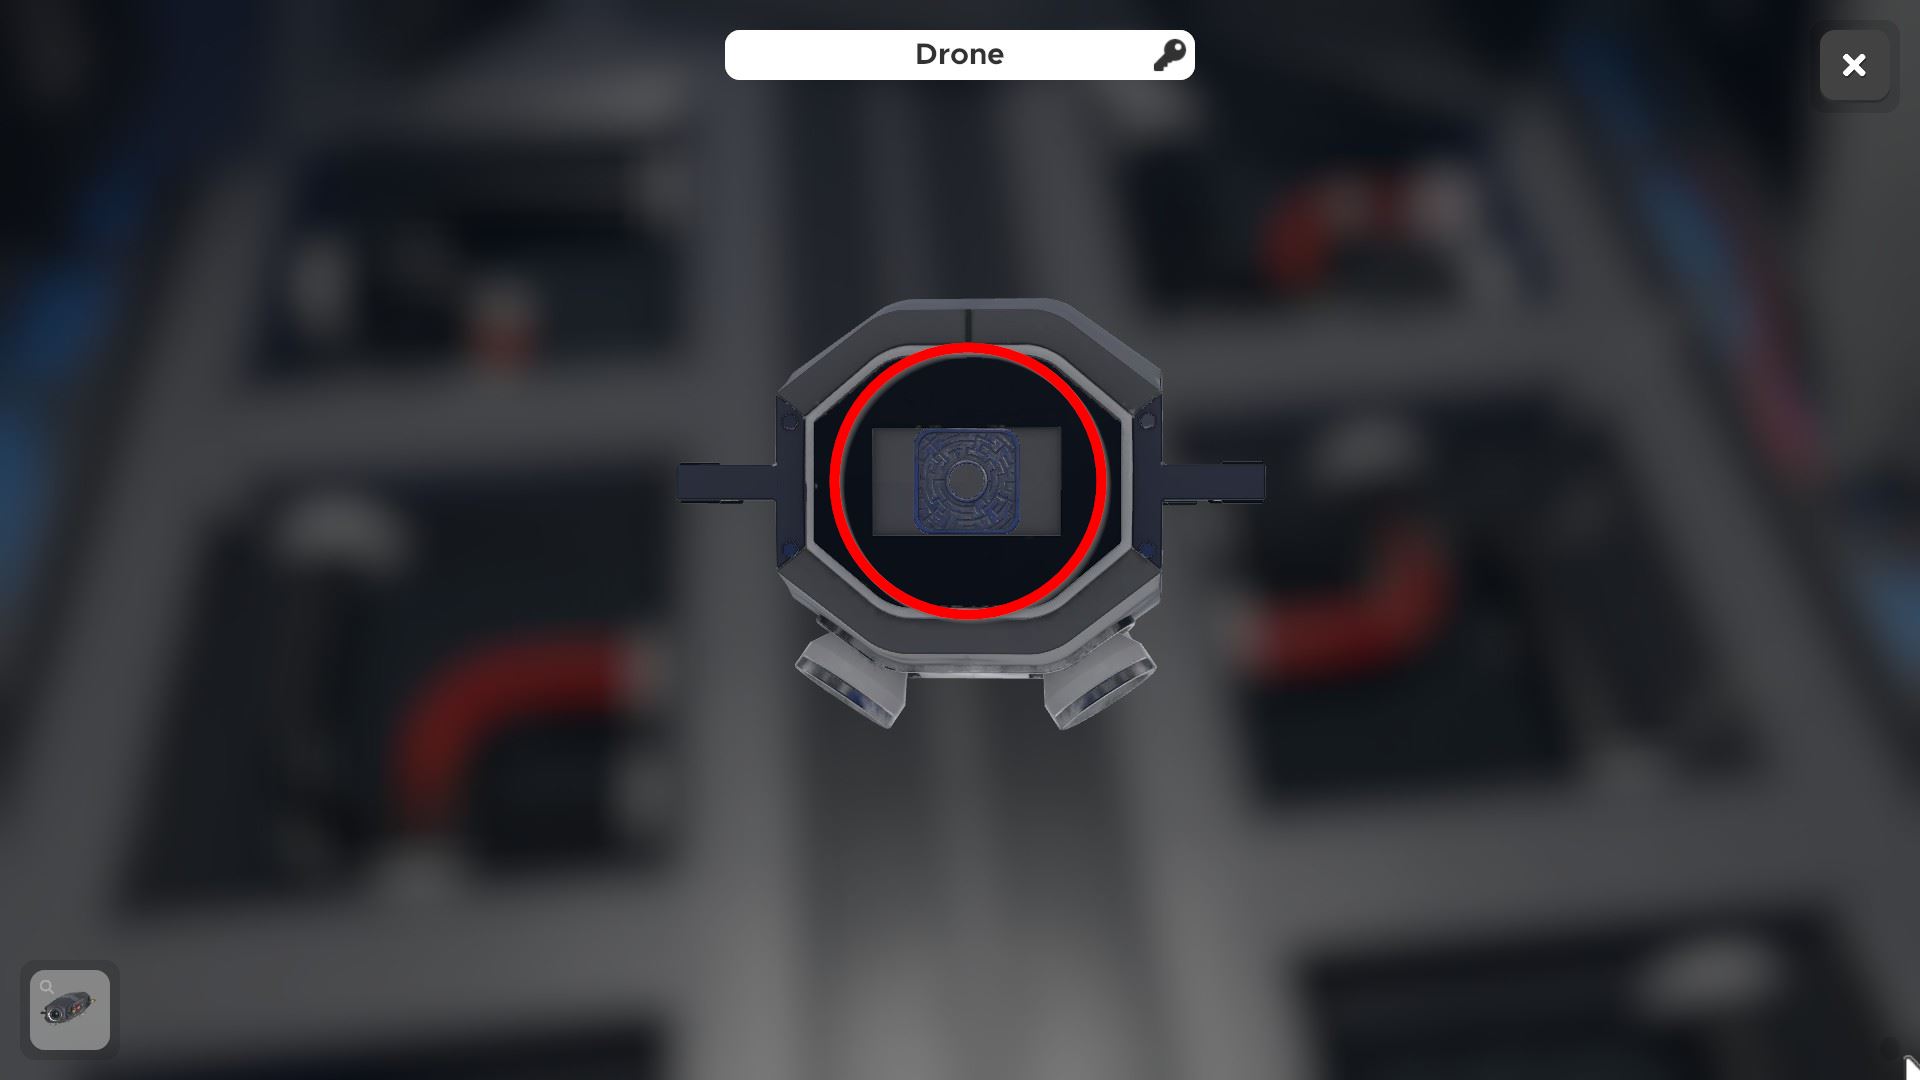
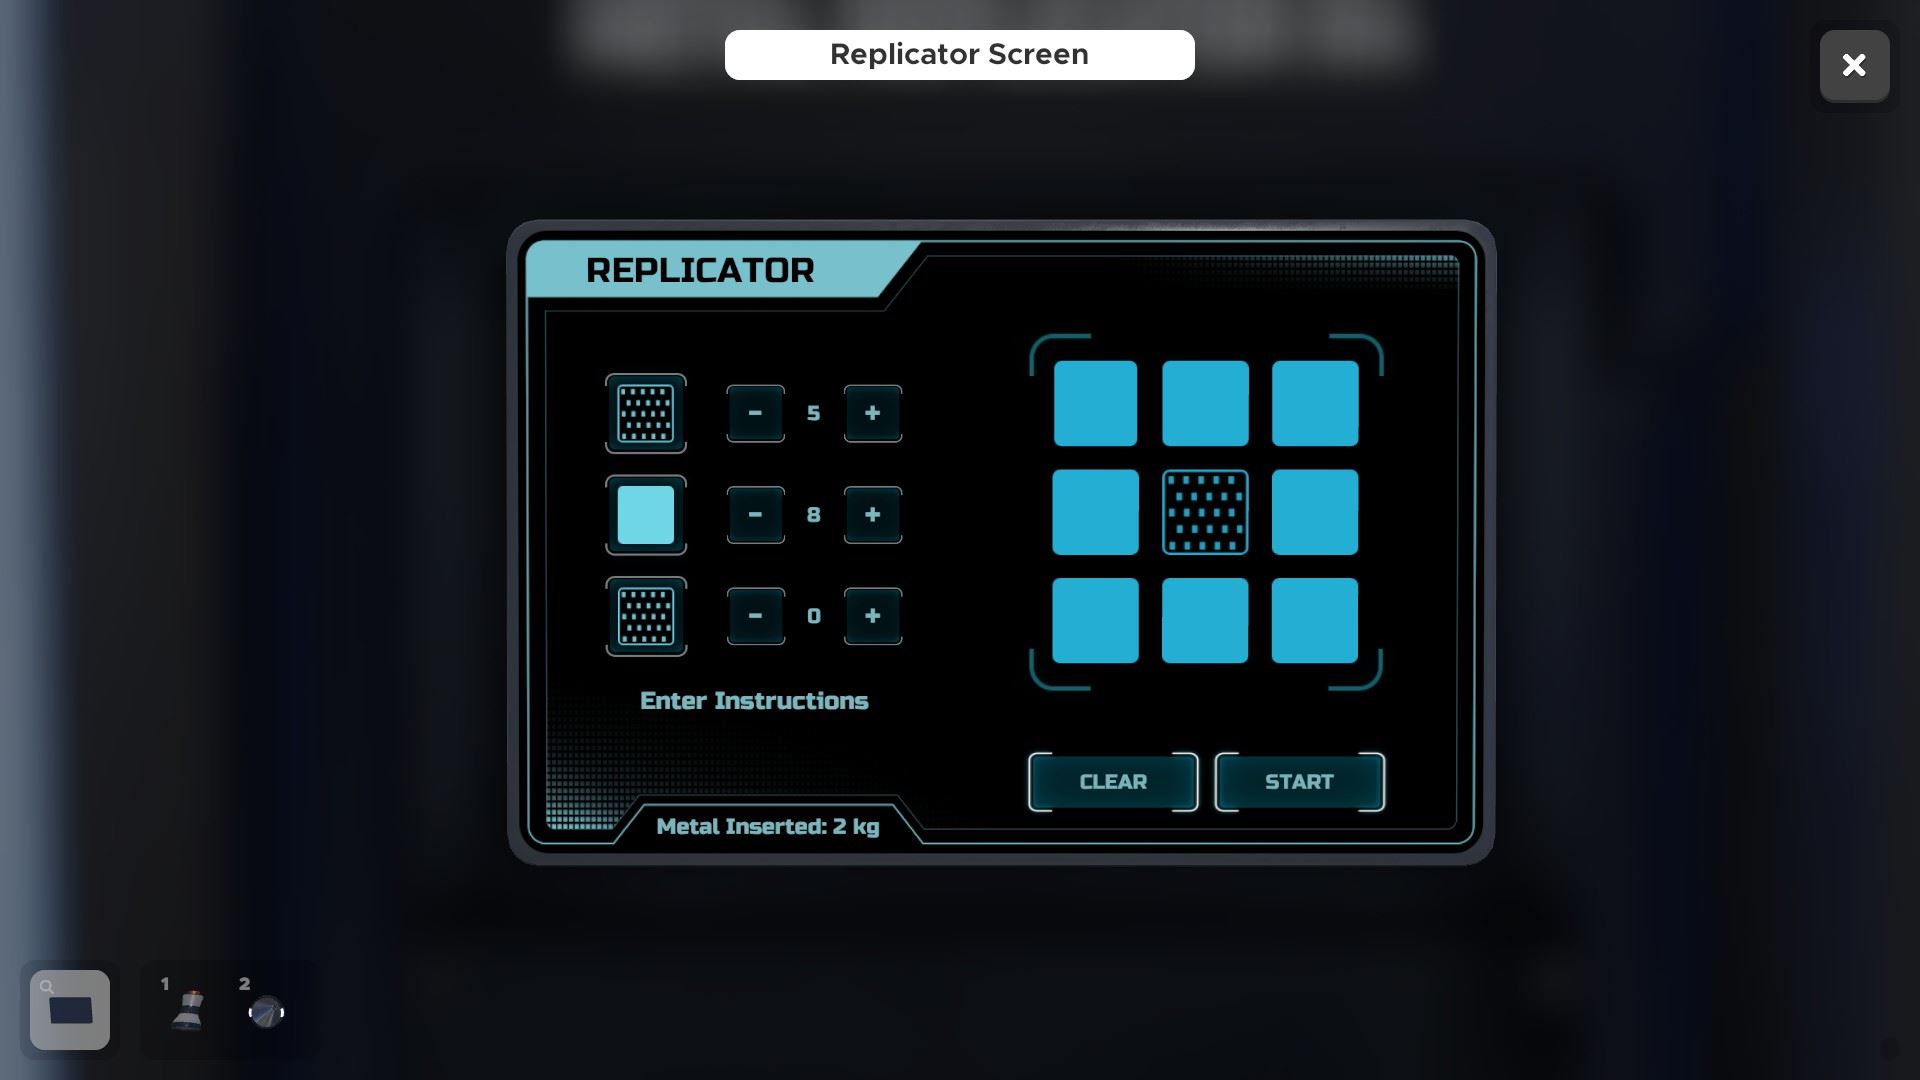
Insert a metallic piece or rod into the replicator, and configure information technology every bit follows to create a drone thruster (step-optimized for only 2 program cycles):

Insert some other metal piece or rod, and configure information technology like this to create a drone cone (step-optimized for only two program cycles):
⏹ Token 6 / 8 - after you have created both a drone cone and thruster with optimal stride count, y'all will find a token under their spawn bespeak:

⏹ Token seven / 8 - within the outbox of the metallic replicator, at the top:

Attach both parts (thruster below, cone on the 'olfactory organ') to activate the drone.
Orient the drone towards the leave door (mode: rotation) and press the laser push to melt the metallic pieces blocking it.
Repeat for the door opposite of the exit door.
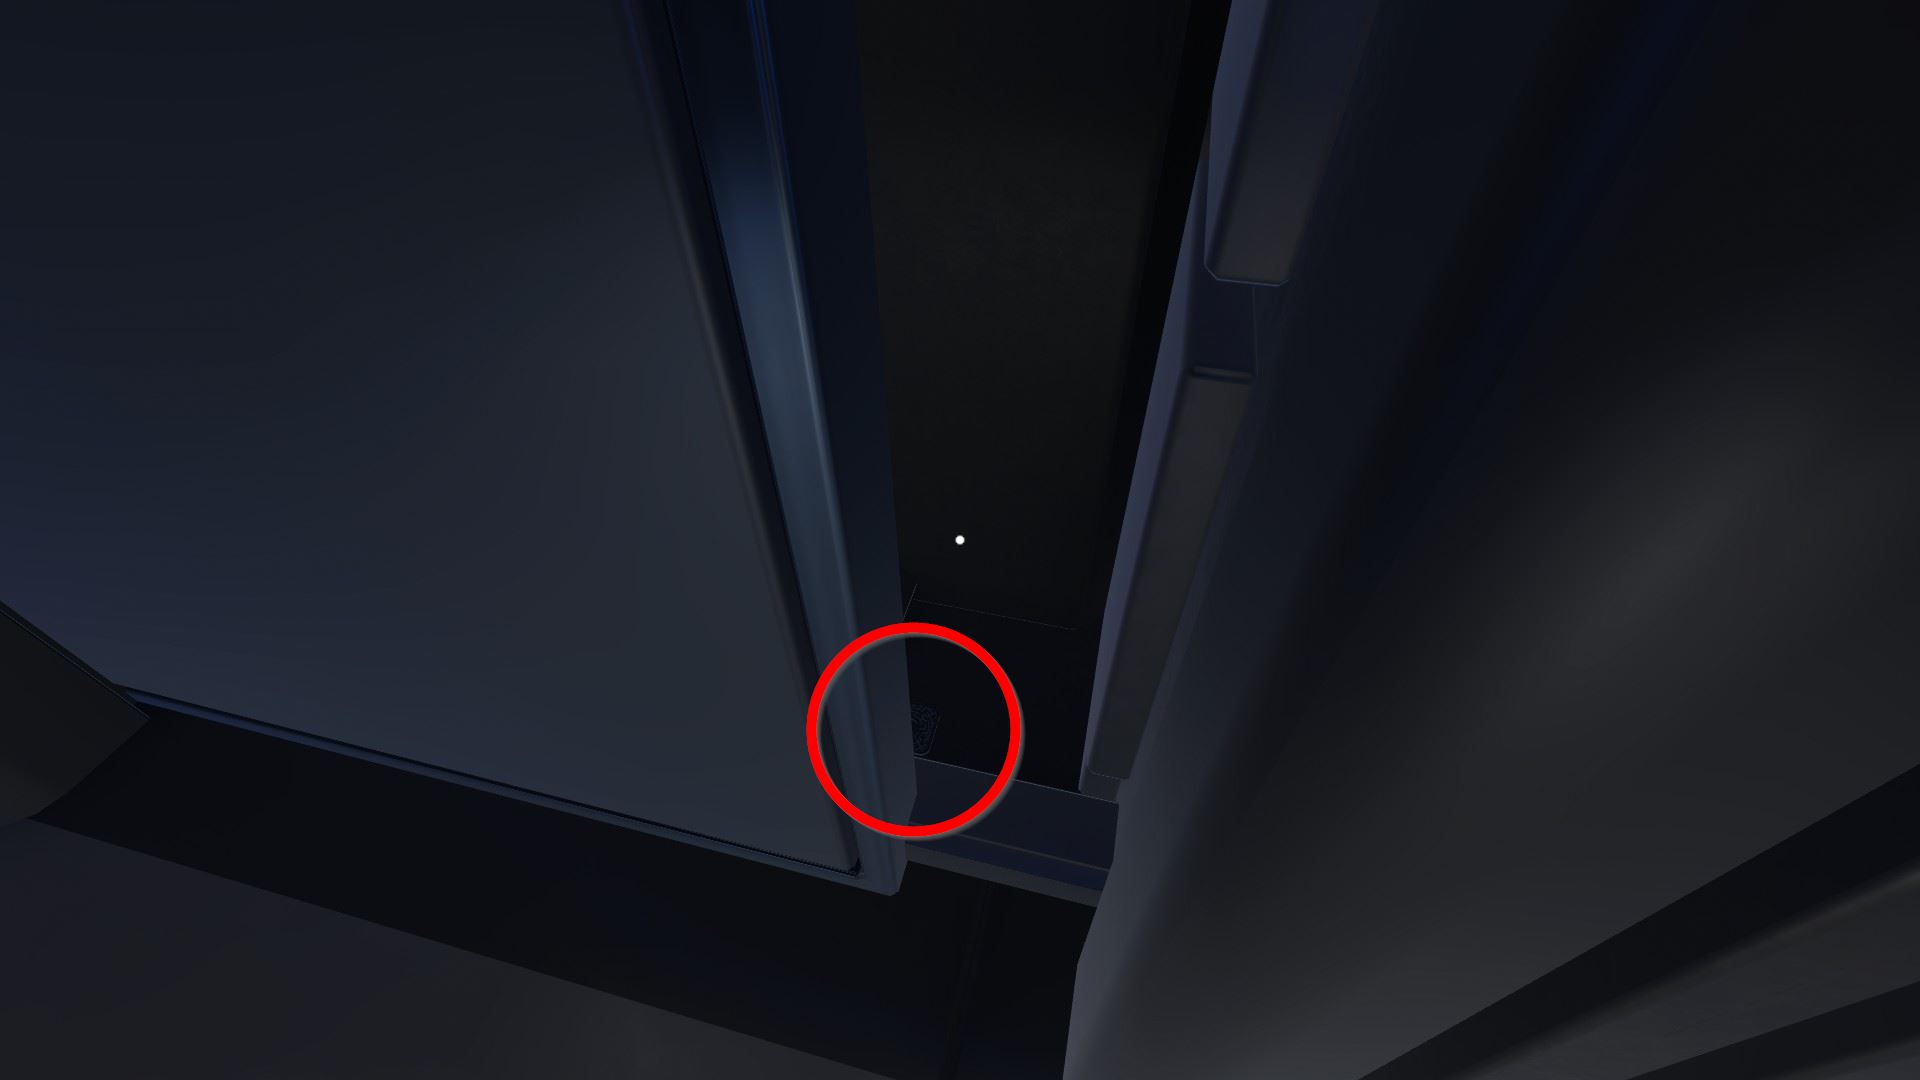
Now you tin use the fingerprint scanner and reveal a hard to spot token on the basis backside the glitchy door.
⏹ Token 8 / 8 - behind the glitchy door:
Insert the red card into the menu developer and set the numbers every bit below (this is the upshot of the combined readings from the 2 other damaged cards, which are incomplete – you can find the damaged cards on the flooring and under ane of the movable wall pieces).
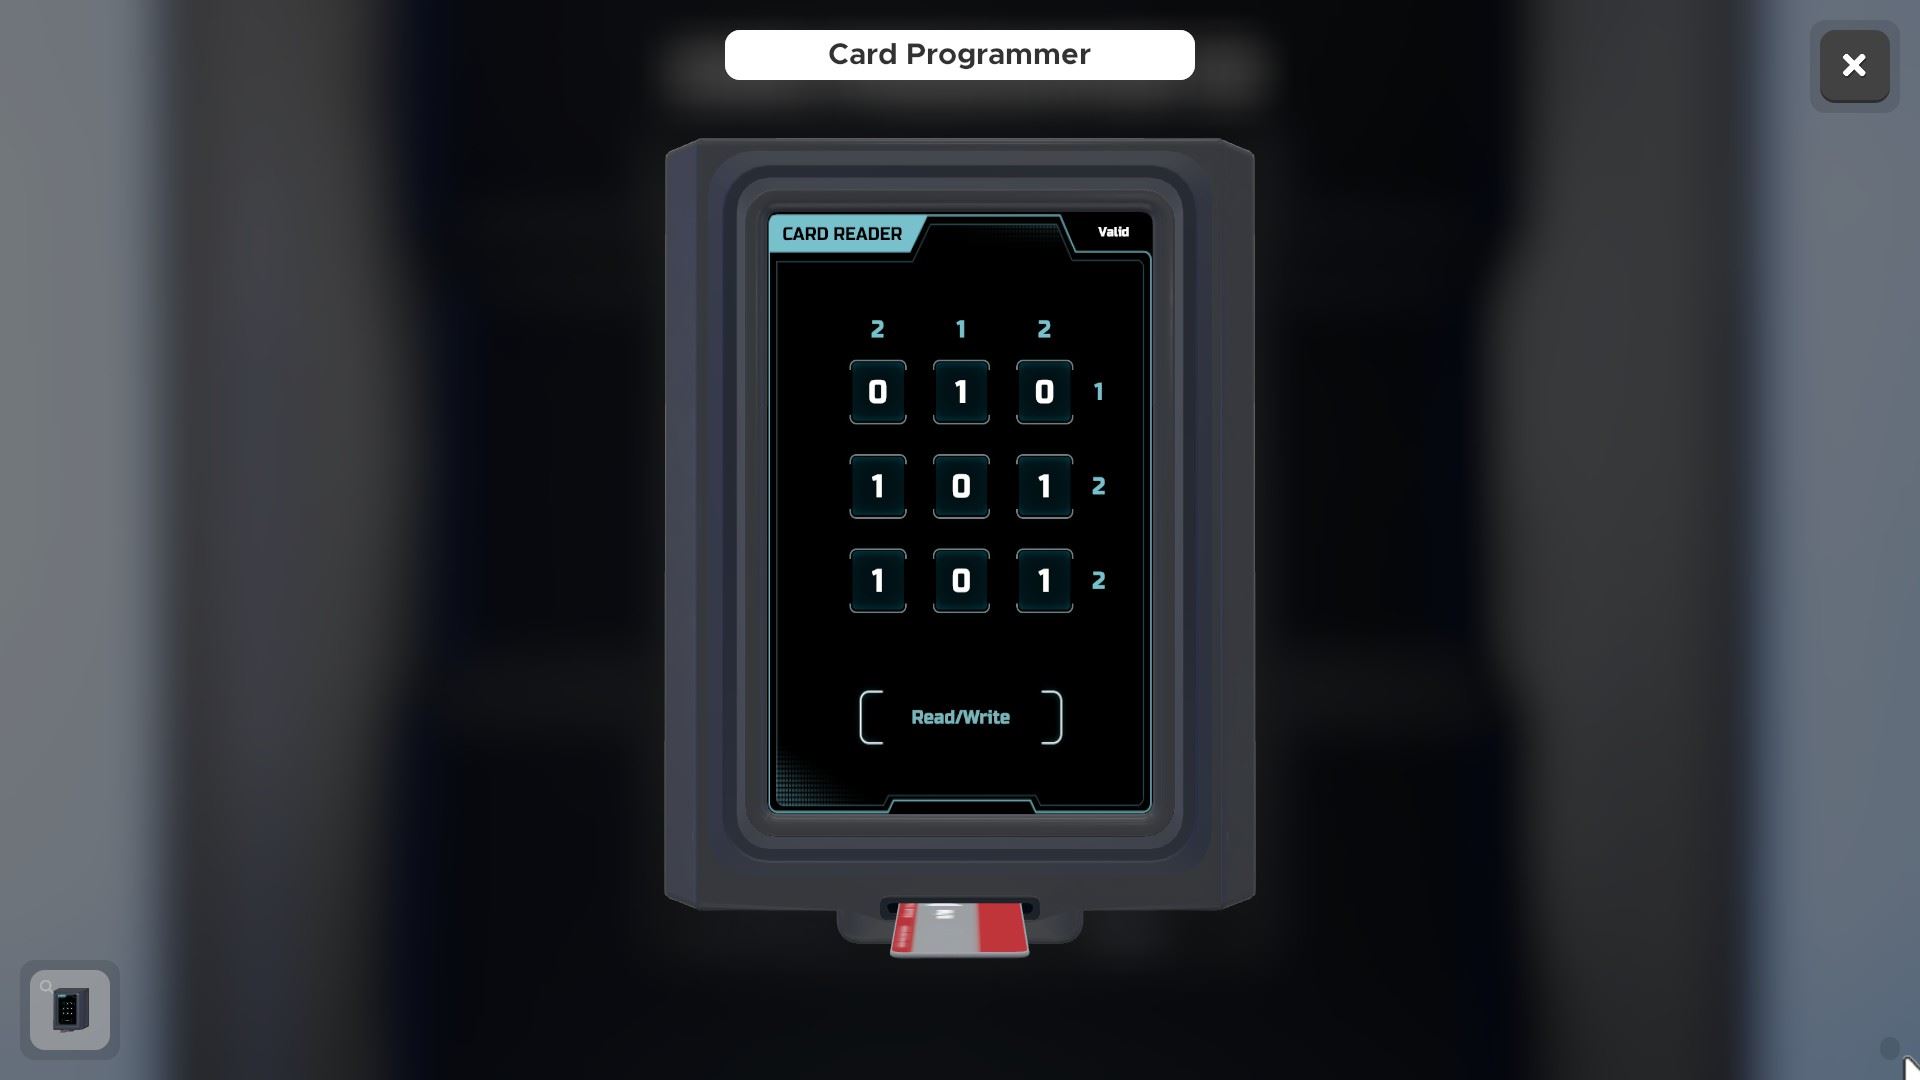
Finally, insert the rewritten cherry-red card into the the leave panel to finish the level.
Adrift in Space: The Lab
🏆
Level-specific achievement: Condom Precautions
After you stop using the blowtorch, drib information technology in the sink and turn on the water. This breaks the blowtorch.
🏆
Level-specific achievement: D'oh!
Can simply exist caused while wearing the yellowish graphic symbol pare (change it from the character customization screen).
Collect the doughnut that is located in the left drawer under the fabricator.
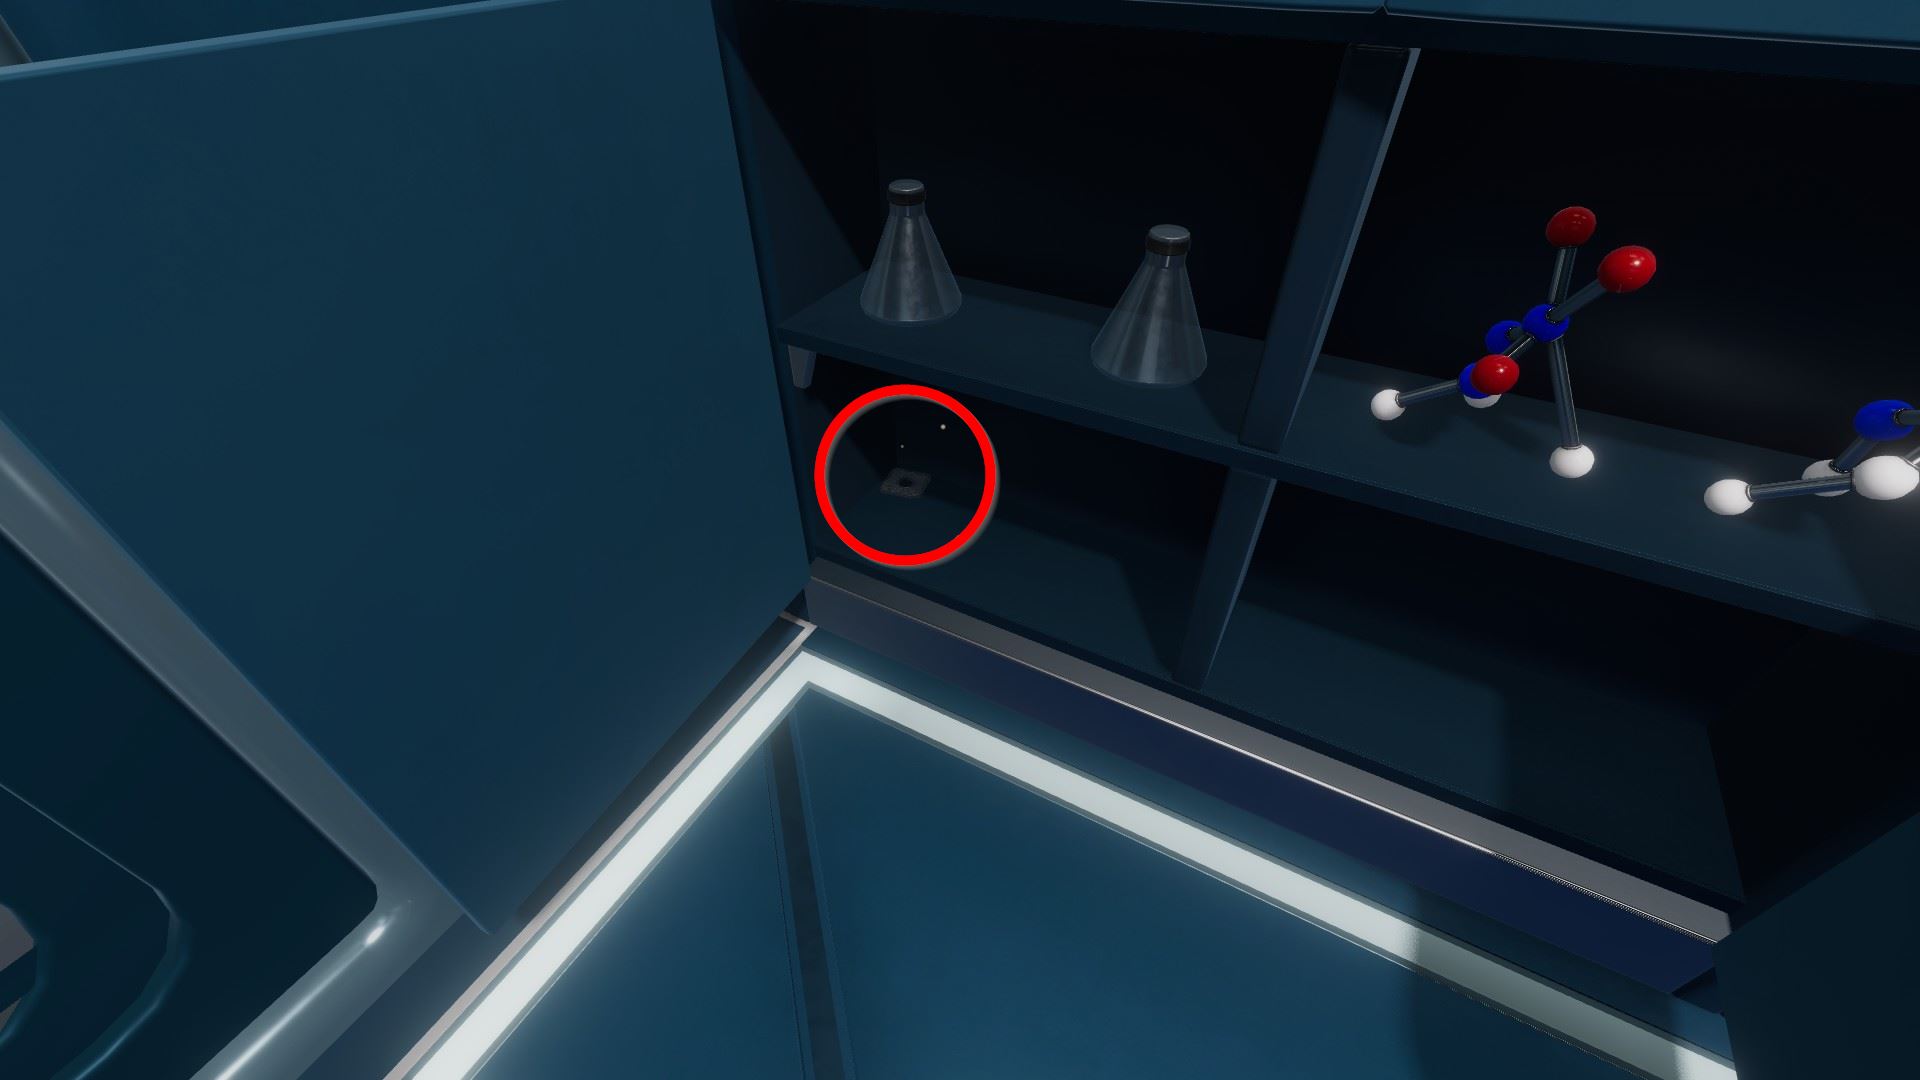
⏹ Token 1 / 8 - in the cabinet:
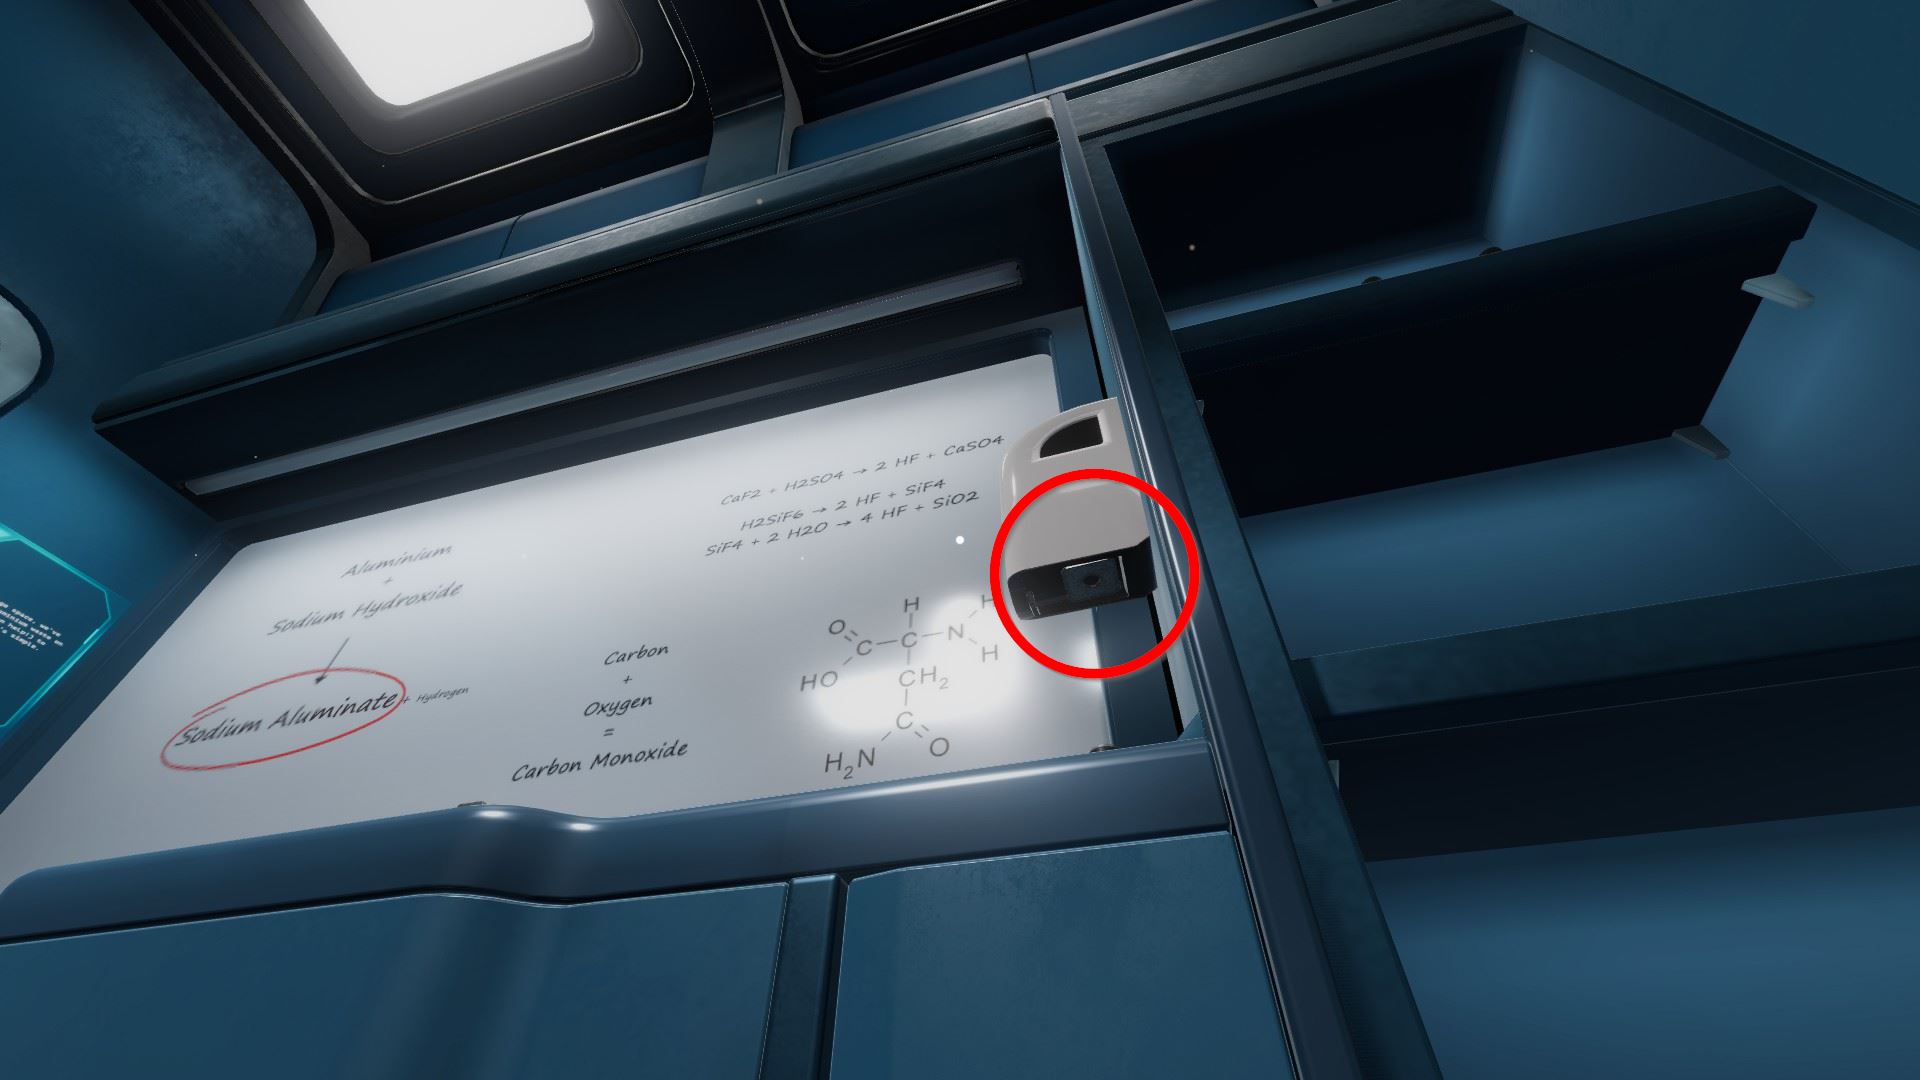
⏹ Token 2 / 8 - under the hand sanitizer:
⏹ Token 3 / 8 - above periodic table on the correct:

⏹ Token four / viii - behind the fabricator (right side) that's left of the periodic table:

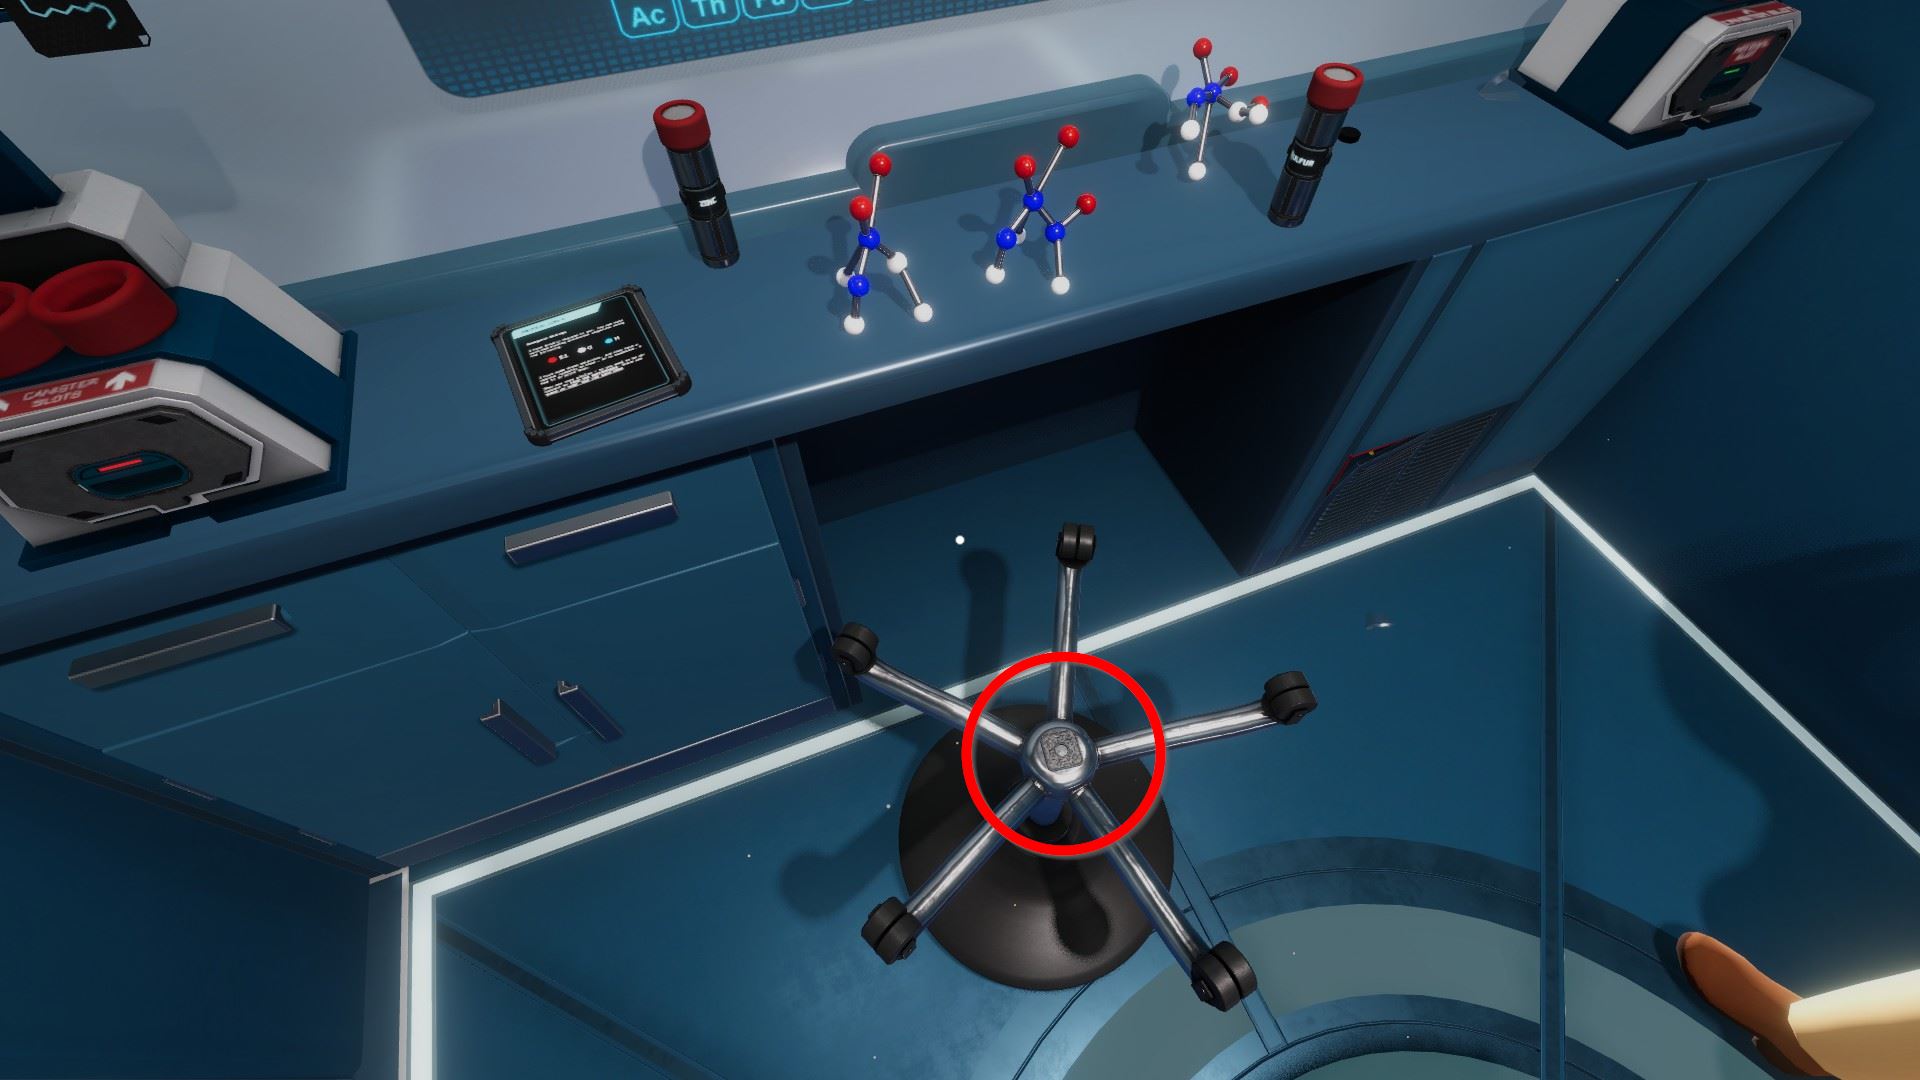
⏹ Token 5 / 8 - under the movable chair; it has to exist flipped using physics interaction:
The keypad lock below the hand sanitizer requires the odd one out of each element among the three molecular models in the level. The hint is given by the tablet to a higher place the metal recycling drawer.
The correct solution is 2-3-3.
Accept the at present-accessible controller from the cabinet, unlock information technology using the code ane-3-six (periodic elements on the back course ONeThReSIx).
Using the blowtorch (plow it on in inspect view first!), y'all can remove the panels of the two lower vents (storage room door, 1 nether the chemical combiner, and the left ventilator vent) by dragging it in a square shape around their edges.
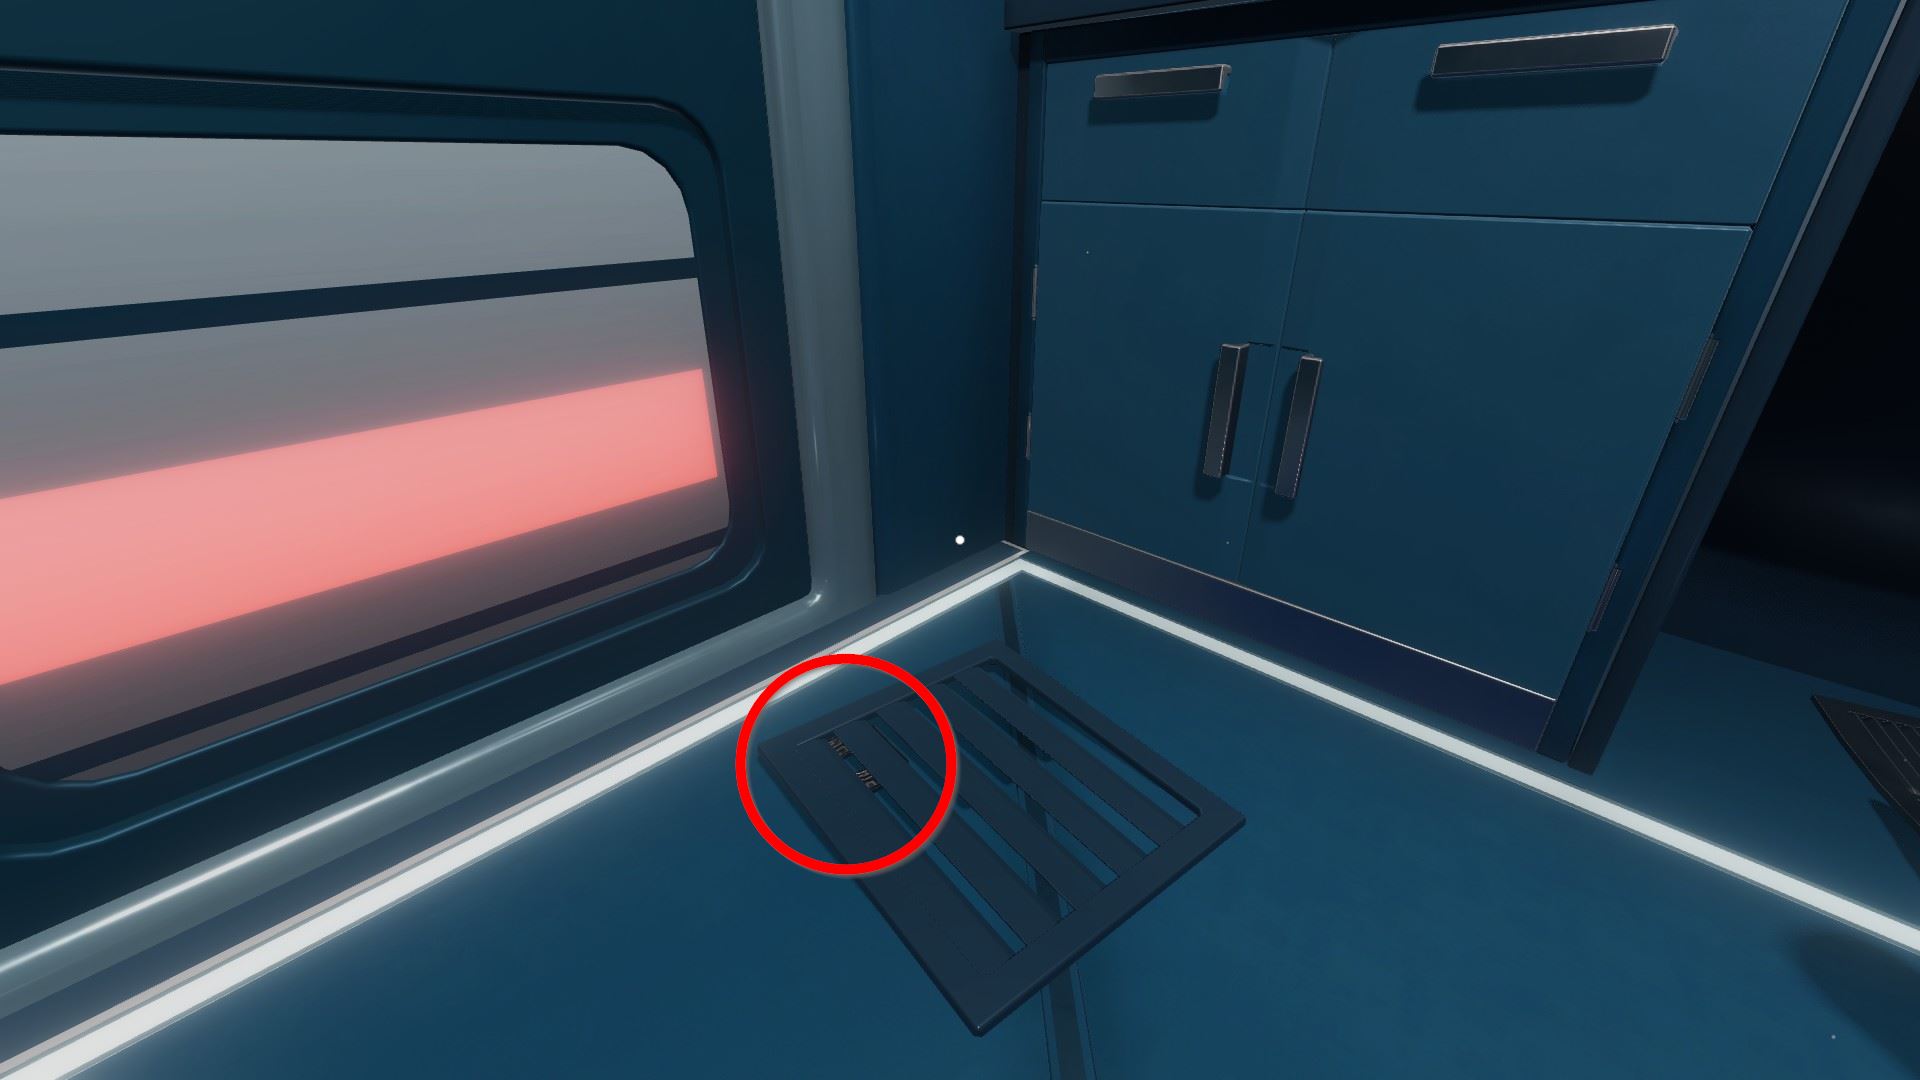
⏹ Token six / viii - fell downwardly from the left ventilation grille:
⏹ Token 7 / viii - inside the flooring height vent tunnel:
⏹ Token 8 / 8 - inside the supply cabinet room, very abrupt angle:
Using the controller, bulldoze the robot through this vent tunnel and knock off the table with the nitrogen vials by bumping into its leg. You tin and then pick them up through the door opening.
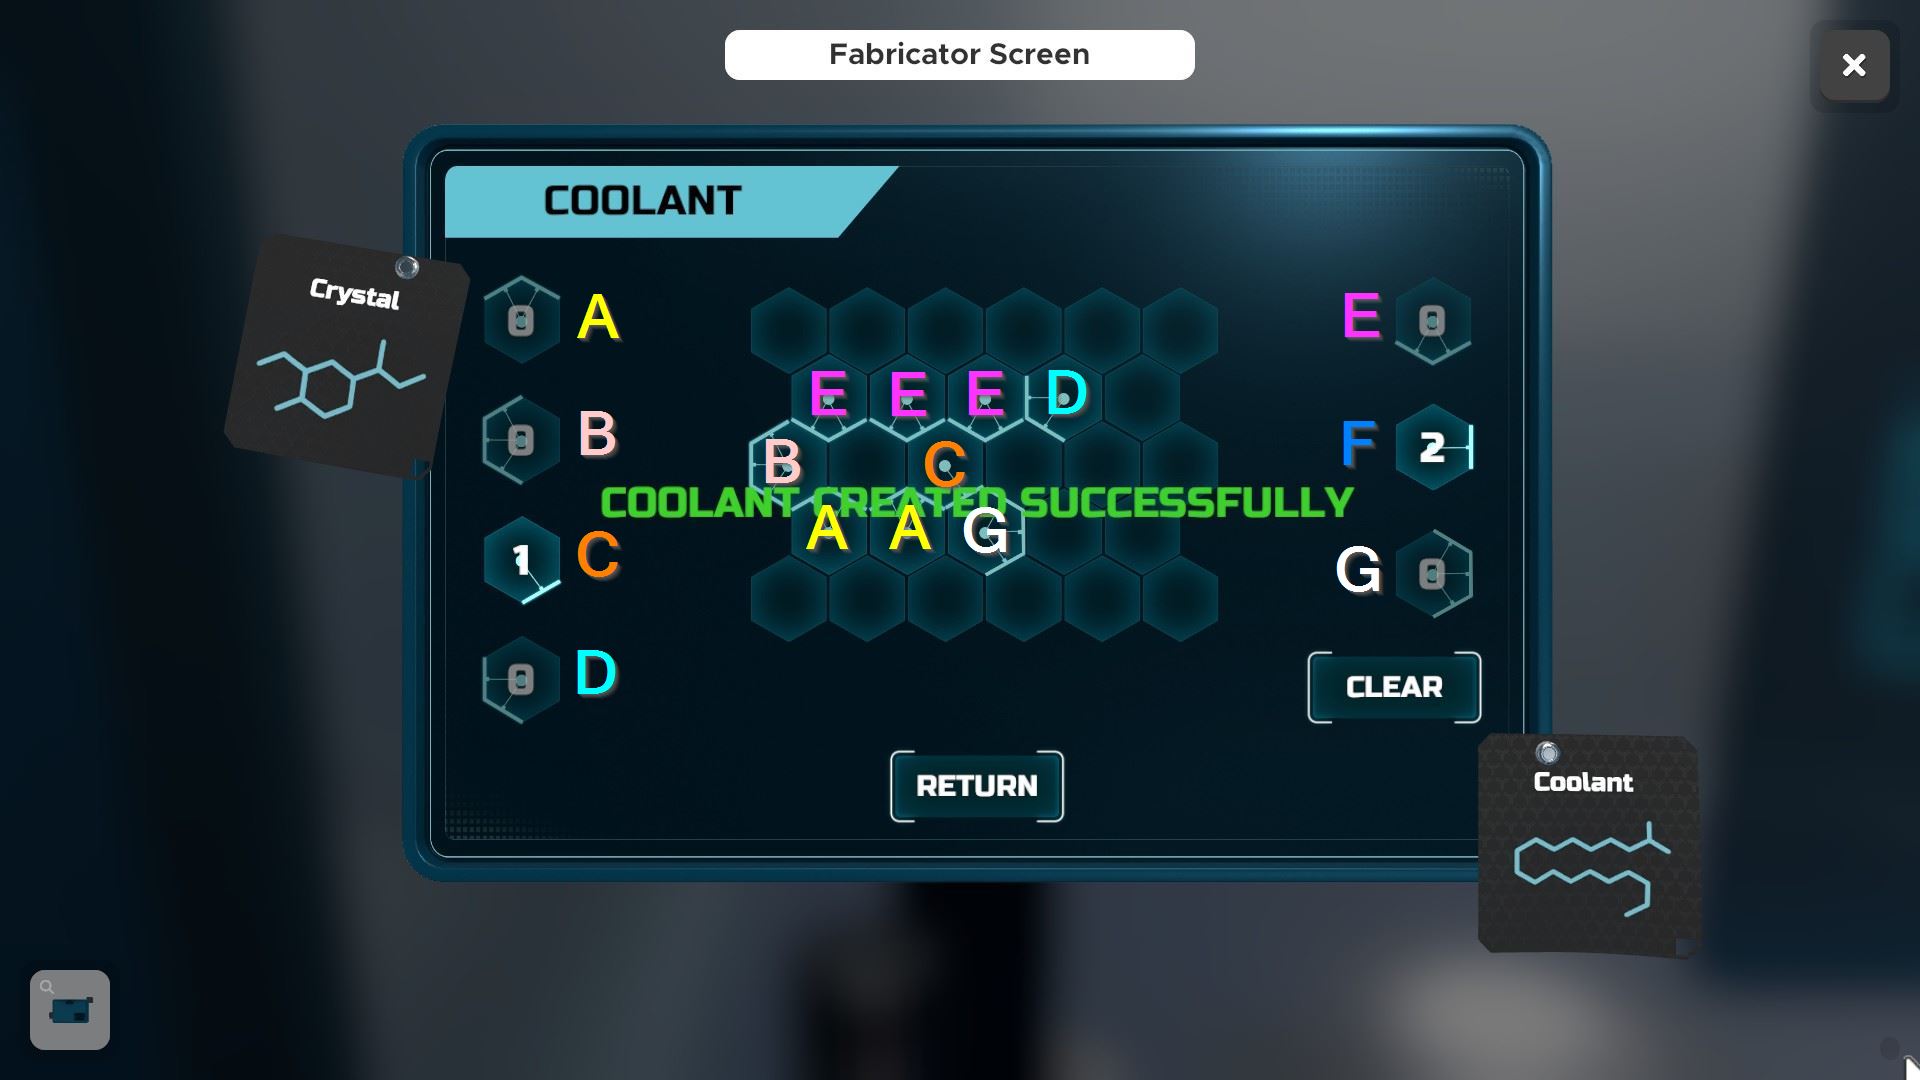
In the fabricator, use the helium that's correct next to it to create coolant.
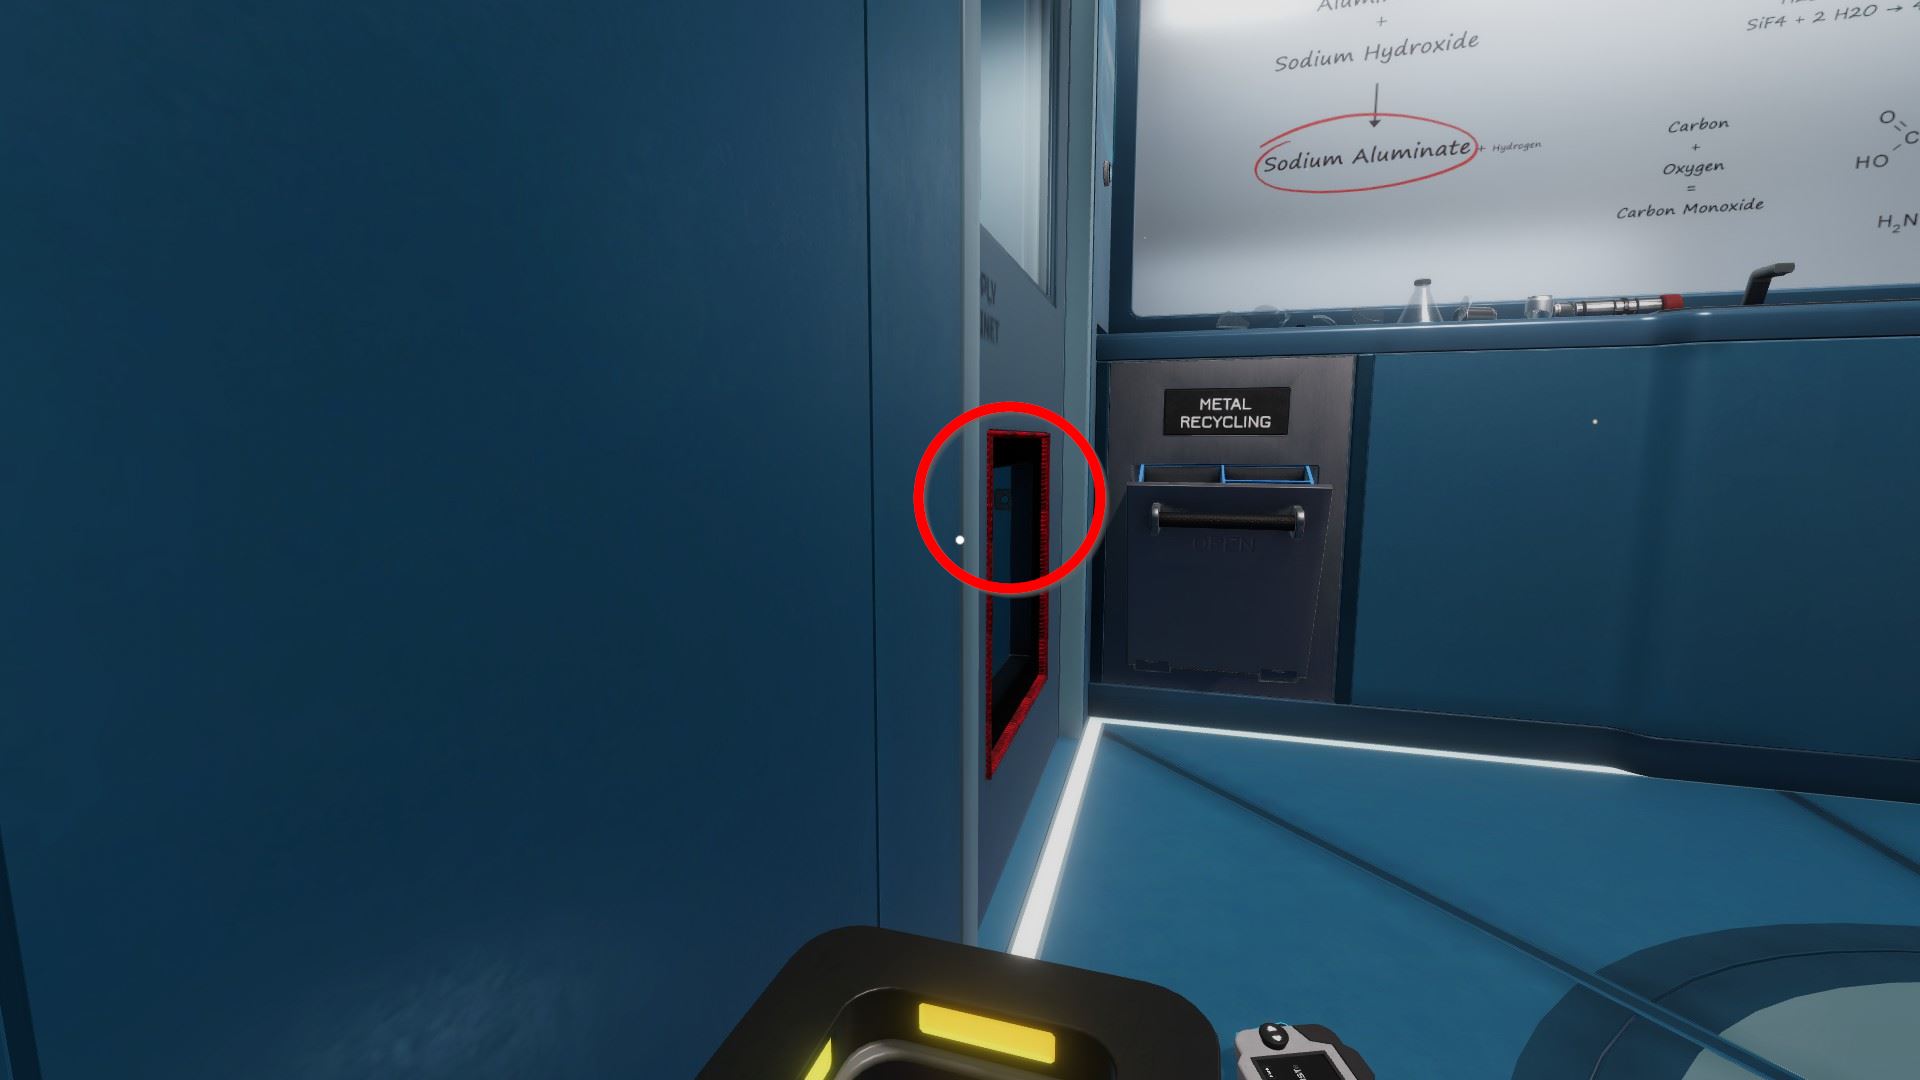
In the chemical combiner, create sodium aluminate by combining sodium hydroxide (in the right drawer below the fabricator) in the canister slot and a piece of aluminum from the metal recycling drawer in the material slot.
In the fabricator, combine sodium aluminate and nitrogen.
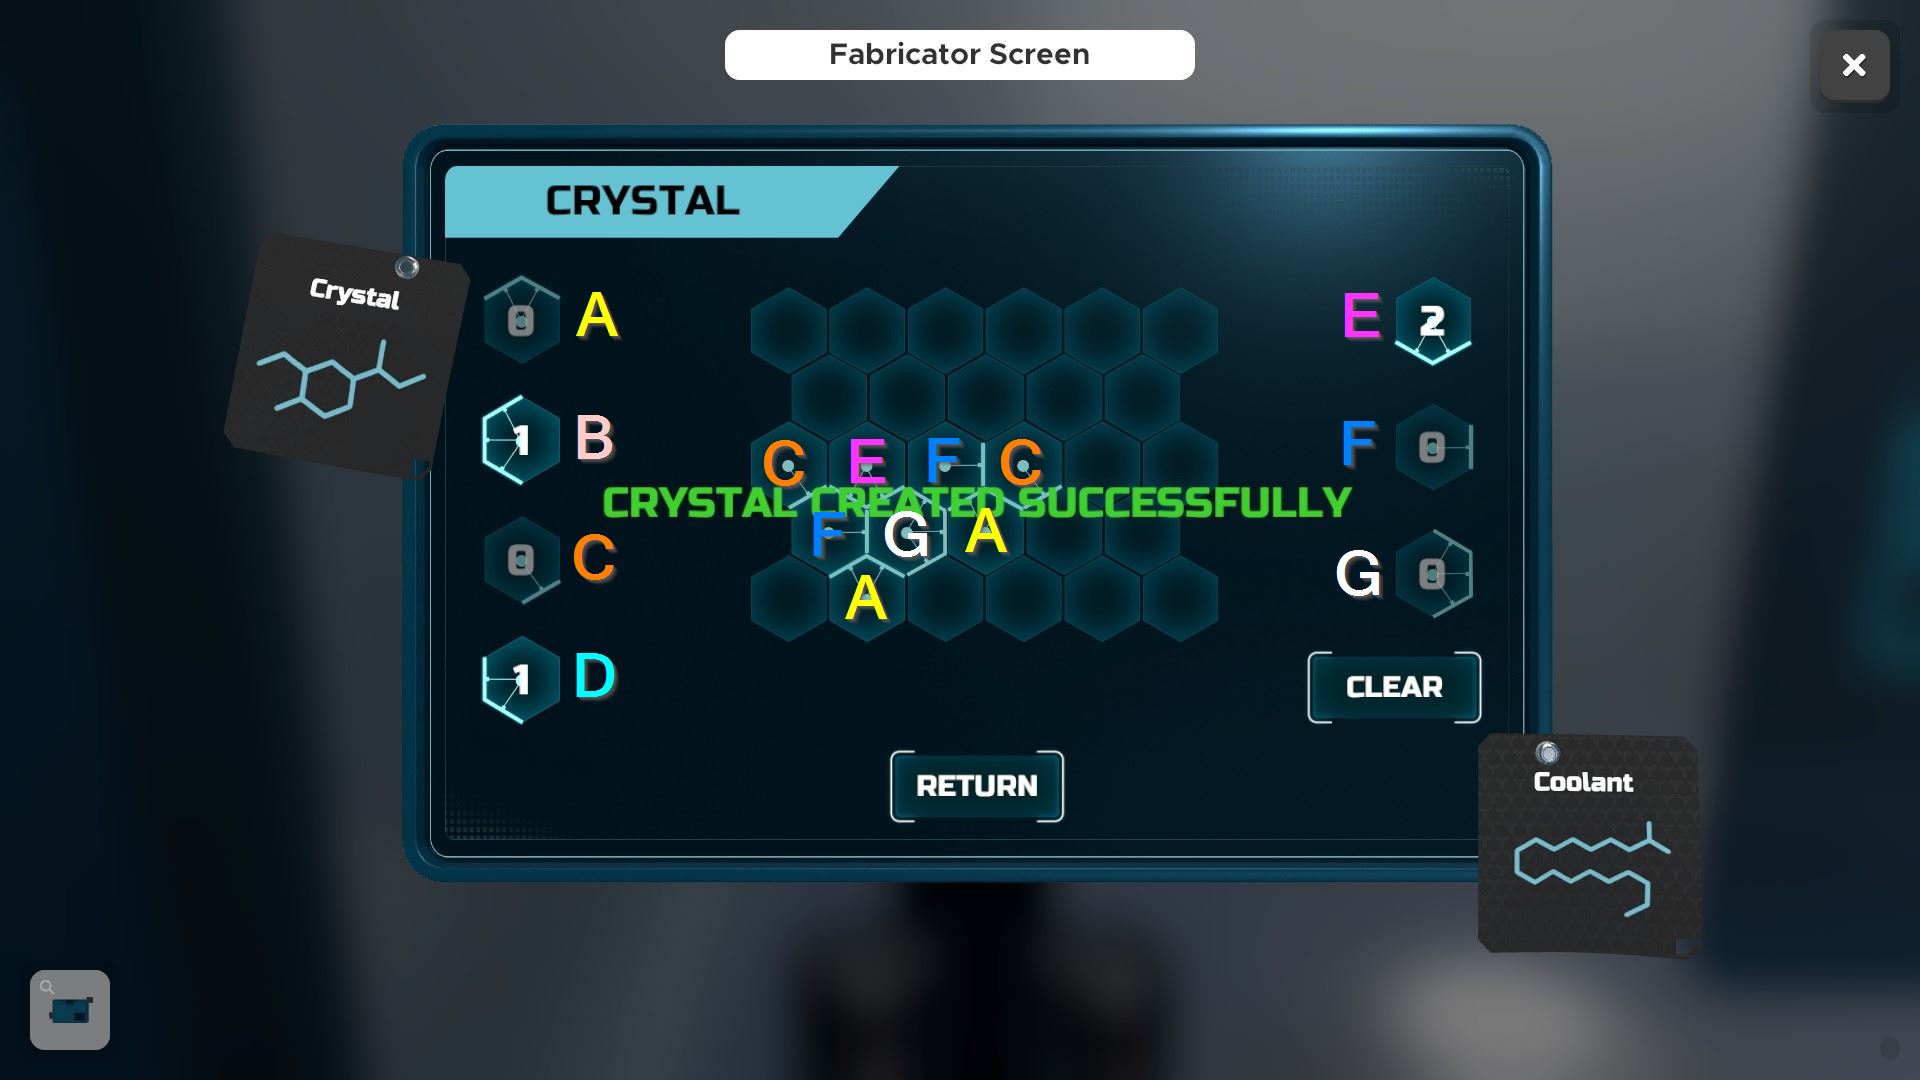
Insert the coolant into the lower port on the central tank, then adjust the crystal device until you have the correct tiptop (move it up until the text changes), and then insert the crystal into the upper port.
Afloat in Space: Decompression Bedroom
⏹ Token i / 8 - on the top correct corner of the top right vent:
⏹ Token 2 / 8 - below the former, on the left stop of the bench:
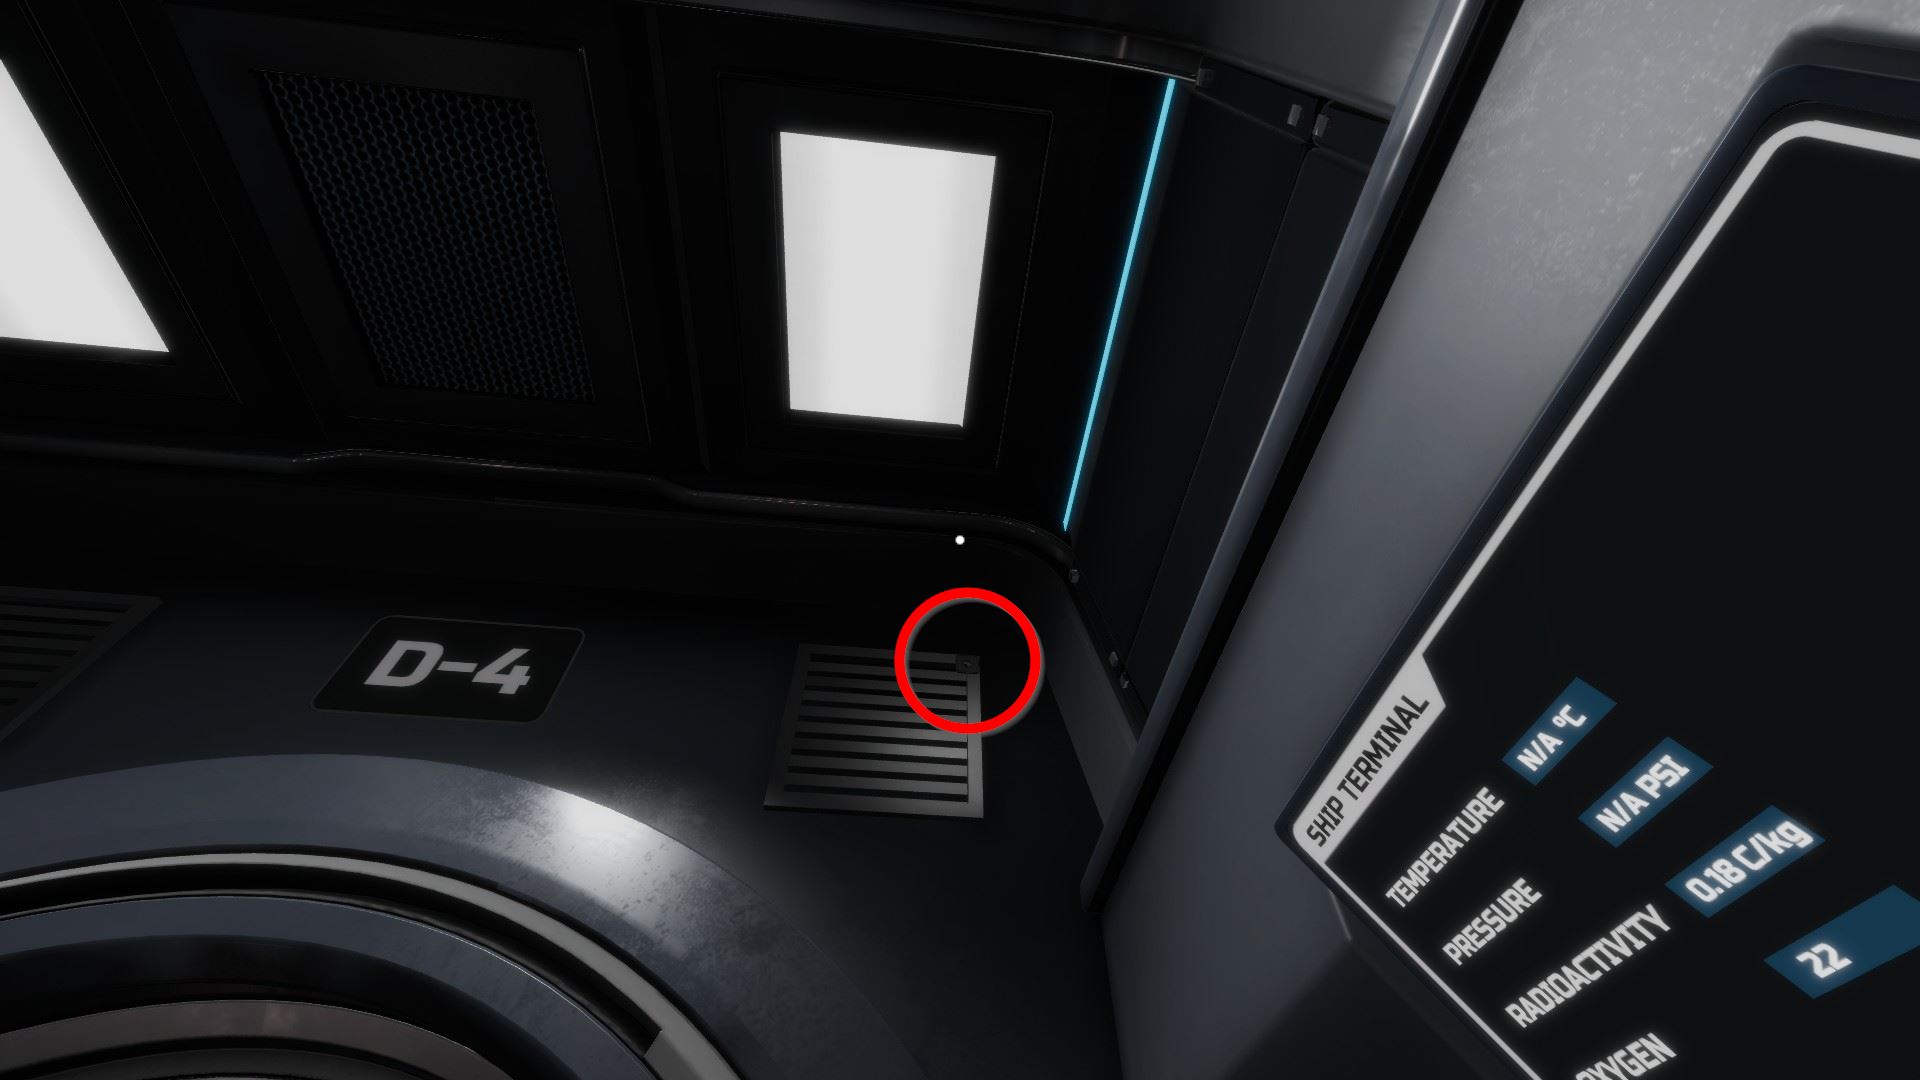
⏹ Token 3 / 8 - under the ship status concluding:
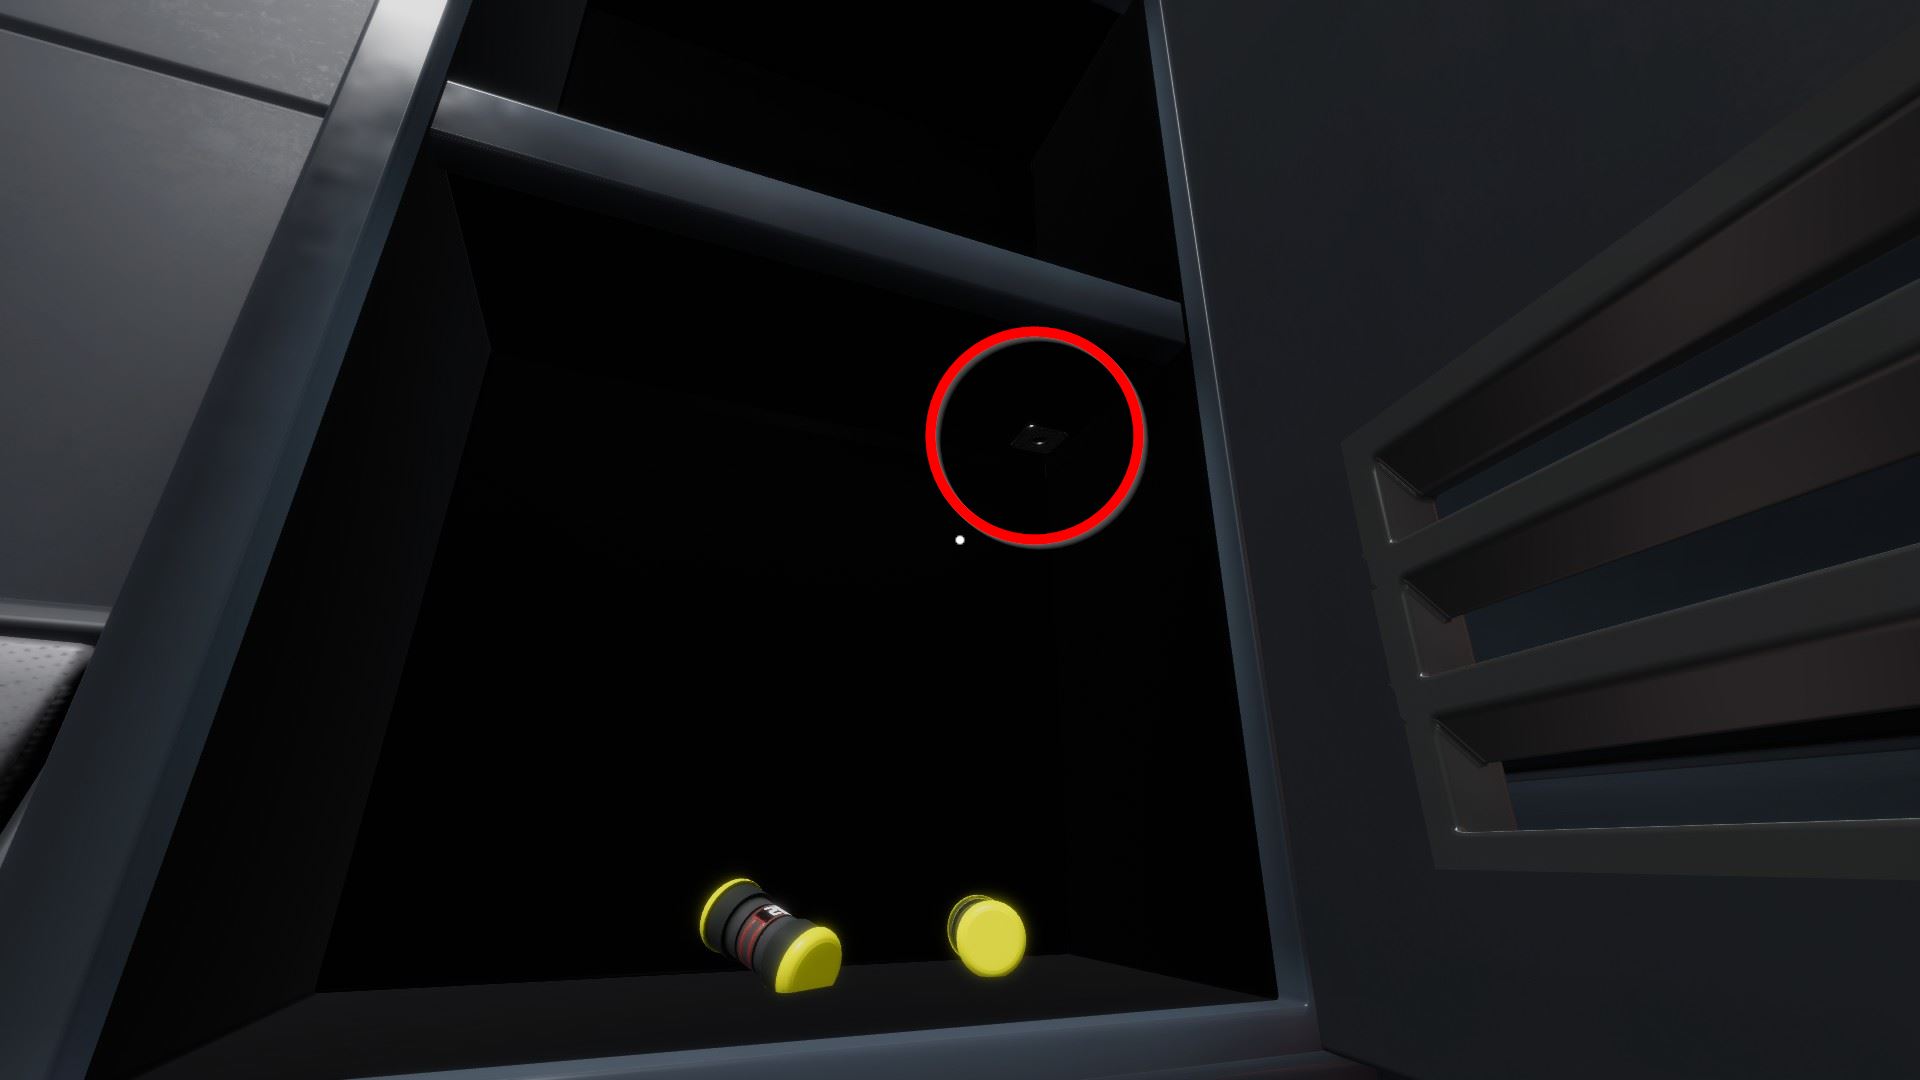
⏹ Token four / 8 - within the locker on the right terminate of the bench, in the lowest section:
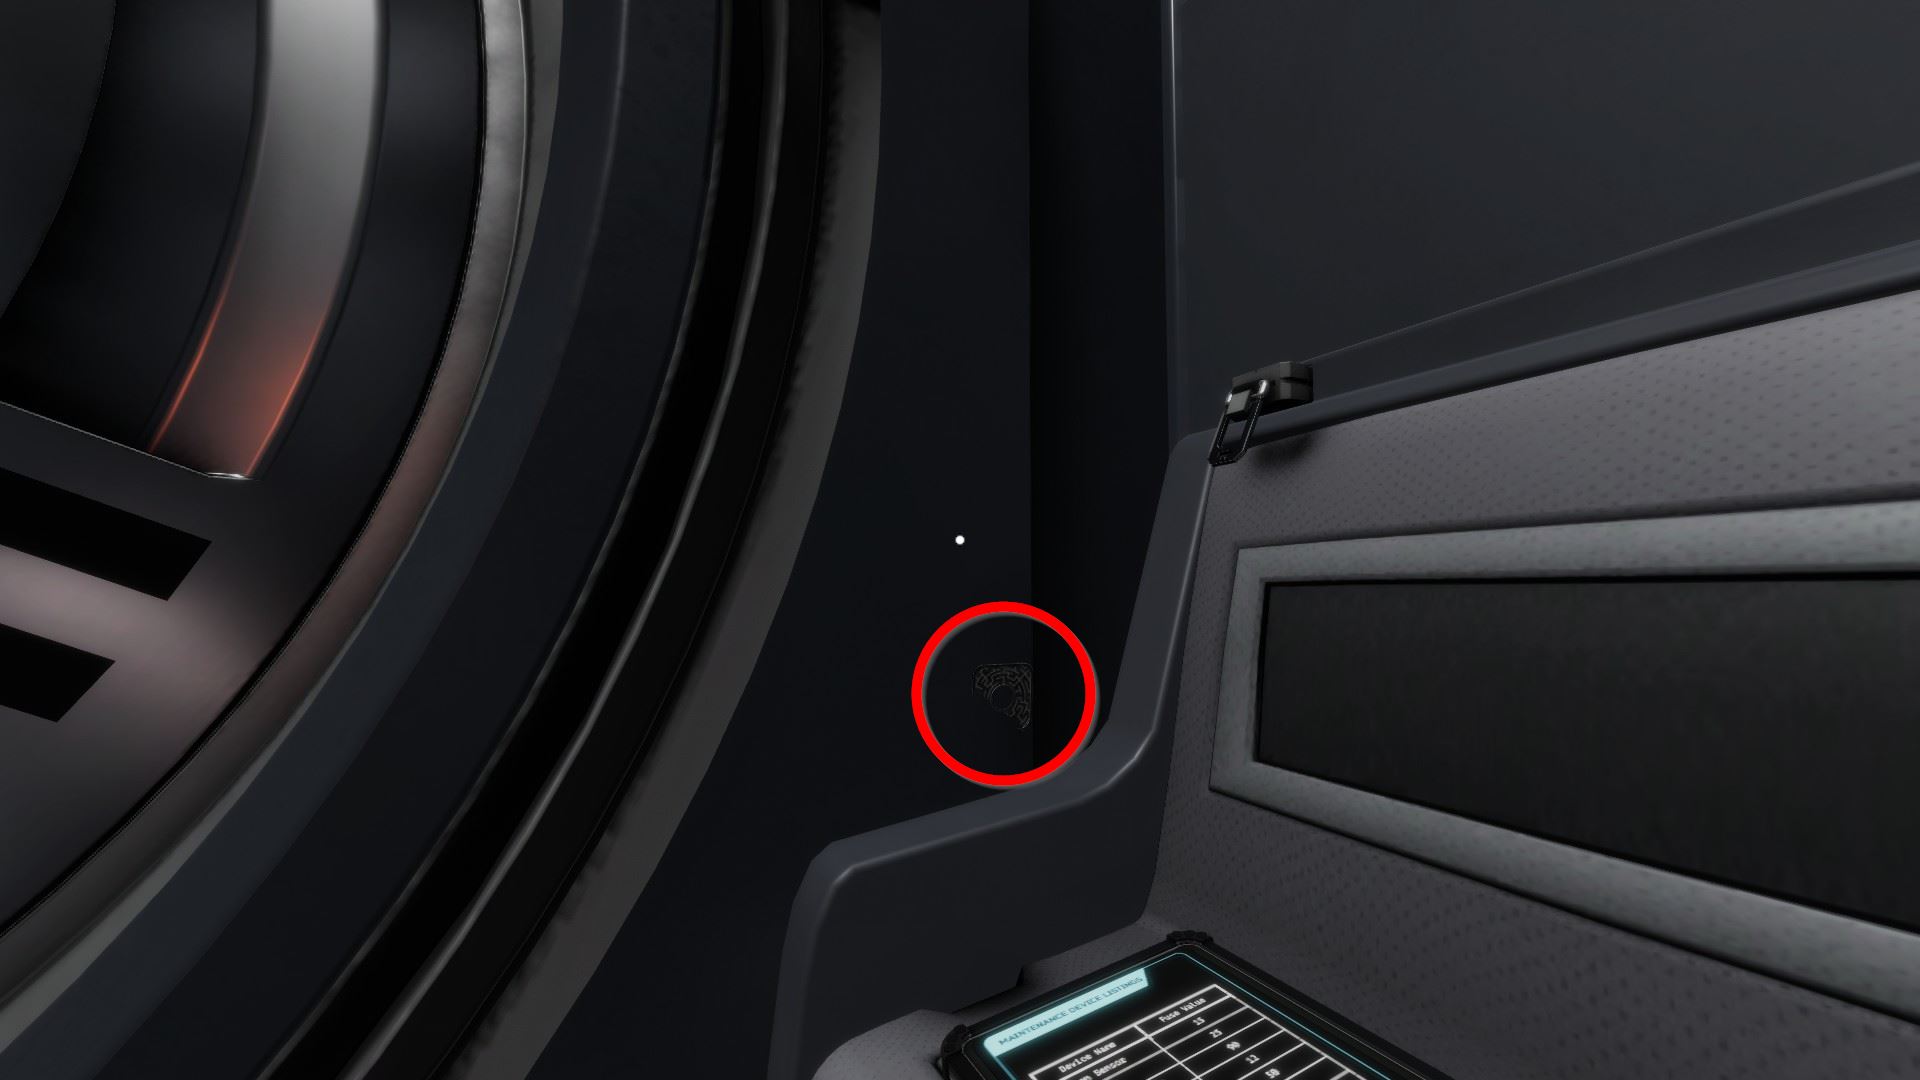
⏹ Token five / eight - inside the gas bottle holder on the right of the space suit (bottom hole):
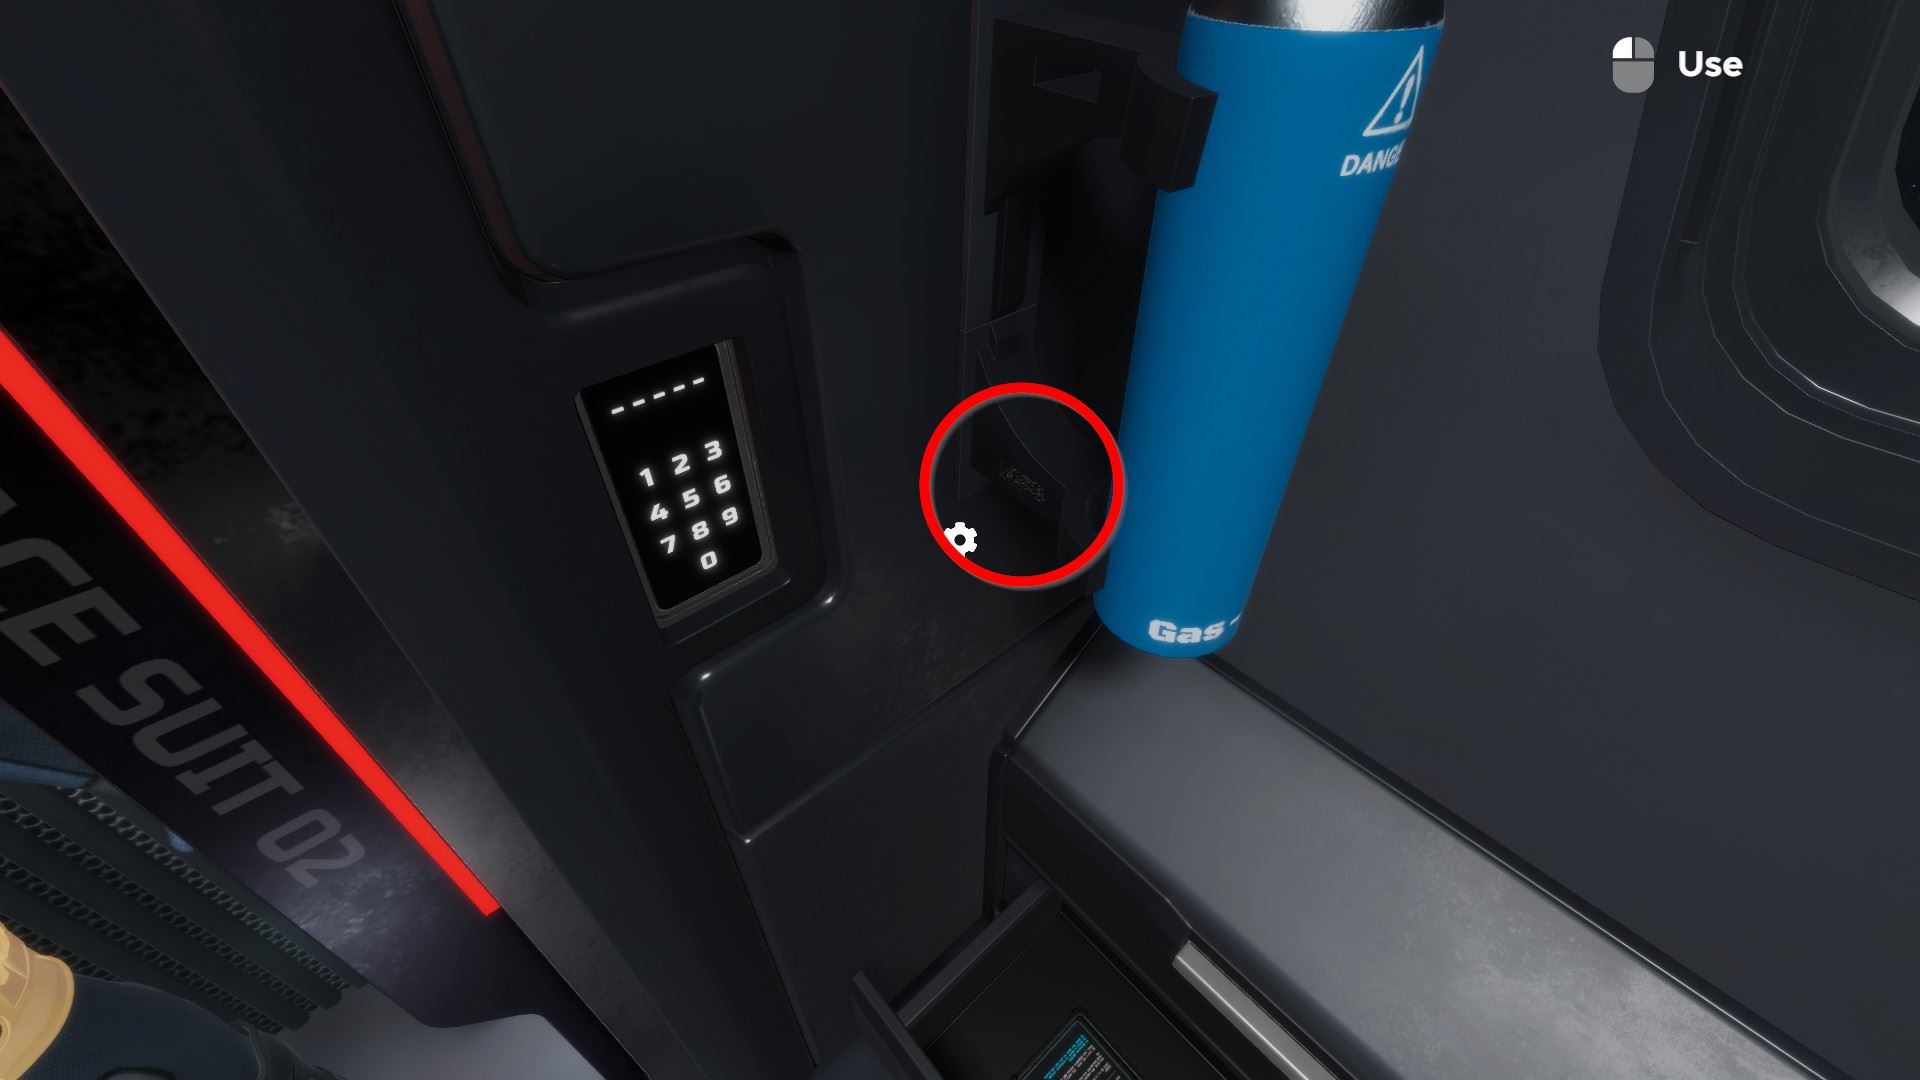
Opposite the bench, take ii fuse-fifteen from the right drawer, remove the service console in the centre, and insert the two fuses (drag into the available spots).
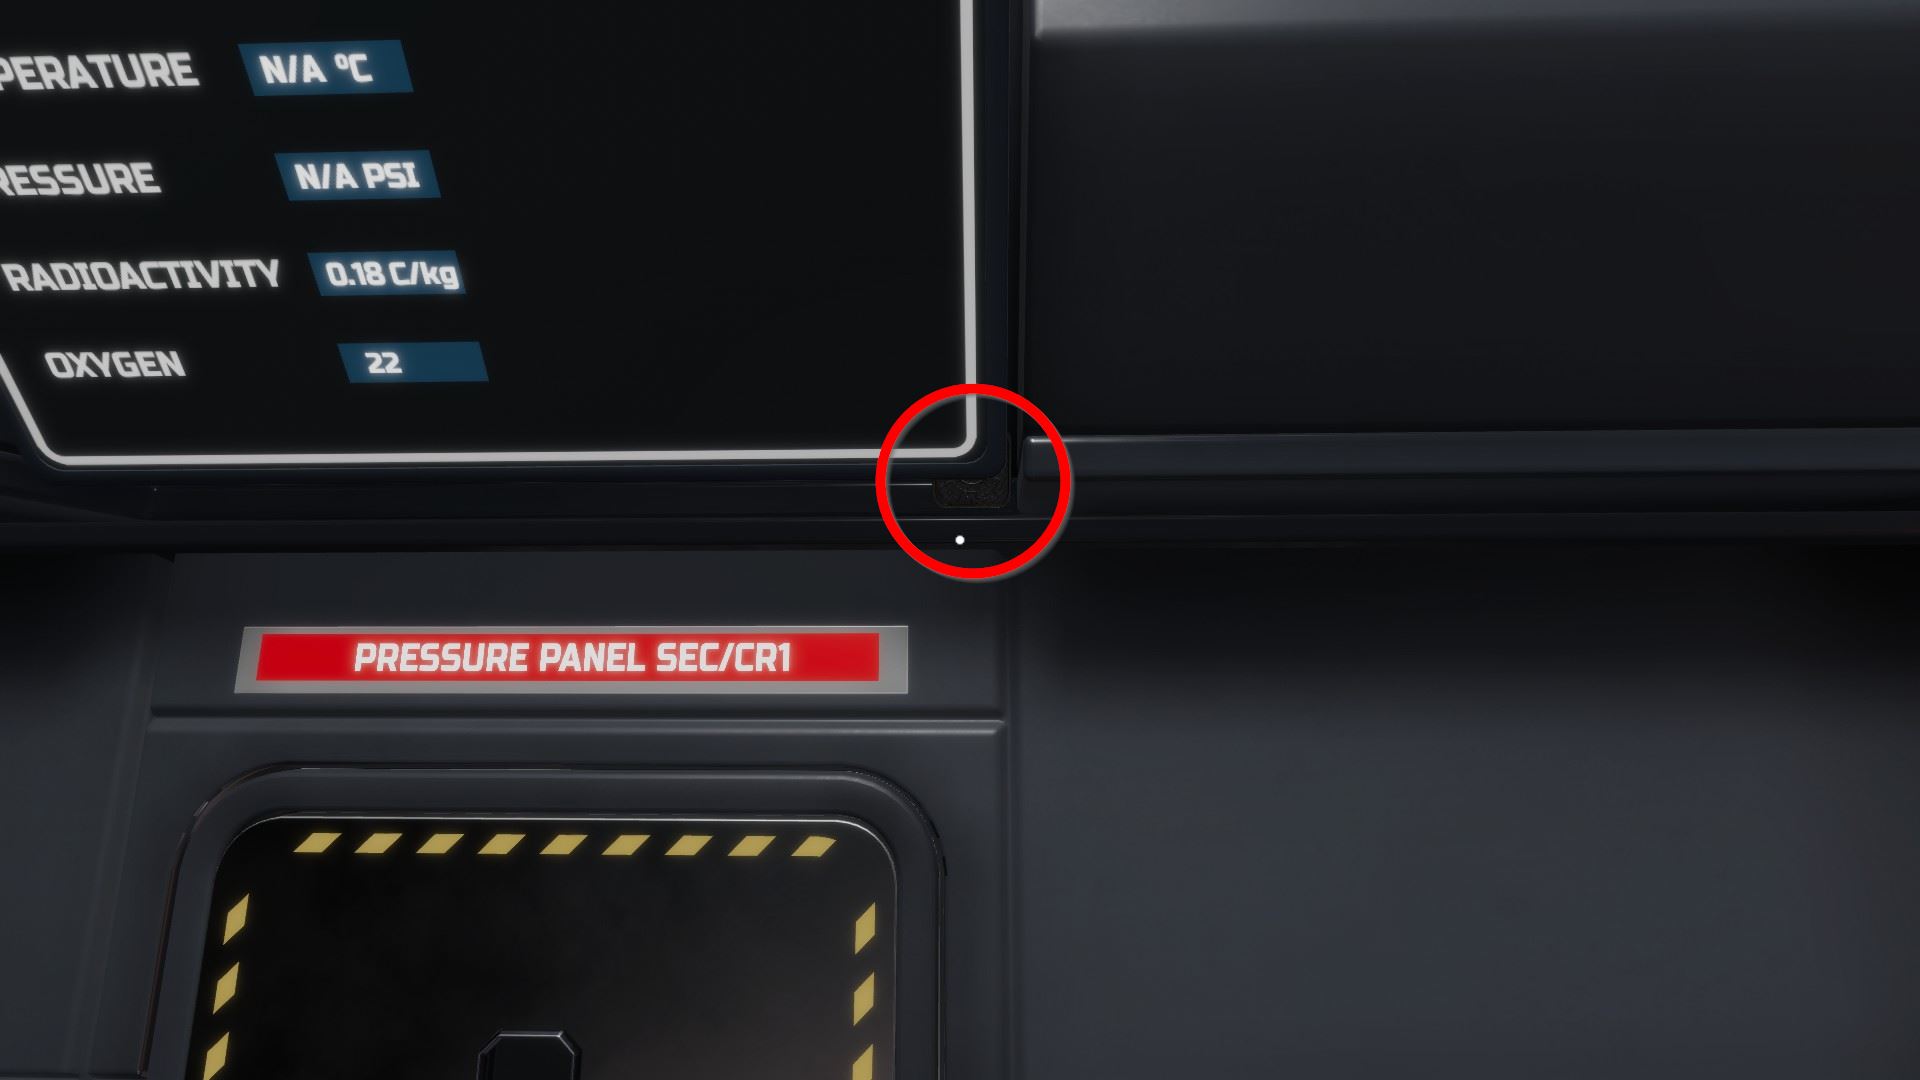
⏹ Token half-dozen / viii - on the top correct of this service panel:
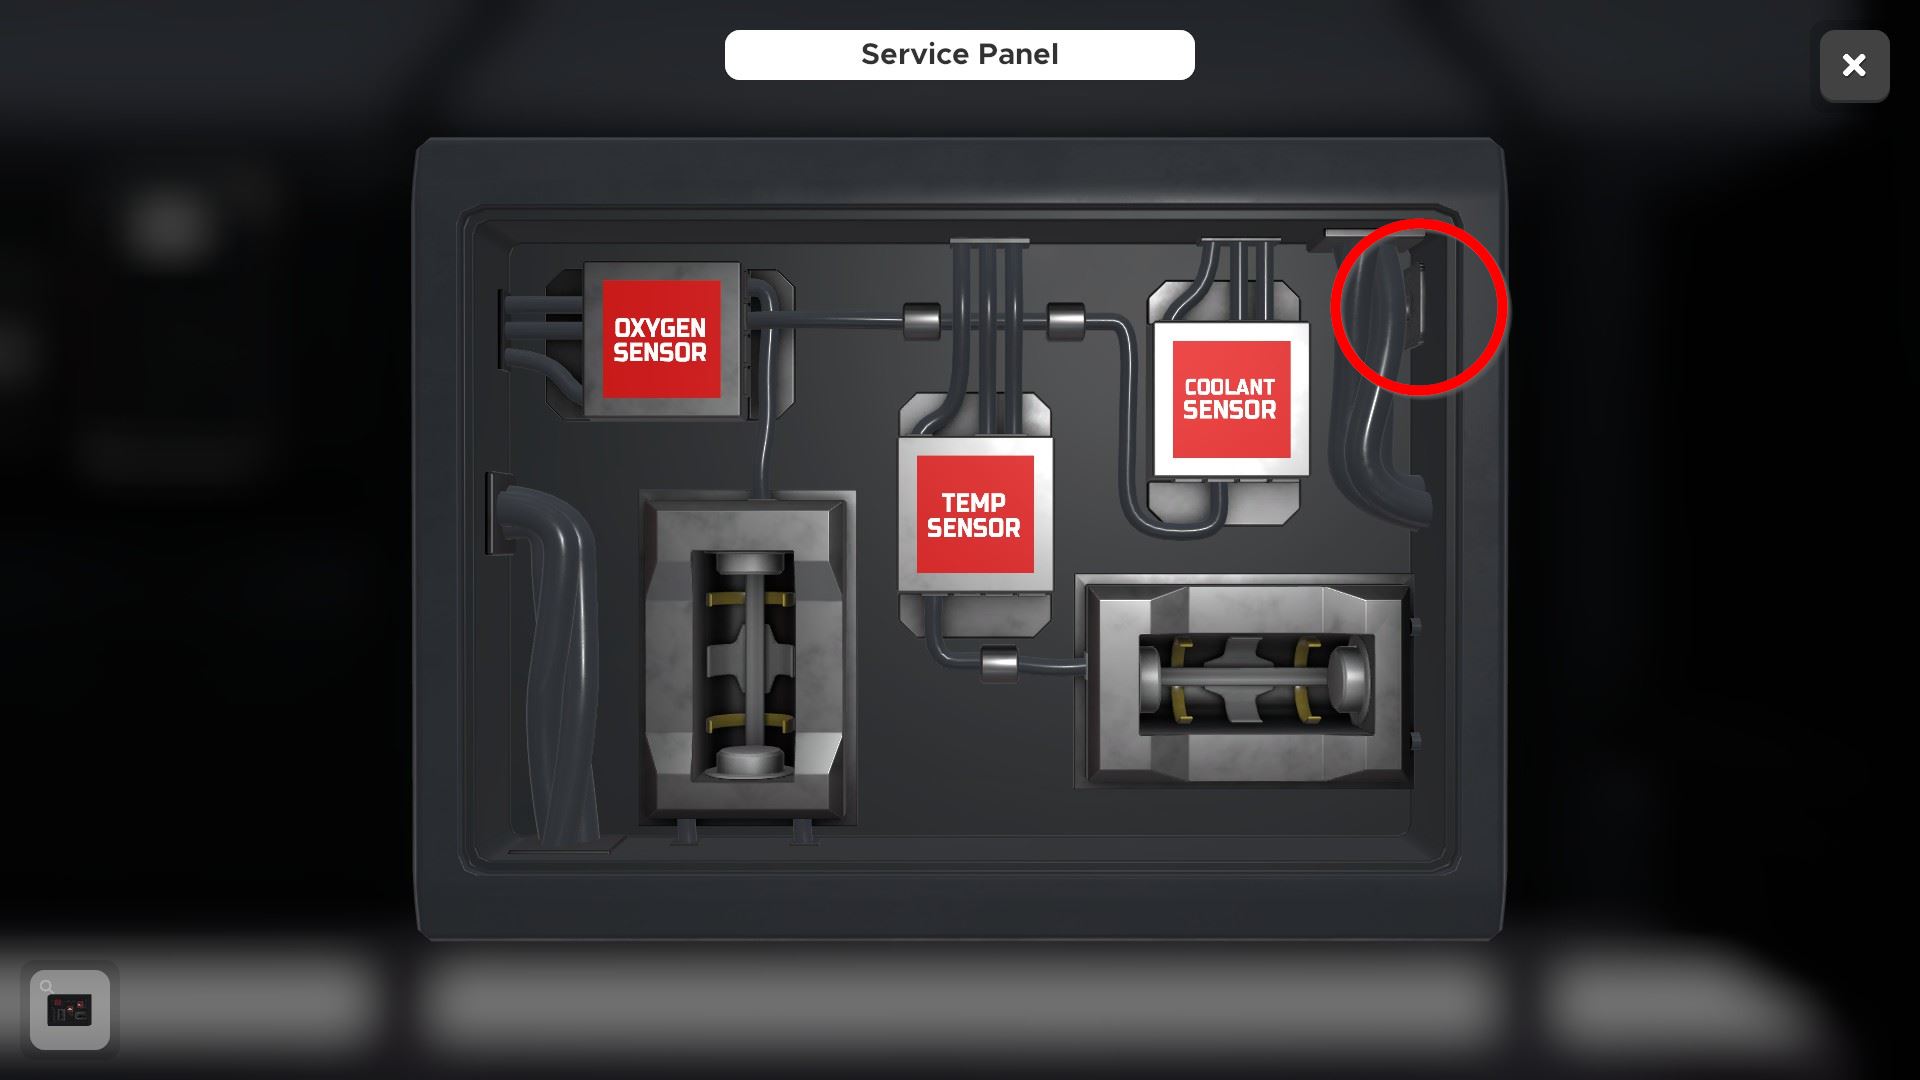
The keypad above the left drawer takes a code derived from the safety protocols: 3-8-4 (hint PDA in the depict below; safety protocol affiche reverse to information technology)
Take the tools from the toolbox inside.
⏹ Token 7 / 8 - on the dorsum of the toolbox:
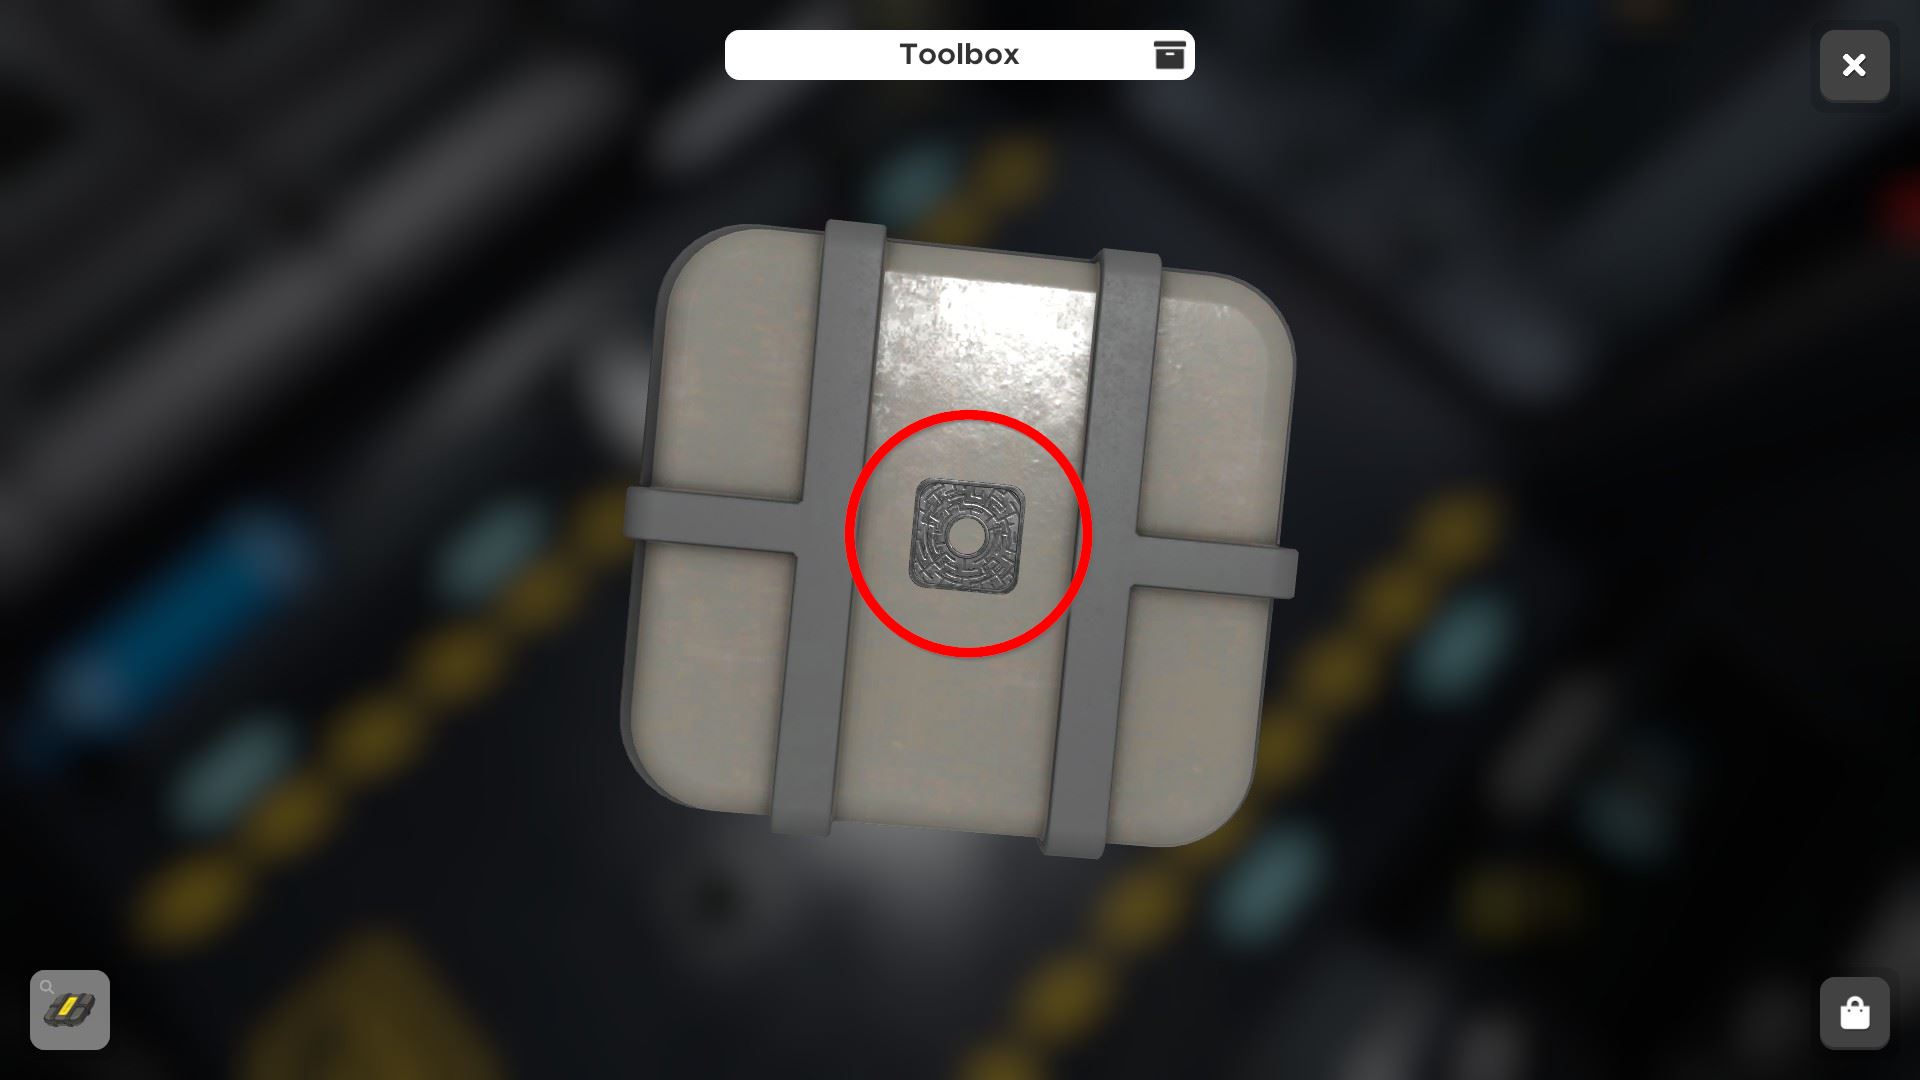
From the toolbox in the keypad drawer, use the tool with a square with rounded edgs to remove the pressure panel comprehend above the bench.
Now y'all can set the correct pressure:
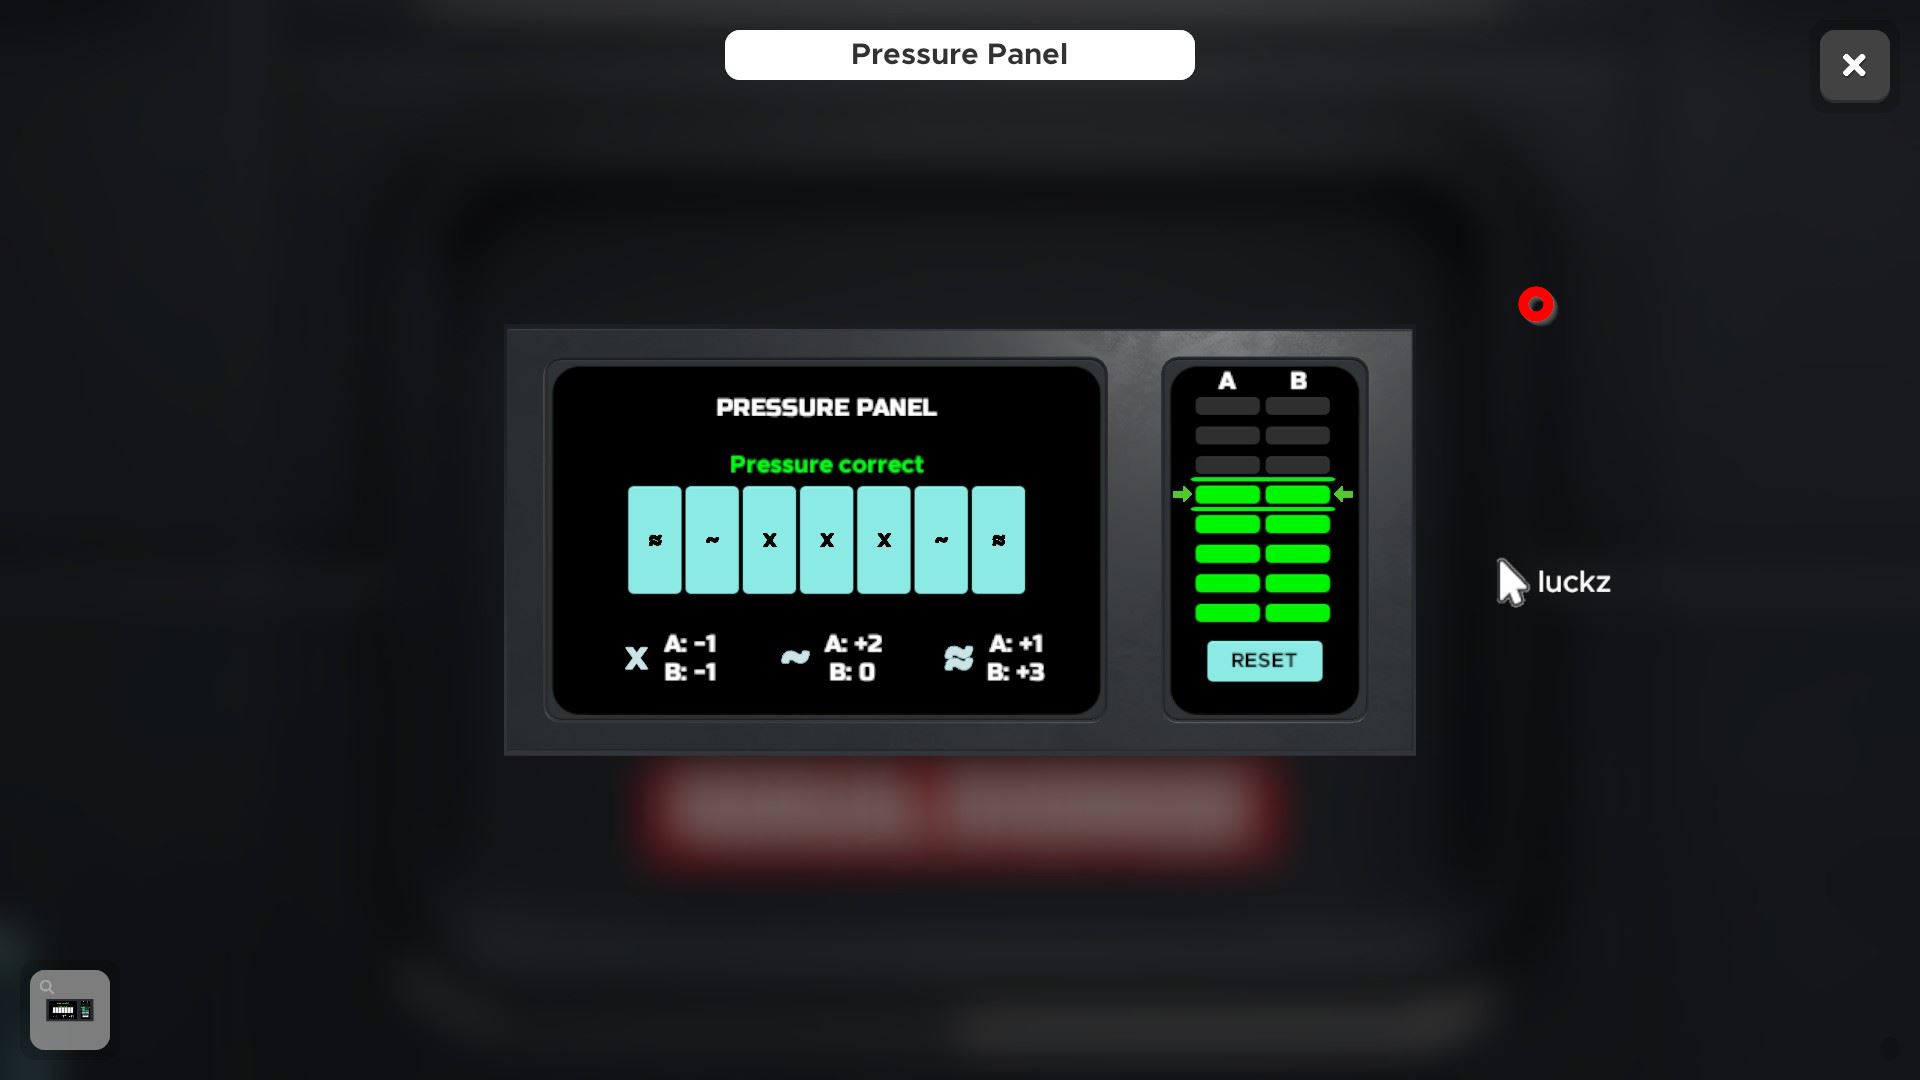
Use a lawmaking derived from the projected hint in front of the space suit to access it: 2-iv-8-v
Attach the display from the keypad drawer, the safety tether from the rightmost drawer, and the helmet & toolbag from the safety rules locker. From the toolbag, accept the screwdriver.
Use the screwdriver to open the power panel higher up the infinite suit. Remove the cleaved fuse-45 and one of the fuse-15. Insert the fuse-25 from the exit panel, the fuse-30 from the left bottom drawer, and a fuse-20 from the rubber rules locker. Now put on the space suit, and move the fuse-25 dorsum to the exit console.
⏹ Token 8 / 8 - nether the space accommodate:
Adrift in Space: Space Walk
🏆
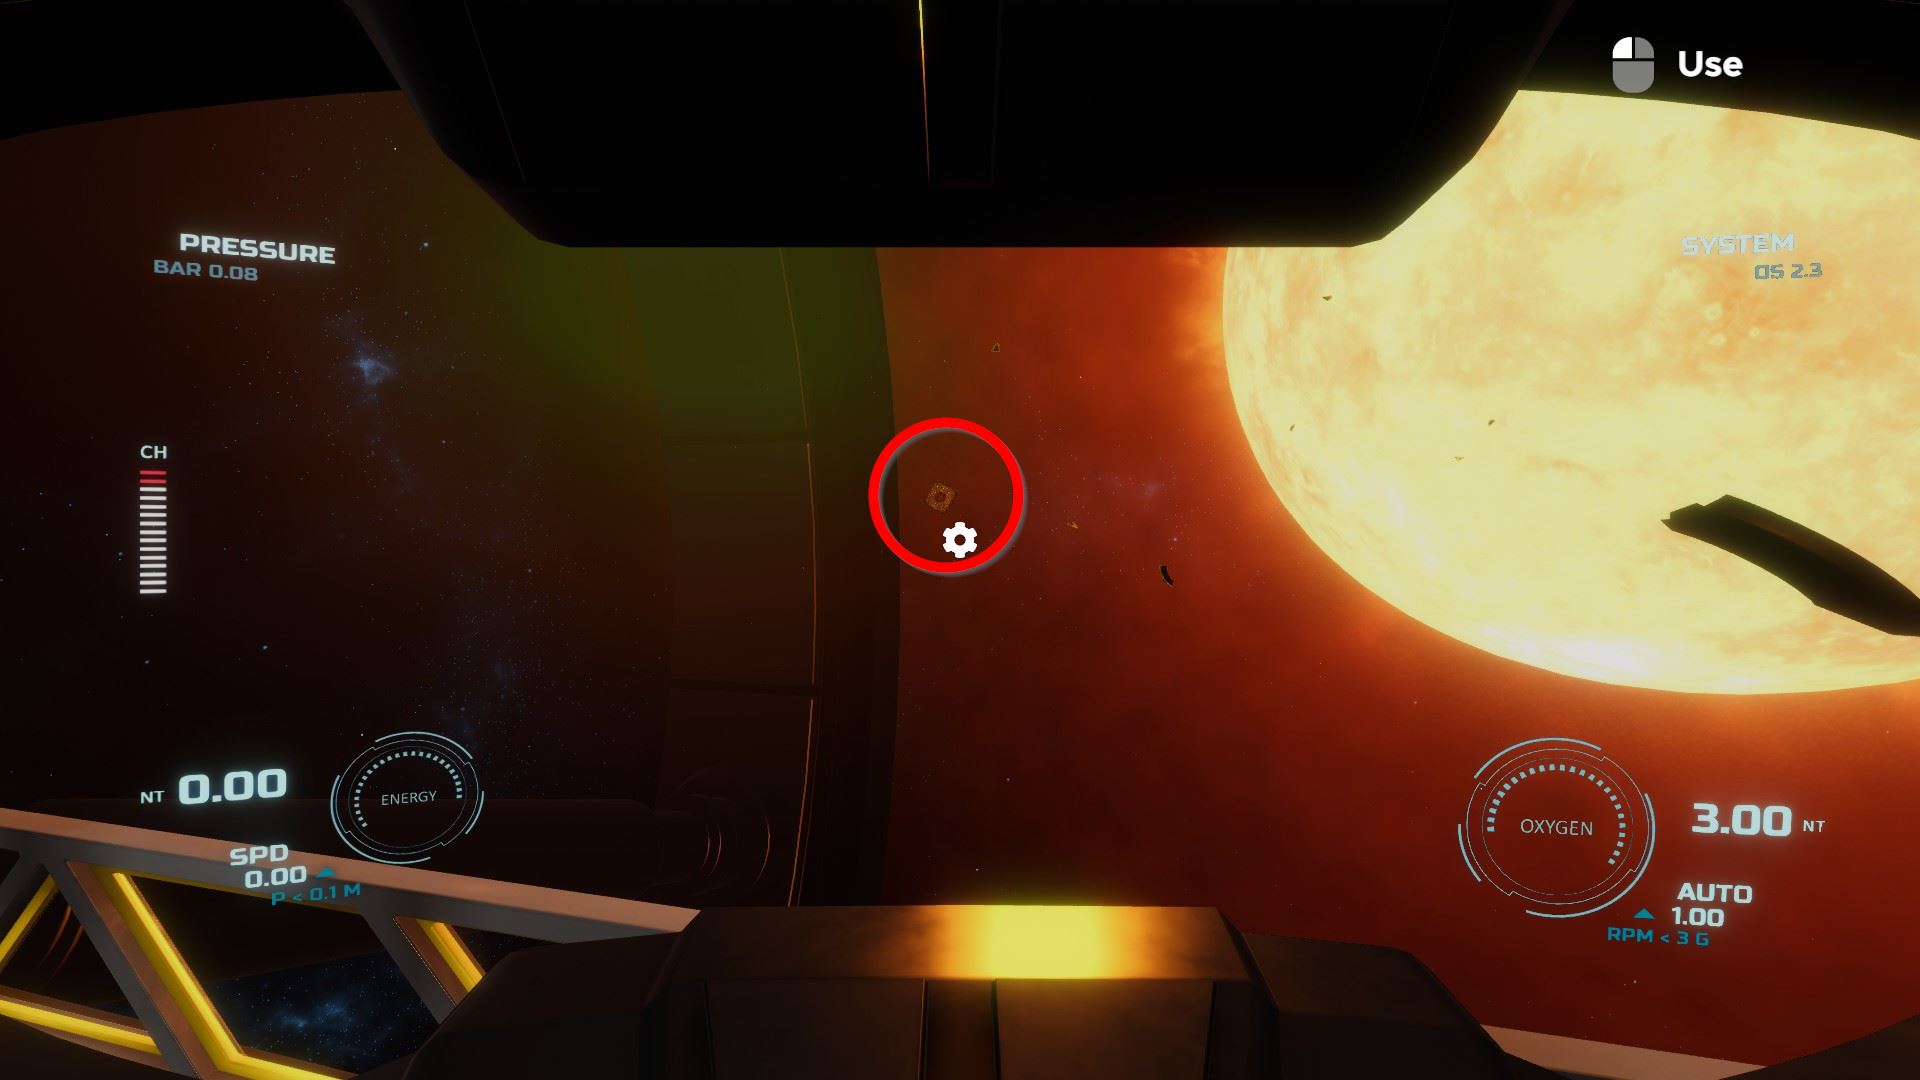
Level-specific achievement: Don't Wait at the Sun
But stare out of the open window for a while.
Use the zooming in function (middle mouse central).
Tin likewise be obtained in Adrift in Space: Emergency Awakening
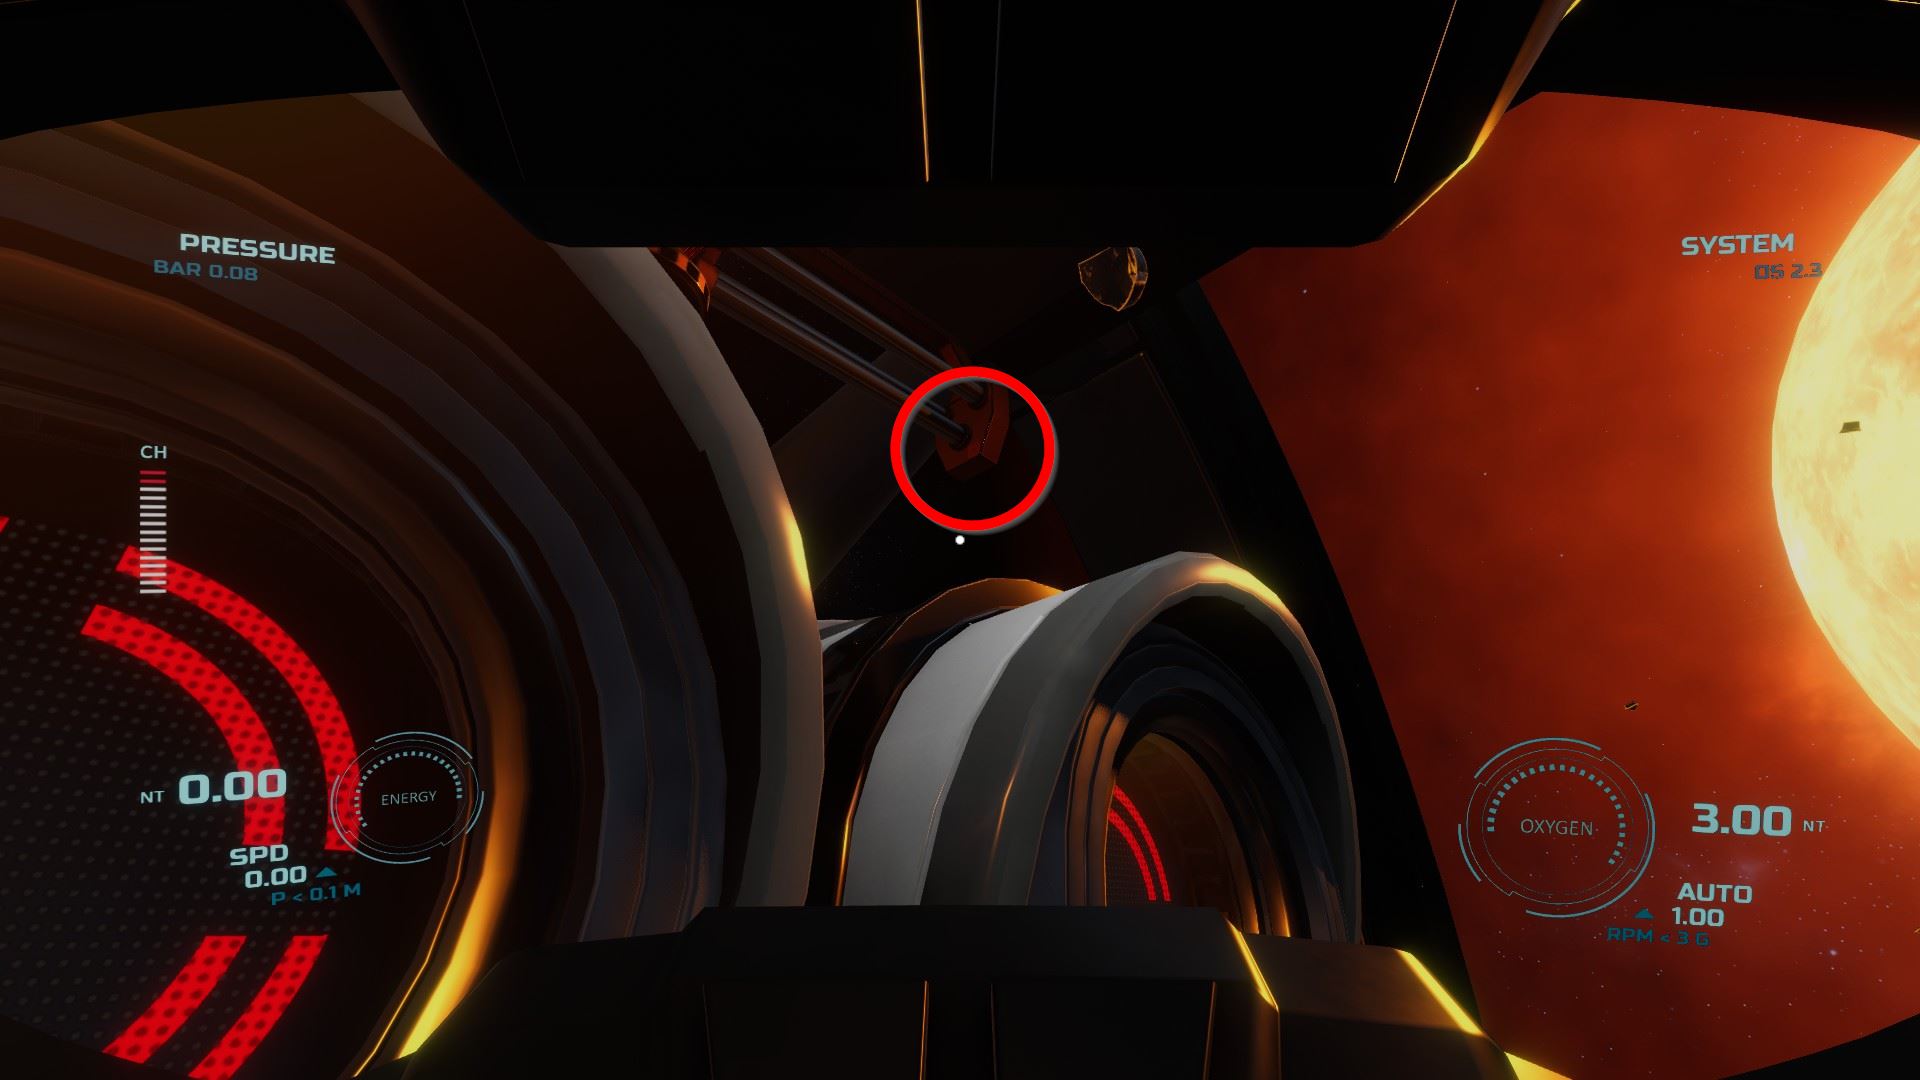
⏹ Token 1 / 8 - nether the (correct) fuel tank monitor pipage:
⏹ Token 2 / 8 - within the 'viii' of the space vessel proper noun:

⏹ Token 3 / 8 - left of the E1 engine:
⏹ Token 4 / eight - behind the control panel, on the back side of the top:
⏹ Token 5 / 8 - on the crane:
⏹ Token vi / 8 - floating freely in space, looking directly ahead from the keypads:
⏹ Token seven / 8 - on the fuel pipes:
Pull down the E1 and E2 levers and use this order to plug in the cables on both sides: blue, red, yellow, light-green

Left keypad 1531 (hint in drawer beneath)
Right keypad 2357 (worn out buttons in ascending social club)
Use crane to pick up the battery with a cherry glowing calorie-free and drop information technology in the player area, and then remove top disc (has an error condition), and insert the purple laser element from the right keypad box. Put the disc back into the battery. Utilize the crane to put the batteries into the E1 and E2 engines.
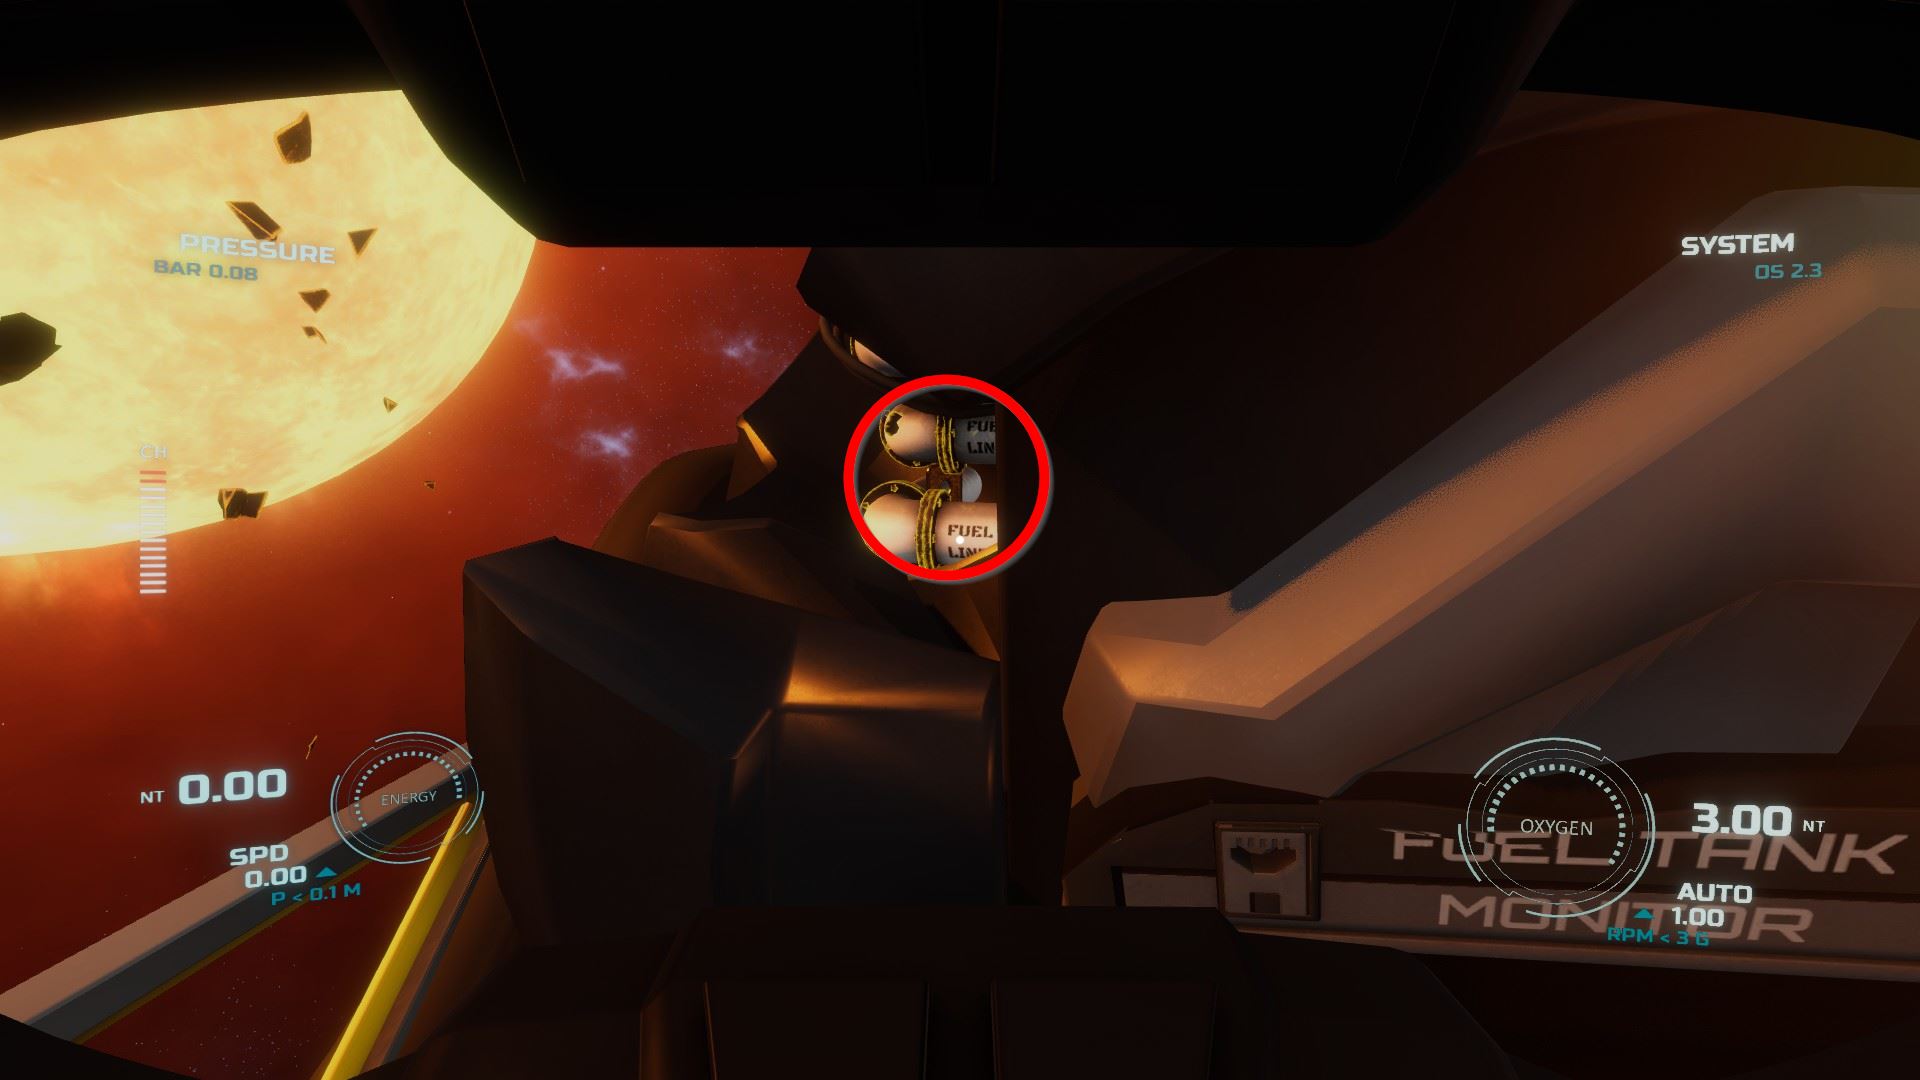
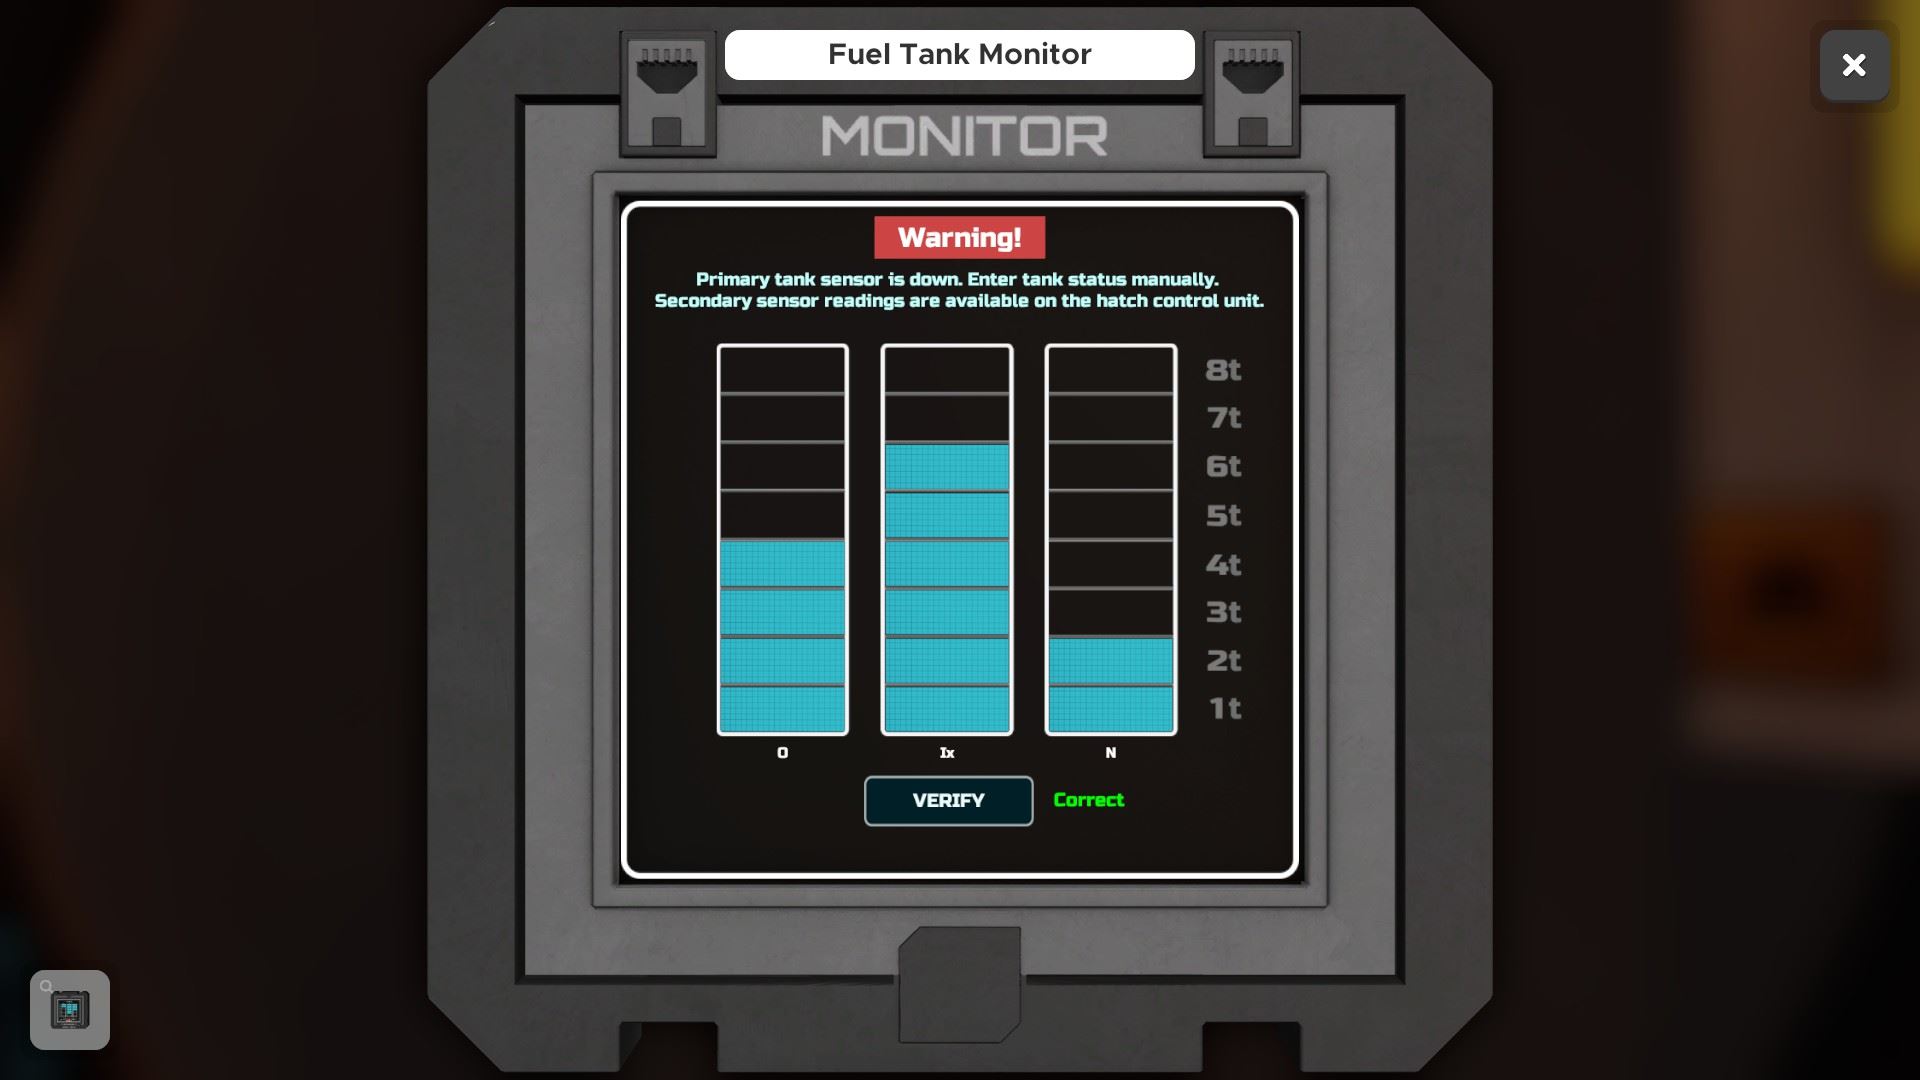
Fuel tank monitor: 4 O, 6 Ix, two North (hatch monitor -> sensors)
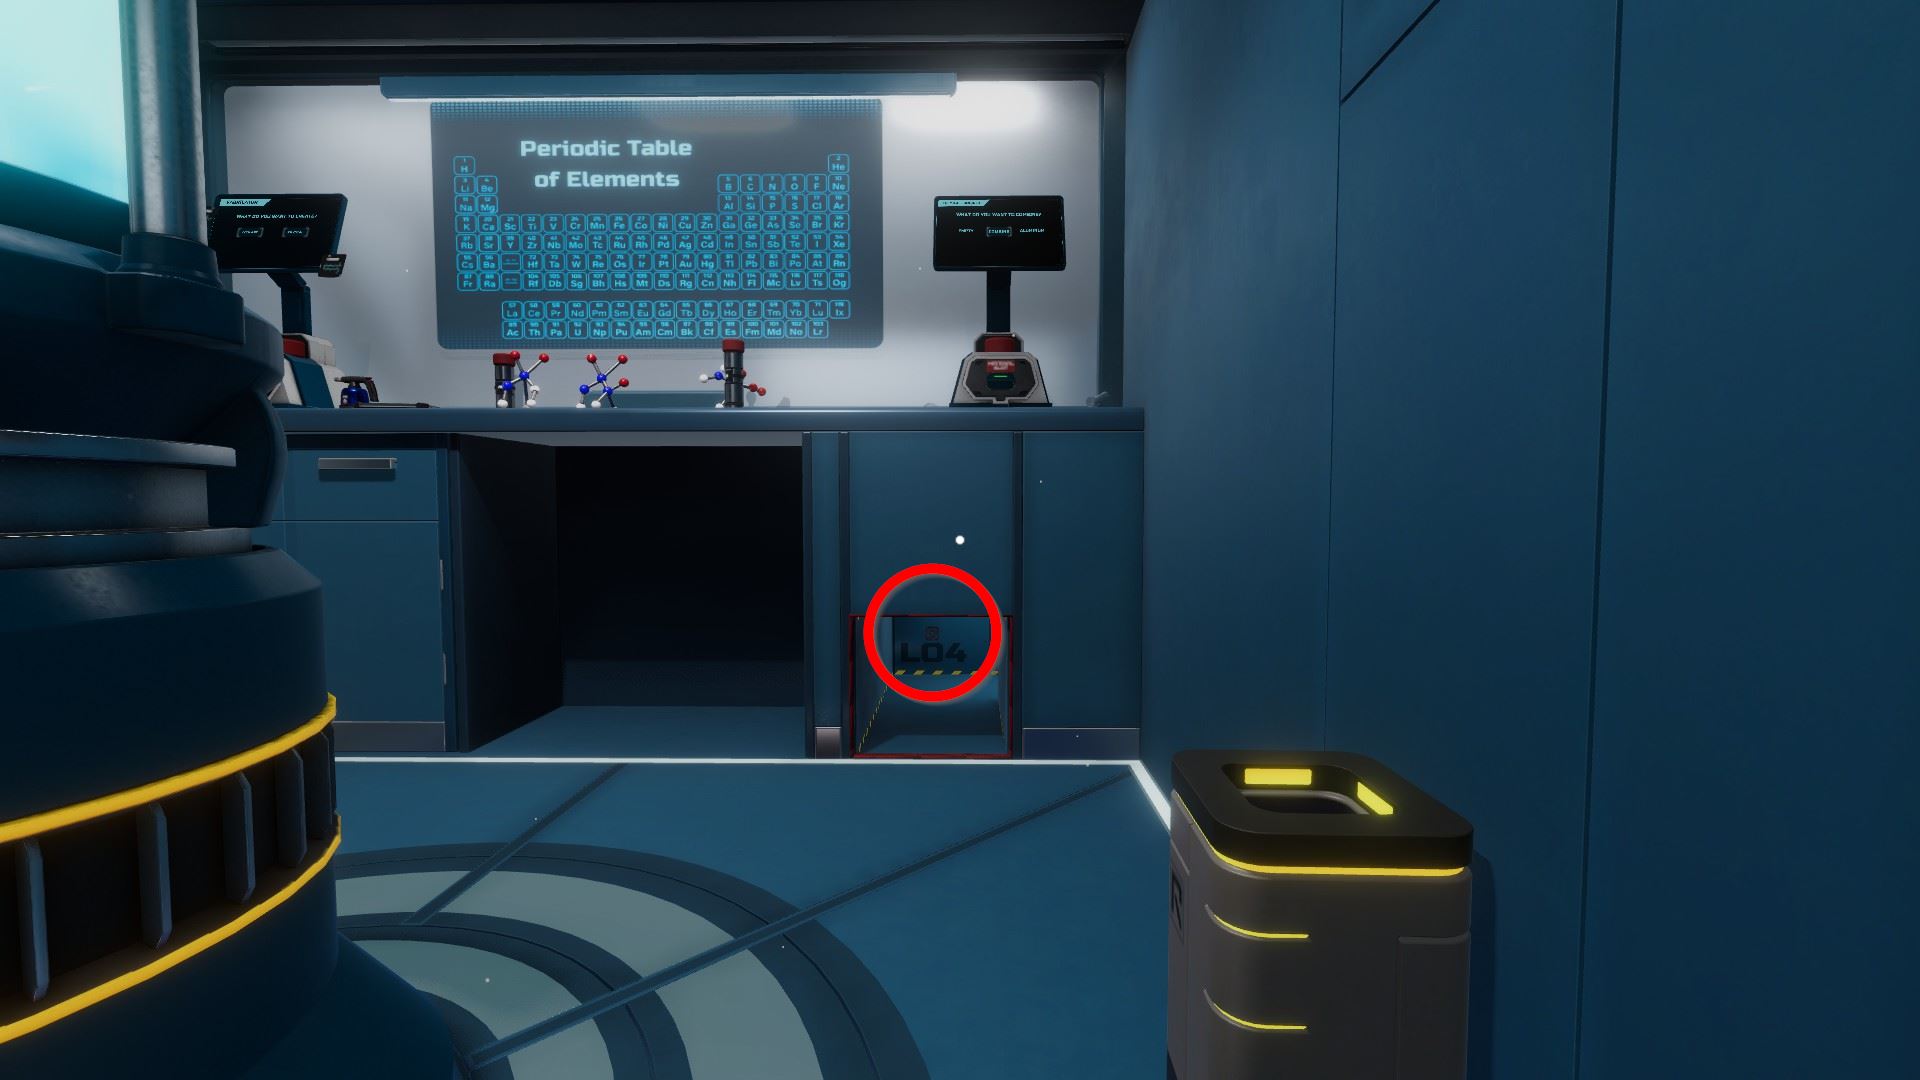
Hatch monitor card grid: B04 to unlock a floor panel (from PDA in the drawer under the left keypad)
⏹ Token 8 / 8 - if you input the code C06 in the hatch monitor menu to unlock a different floor panel:
Make full the three accessible floor pipe puzzles as follows (extra pipes in left keypad box):
(Alternatively you can also route it through the B-D connectedness.)
Pull the hatch switch and click the exit.
Edgewood Mansion: Brain Checkup
If you are merely looking to complete the level, it's enough to get the level exit key from the final step. Some of the optional tasks are required to go the tokens, and doing all is best to sympathise the whole level.
⏹ Token one / 8 - tiptop left of the doorframe:
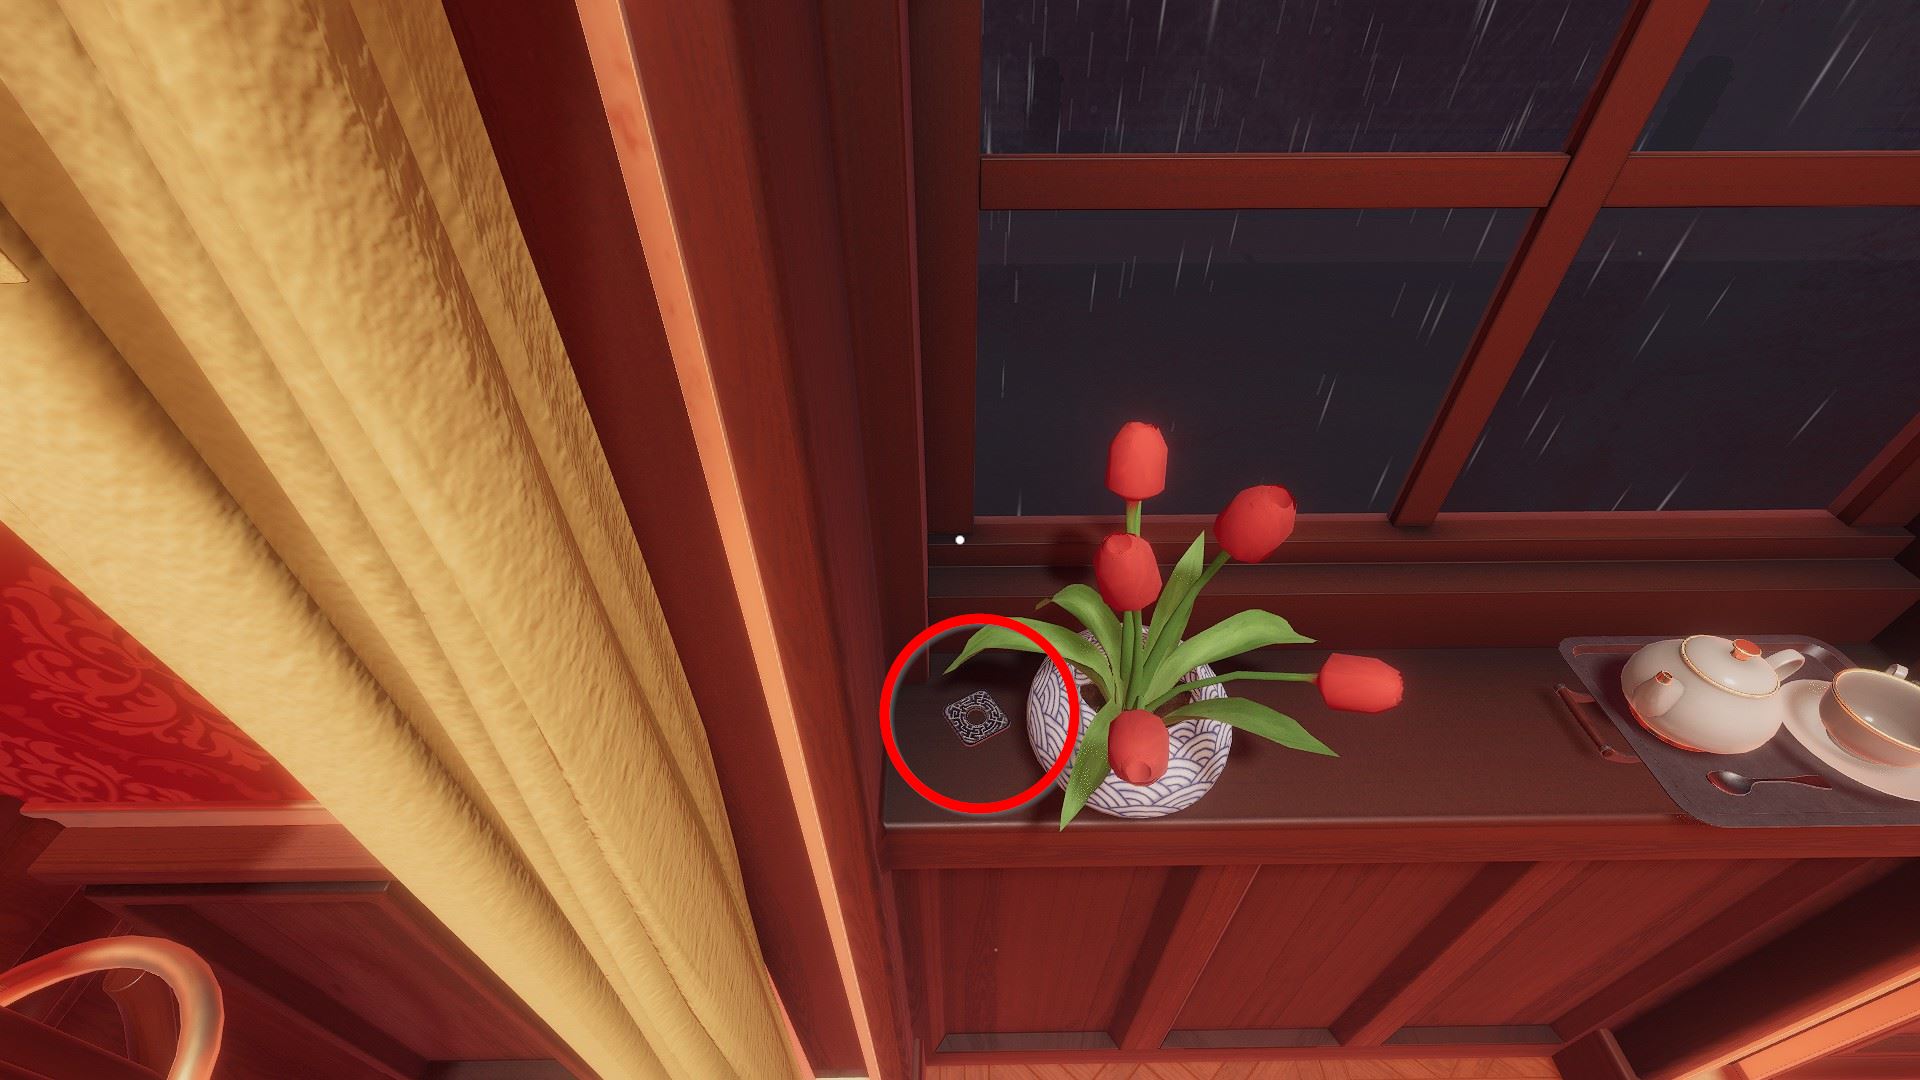
⏹ Token 2 / 8 - at the left of the bloom pot at the window:
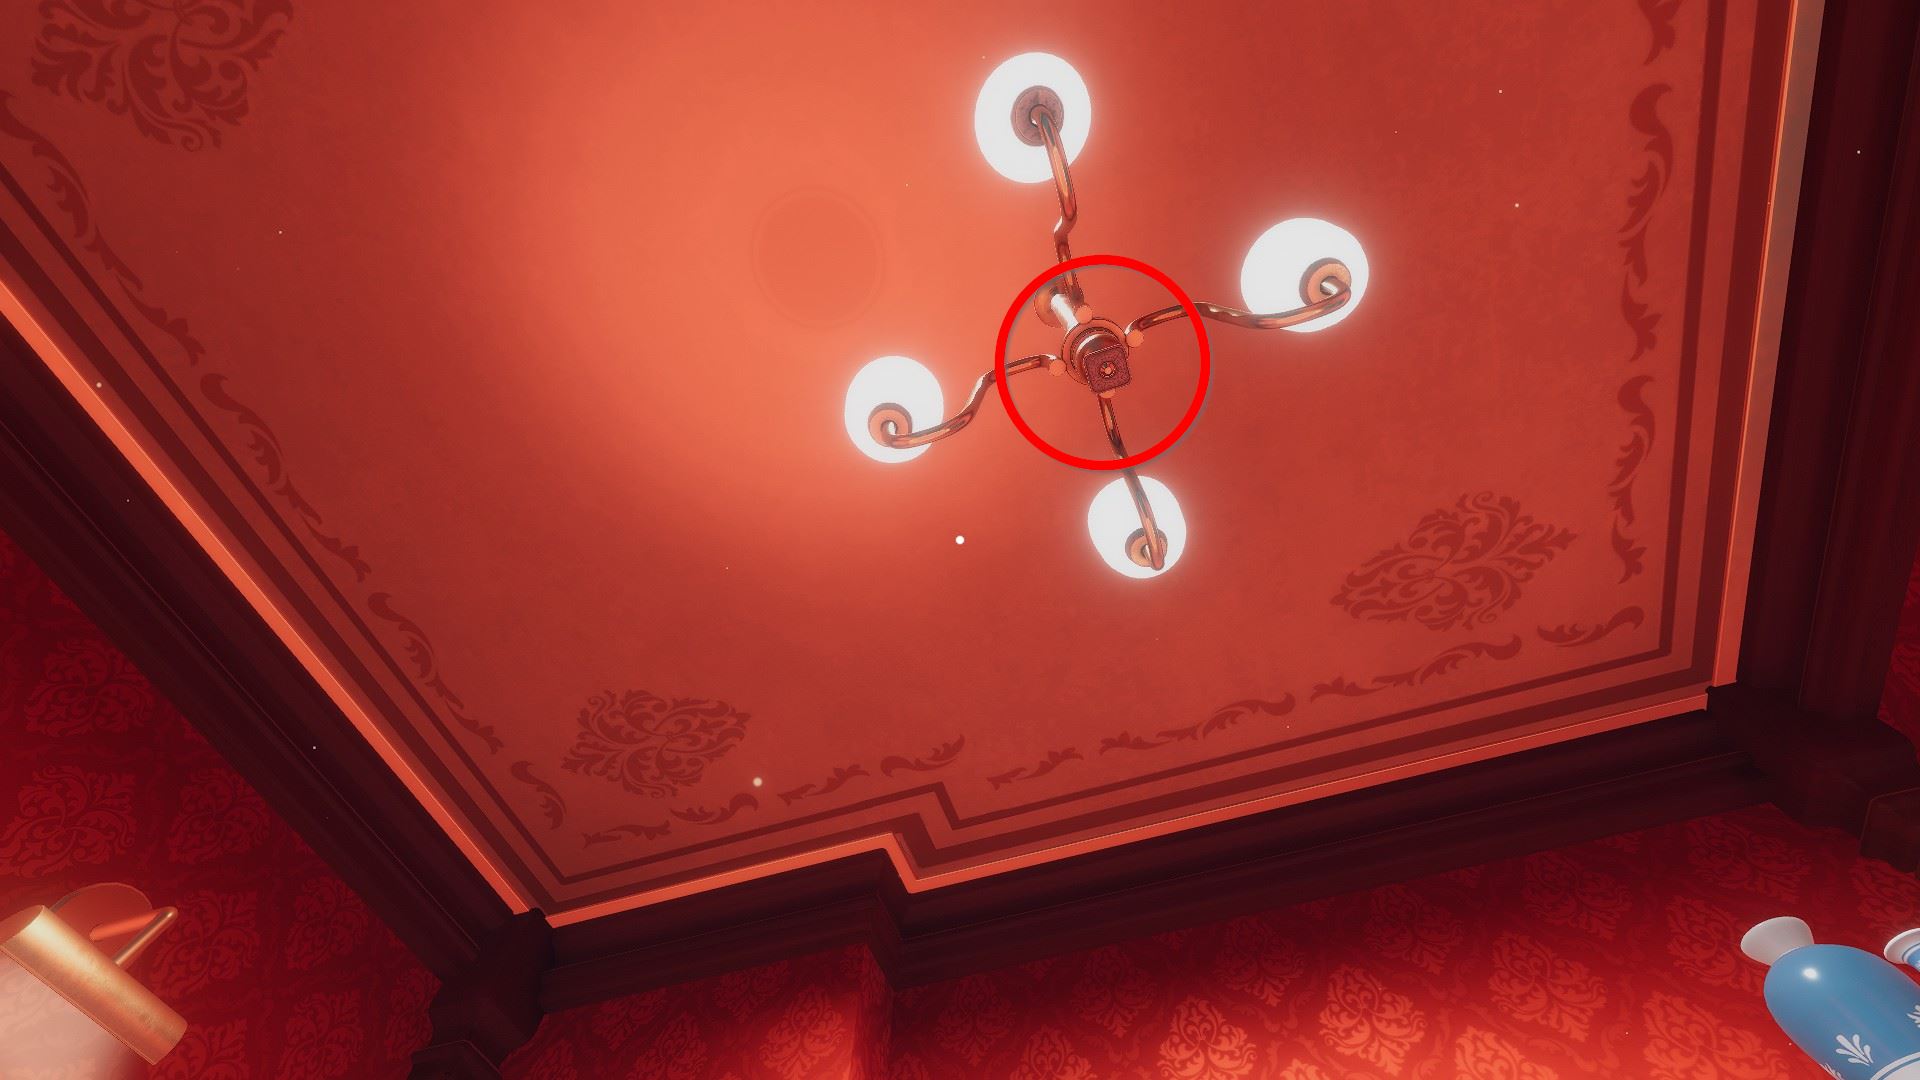
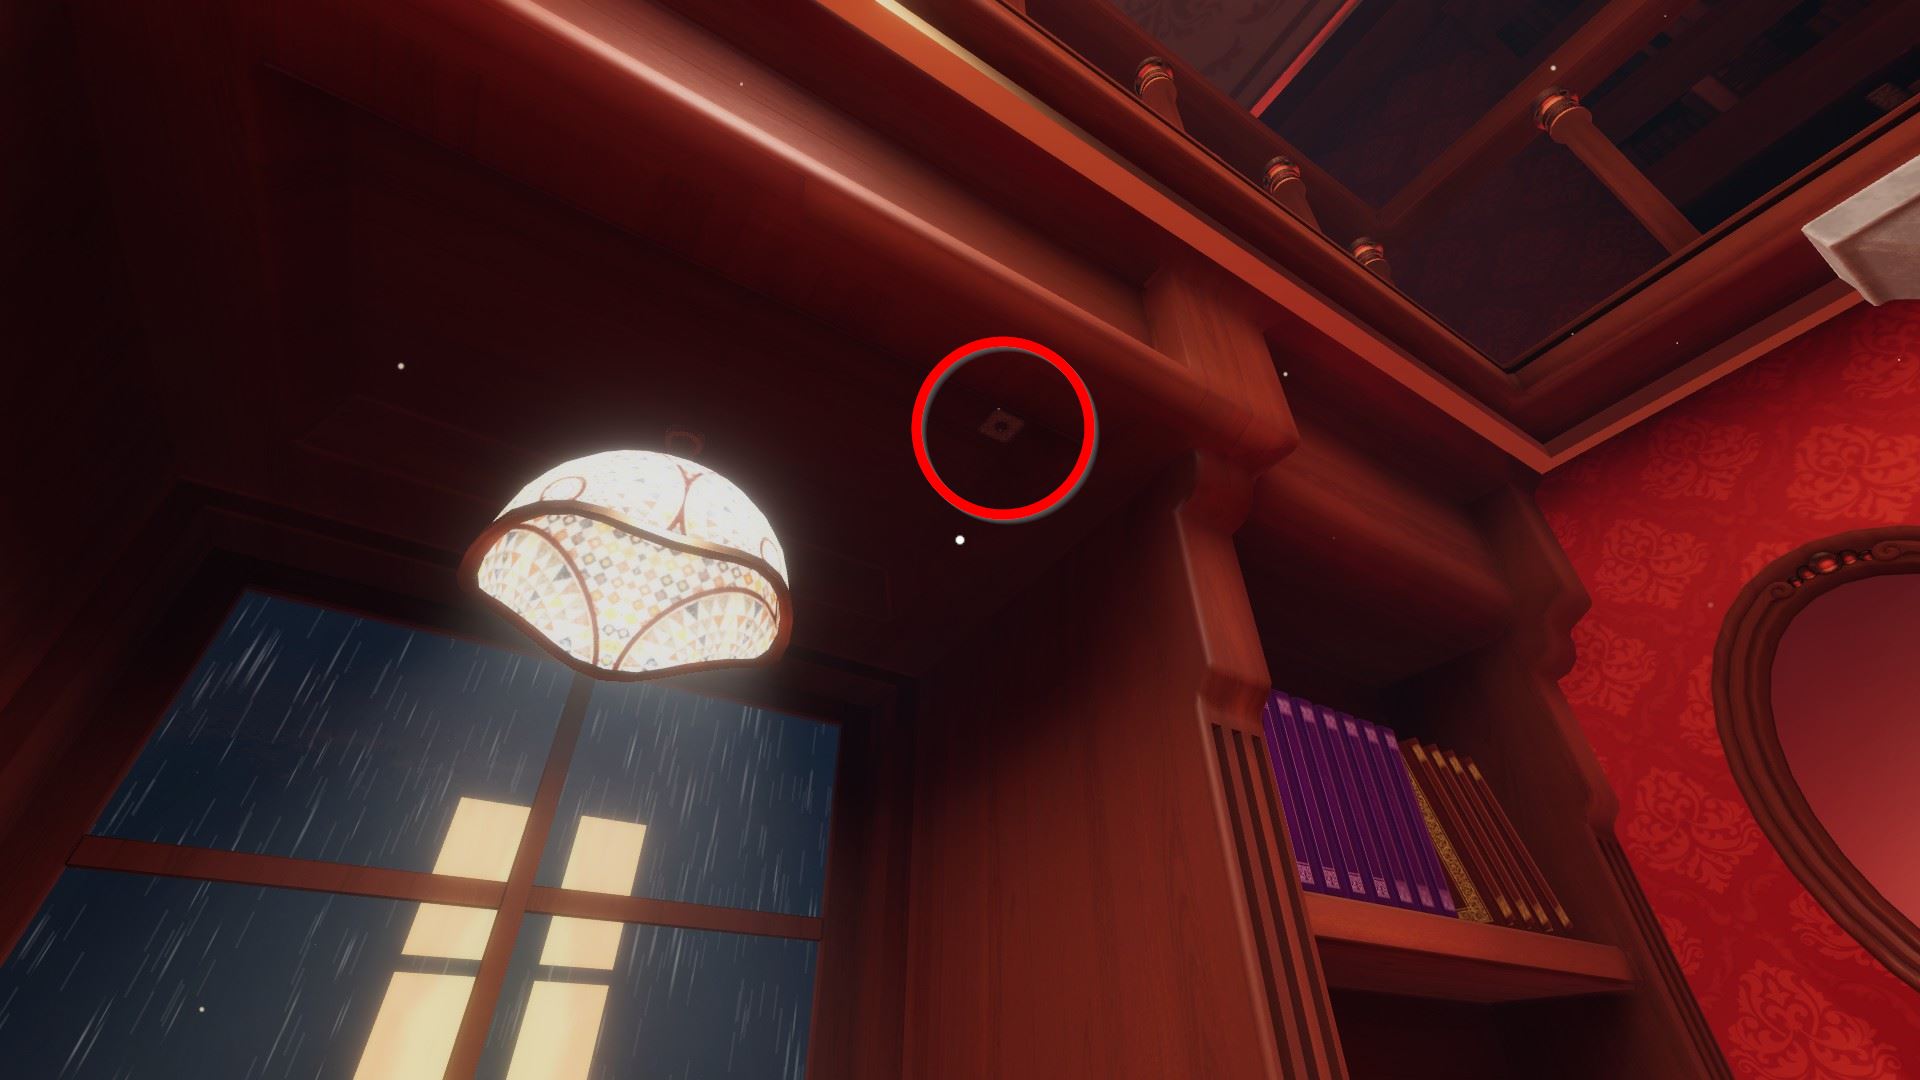
⏹ Token 3 / viii - on the bottom of the ceiling lamp:
⏹ Token 4 / 8 - on the soil of the flower pot to the right of the sofa:

⏹ Token v / viii - inside ink bottle in chiffonier higher up the desk (left of head statue):

**Optional / token** Take the central from behind the correct pillow on the sofa
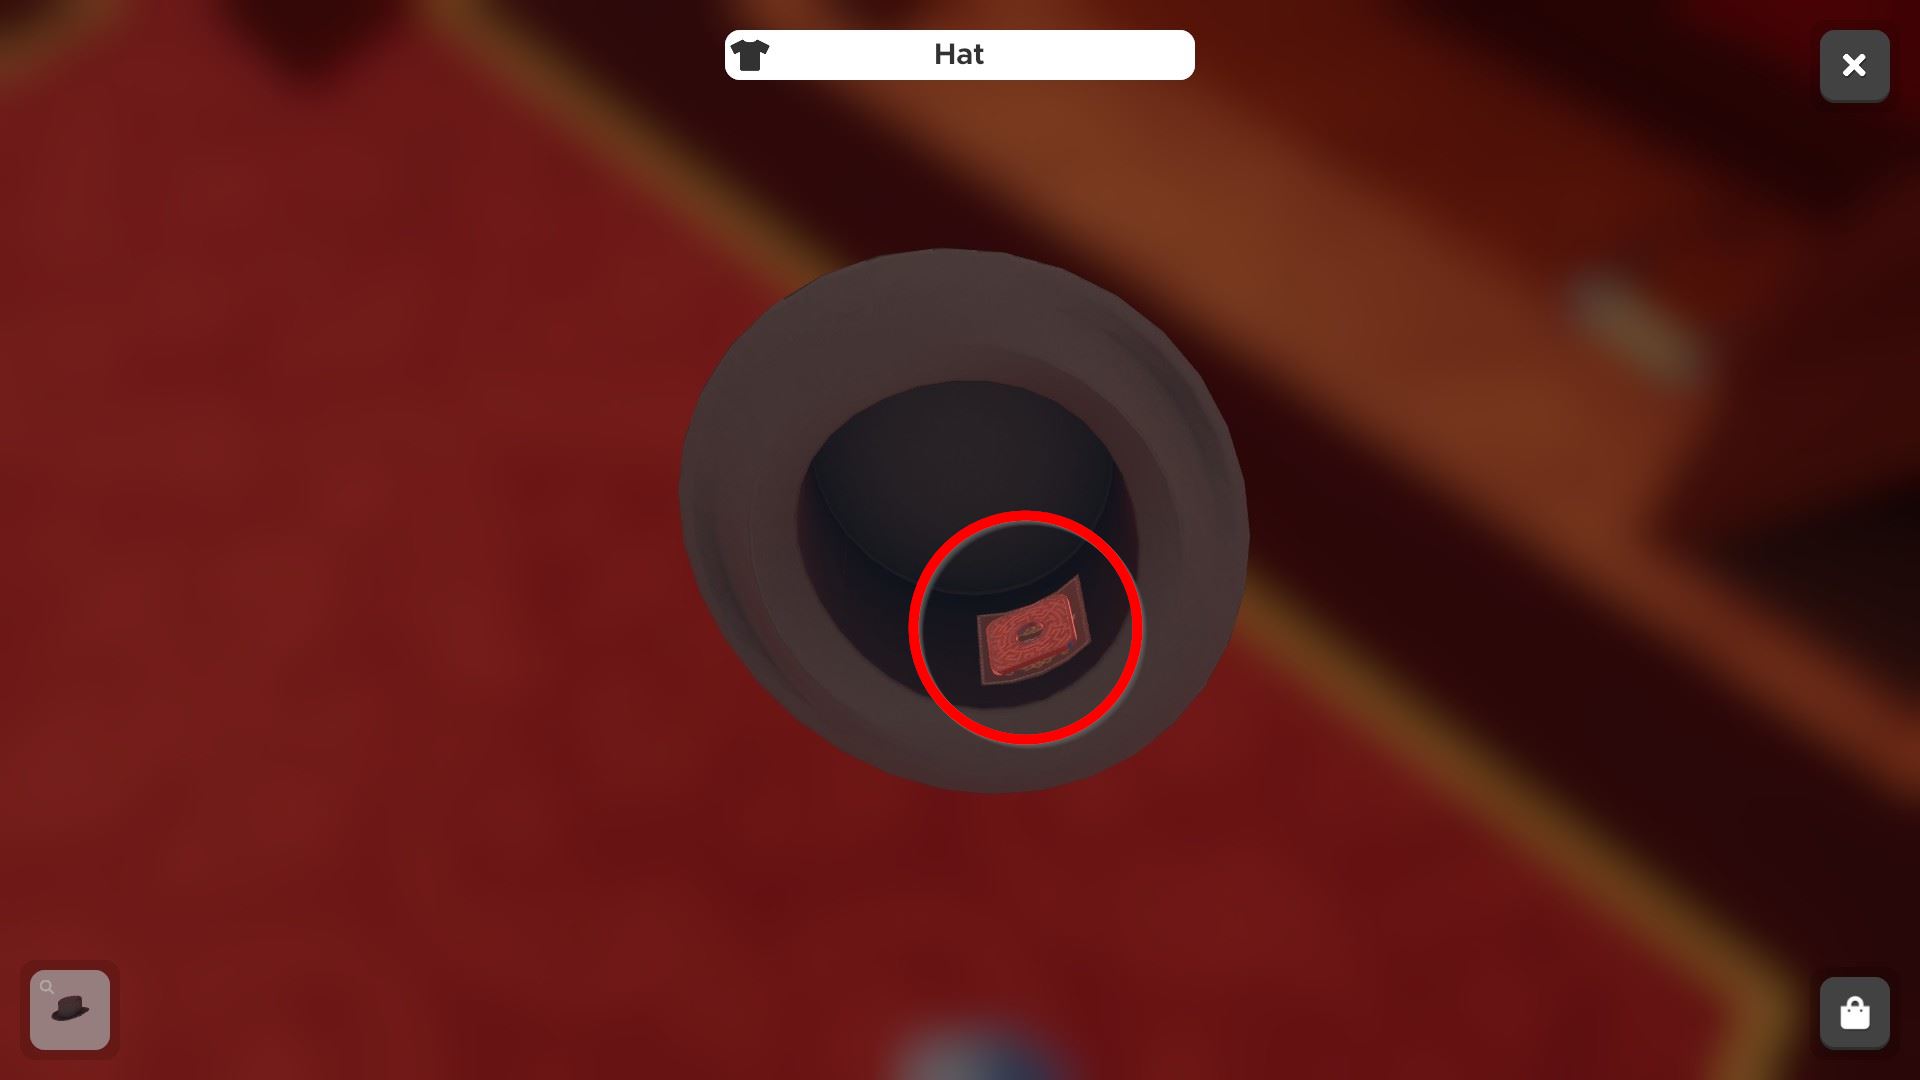
⏹ Token 6 / 8 - within chapeau in bottom right locked compartment:
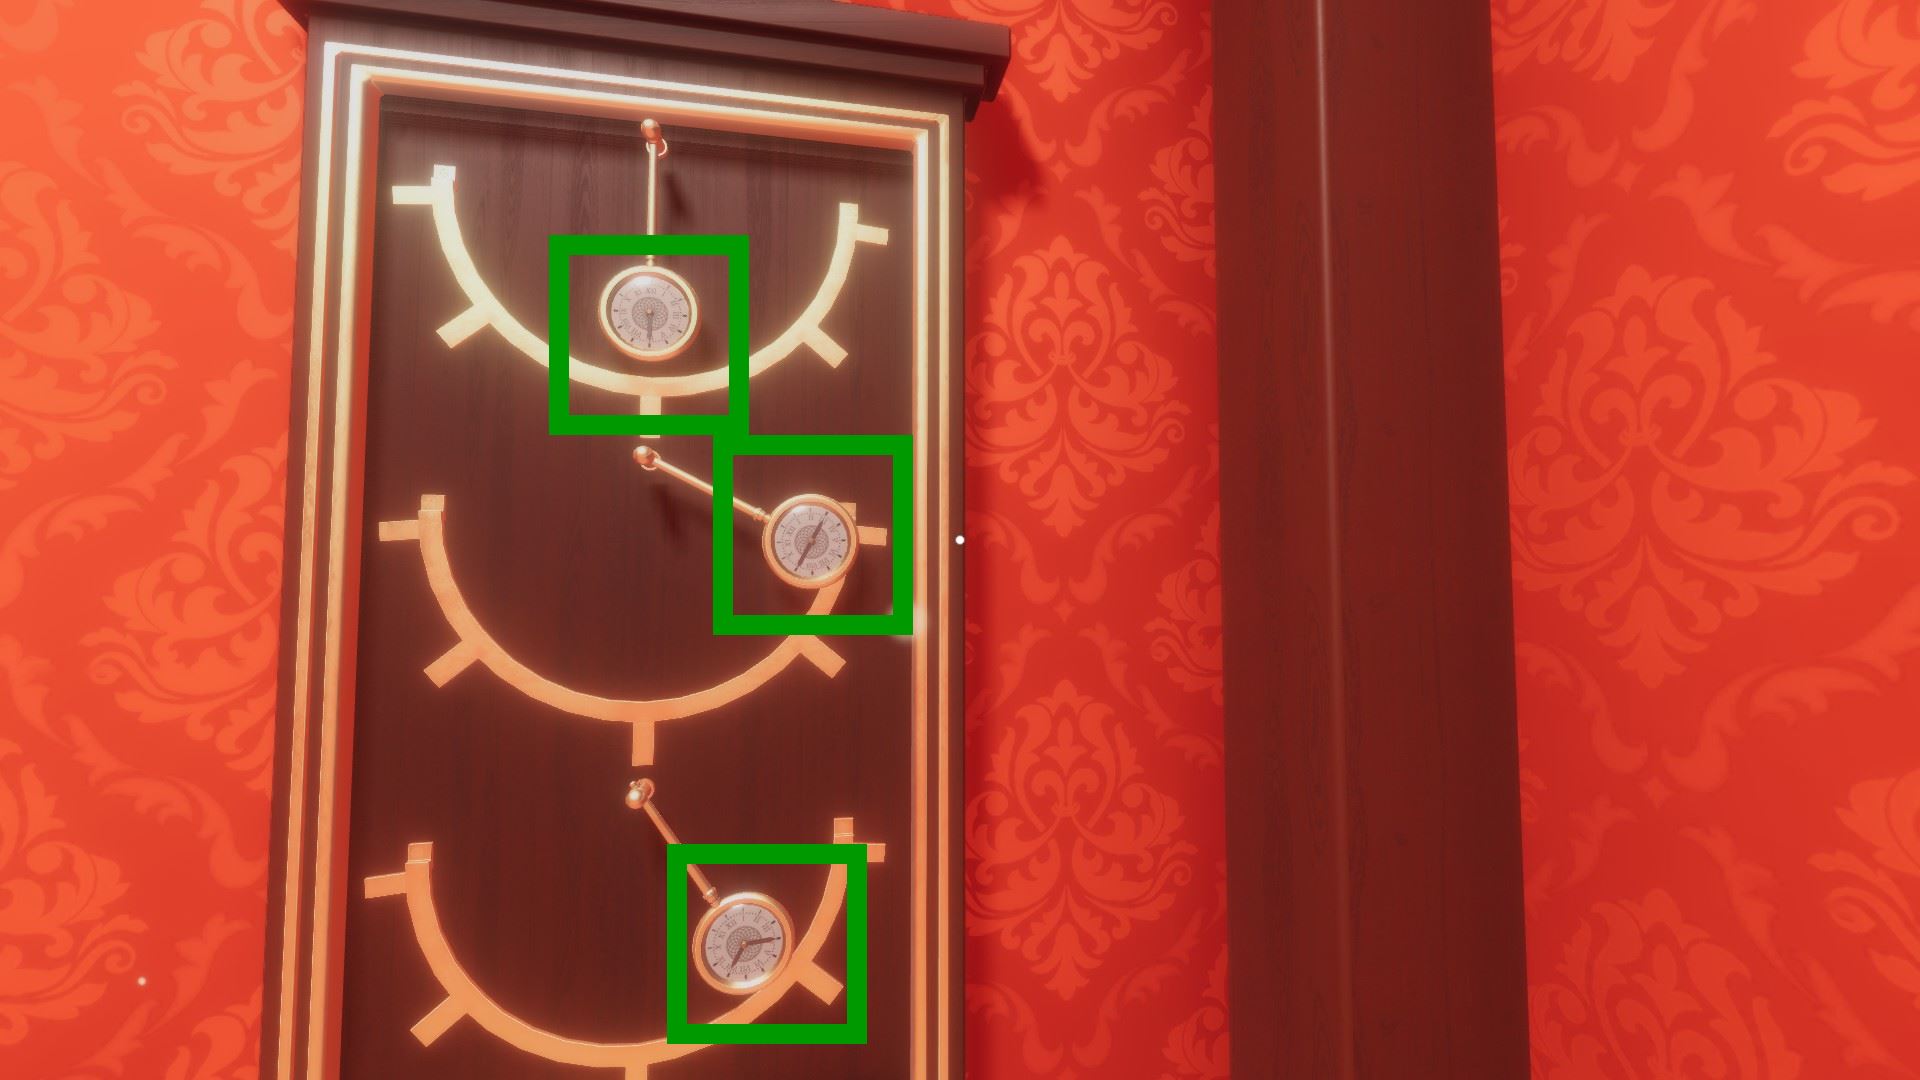
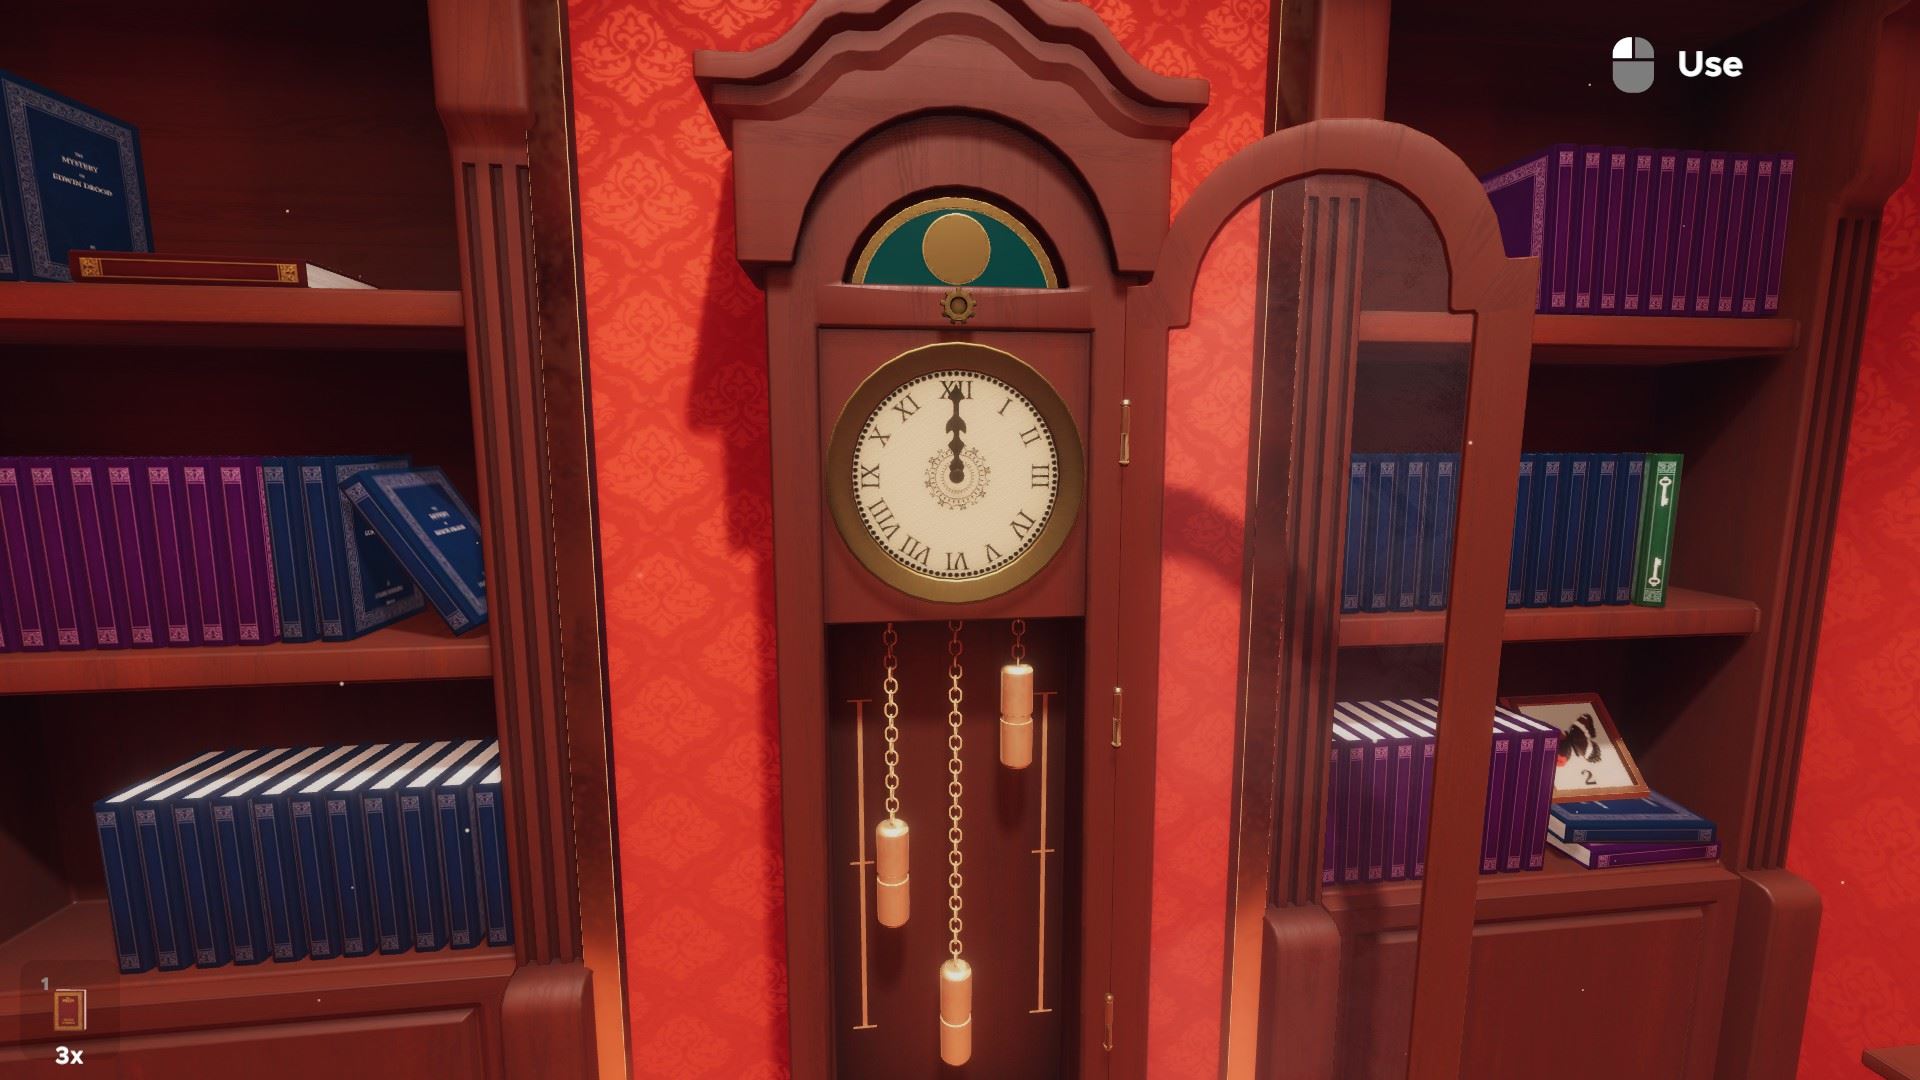
**Optional / token** Clock puzzle: put the pendulums in order: static in the heart (idle), all the way left or right (full swing), and diagonal (half swing). The solution stems from the newspaper on the sofa.
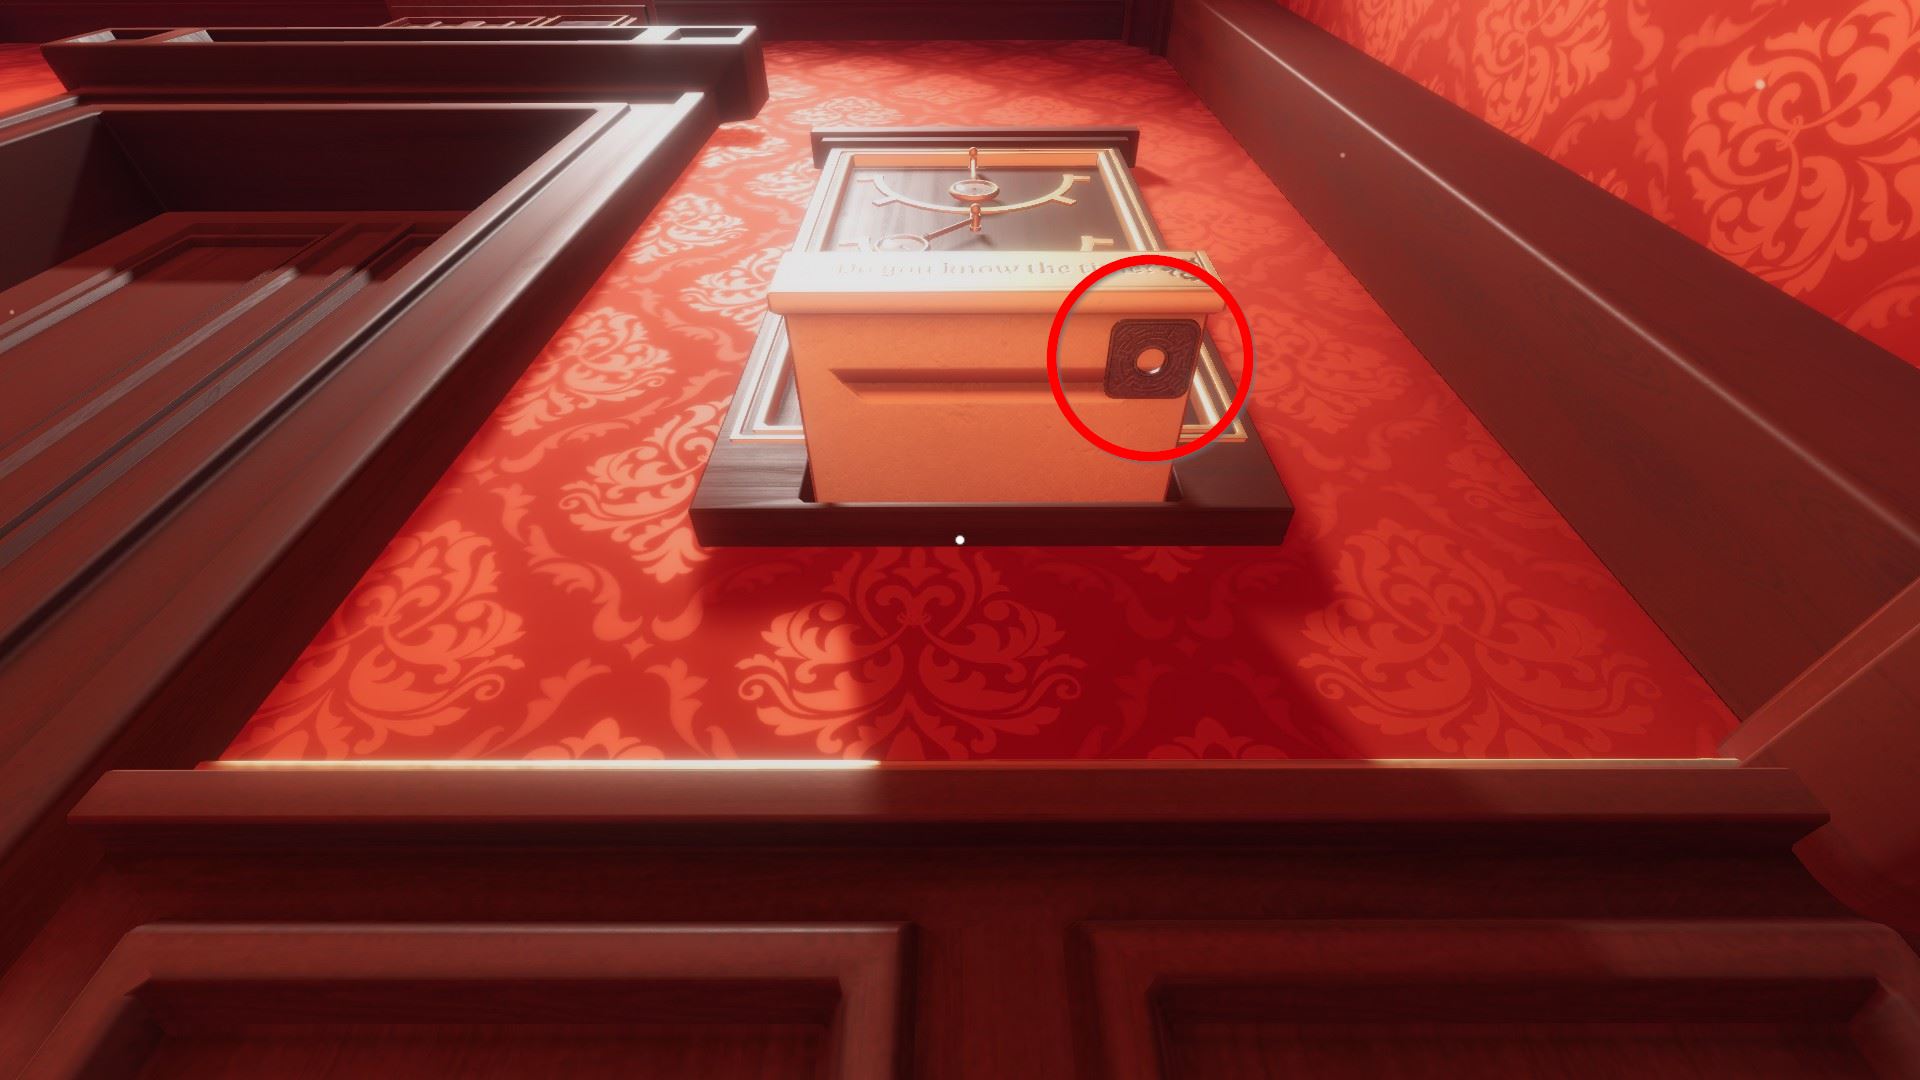
⏹ Token 7 / eight - under clock puzzle drawer:
**Optional** IQ lock (right lock on the correct drawer of the desk); the solution is from clock puzzle drawer:
2-32-three
**Optional** Books lock (left lock on the right drawer of the desk-bound)
Lawmaking iv-four-7-vii from the numbers of book symbols within the nighttime red books; two of them inside bottom left cardinal-locked compartment, ane on the desk and 1 on a shelf to a higher place the desk (taken in the club of the tomes).
** Optional / token** Safe behind correct movable painting: lawmaking 2-9-5 (from Rorschach test sheets, two inside IQ lock and one correct in a higher place)
⏹ Token viii / eight - inside this safe:

Phrenology caput, above the desk: 6-3-5-9 (from notes in wall safe & IQ drawer book)
This provides you the key to go out the level (use information technology in the door lock).
Edgewood Mansion: The Library
Like in the previous level, doing the very final step is plenty to terminate it. The other ones are partially required for tokens, and are of course recommended to experience the unabridged level.
⏹ Token 1 / 8 - above the desk:
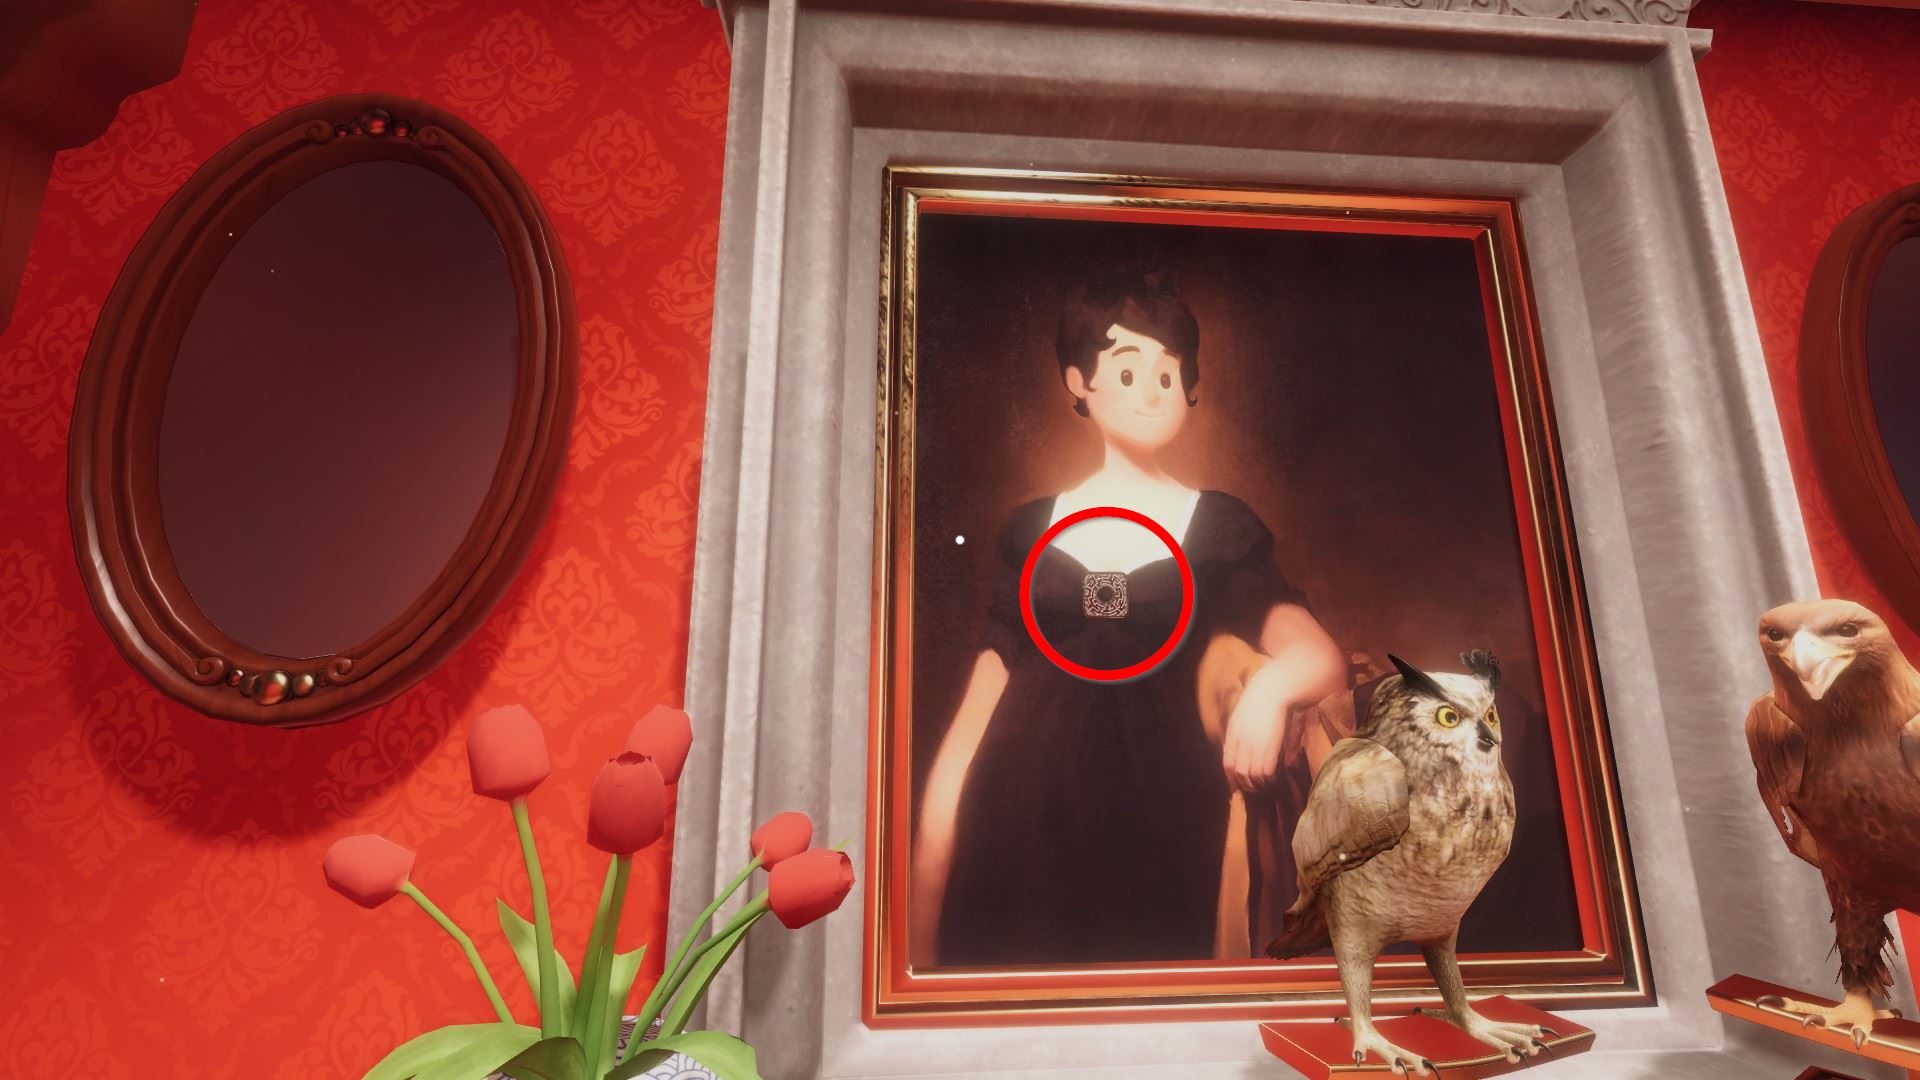
⏹ Token ii / 8 - on the painting of a adult female that'south backside the 2 birds:
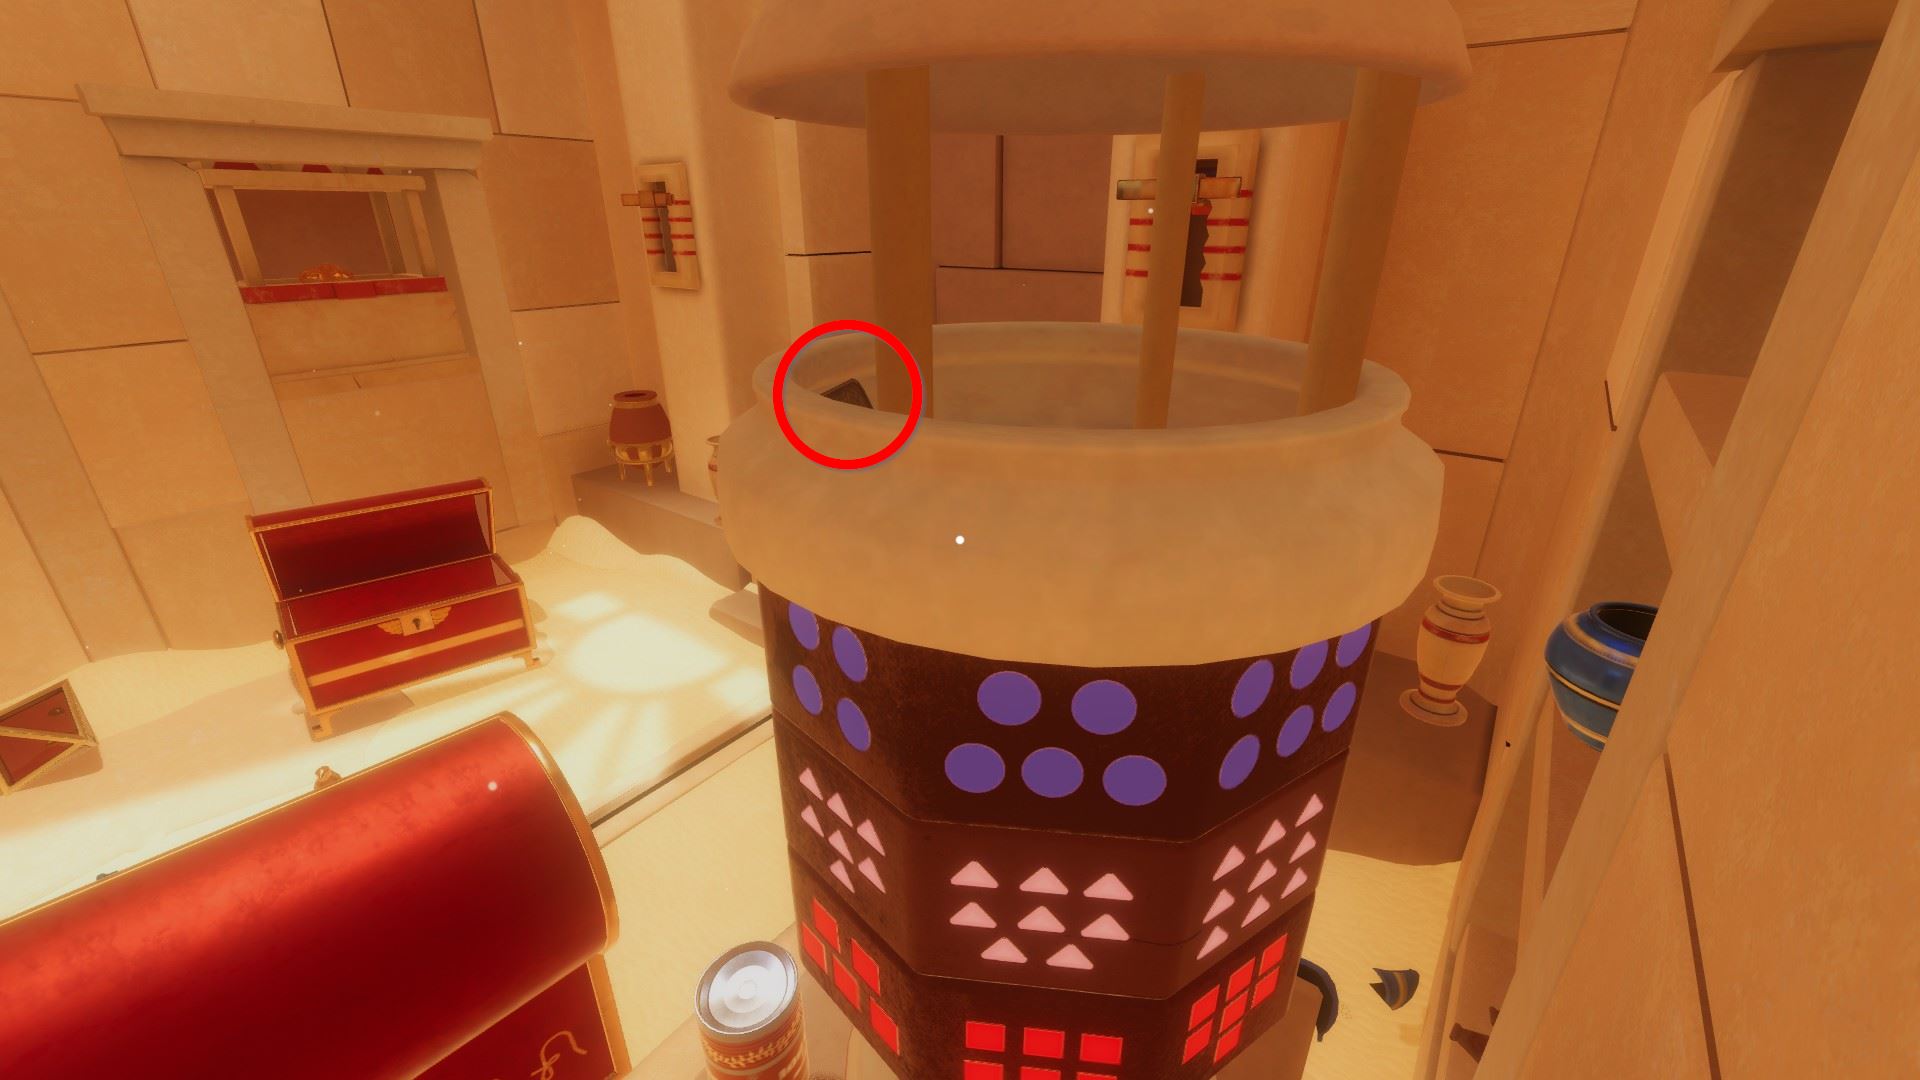
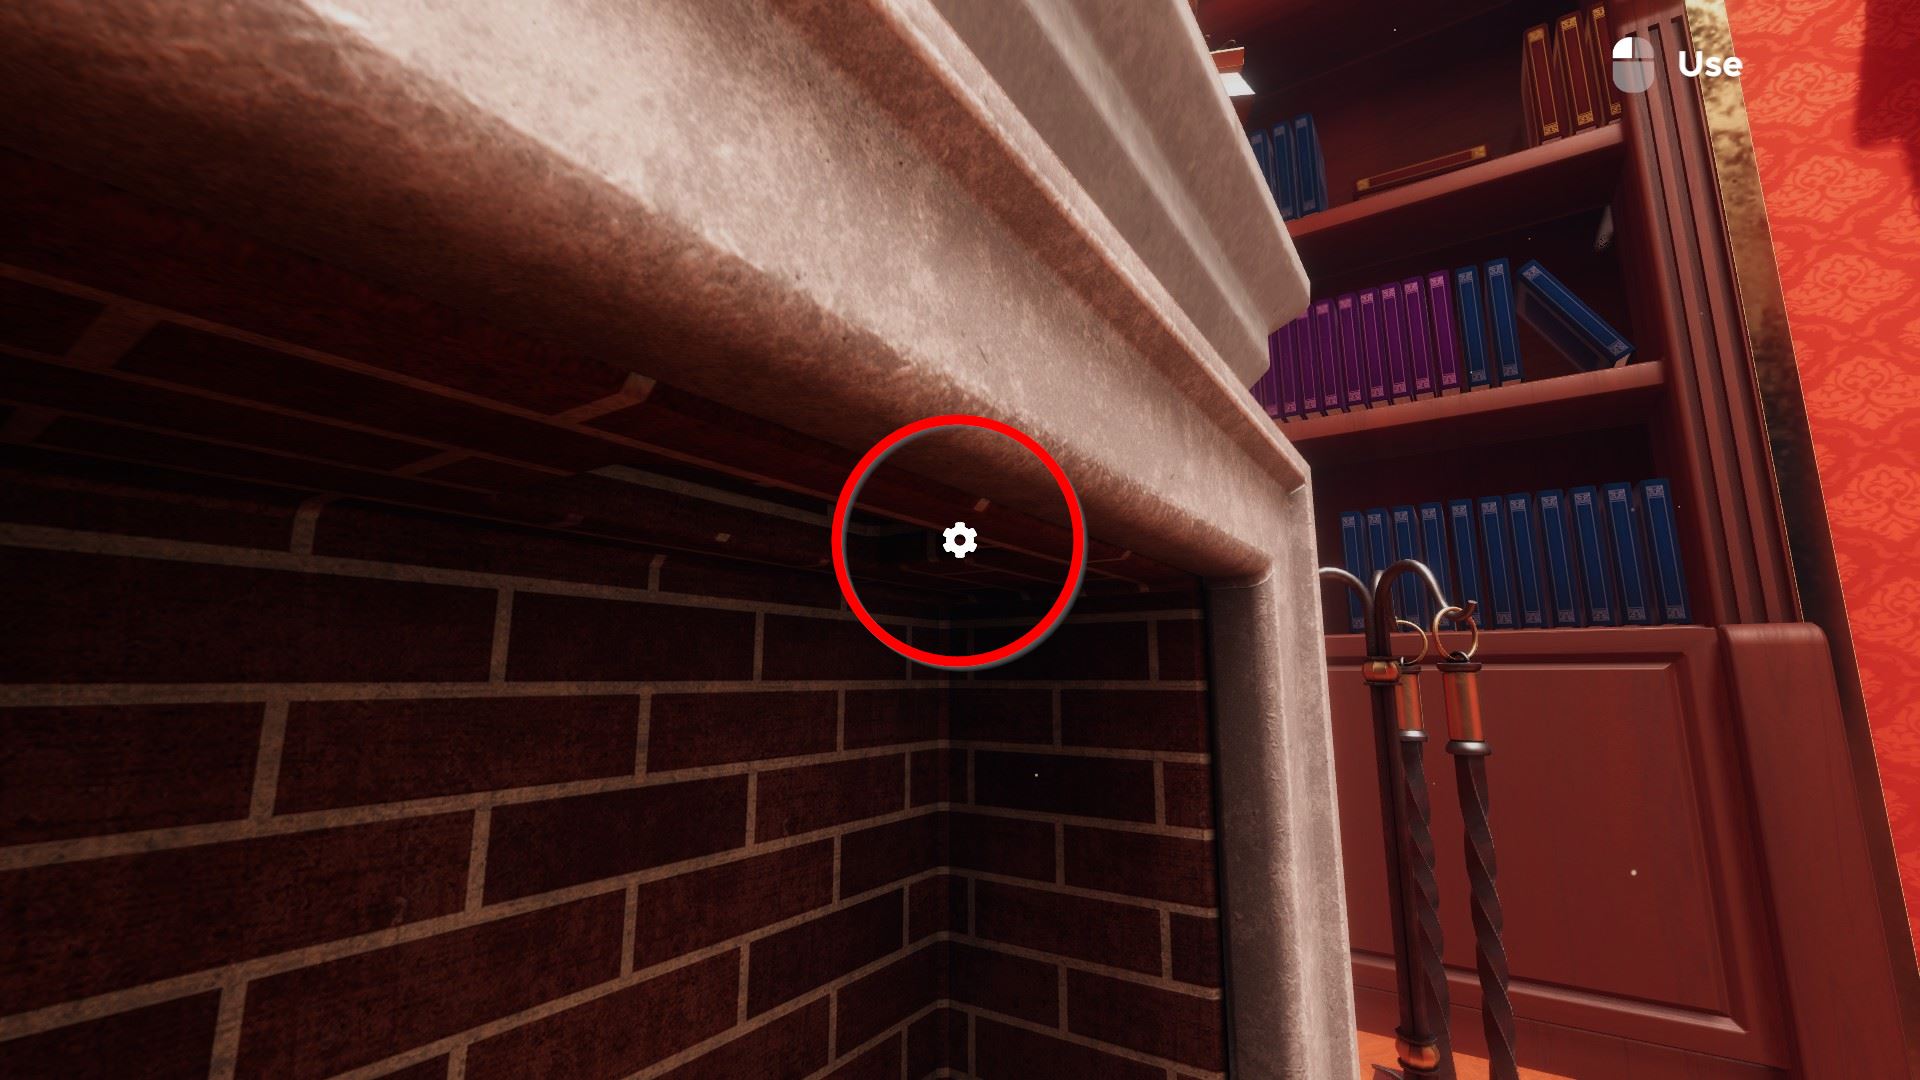
⏹ Token 3 / eight - inside the fireplace, visible only at a sharp angle:
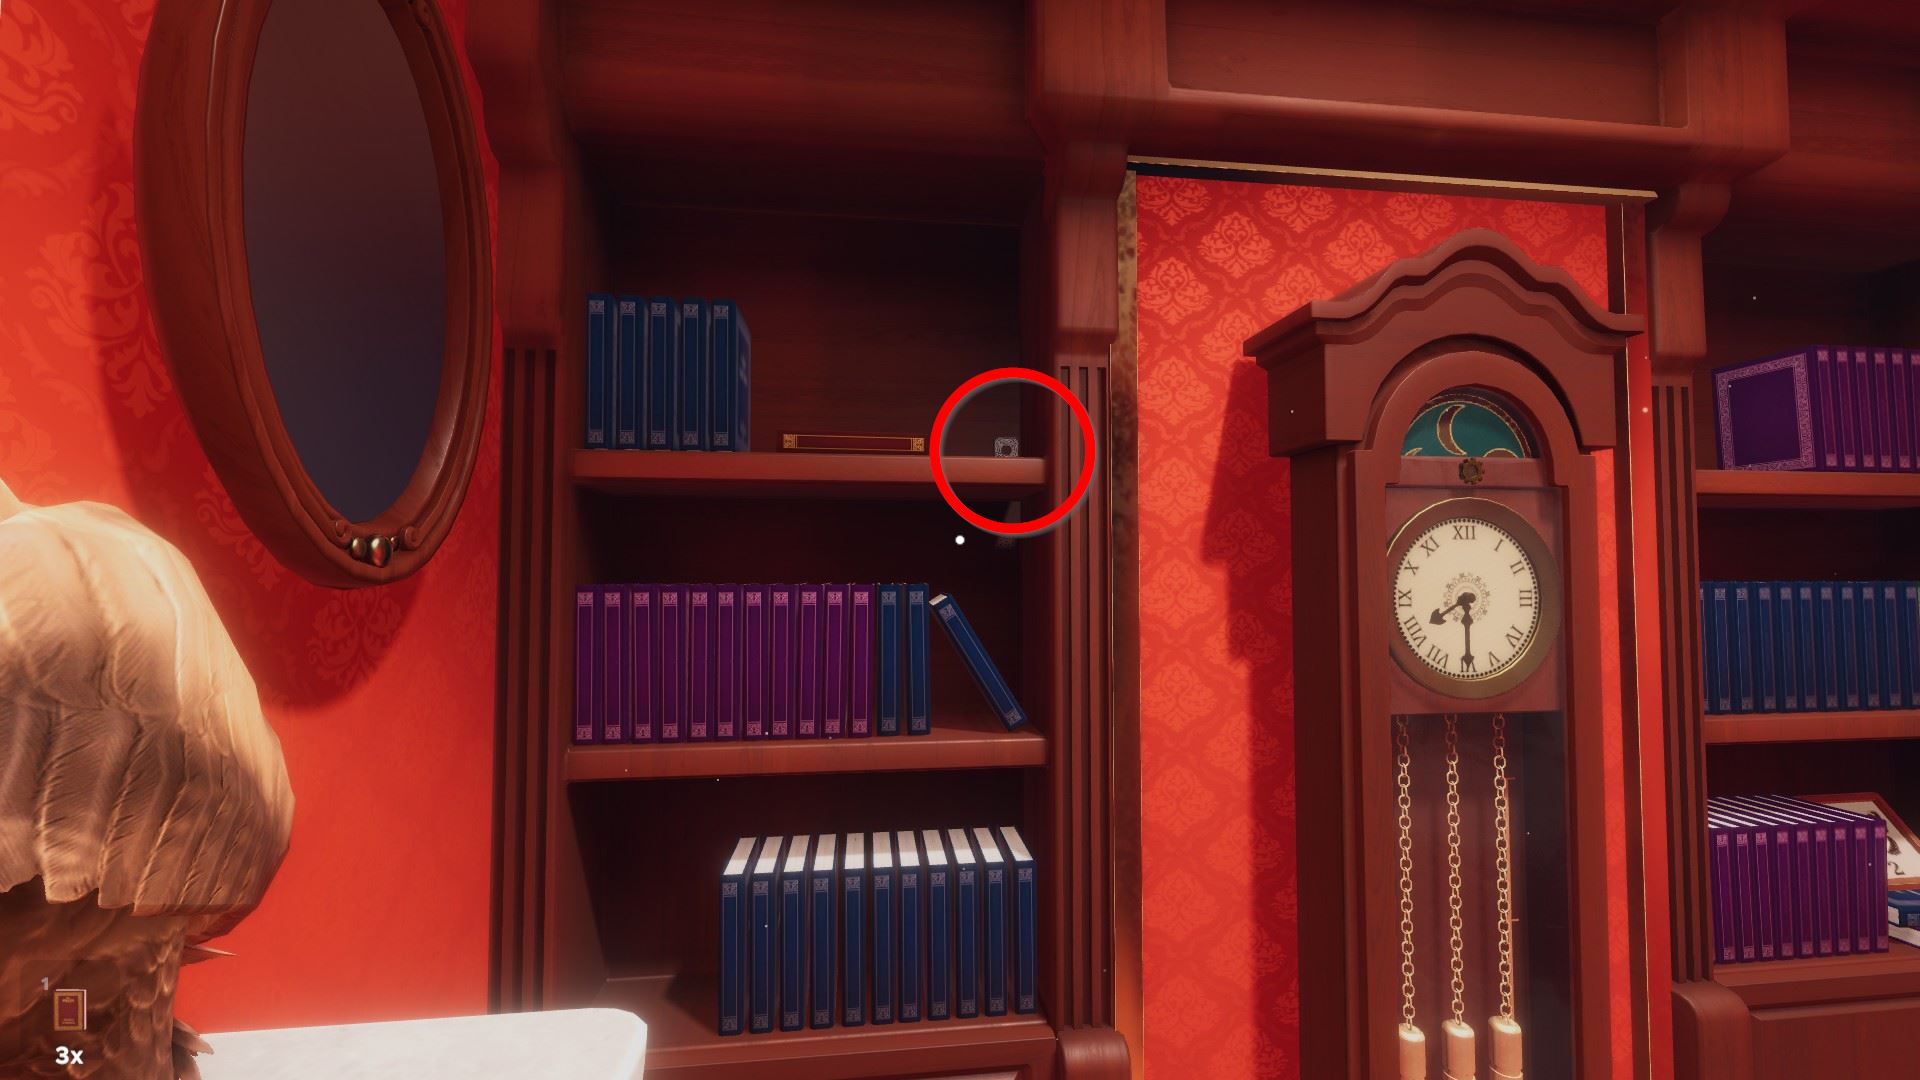
⏹ Token 4 / eight - left of the clock, behind 3 nighttime cerise books on the right side of the tiptop shelf:
⏹ Token 5 / 8 - nether the clock (more easily reachable at the finish of the level):
⏹ Token 6 / 8 - within the gramophone horn:

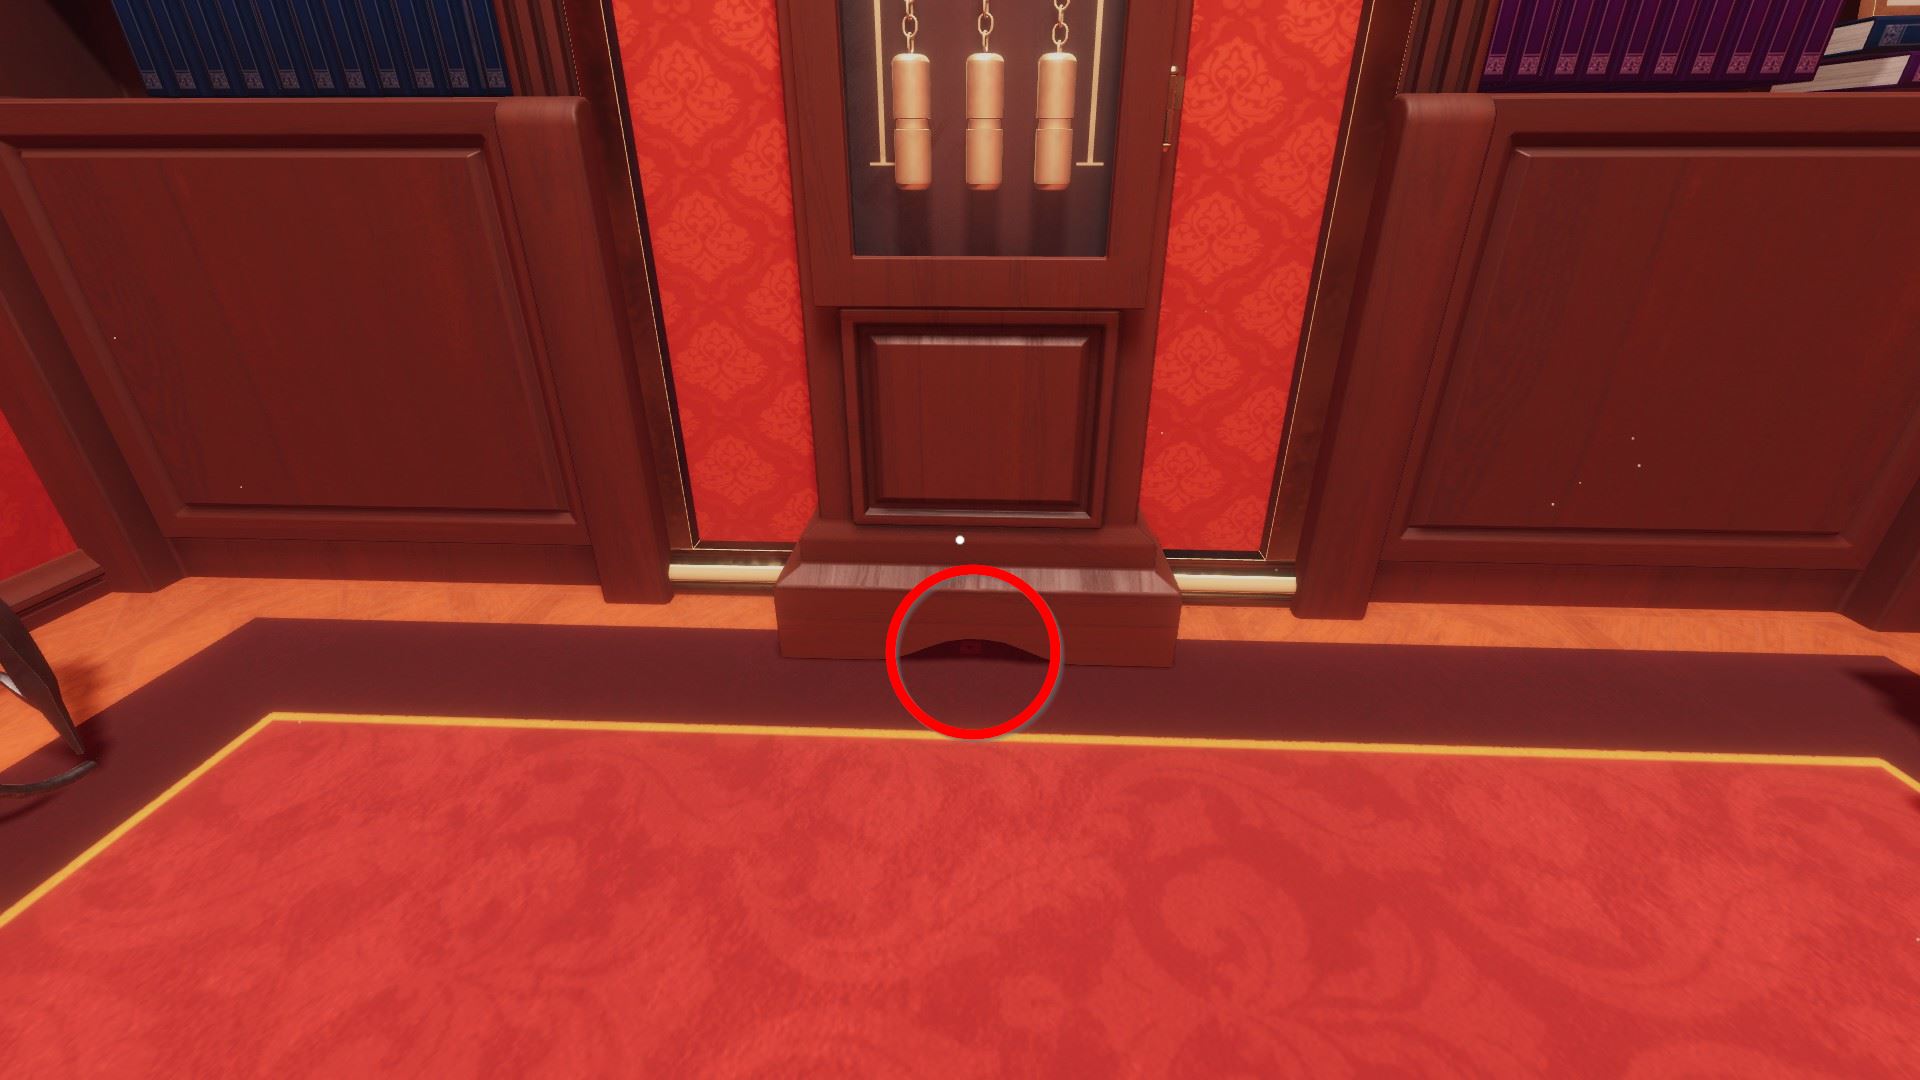
**Optional** Take the cardinal hanging backside books in the cabinet to the bottom right of the desk.
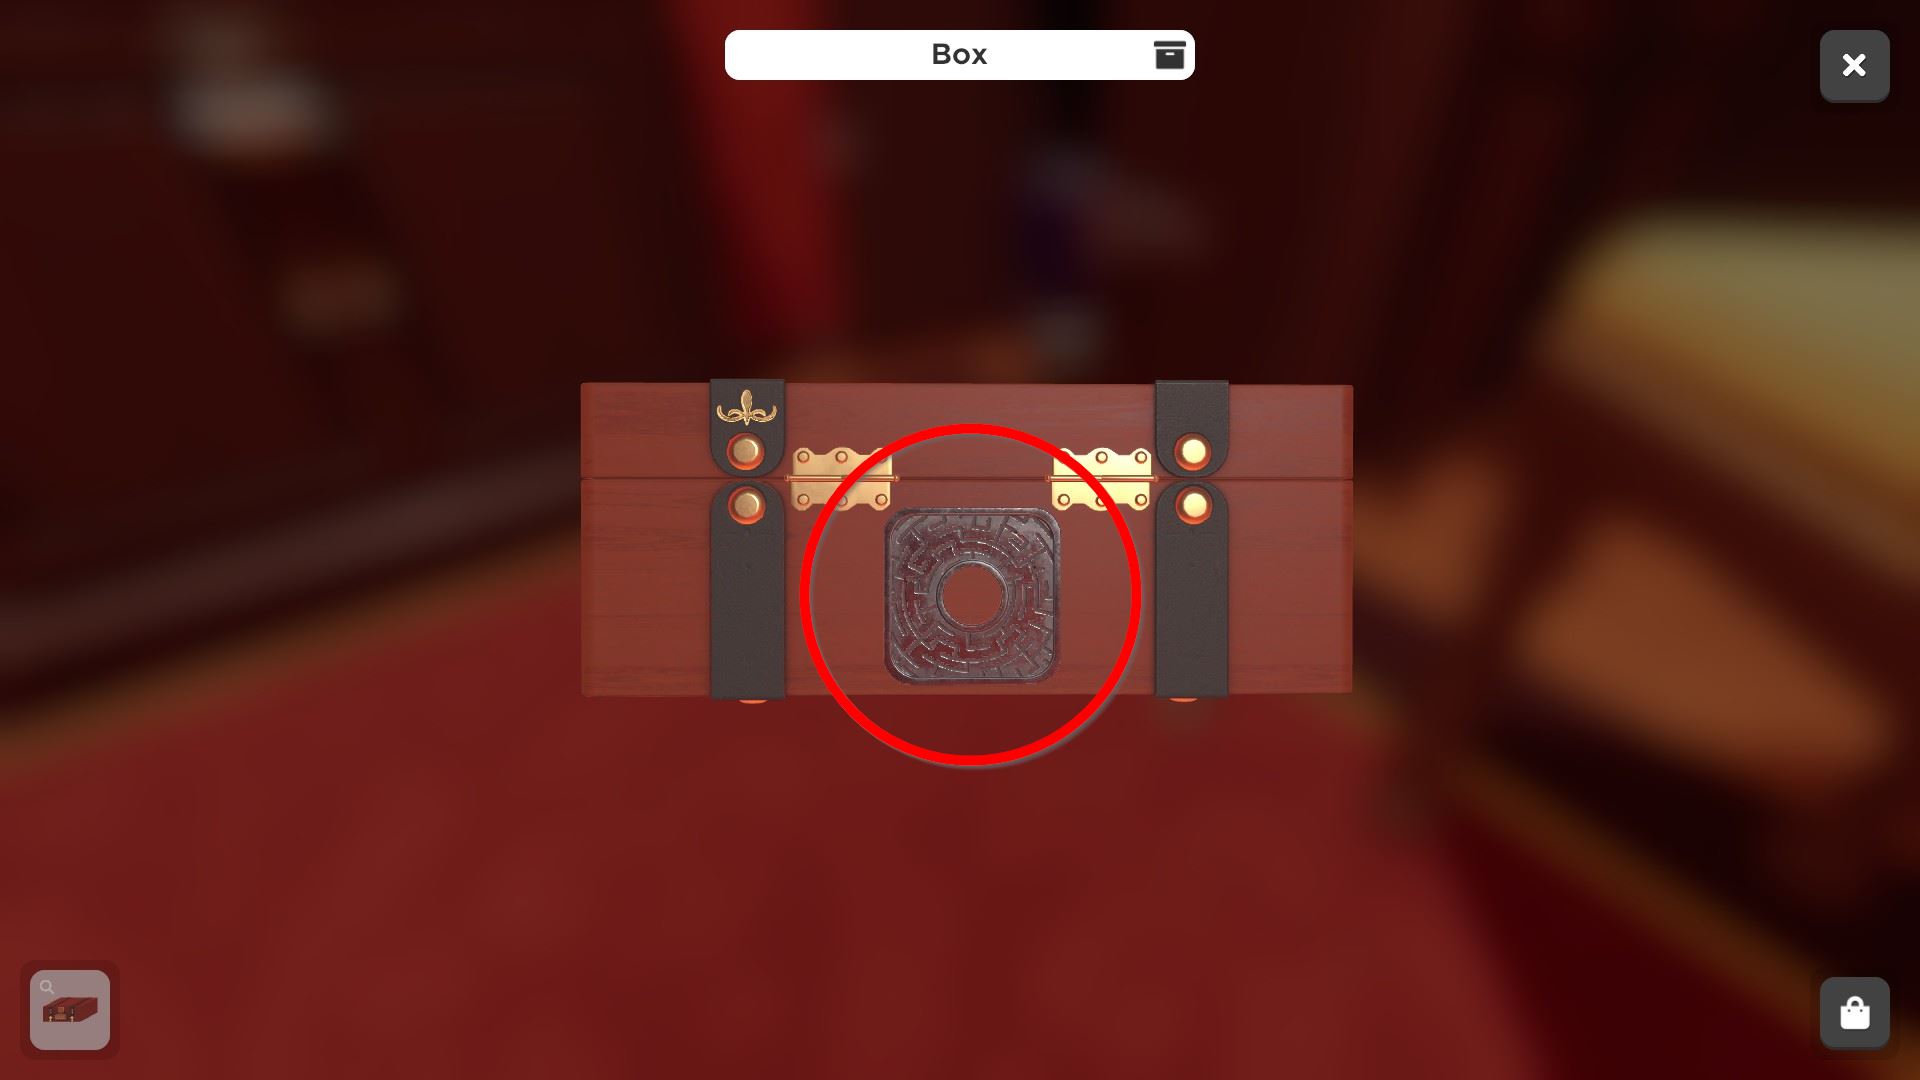
**Optional**Open the the cabinet on the other side of the desk with it and pick upwards the box.
⏹ Token 7 / 8 - on the backside of the box inside:
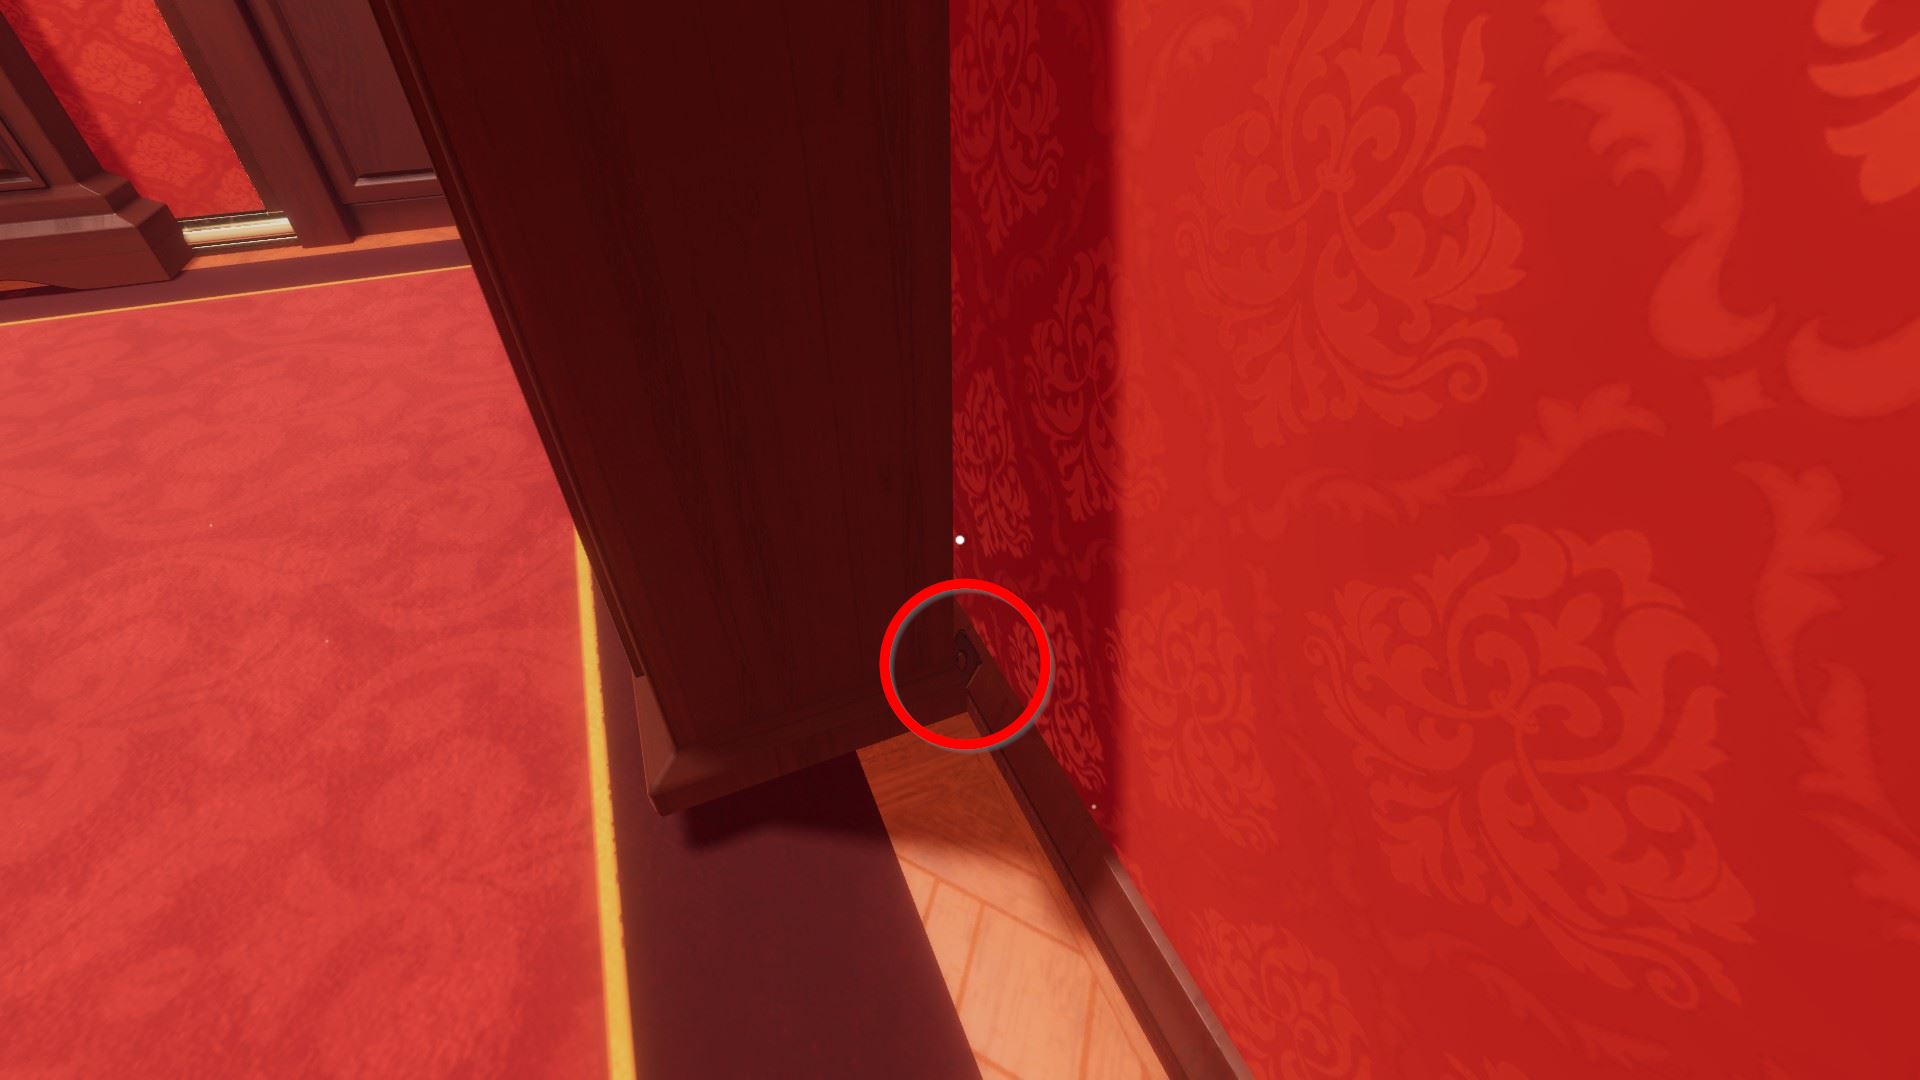
⏹ Token 8 / 8 - behind the cabinet under the butterfly paintings (on the right side):
**Optional** Use the key from one green volume to open up the lock on the other green volume, revealing the code to the box from inside that cabinet.
Open the box by entering D-R-Due east-A-M and accept the thermometer within.
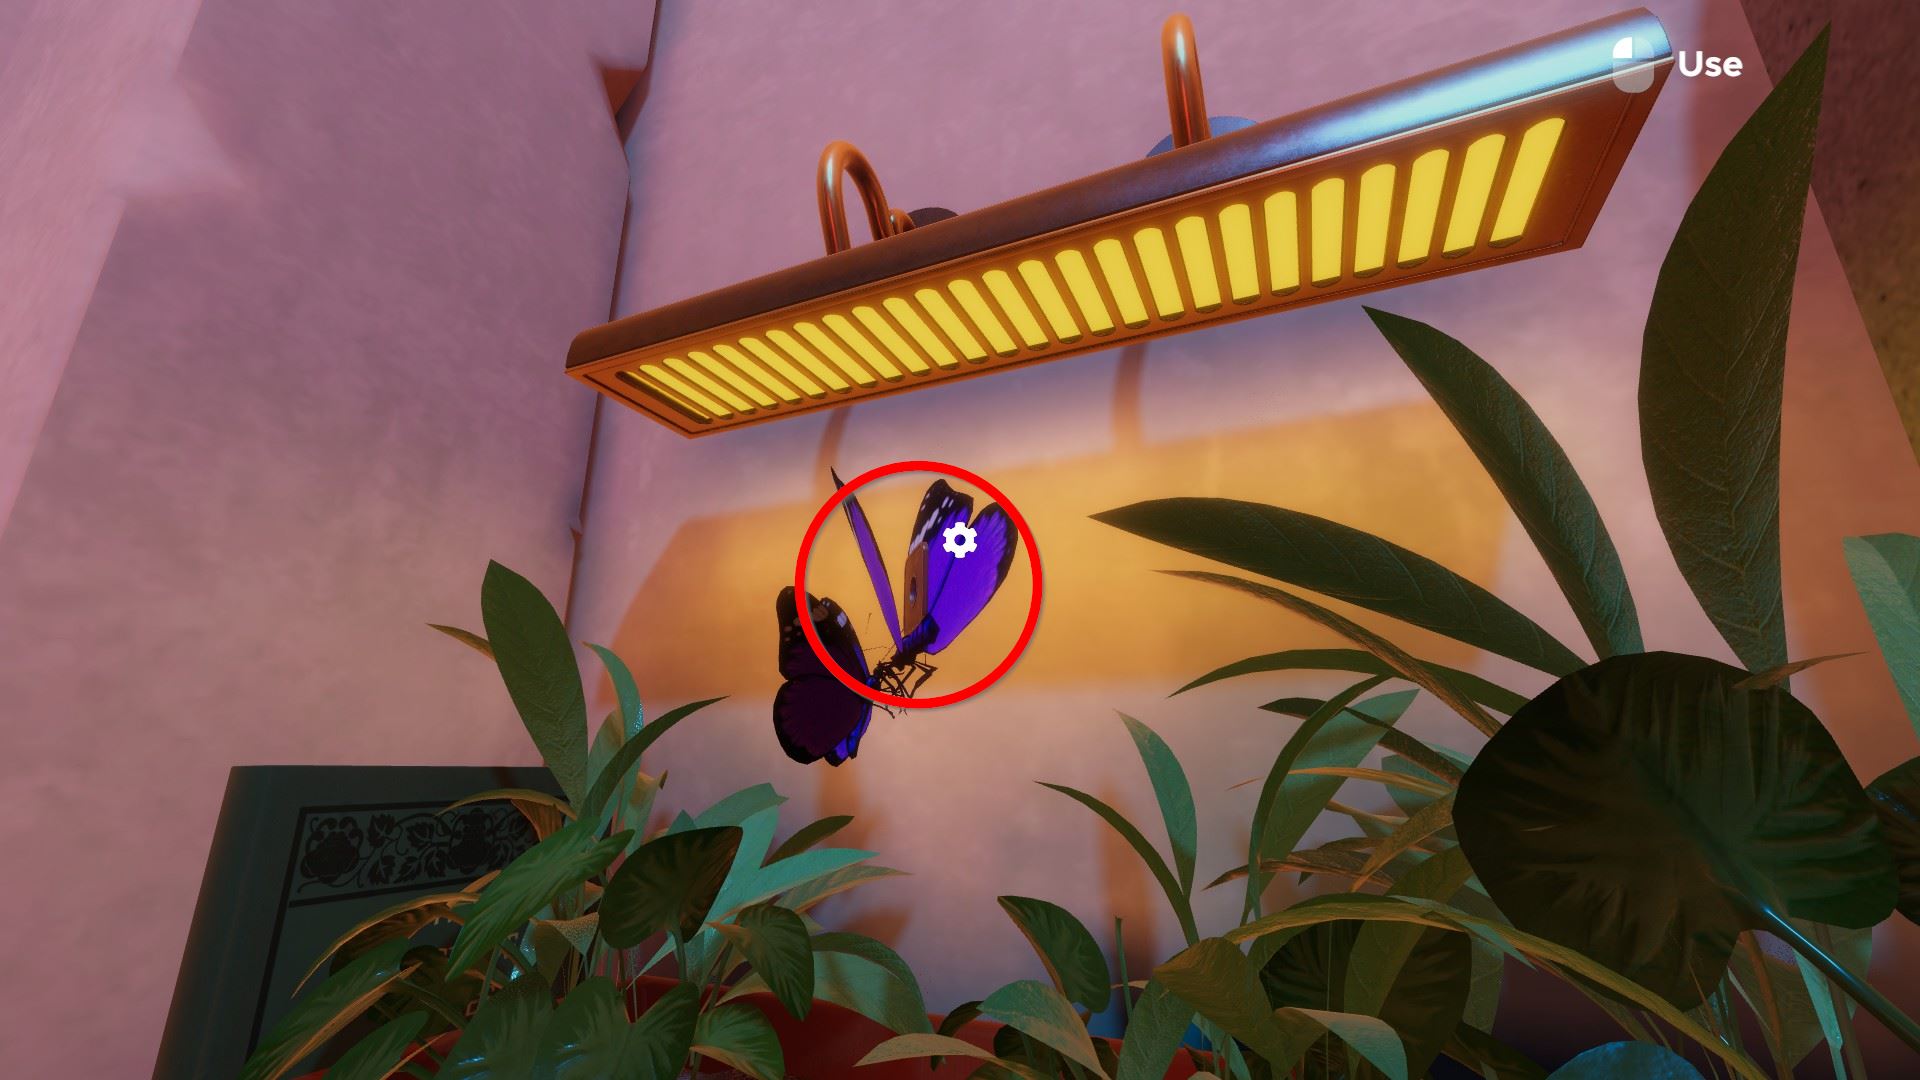
**Optional** Pick up the 3 butterfly paintings from the bookshelves and consummate the butterfly puzzle in order 3-8-5-seven-two (hint: connect identical wings)
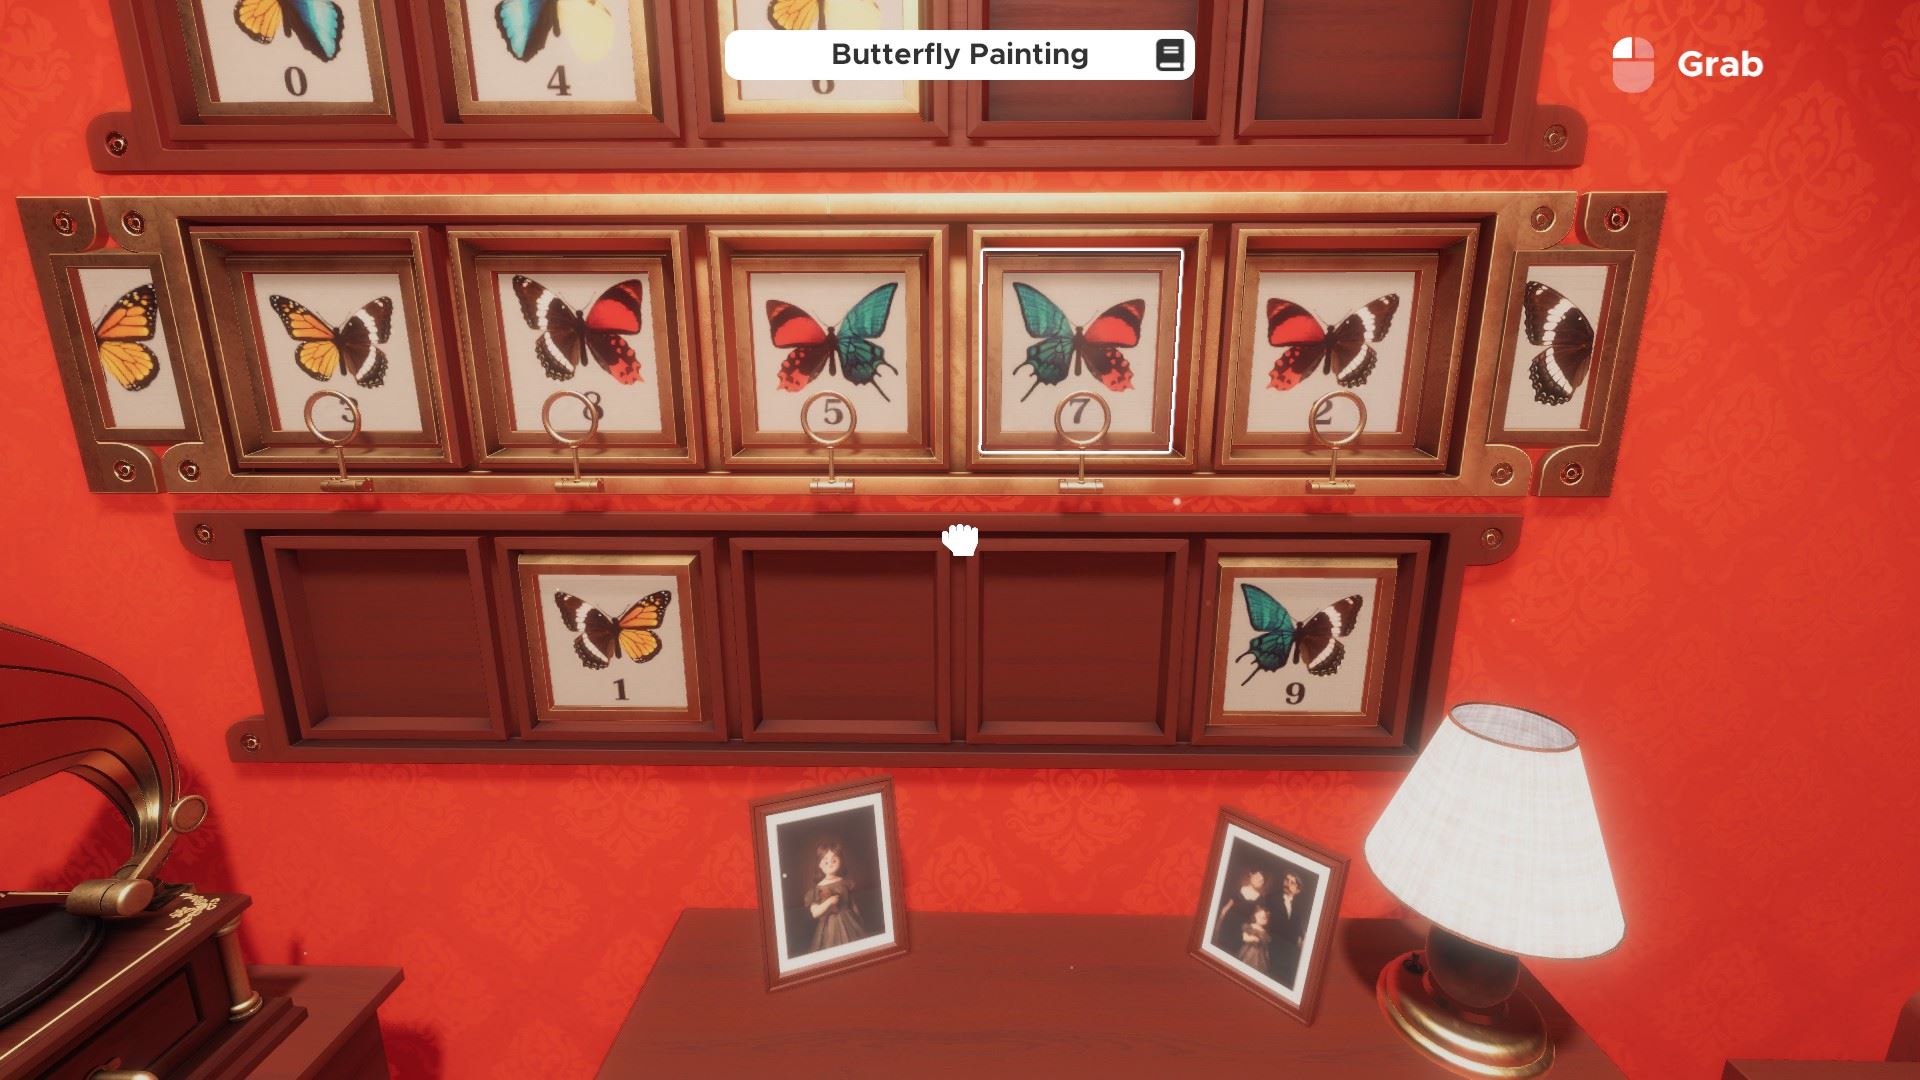
**Optional** Utilize the butterfly combination (3-8-5-7-2) to unlock the cabinet under the butterflies paintings.
**Optional** Connect the vinyl pieces: two from the butterfly lock chiffonier (one under a book on the left side, the other i the correct), and the last ane from the right drawer higher up information technology. Placing the vinyl on the gramophone and playing it reveals the correct order for the lock beneath it, which also requires a bird from the butterfly chiffonier to empathise.
**Optional** The bird lock under the gramophone opens with 9-3-ix-1 (and can sometimes be cleaved with buggy physics too...). Have the matches inside, and interacting with the matchbox, take out a friction match, lite it on the side of the matchbox, and use it to first a fire in the fireplace.
Place the thermometer inside the fire to accept it open.
To finish the level, set up the clock in the following way, as hinted by the unlocked thermometer: full moon, both clock arms to midnight, and the three levers from left to correct: center peak, bottom height, top pinnacle.
Edgewood Mansion: The Attic
🏆
Level-specific achievement: Writer
Fill up an unabridged sheet of paper on the typewriter. Find paper in the right drawer below it. Insert paper into the typewriter and printing whatever random buttons on information technology until you are done.
⏹ Token i / 8 - on a ceiling bar:

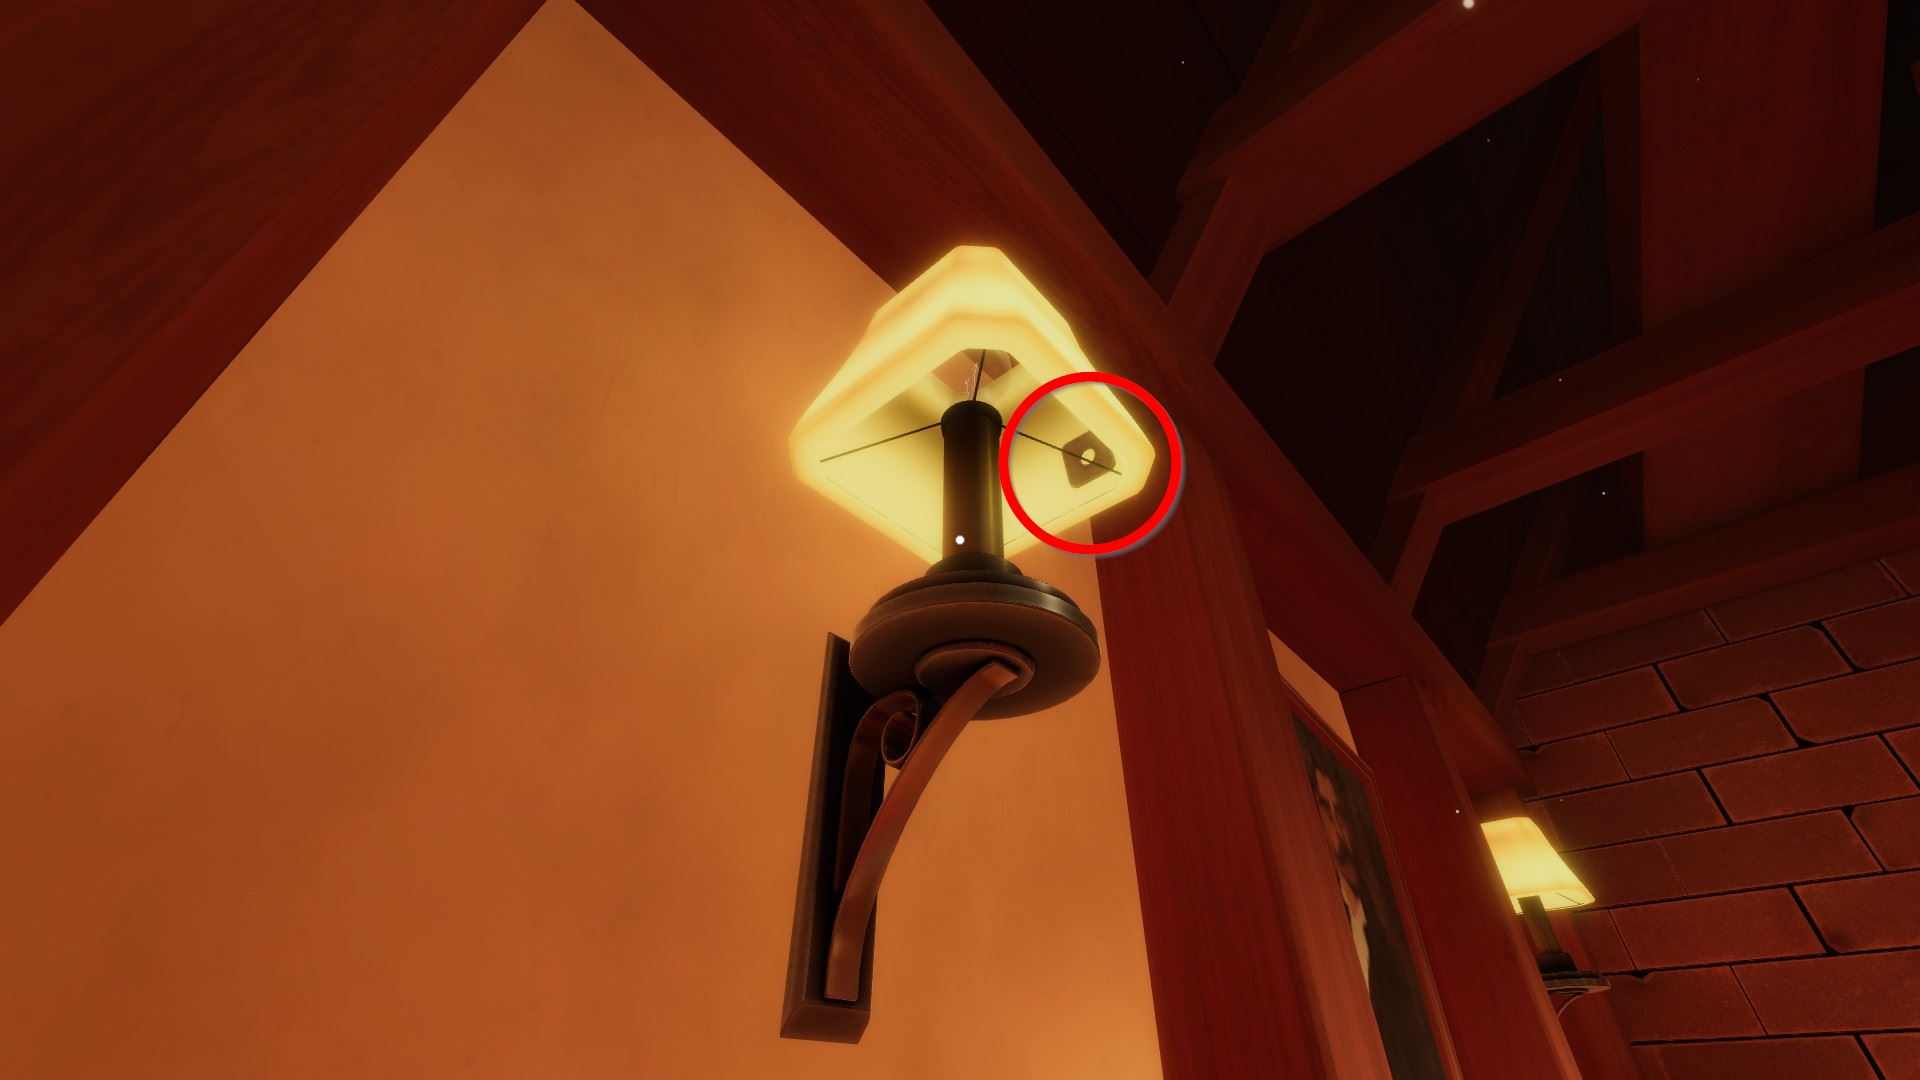
⏹ Token 2 / 8 - within the left wall lamp on the side with the male portrait:
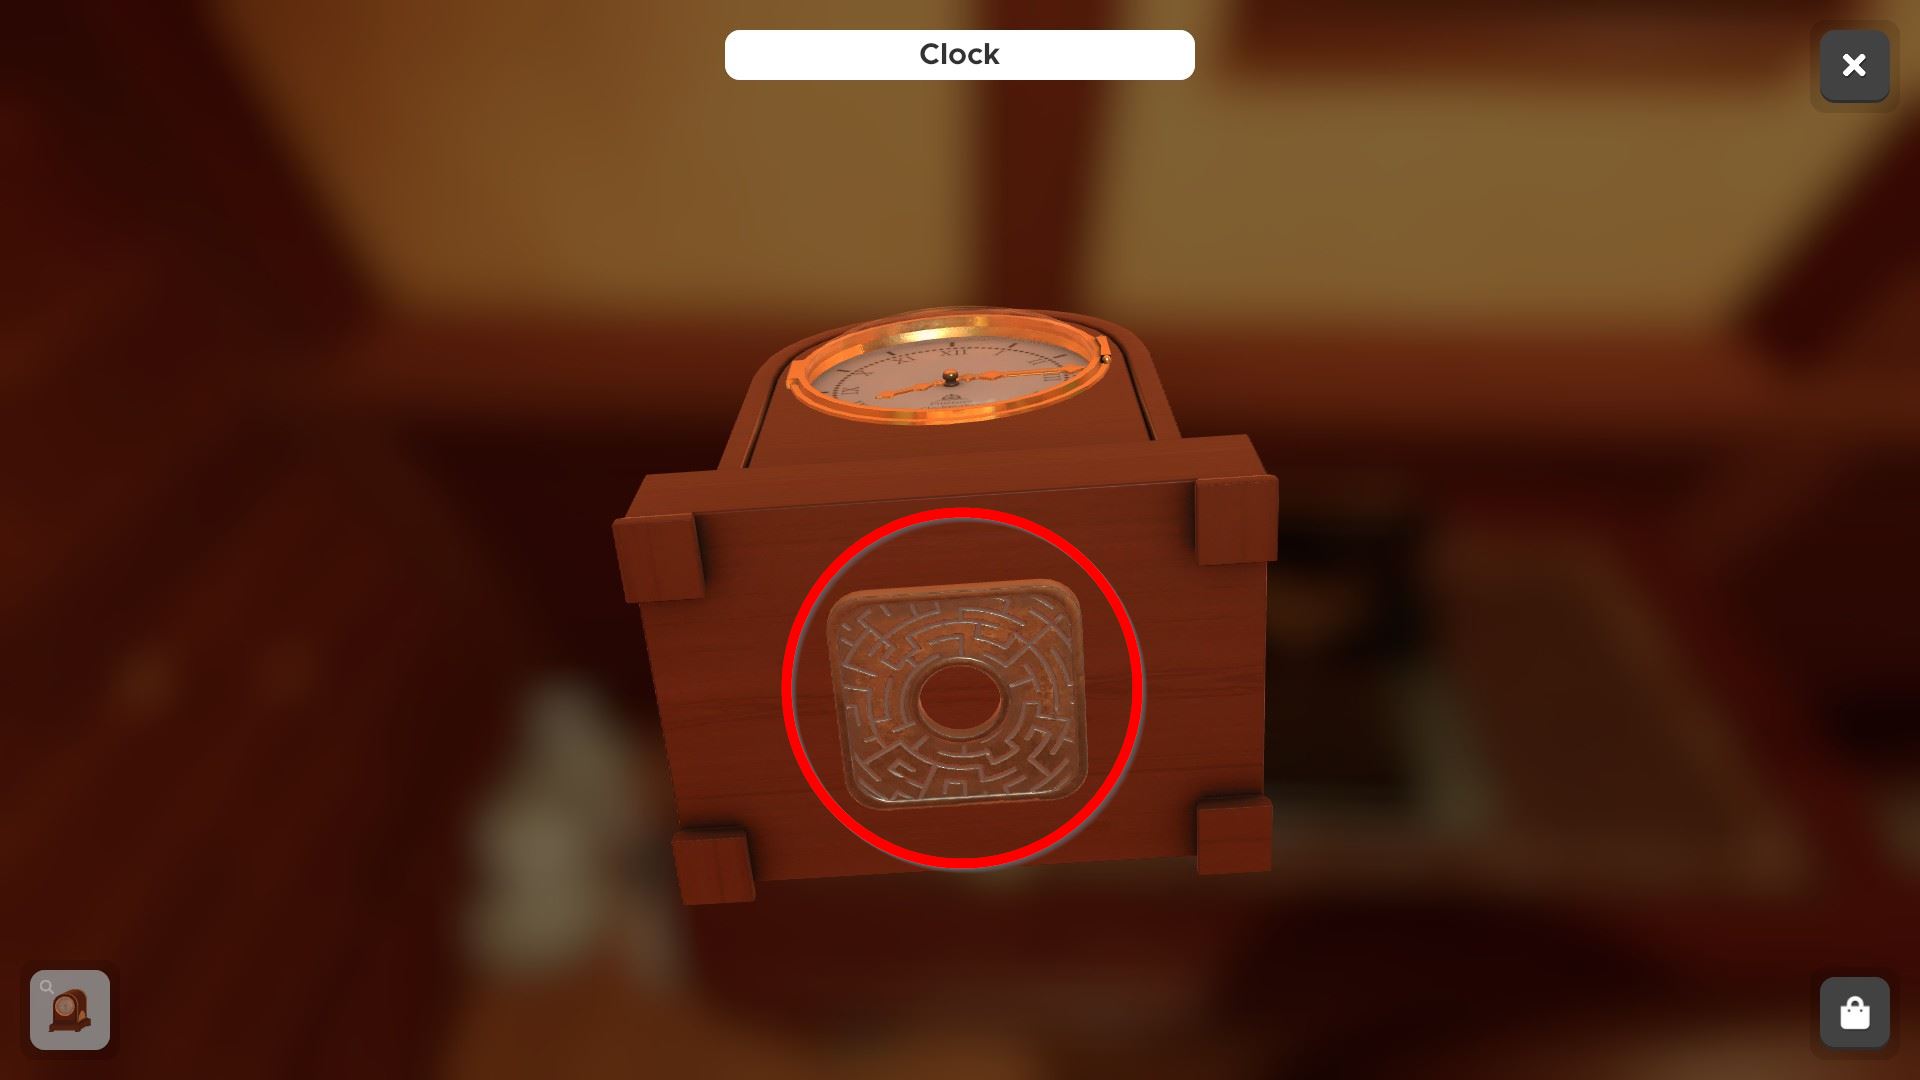
⏹ Token 3 / viii - on the lesser of the clock on the desk:
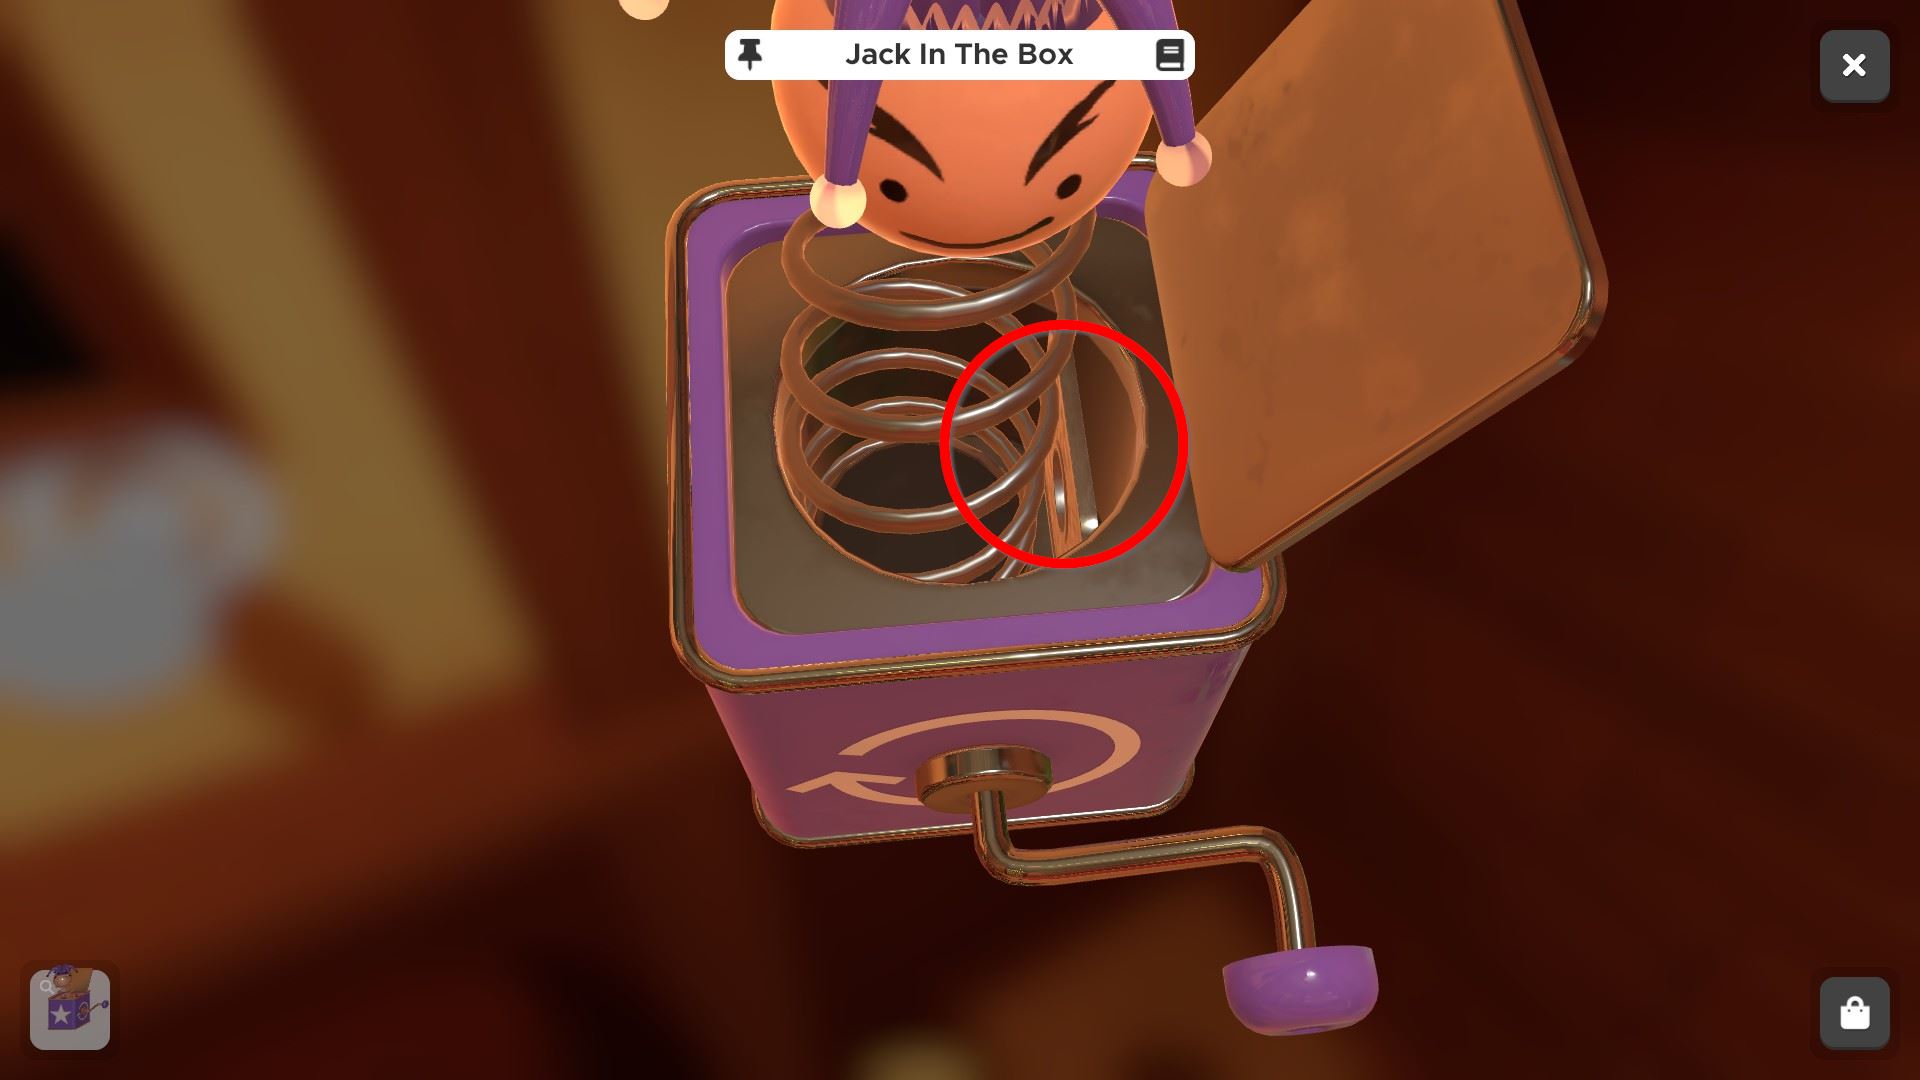
⏹ Token iv / 8 - within the majestic jack in the box to the correct of the previous token:
⏹ Token v / 8 - to the right of the previous, on the bottom left side of the projector cabinet:
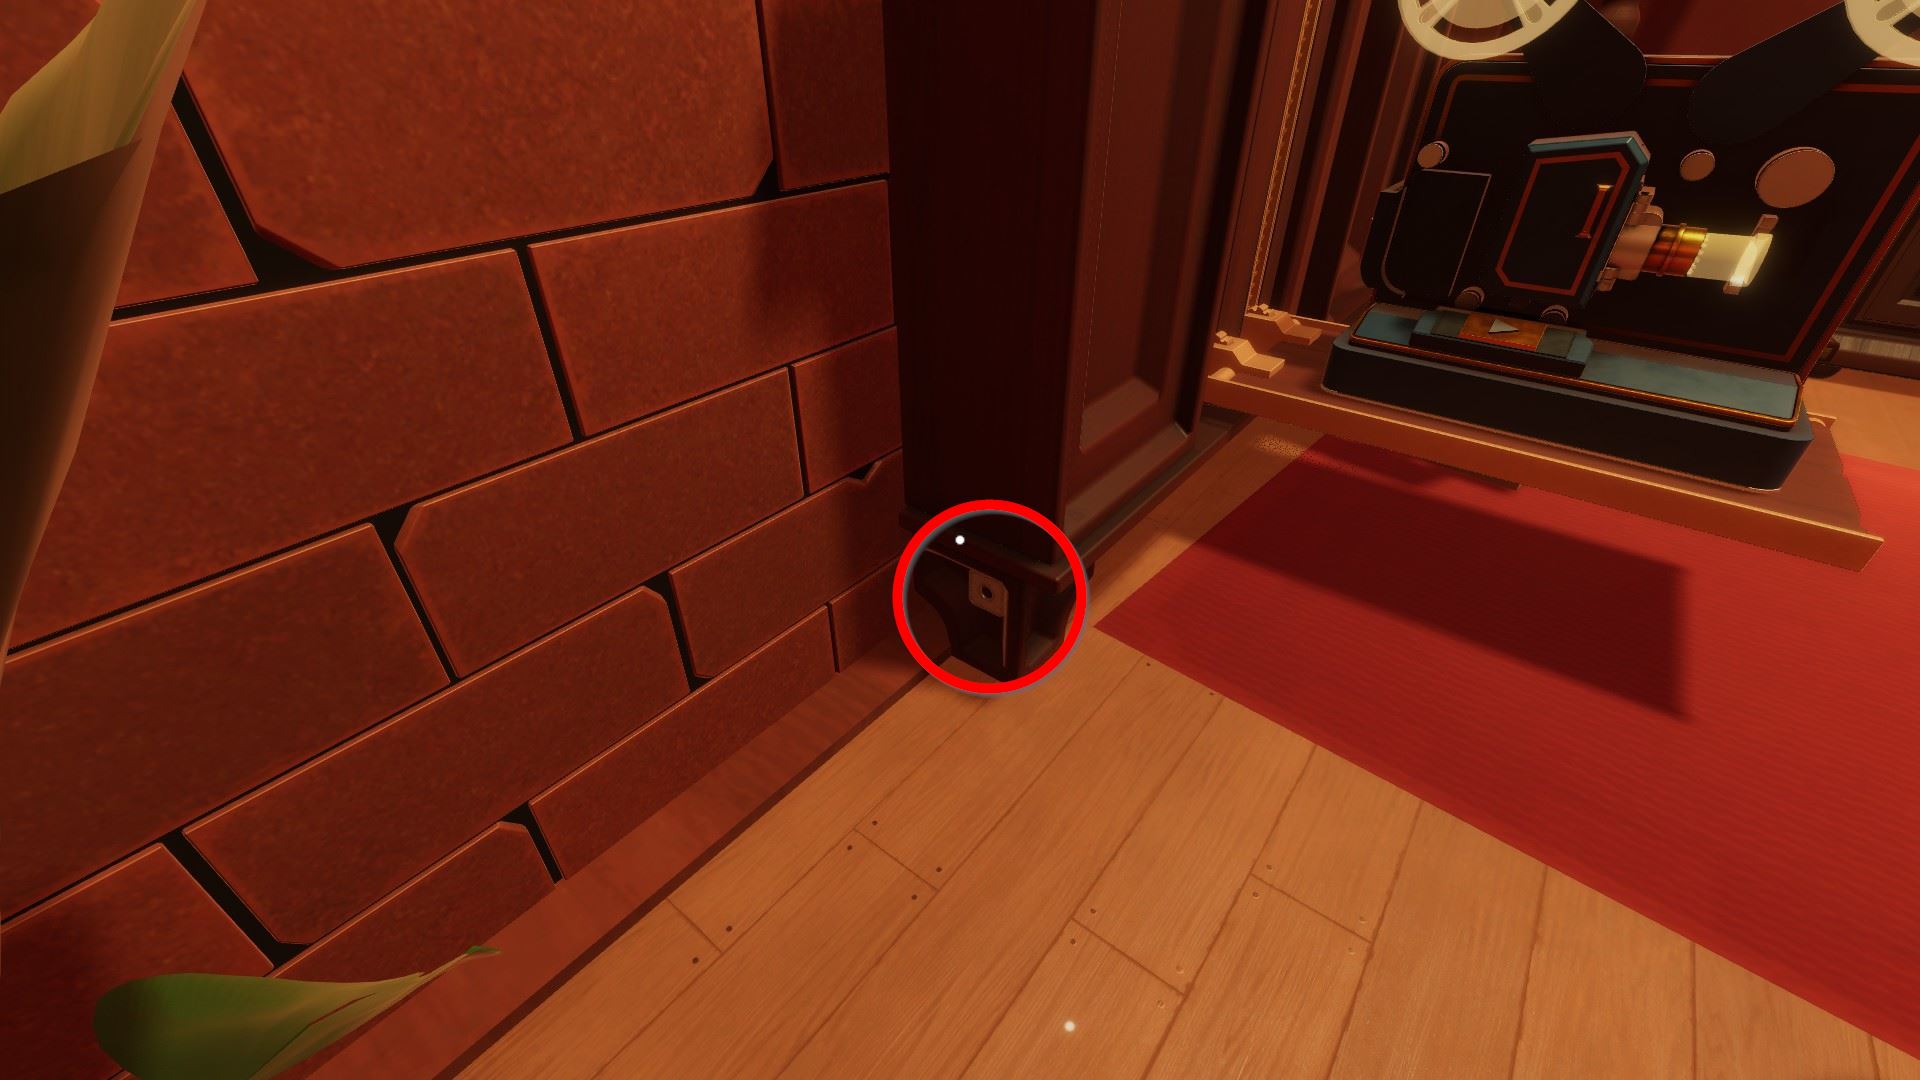
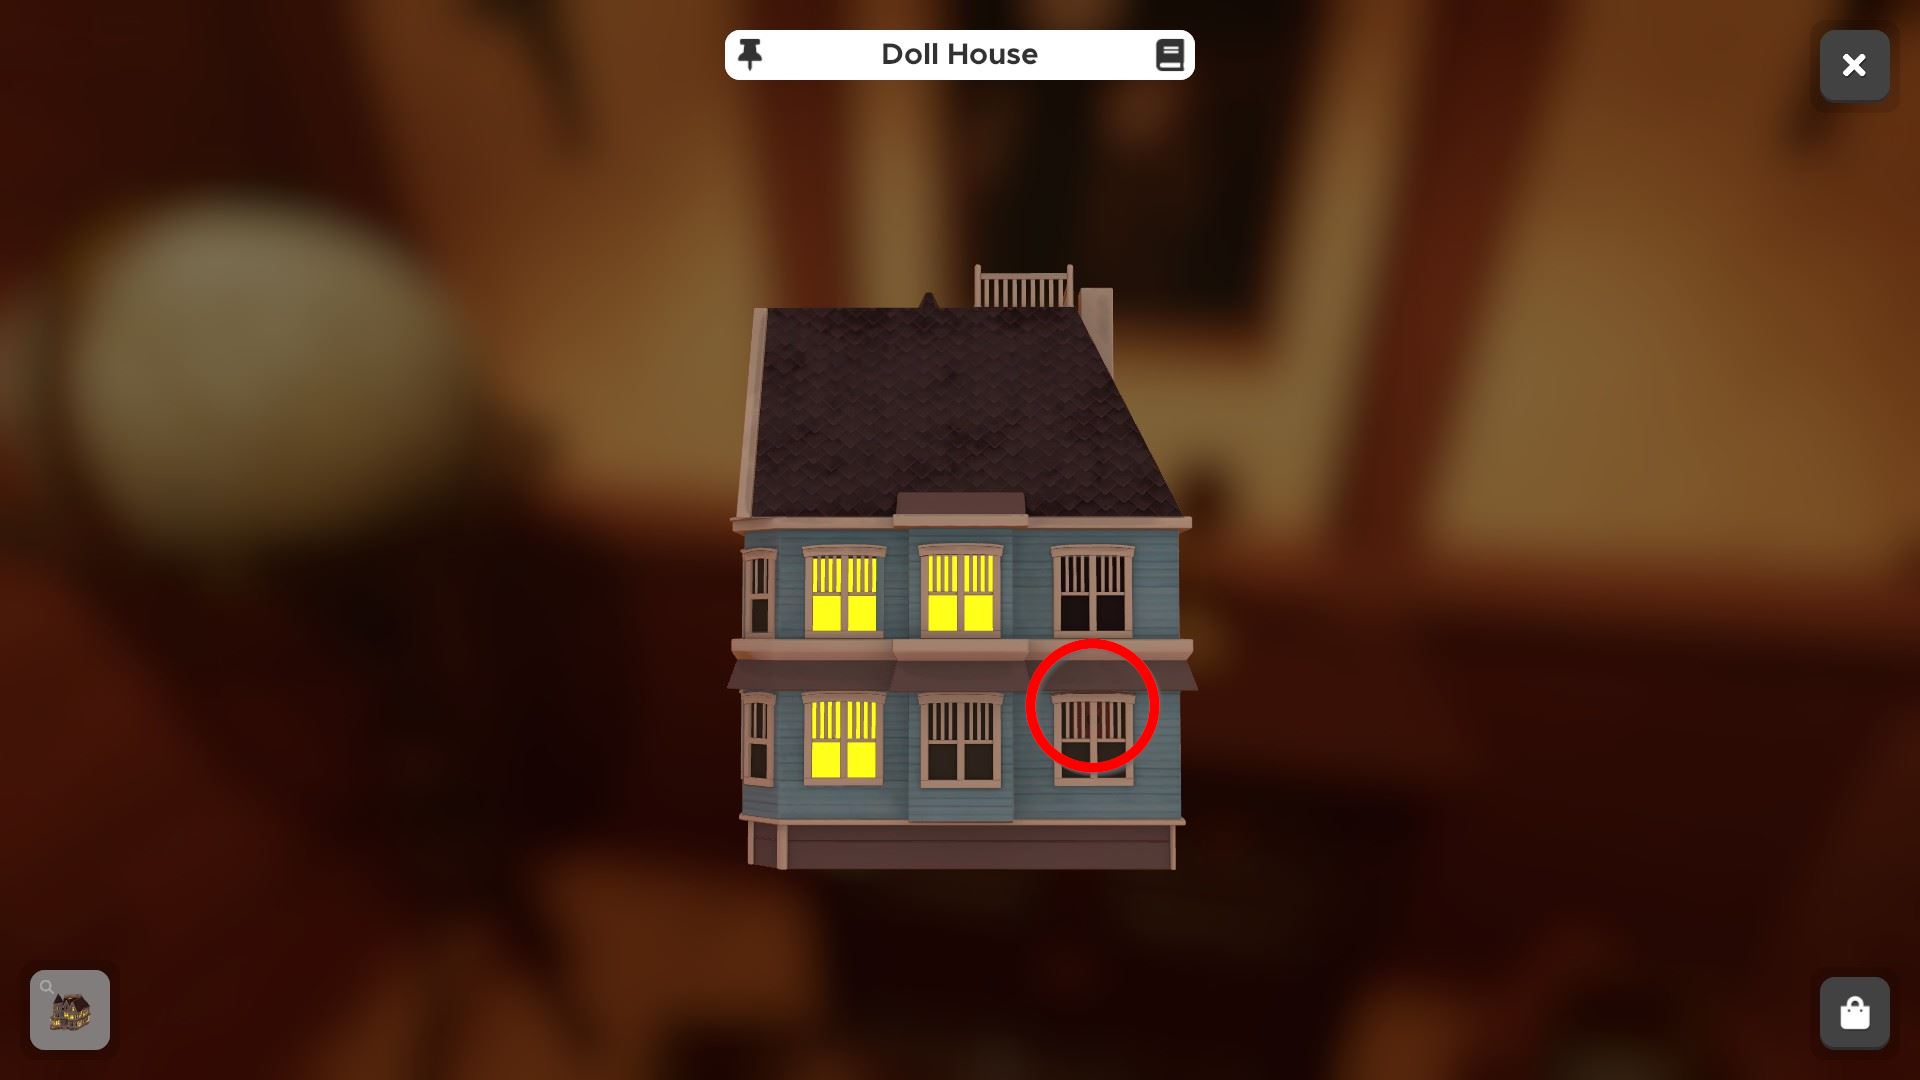
⏹ Token 6 / eight - on the doll house (on top of the dresser), in the upper part of the window:
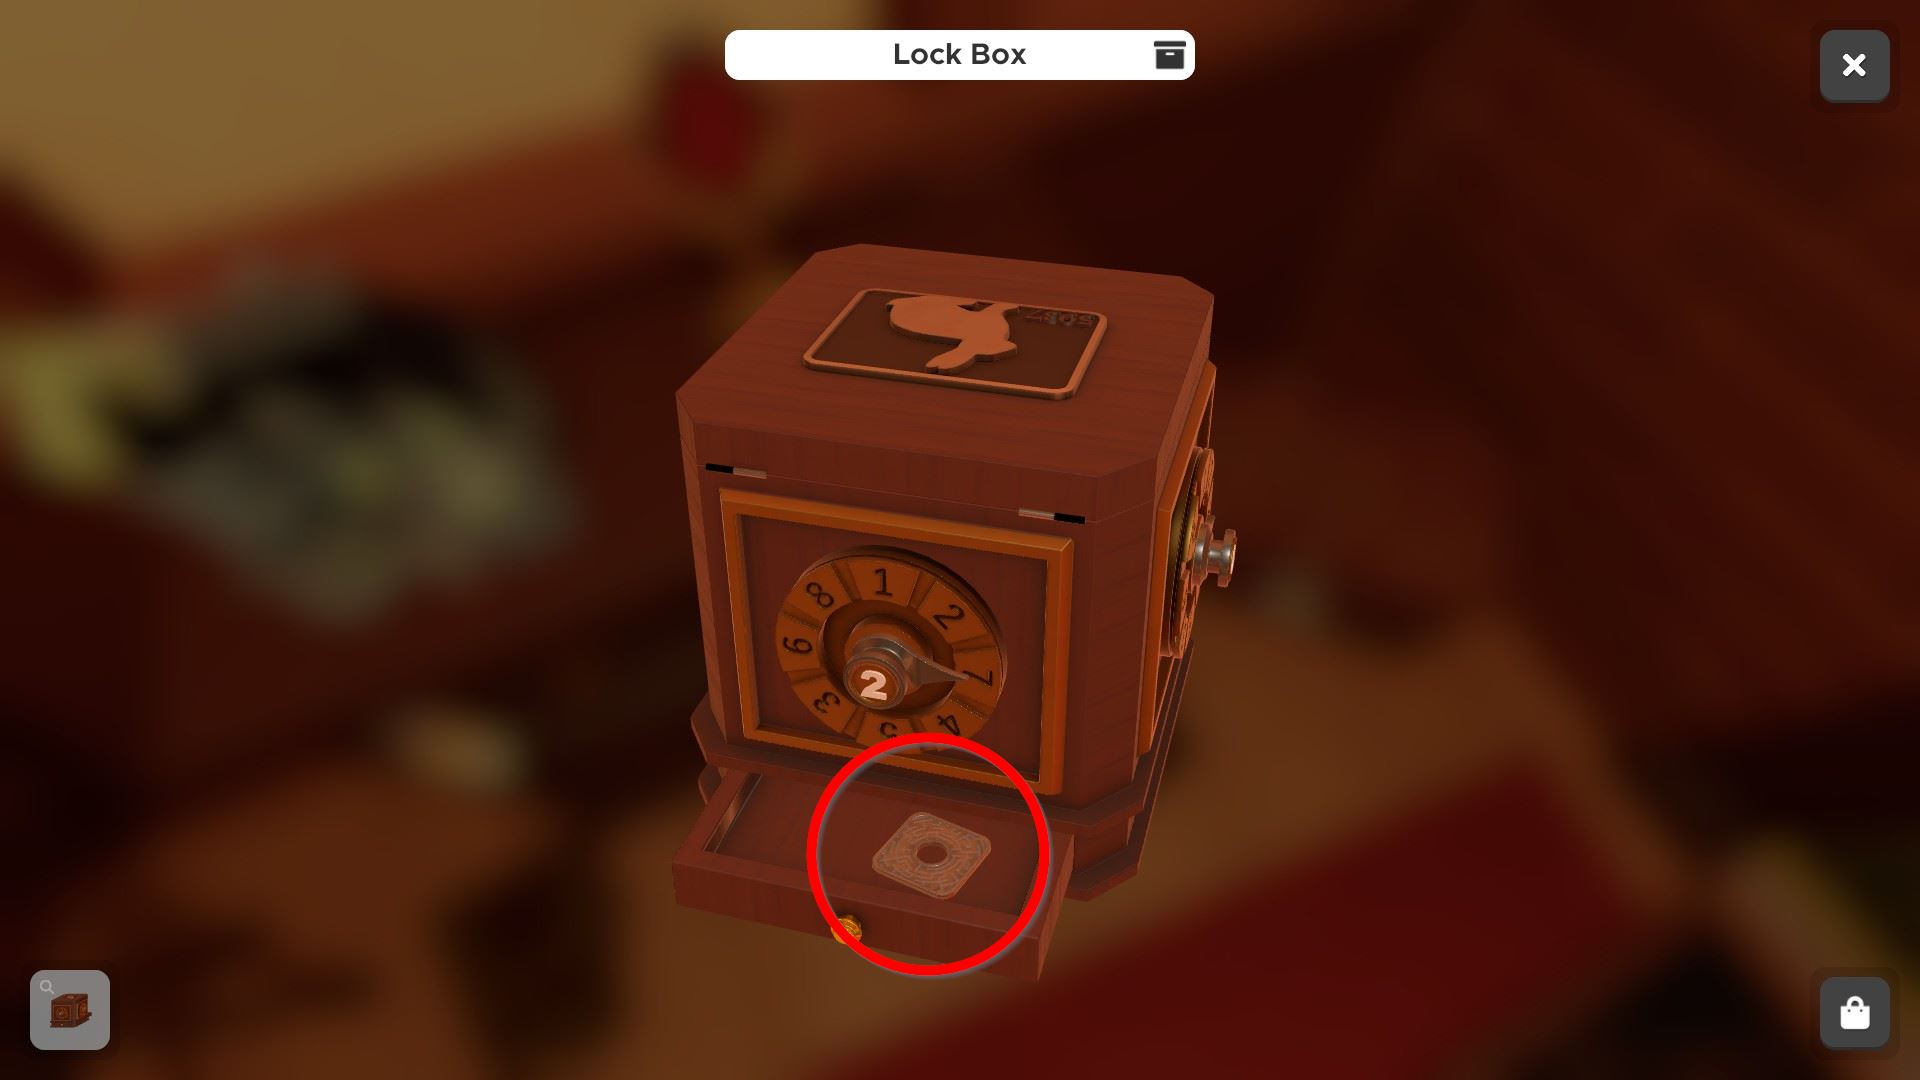
⏹ Token vii / 8 - inside rabbit lock box drawer, in the top right drawer of the dresser:
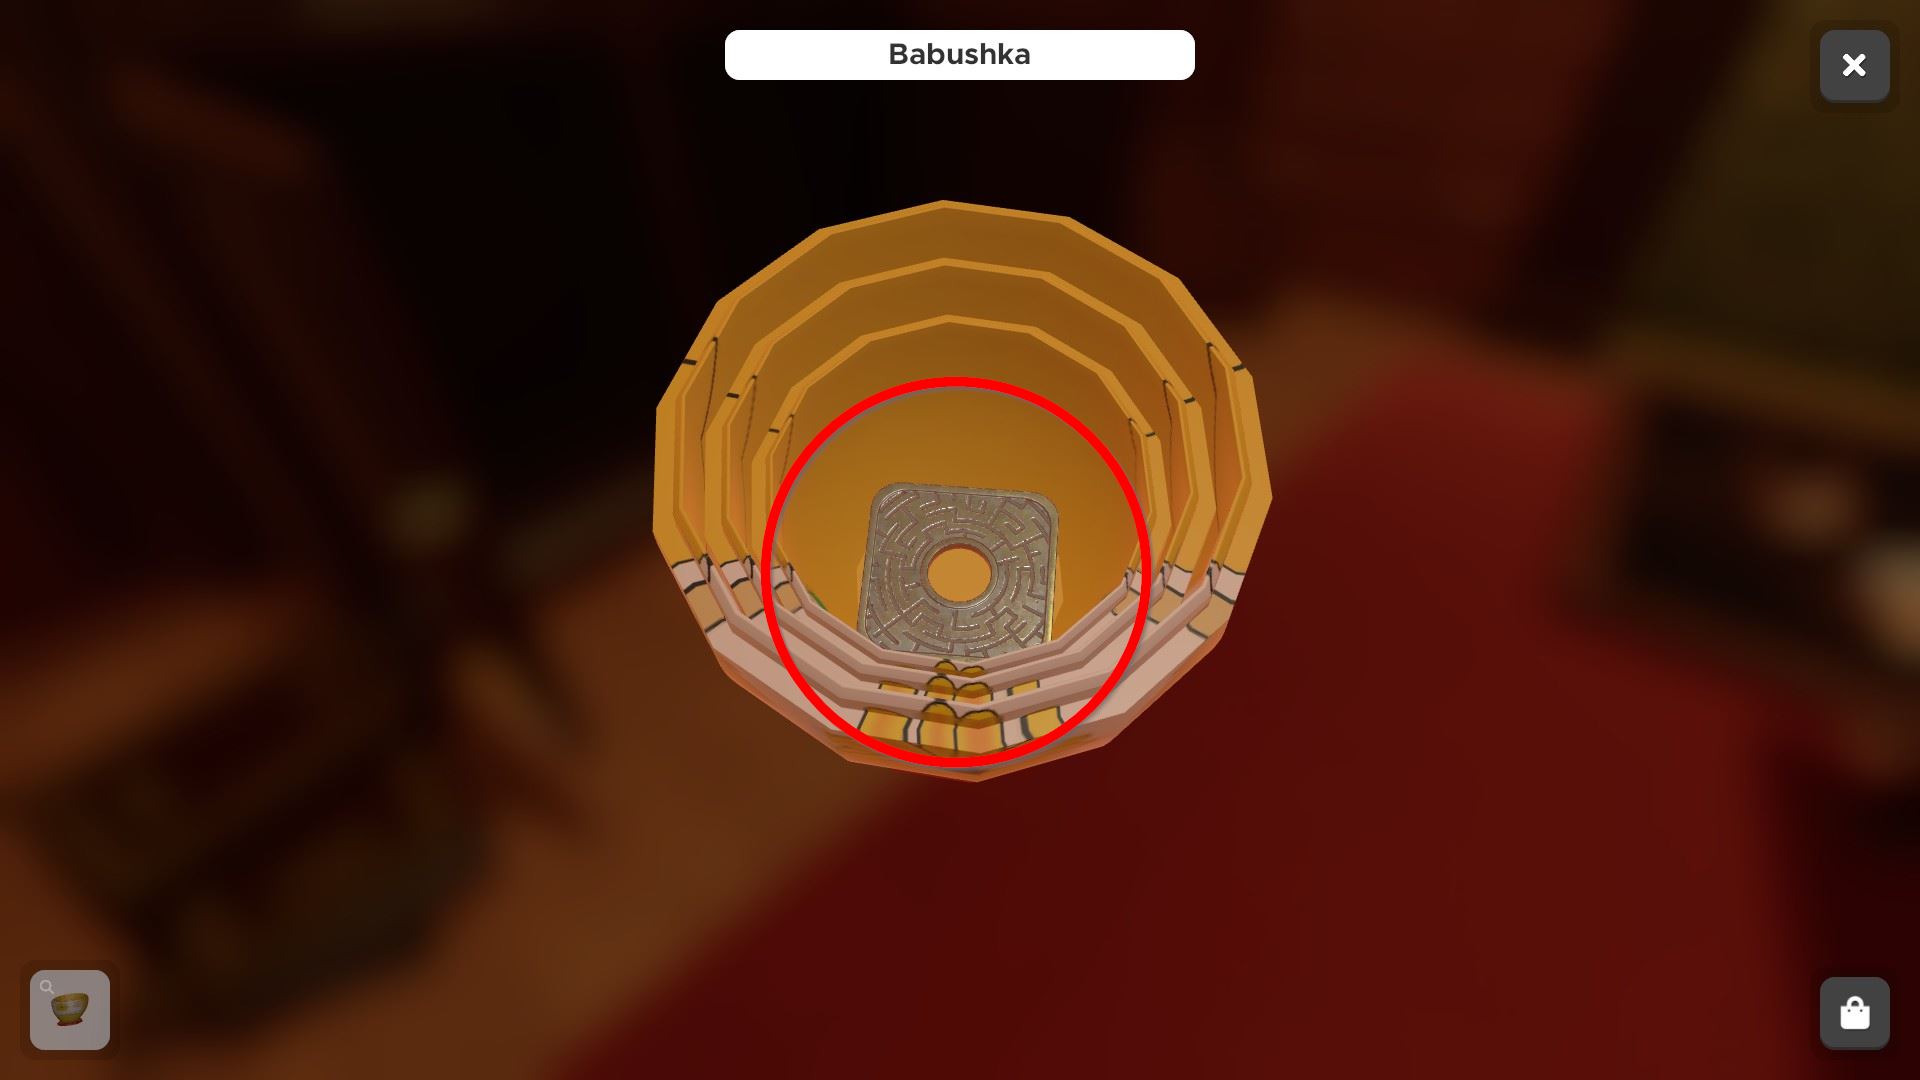
⏹ Token 8 / 8 - inside "babushka" matryoshka in the lesser right compartment of the dresser:
Open the globe by clicking locations in this order: China -> USA -> Brazil -> South Africa -> England. Y'all receive a light bulb.
Open the rabbit lock box in the right dresser drawer using the code 2-4-8-i (obtained by typing the code 5-iii-9-7 on the lockbox proper using the typewriter and paper). Take the projector lens.
Open the lock on the left dresser drawer: ii-7-v (solution from counting the lit windows on the doll business firm above). Accept the first film reel.
Open the toys box using the jack in the box codes: 2-iv-six (solution from "dearest children" letter and trying after how many rotations the different jack-in-the-box toys pop out). Take the horse toy.
Take the central on the back of the mirror on the dresser; this opens the left drawer under the typewriter. Take the second film reel from that drawer.
Assemble the projector: i moving-picture show reel from the desk, the other one from the dresser drawer; the lite seedling from inside the globe, and the projector lens from the rabbit lock box in the top right drawer of the dresser.
Insert the toys as follows to terminate the level (solution from the family unit portrait left of the typewriter):
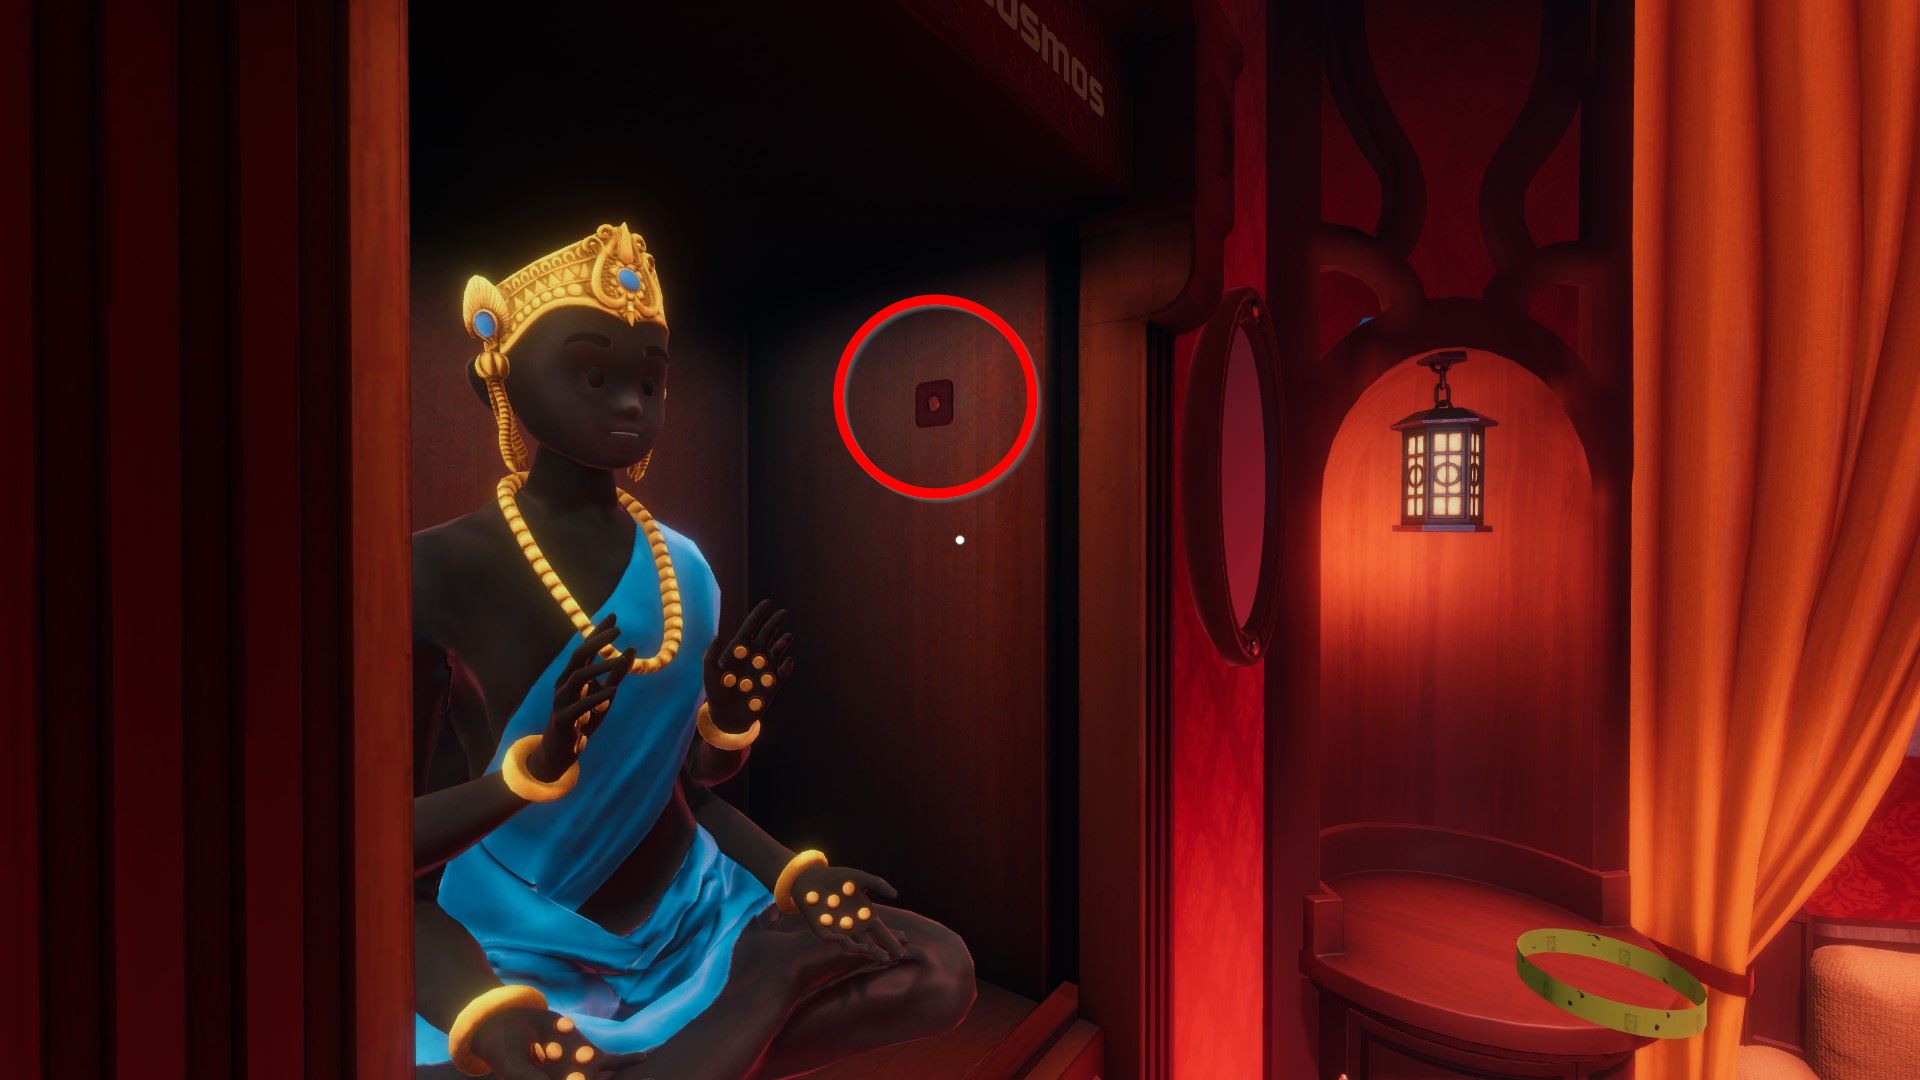
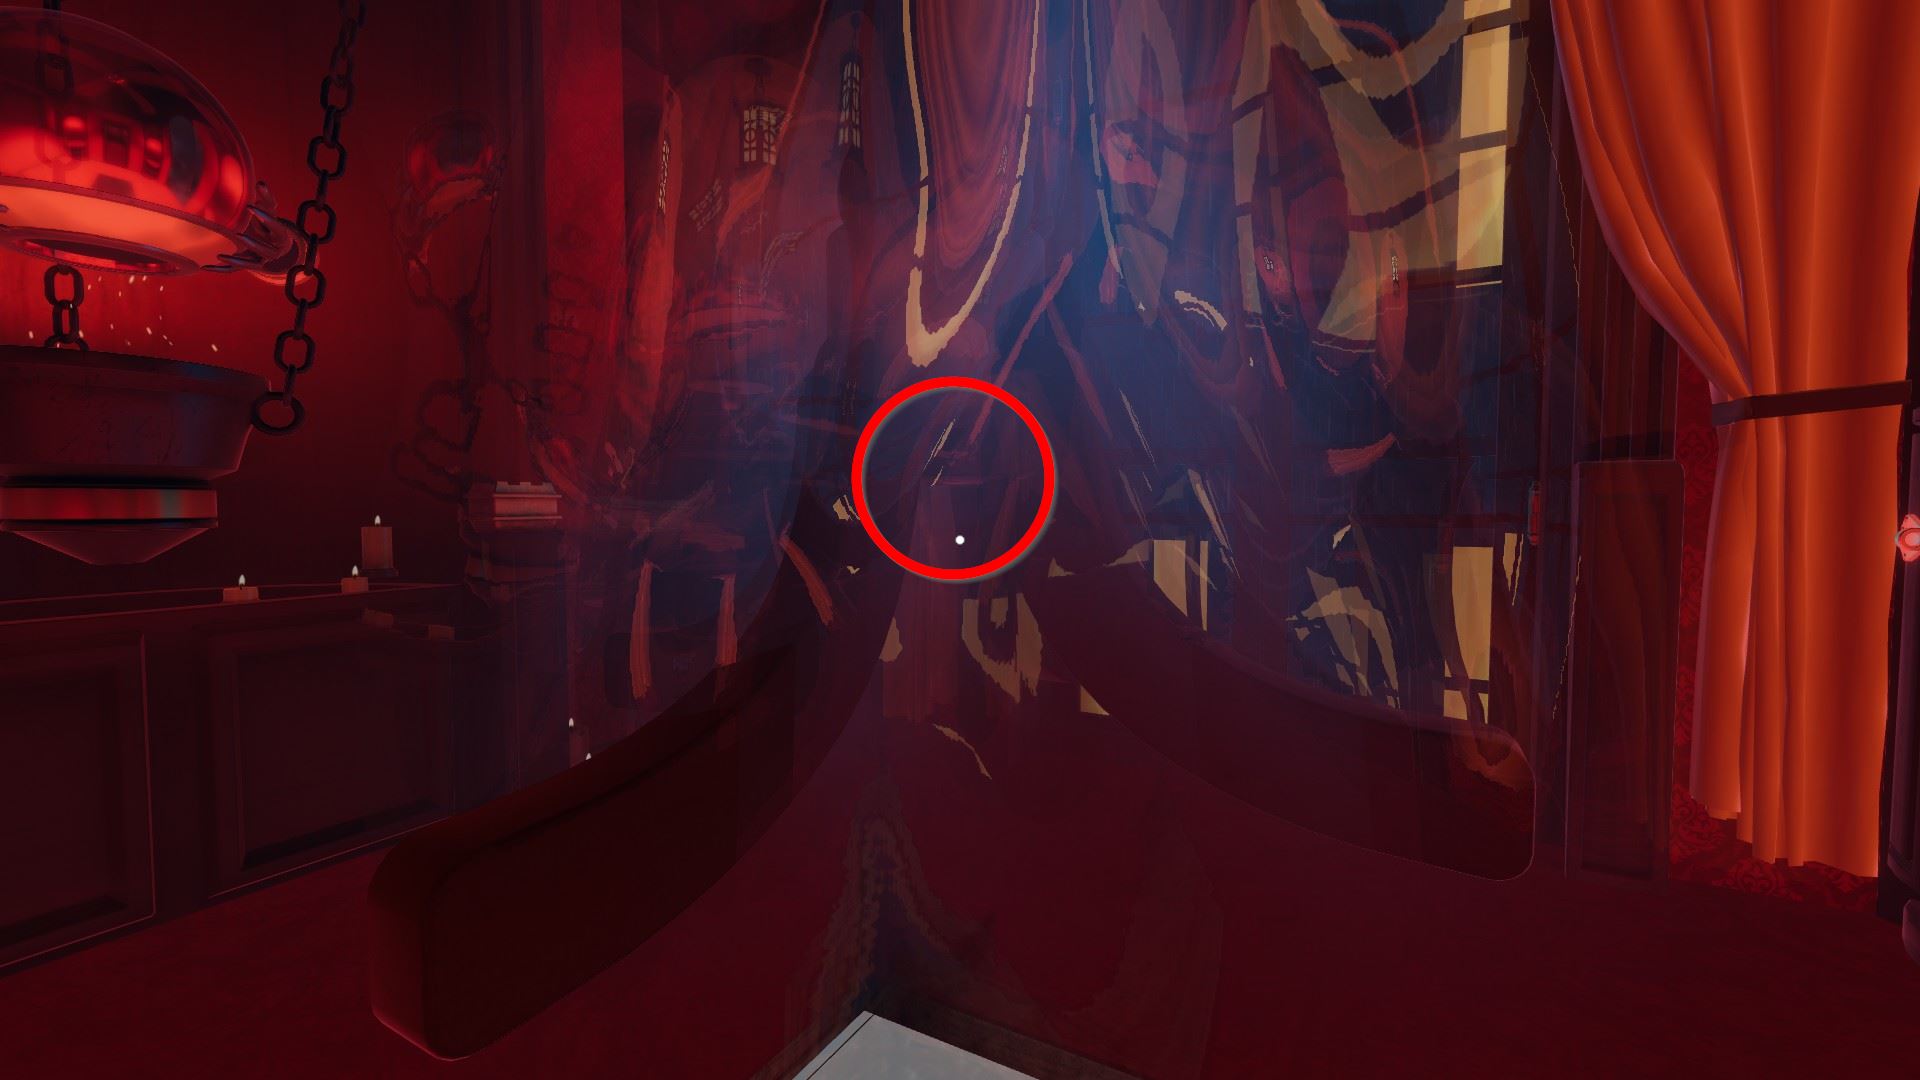
Edgewood Mansion: Lost Spirits
⏹ Token 1 / 8 - shake the chandelier and it volition fall on the table effectually G/H letters:
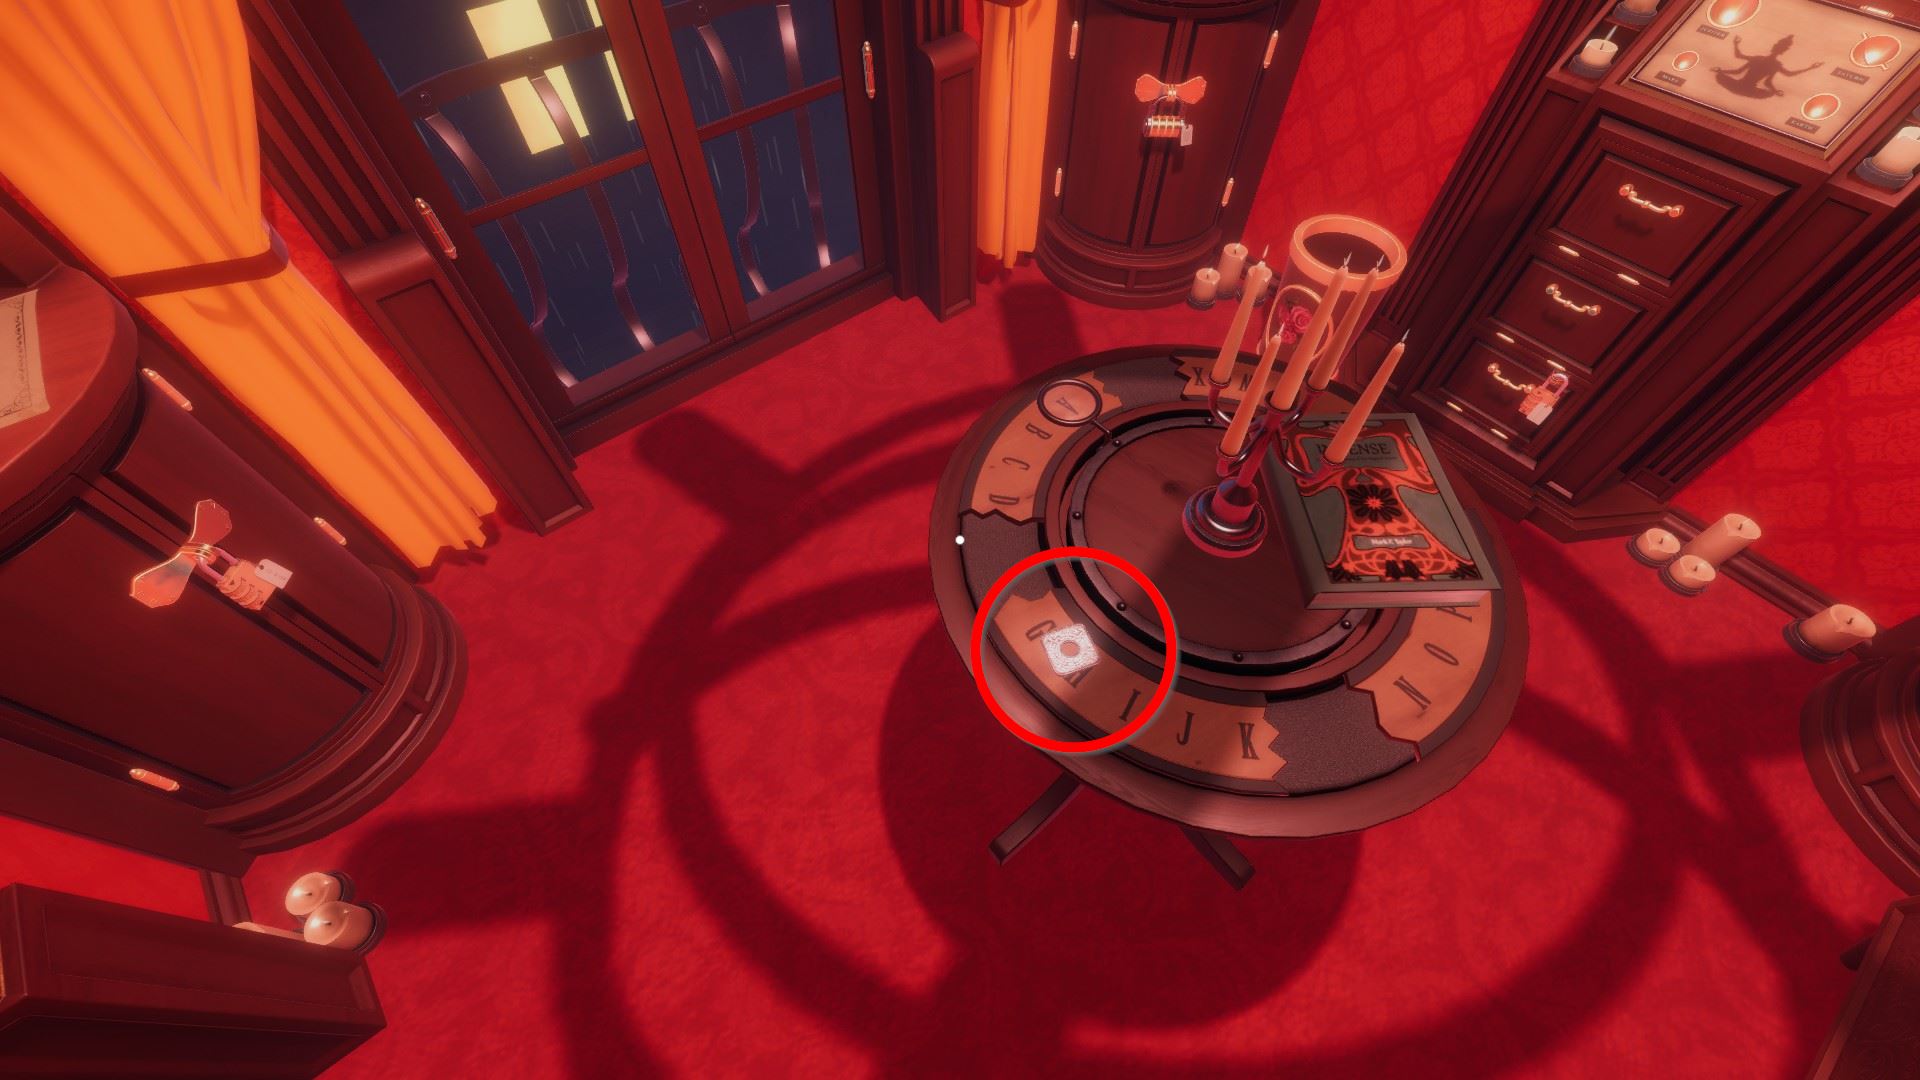
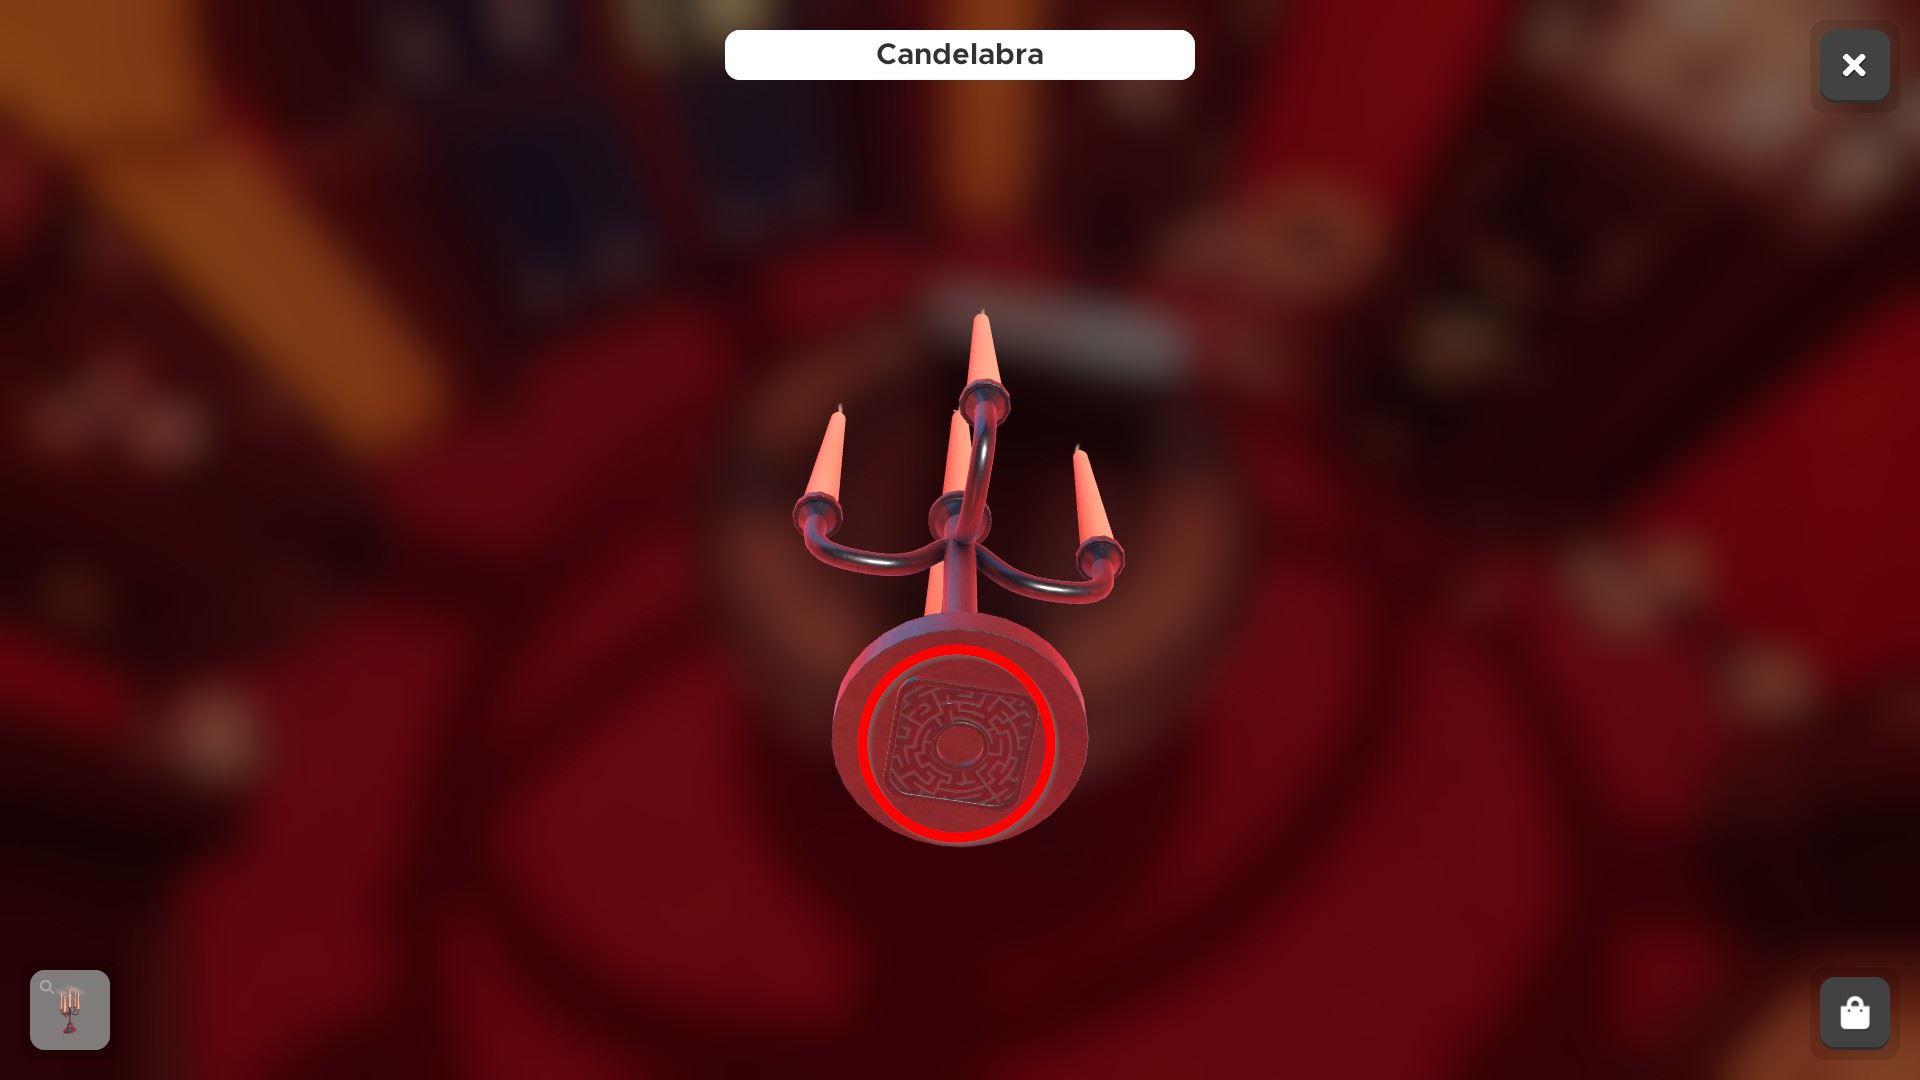
⏹ Token ii / 8 - under candelabra on table:
⏹ Token three / 8 - on the bottom left the wall painting:
⏹ Token iv / 8 - in a tiny cleft on the lesser left of the sofa:
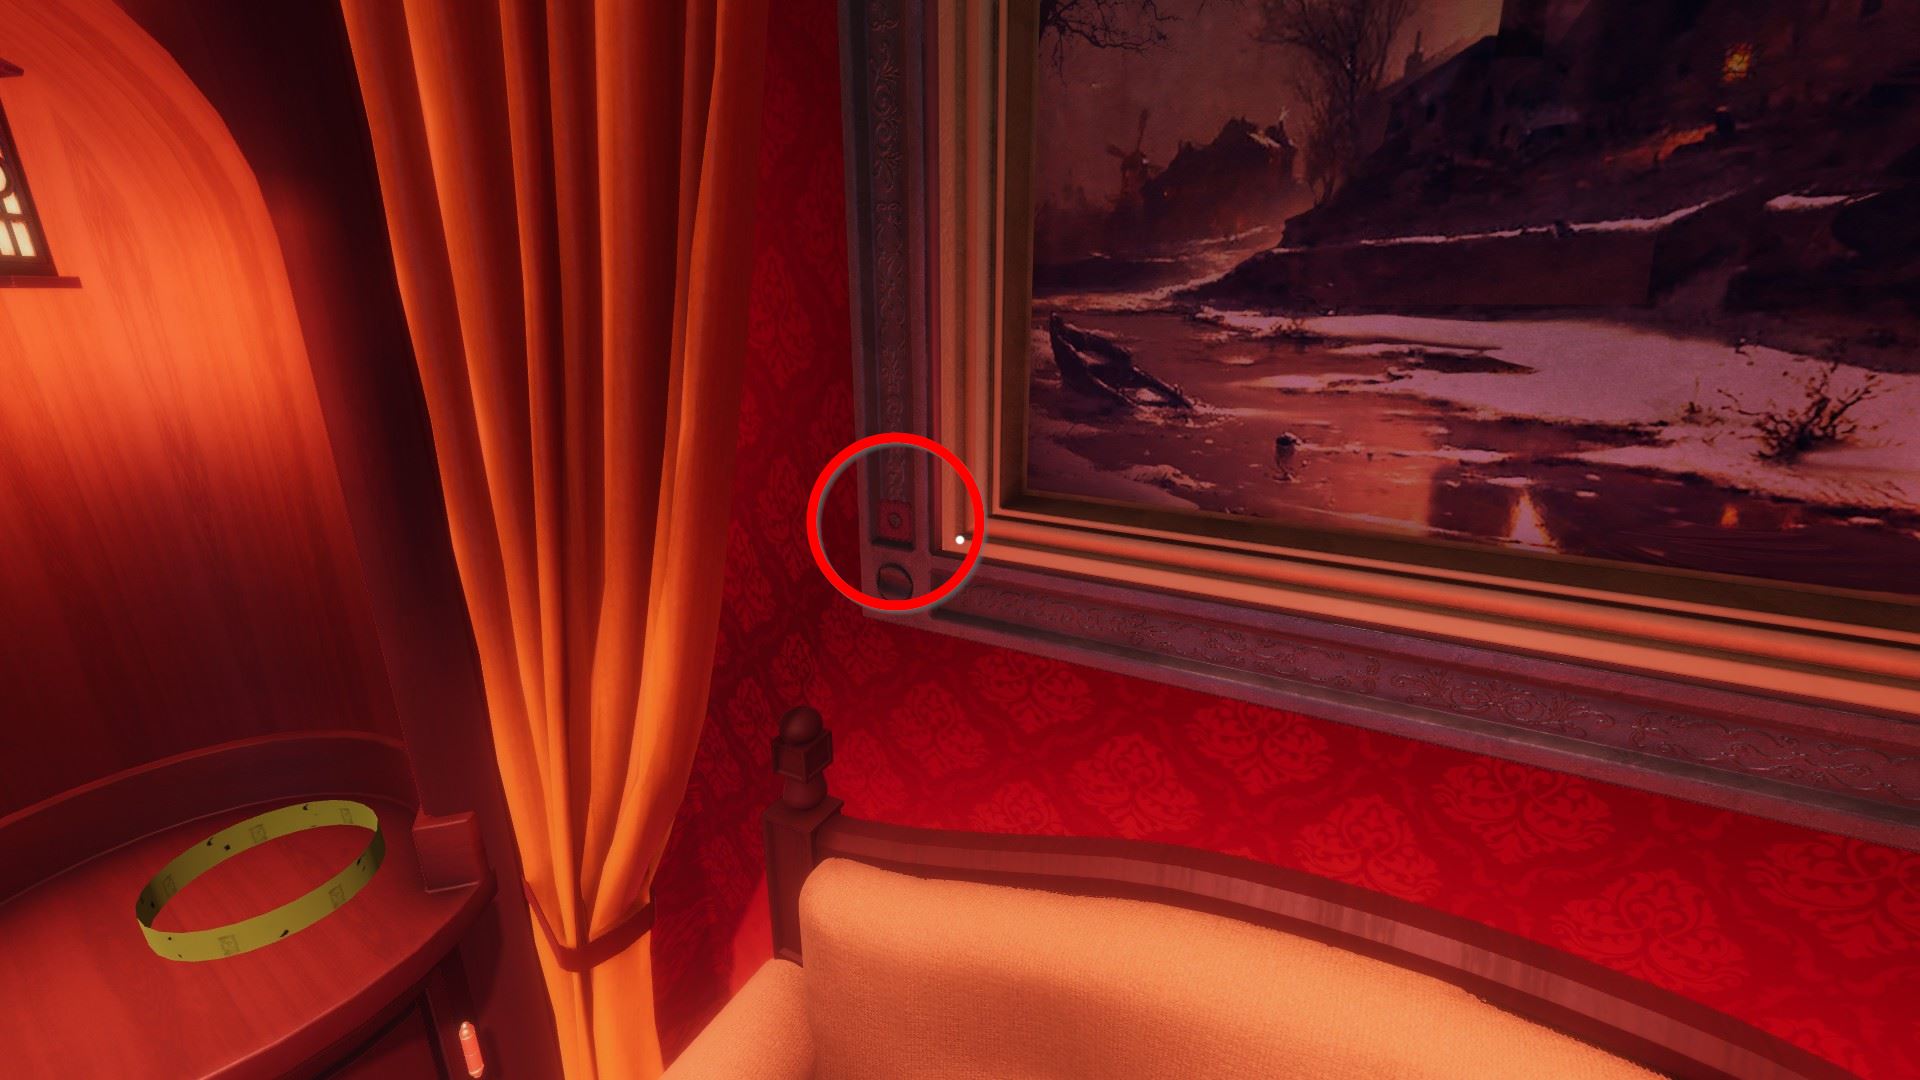
⏹ Token 5 / 8 - under the lantern on the correct of the painting:
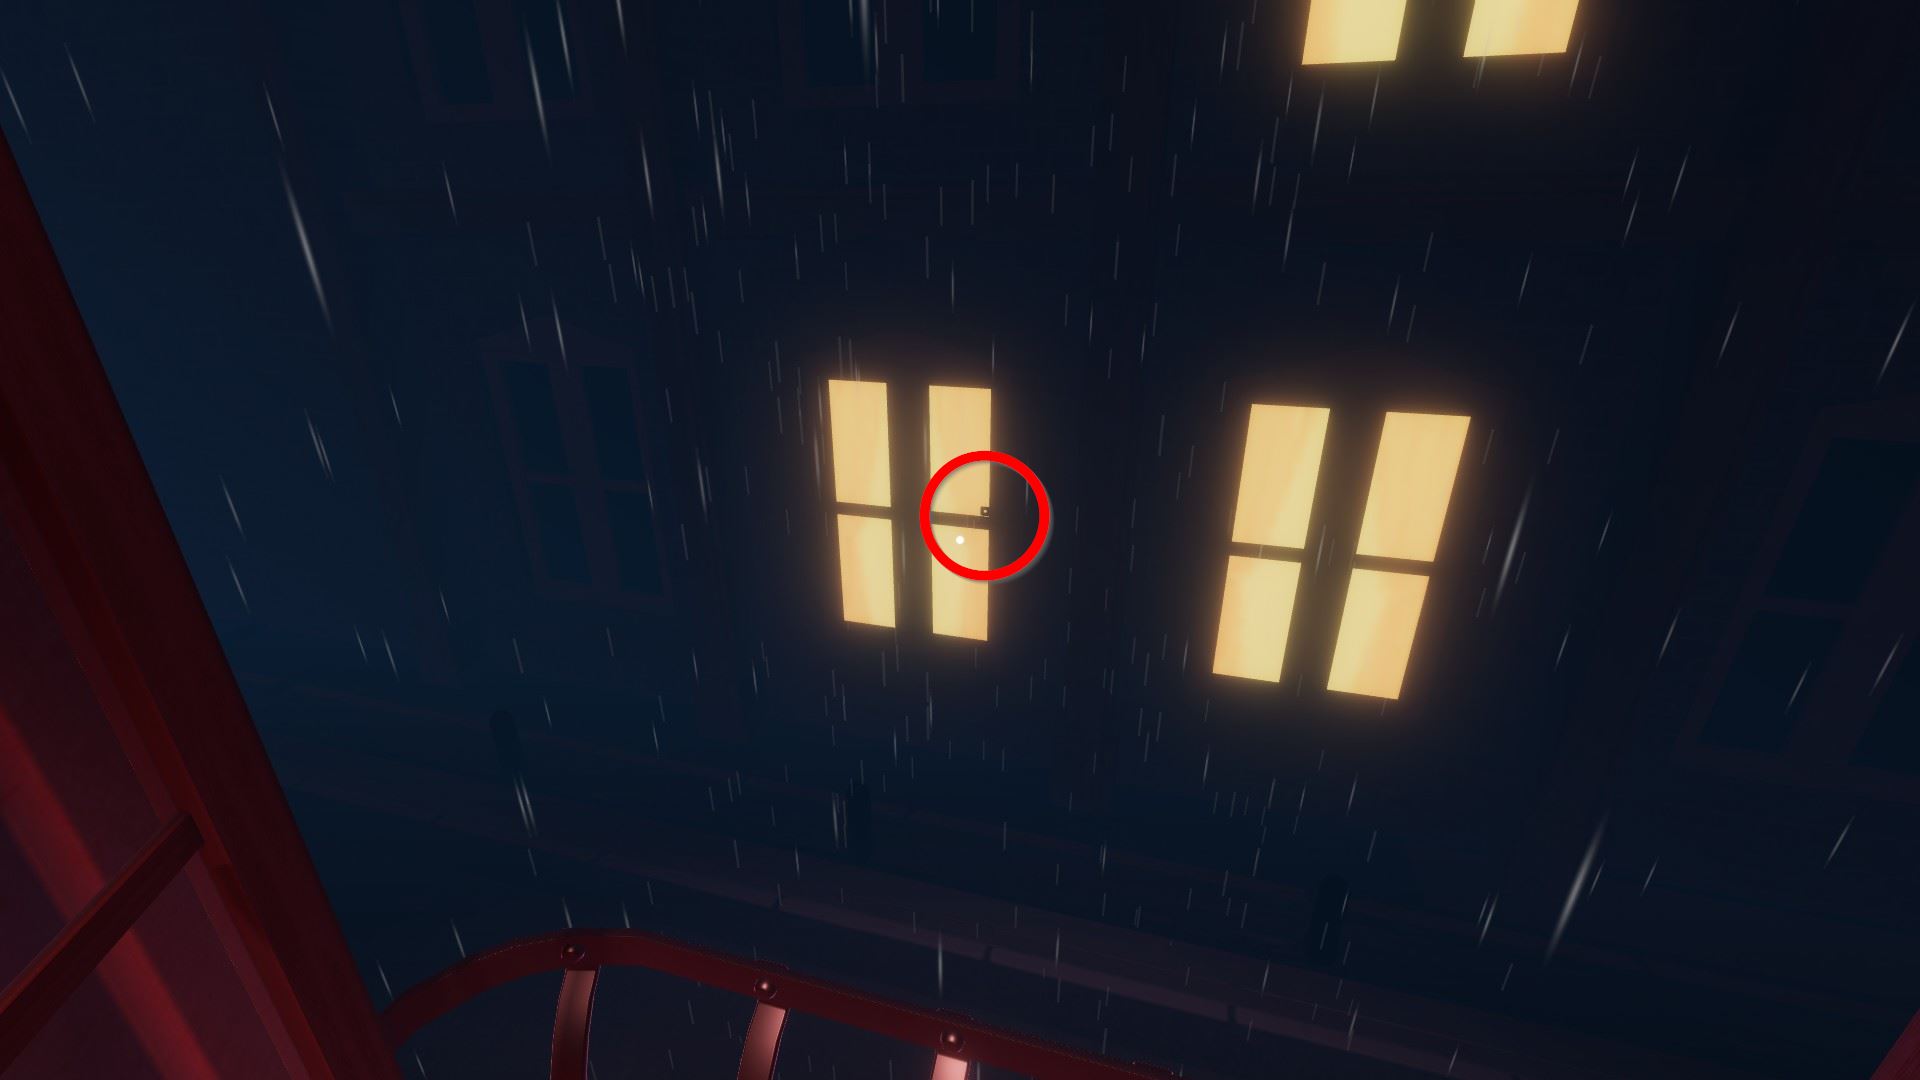
⏹ Token vi / 8 - exterior the playable area (view from the balcony), on a window:
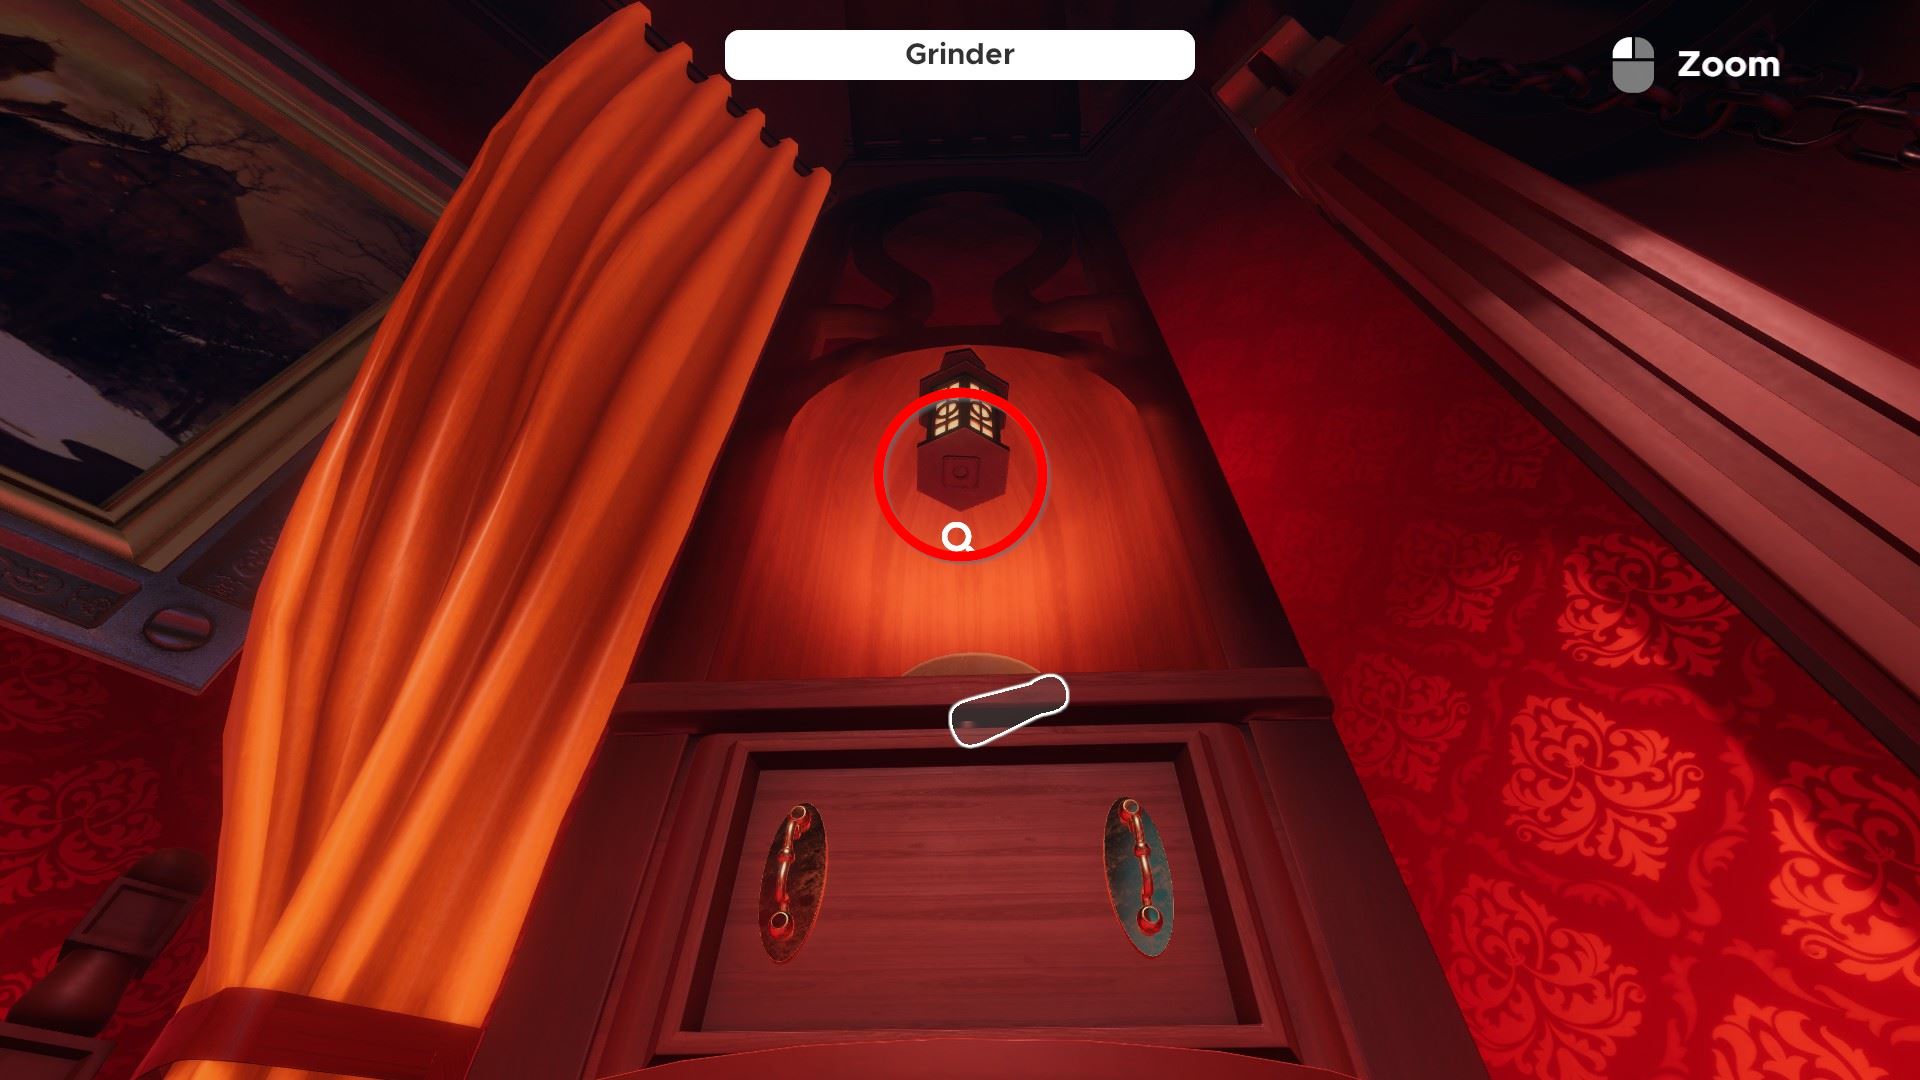
**Optional** cauldron cooking: utilize the compartment under the grinder to access cooking ingredients, and have the morning bong flower in the top right, the mandragora leaf in the lesser left, and the almond in the bottom middle. Grind the almond using the grinder. Insert the ingredients into the boiling coals in the above order to reveal the code 249.
Open the lock with circle using the cauldron lawmaking 249 and pick upwardly the E/F lath piece for the oujia lath.
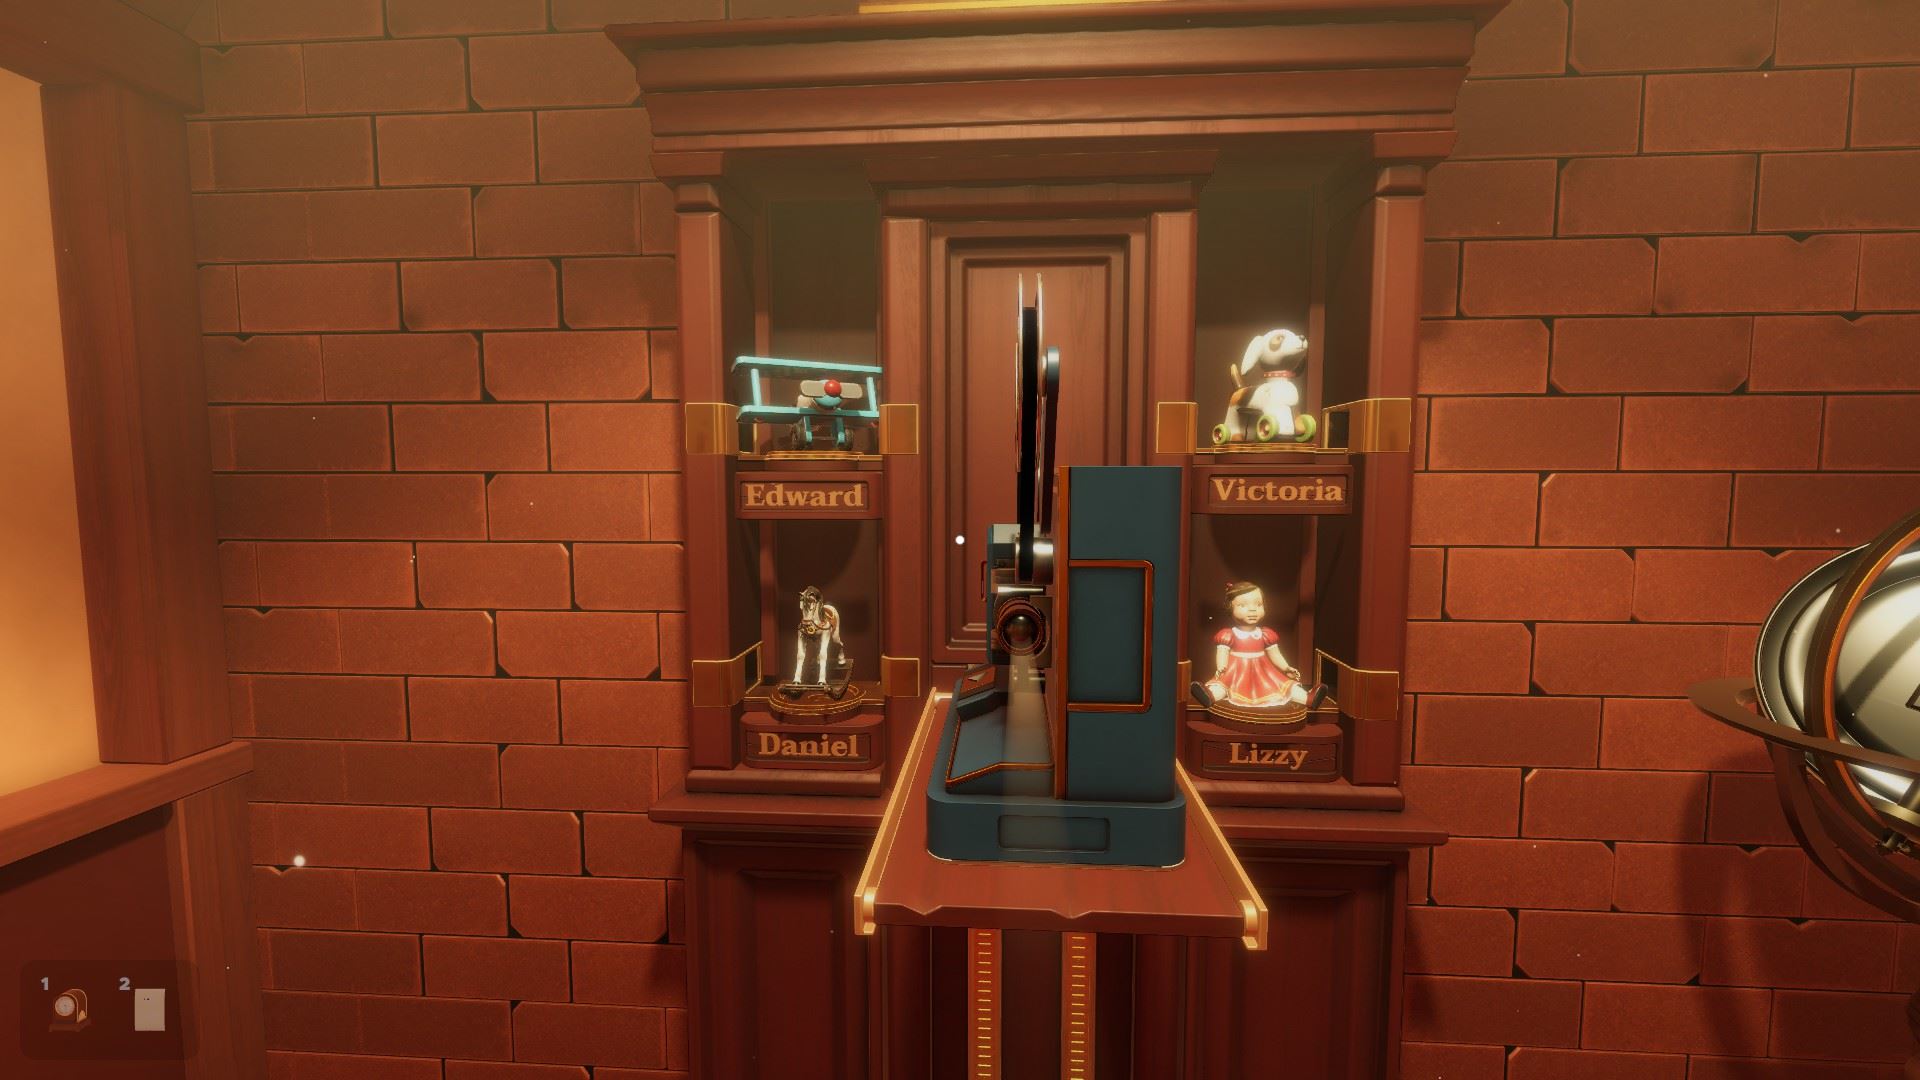
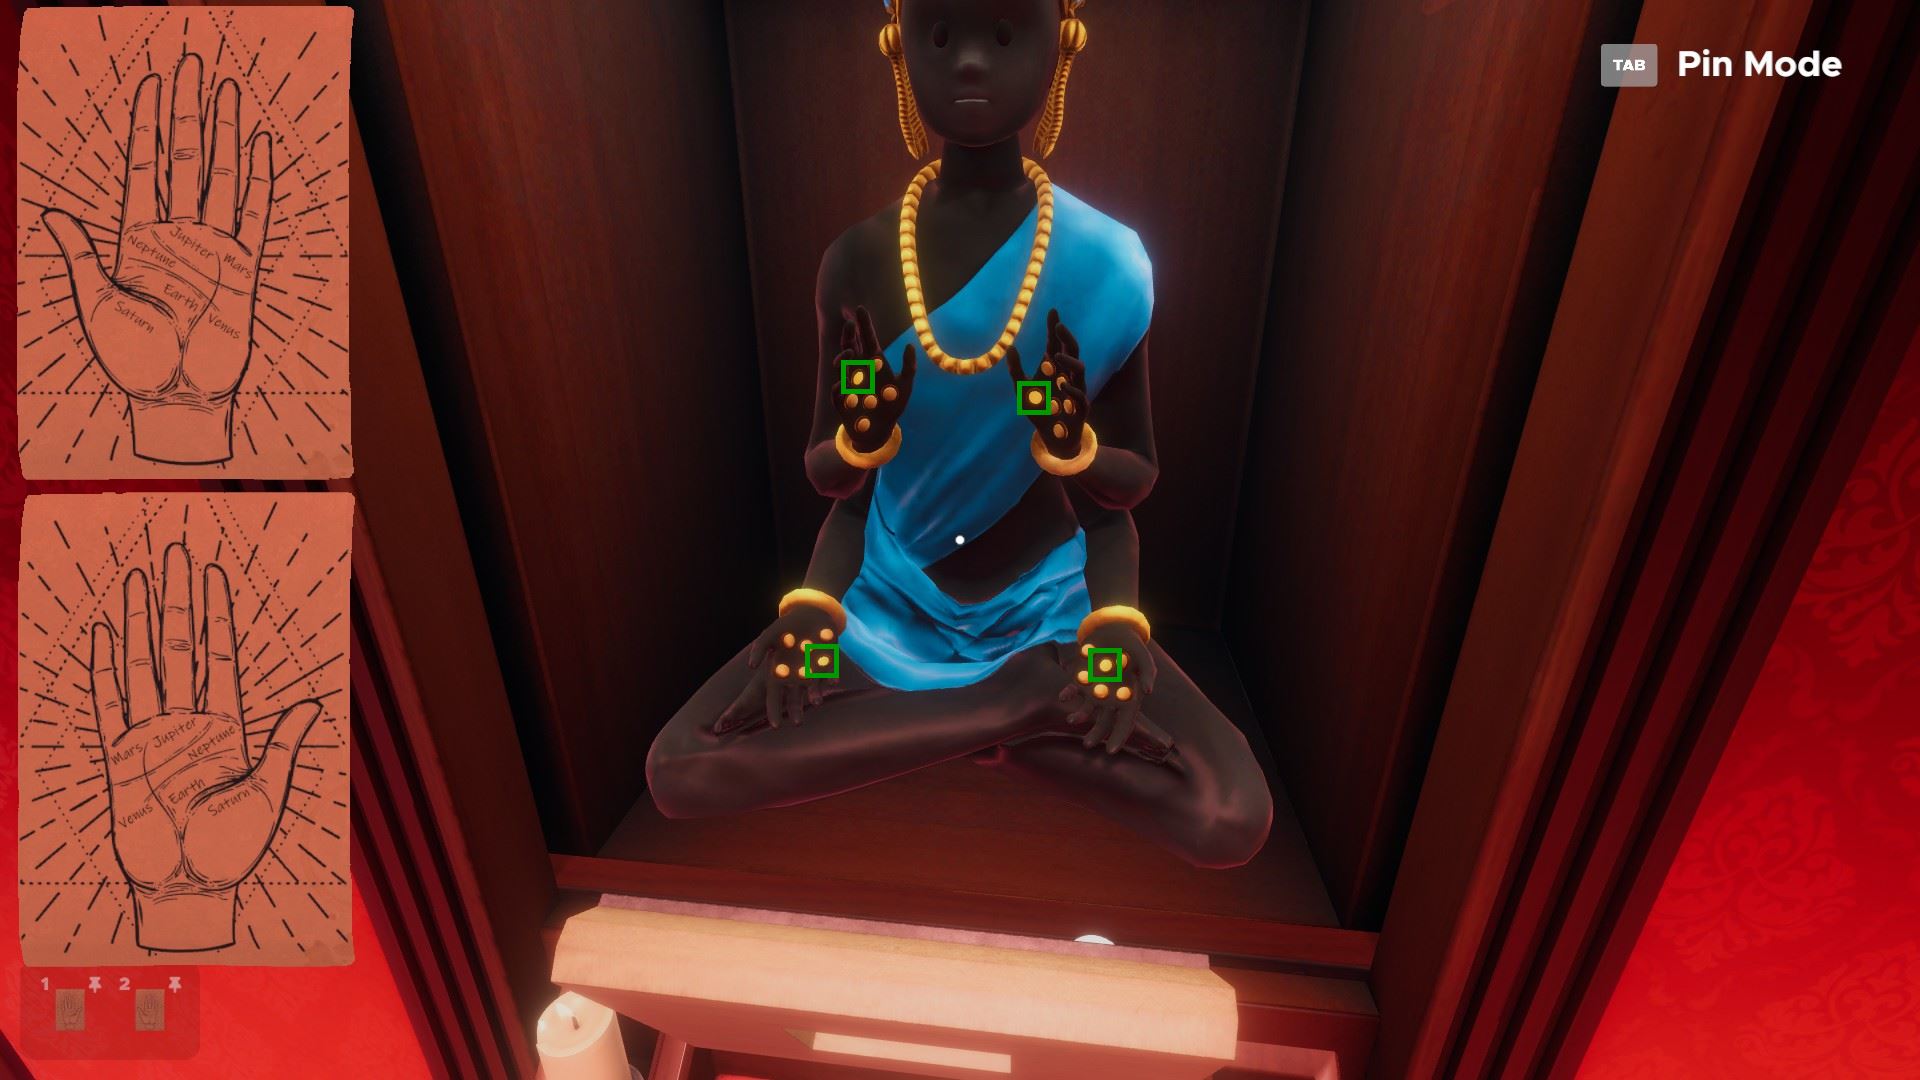
Open up the bottom drawer of the "hands of creation" station with the mannequin code 1-8-2 (solution: mannequin body postures form numbers) to get two planets. Insert all planets into hands of cosmos panel (Saturn from the height drawer of the same place, Jupiter and Mars from its locked lesser drawer, and Earth from the table on the left of it).
The hands of cosmos puzzle asks y'all to click one planet on each hand equally shown on the console; the papers on the sides explain the right spots to click.
⏹ Token 7 / 8 - inside hands of creation compartment, behind the paper on the right side:
Take the key and use it to open the compartment nether the grinding station.
Have the Y/Z ouija piece.
The combination for the tarot card lock left of the hands of creation station is v-viii-0-3 (based on the tarot cards and note from the central-locked compartment). Take the 50/Chiliad ouija piece.
The zoetrope lock is beneath the zoetrope itself. The combination is viii-half dozen-3 (based on inserting the differently coloured stripes and watching the "video" through the cylinder cuts). This gets you the last ouija piece, S/T.
Place all the ouija pieces and and so spell V-O-I-D to stop the level (this is the lawmaking that lights upwards where the painting used to be).
For the concluding token, press Stay to proceed playing.
⏹ Token 8 / 8 - under the pes of the tabular array, visible after it starts floating:
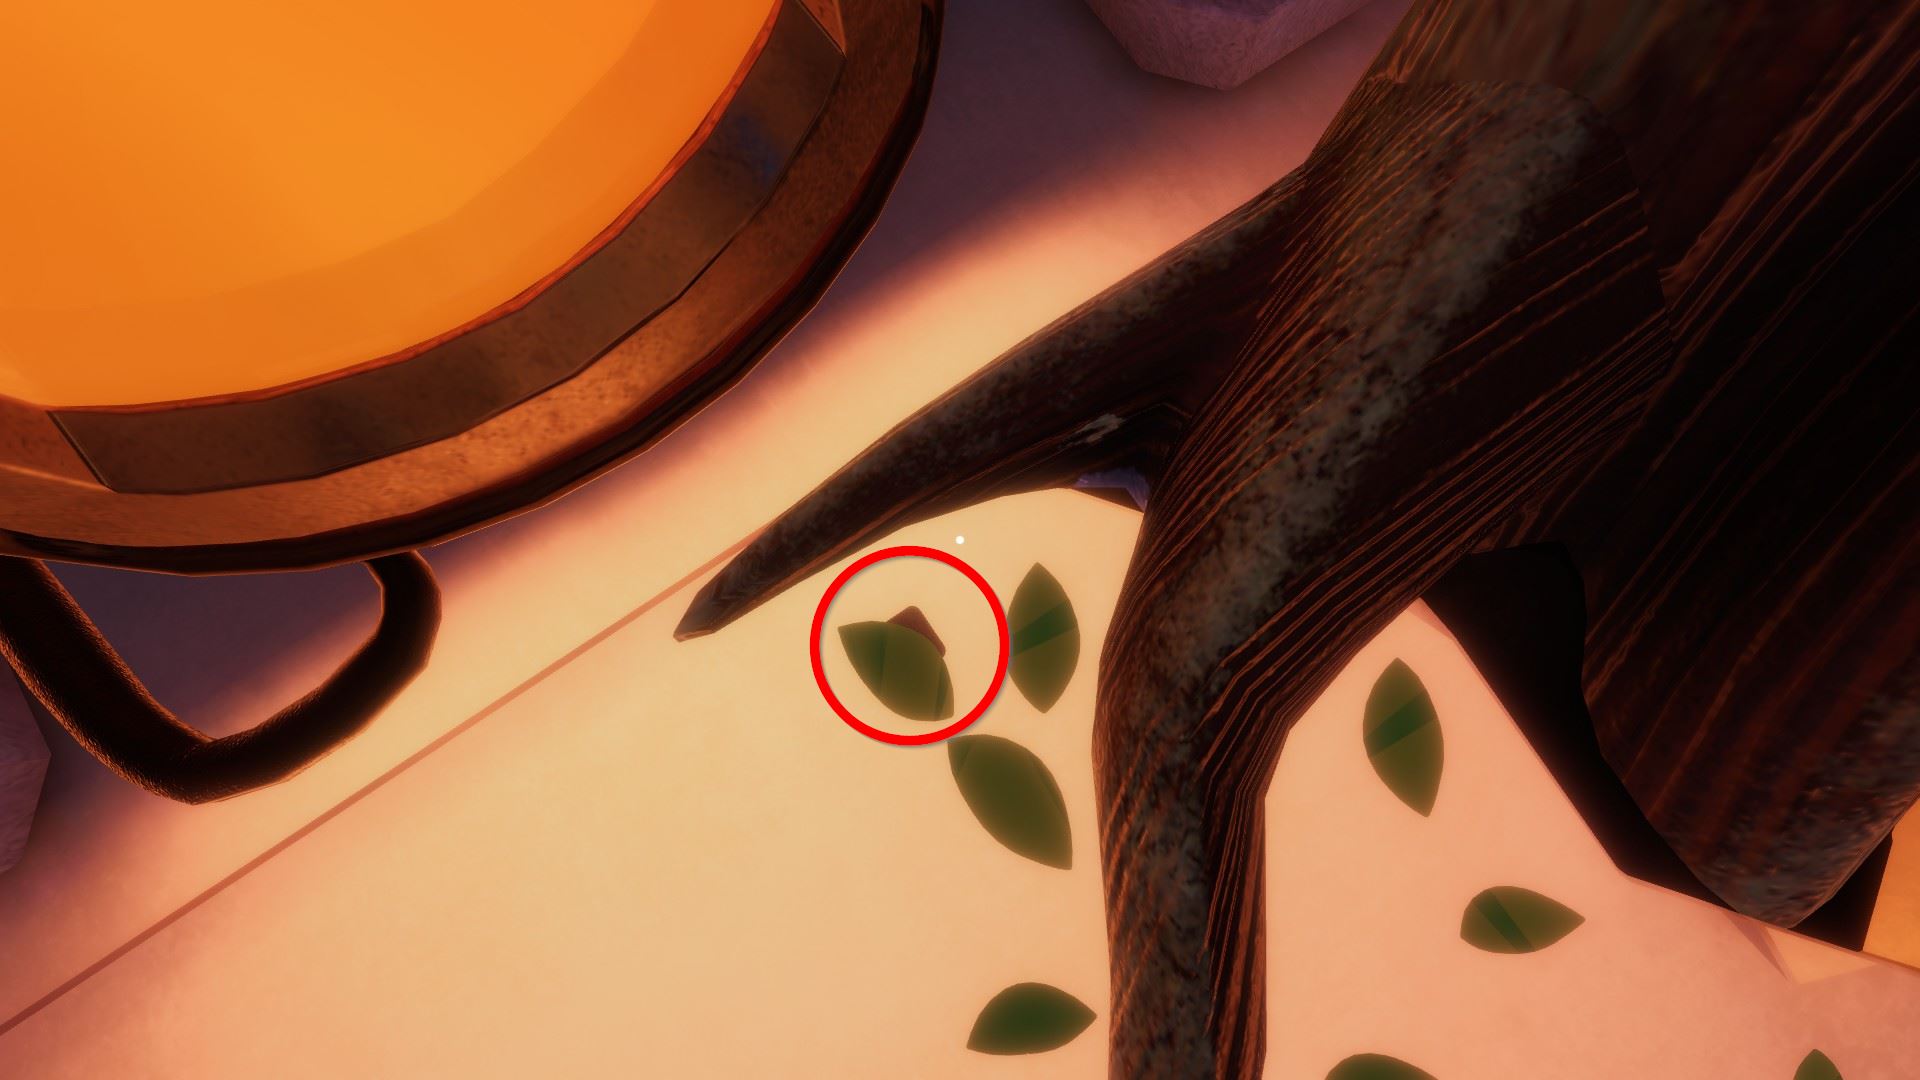
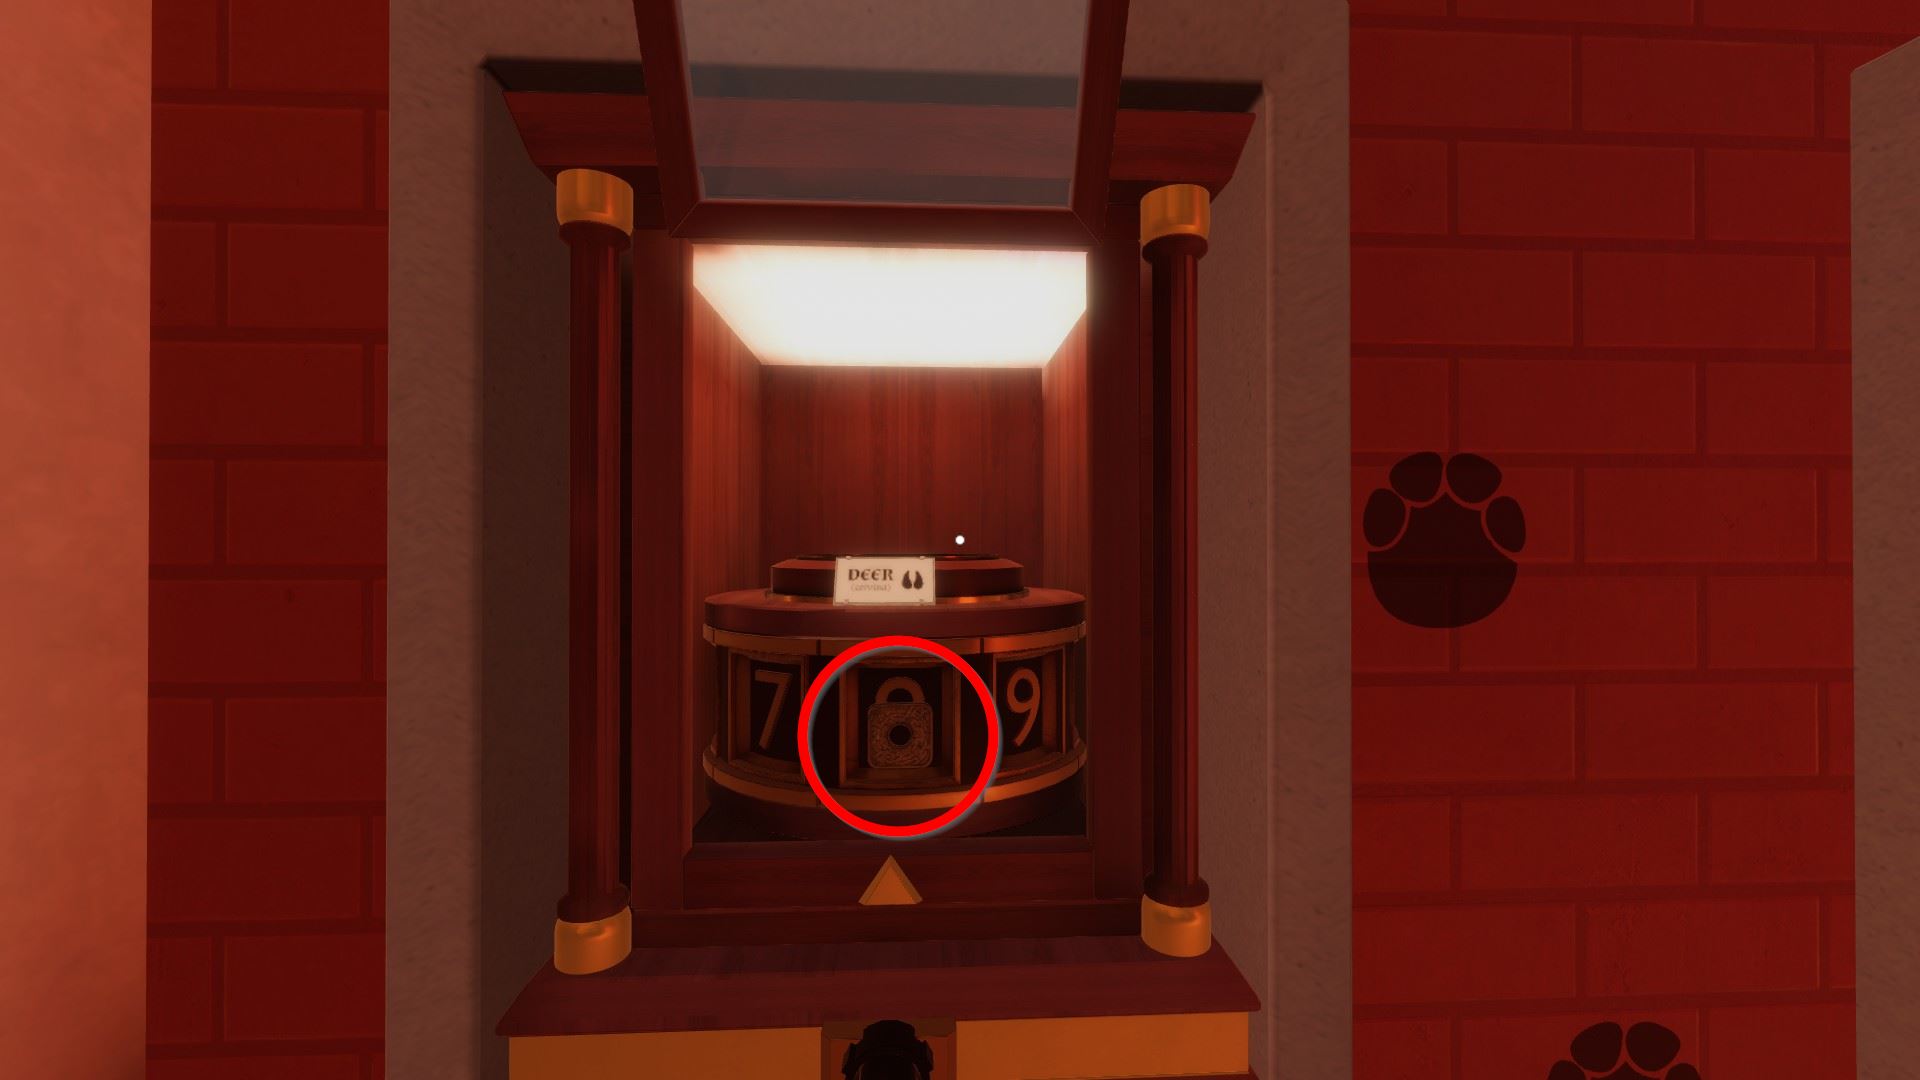
Edgewood Mansion: The Cloak-and-dagger Lab
🏆
Level-specific achievement: Jack Beanstalk
Look up in the heart of the level, to 'where the beanstalk ends'.
Employ the zooming in role (middle mouse key).
⏹ Token 1 / viii - under a leaf at the tree base of operations:
⏹ Token 2 / 8 - on the deer dial:
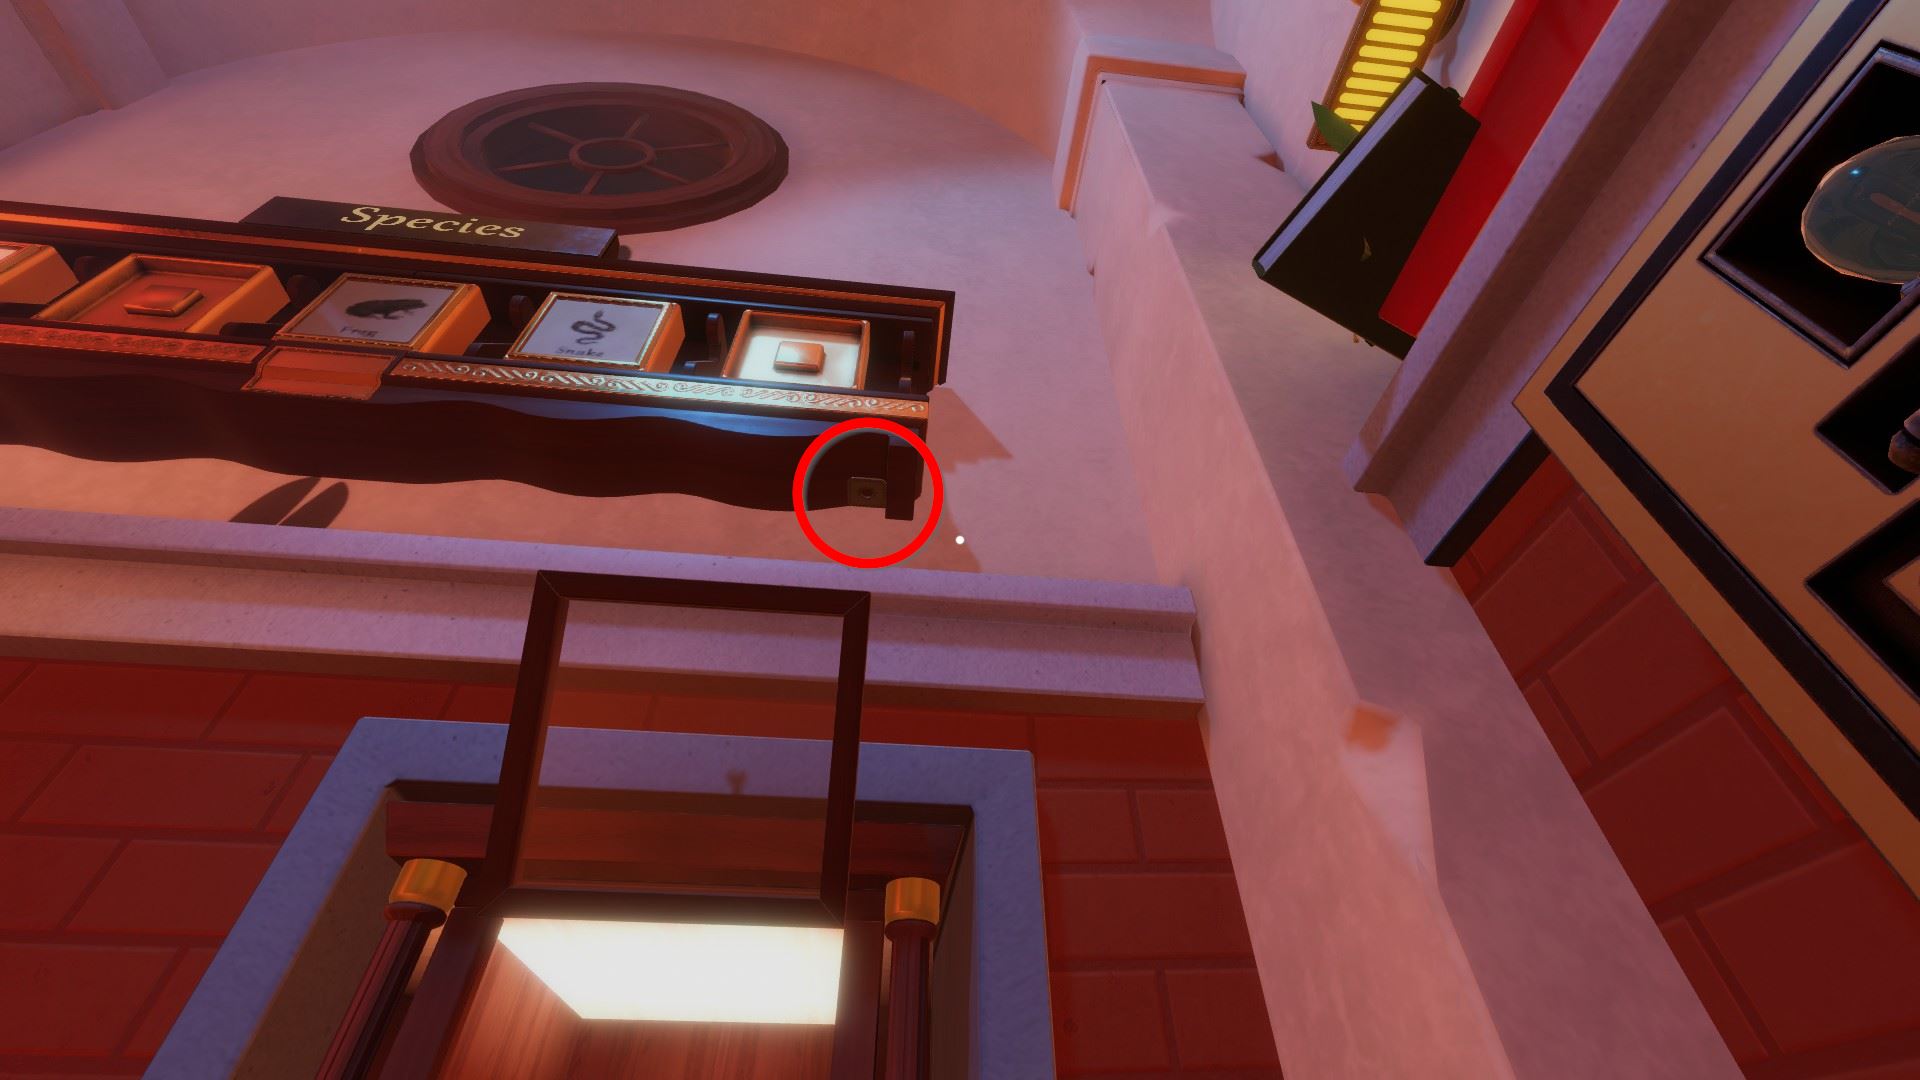
⏹ Token 3 / eight - nether the Species shelf:
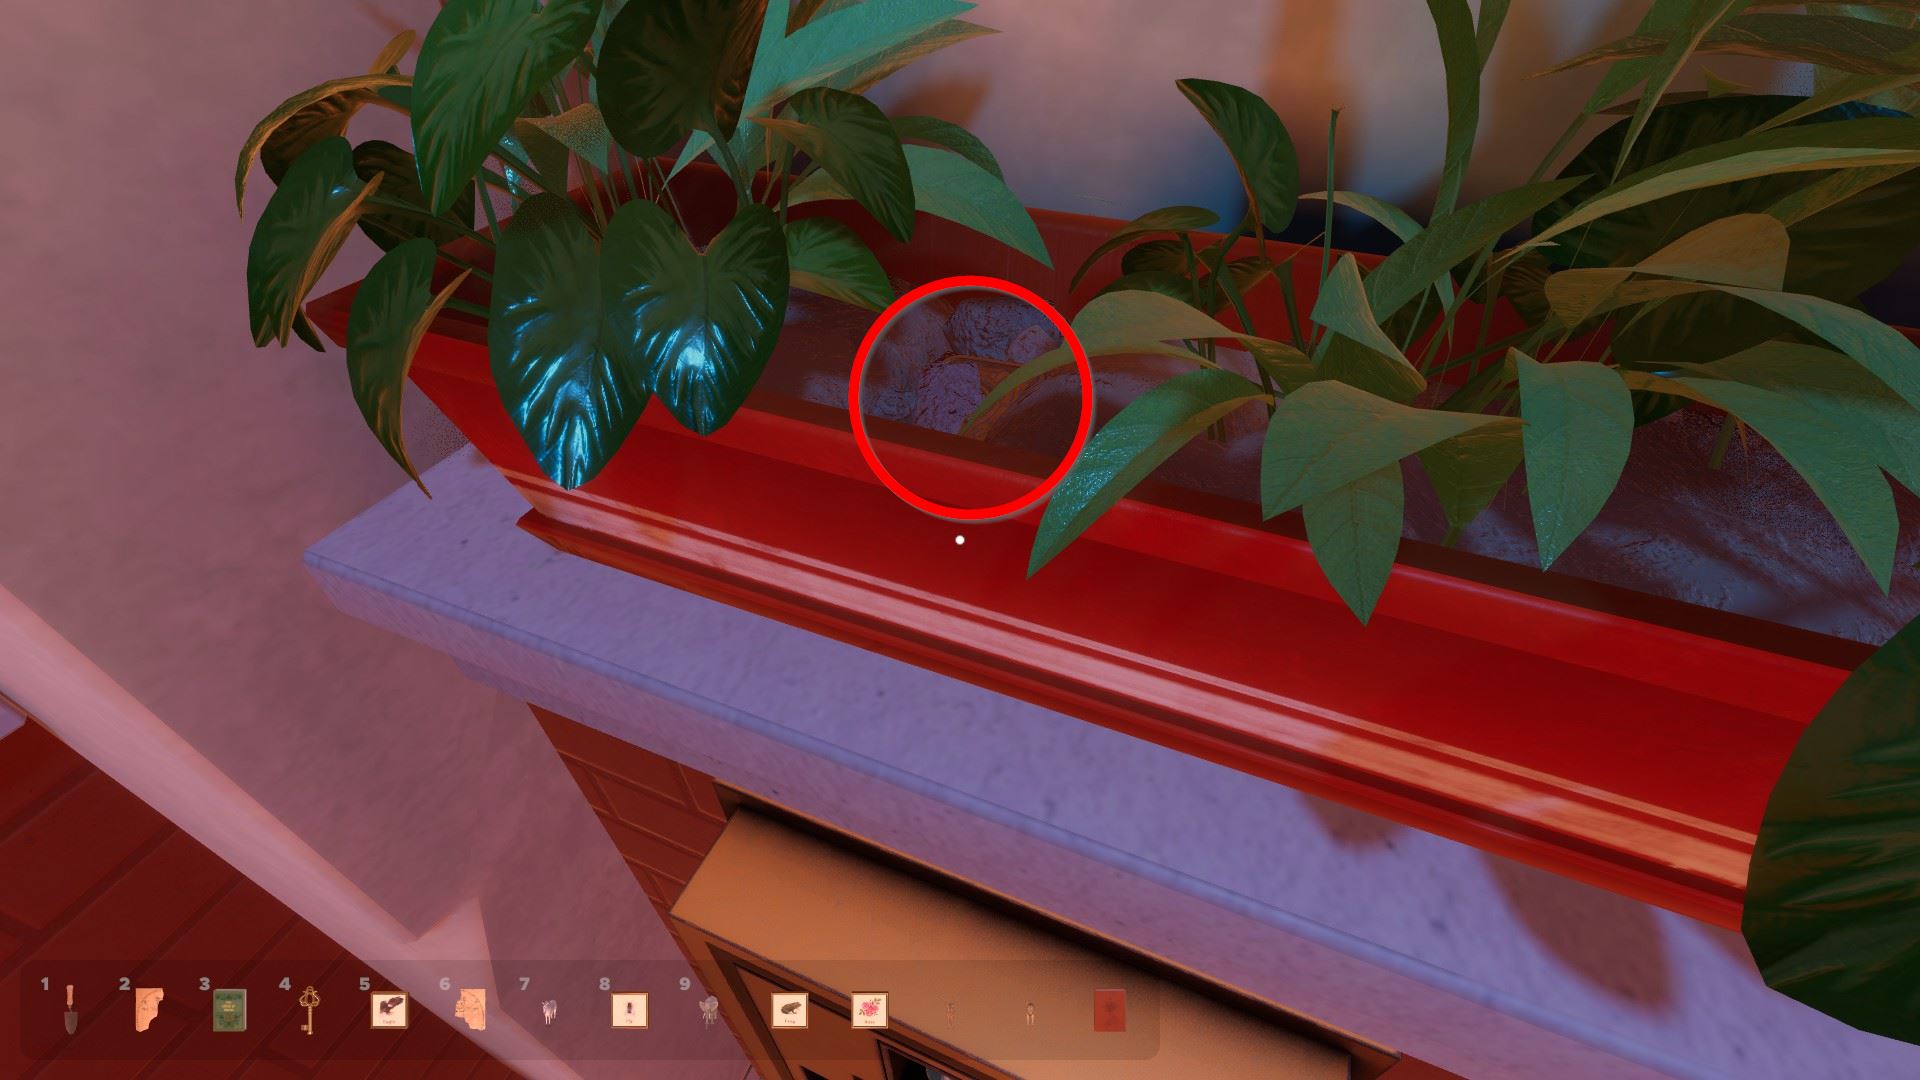
⏹ Token 4 / 8 - have the trowel and dig into the left rectangle plant pot:
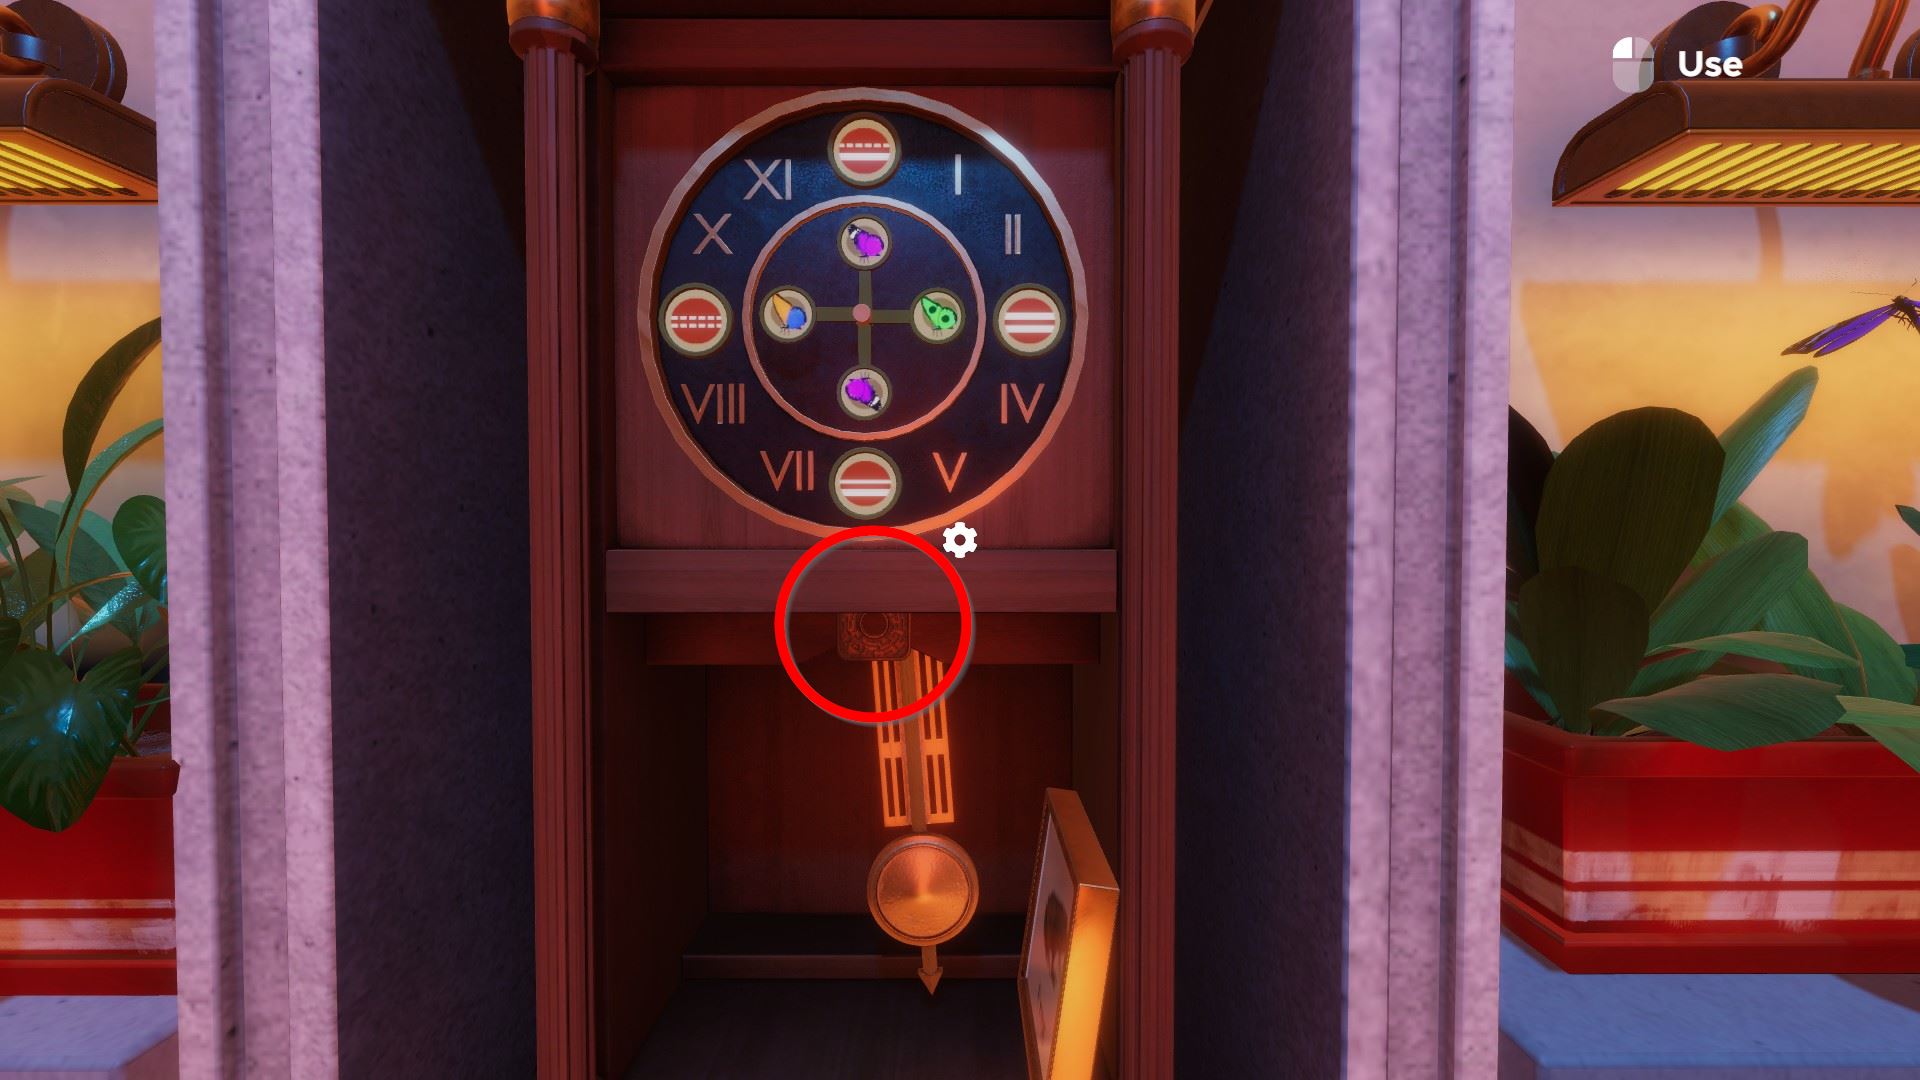
⏹ Token 5 / 8 - correct in the eye of the clock:
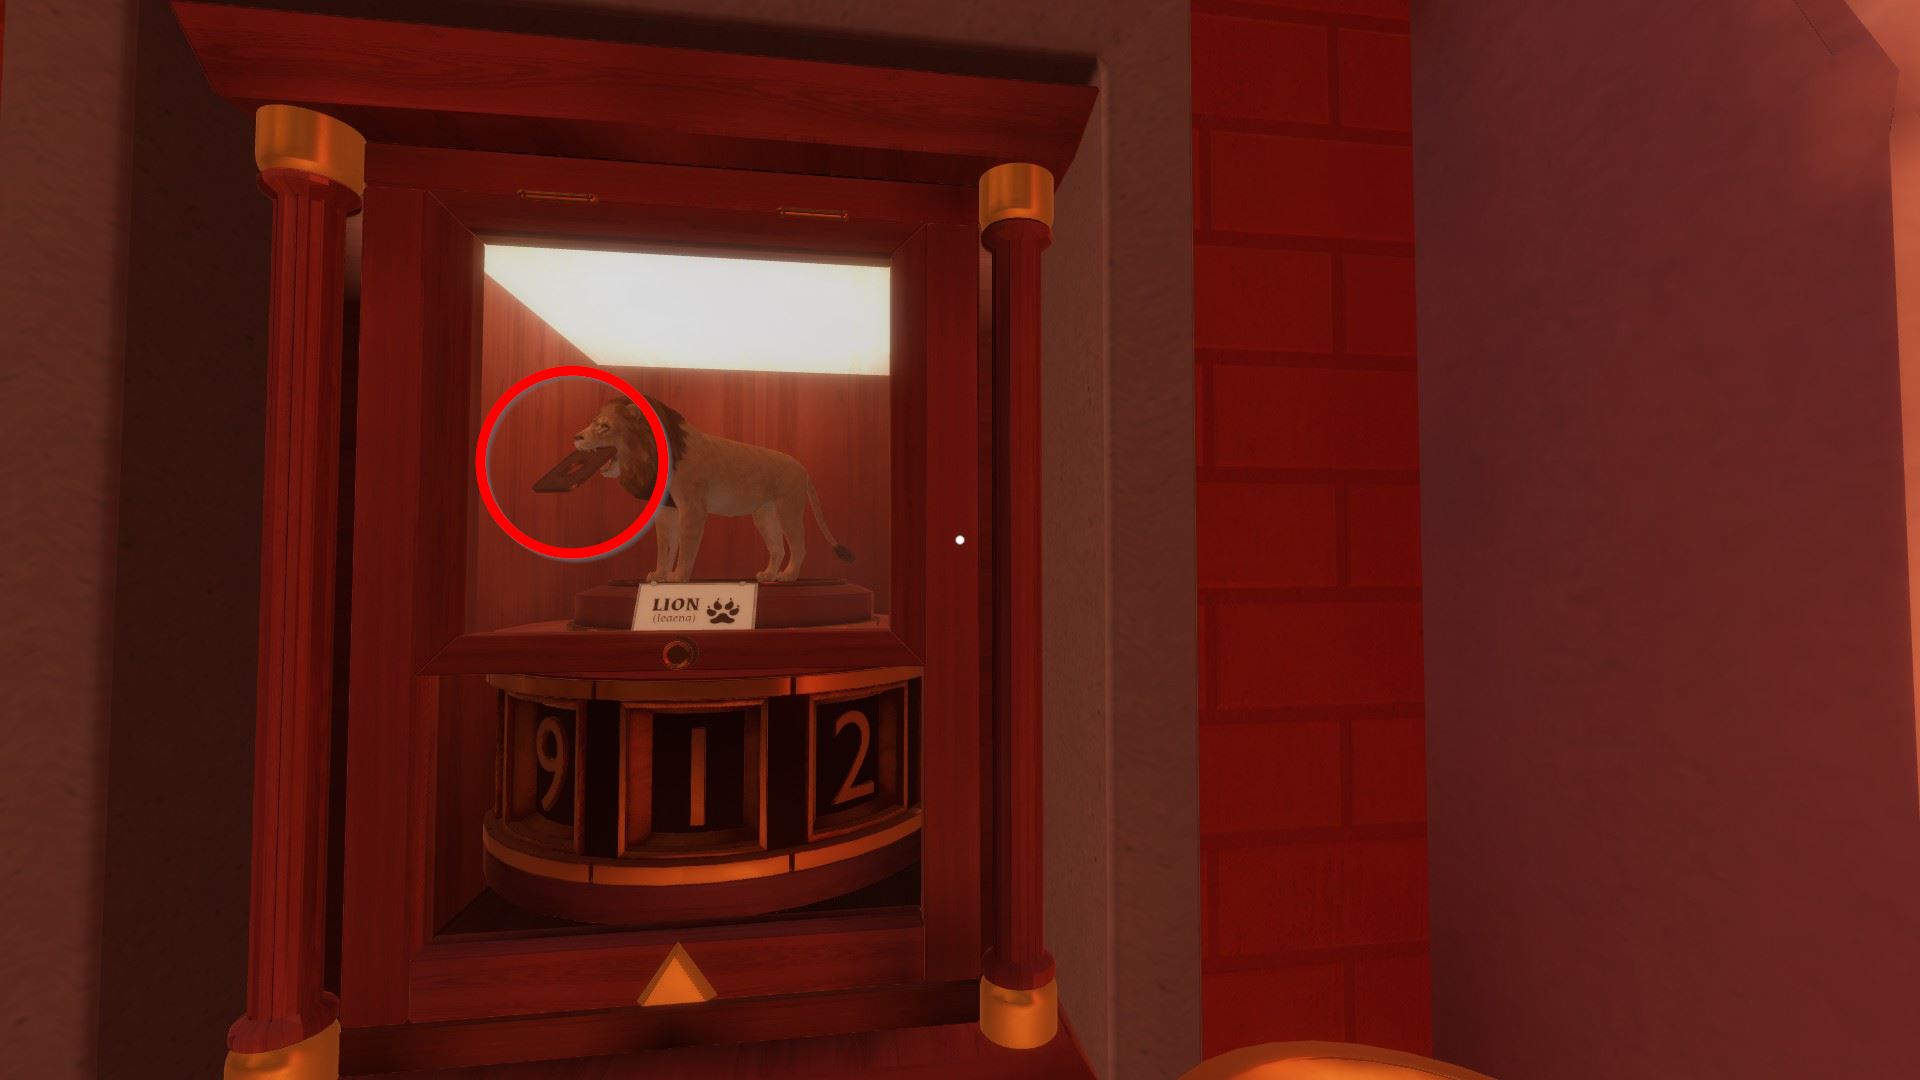
⏹ Token 6 / 8 - in the panthera leo's teeth:
⏹ Token 7 / 8 - on the back of one of the purple butterflies (it can exist in the other establish pot too, since information technology flies dorsum and forth between them):
⏹ Token 8 / 8 - on the door'southward hinges:

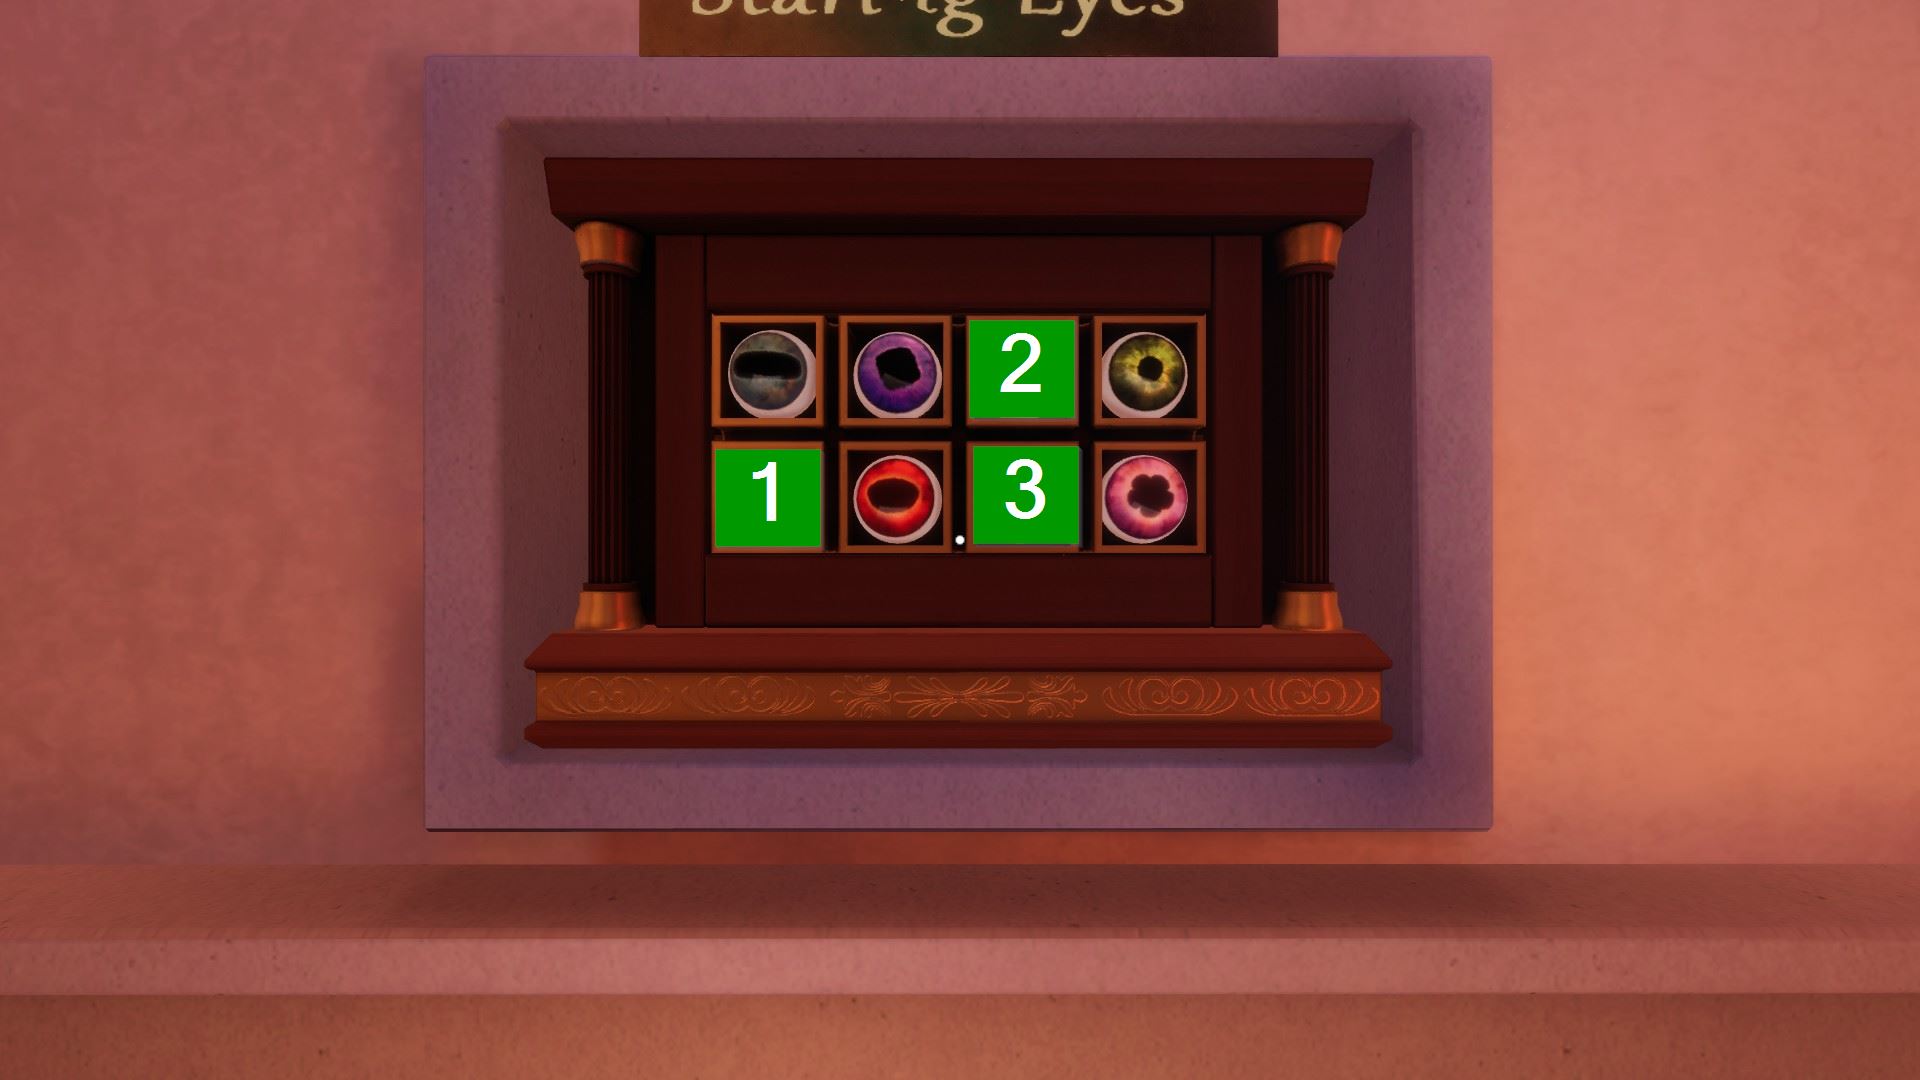
Staring Eyes:
Press the tiles in the following lodge (hint from ruby-red book with compass symbol):
Golden (bottom left)
Blue (peak row)
Big blackness circle (lesser row)
Gives second exit primal.
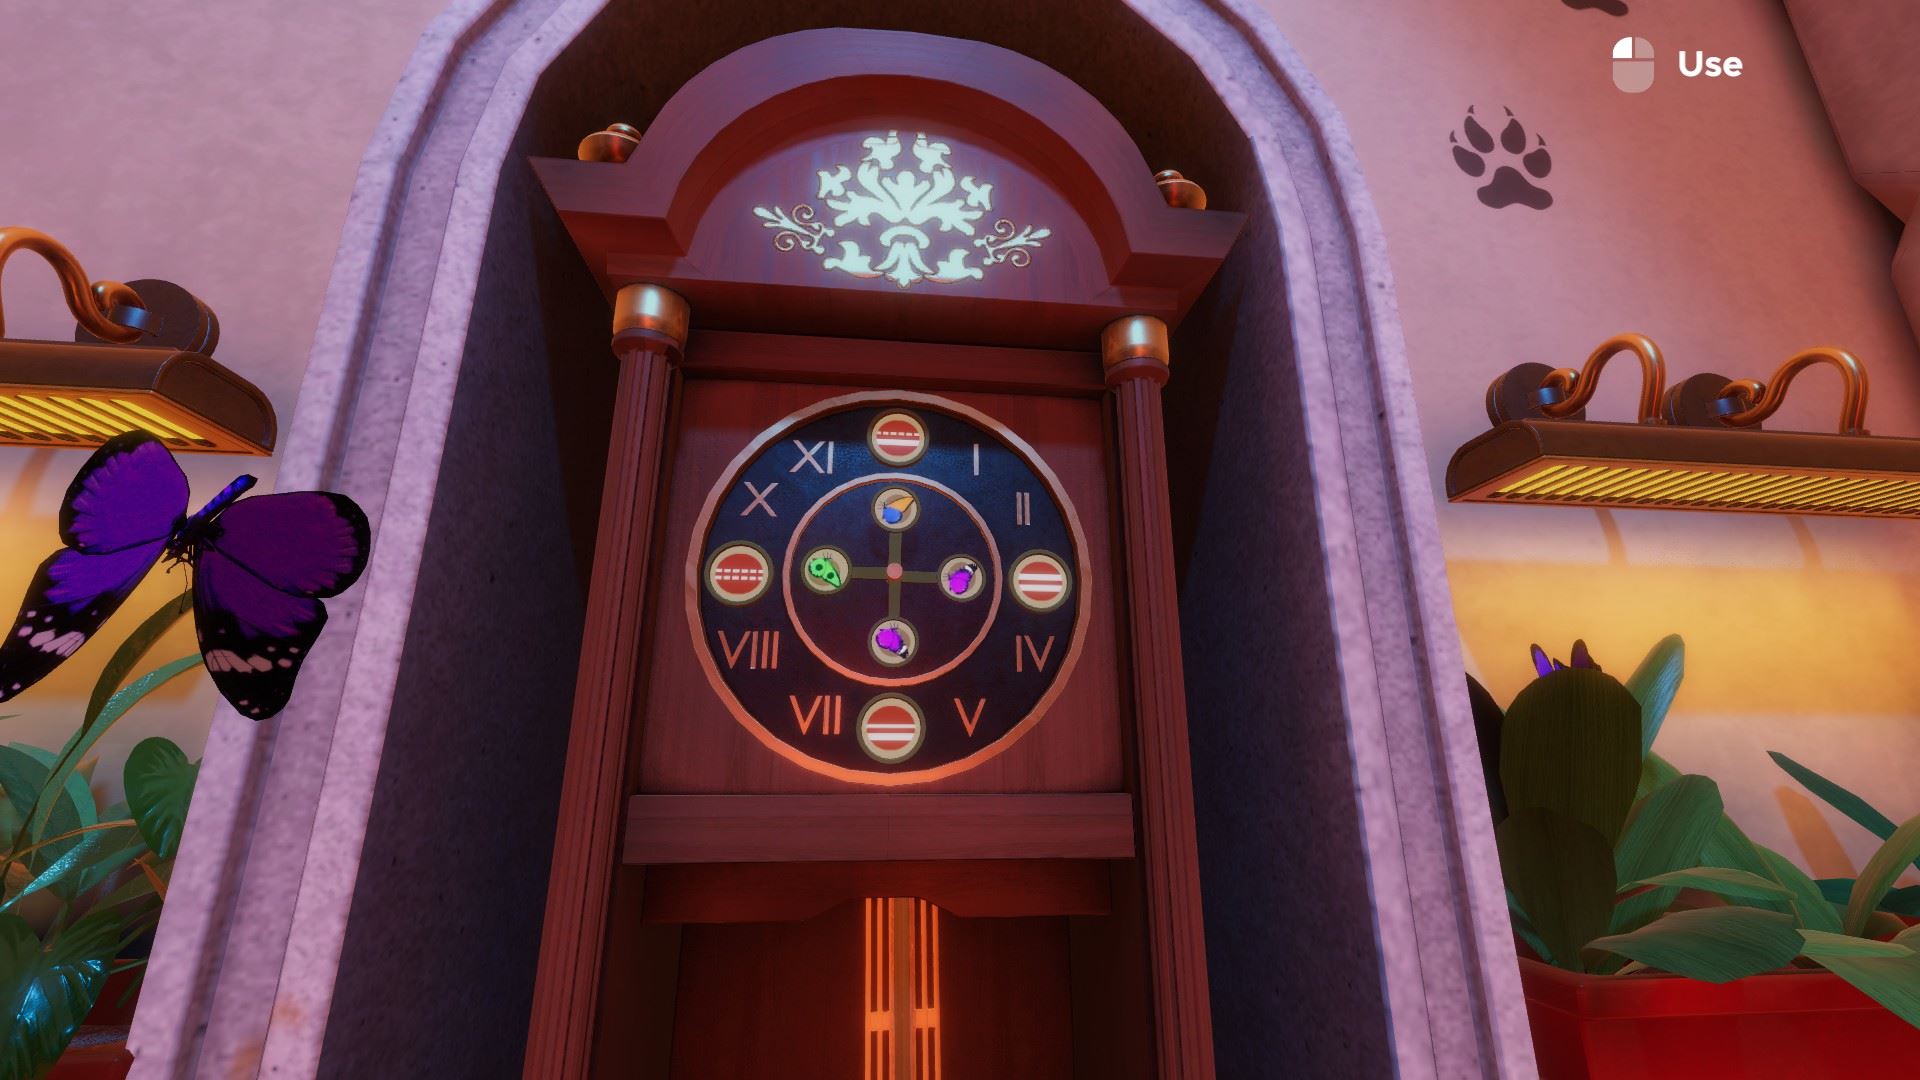
Butterfly clock:
Match the clock artillery with the butterfly colours and the blueprint on their pots. You get the fourth get out key.
3, 6 = majestic
nine = green
12 = blue / xanthous
Mitt prints:
Set the dials as follows (hint from number of paw prints on walls, floor and ceiling):
Zebra iii
Elephant vi
Deer 4
Lion 6
Flip the switch with the light bulb that the floor hoses connect to.
You get the third exit key.
Zebra / deer lock:
Use 5 - 4 - ane - 3 to unlock it (hint from the green stripes on deer figurine in the order given past the numbers under the hooves).
Gives rat man box (and annotation piece to solve it). The code is viii-6-3, namely the rat man's limbs, the corporeality touching the circle, and the ones pointing to the left. Inside you find the first exit key.
Species:
Identify the tiles in the following lodge:
Rose (found in corner of the room, in forepart of the deer door)
Fly (establish under the elephant model)
Frog (found at the clock)
Snake (plant on the right of the optics panel)
Eagle (found within deer lock compartment).
Gives the fifth exit key.
Omega Corporation: The Lobby
⏹ Token 1 / viii - on the window bench:

⏹ Token 2 / viii - in the O letter of the Omega Corporation:

⏹ Token iii / 8 - inside the left side of the X-Ray tray:

⏹ Token four / 8 - inside the left foot kicking:

⏹ Token 5 / 8 - under this constitute pot:

⏹ Token 6 / viii - inside the lesser drawer of the chiffonier:

⏹ Token seven / 8 - on the side of the security camera (expect on the left for the photographic camera and so run to the correct – zooming with middle mouse might be helpful; in multiplayer, it follows the host player, then y'all don't have to be fast):

Rotate the computer monitor so that it faces you, so enter the code: 30-53-98
(hint when pressing "Forgot Password": age from the brithday carte within the drawer = thirty, pinkish favorite beauty = auto movie on the desk-bound = 53, numbers on the soles of the left then right shoe = 98)
On the Security Clearance tab, select the the following symbols: cigarette - shopping cart - pistol
(hint from the sign console side by side to the desk)

**Optional** Unlock the drawer lock with the code 4-v-8-0 (inkling: "Escape from Part B-iv" on the in a higher place room flooring programme, imagining the rooms on the floor plan were the digits of the keypad) to become a metal detector.
Open the safety using the code king, queen, bishop (from using the metal detector on the "omega clock")

⏹ Token viii / 8 - inside the prophylactic, on a shelf:

Open up the briefcase using the code 619-916 (code visible on bracelet with briefcase in metal detector)
On the Security Clearance tab, enter the employee number 042 (from the employee ID carte du jour within the briefcase) and set the security clearance at least to level 3.
Use the employee ID card (from the briefcase) on the exit door and enter enter fruit password:
apple - banana - reddish
(from tree decoration and calculator LED Brandish Controls tab "*Of import" = 011 101 001, using aught to take left and one to take right branches).

Omega Corporation: The Part
⏹ Token one / viii - under the whiteboard:

⏹ Token 2 / 8 - under the slidable window blinds (left side):

⏹ Token three / 8 - upon pressing the 'O' button on the keyboard (token drawer toggle):

⏹ Token 4 / 8 - behind the PC monitor:

⏹ Token five / viii - after using the watering can on the plant pot:

⏹ Token 6 / 8 - accessible for a short period after pressing the air conditioner switch, the left of the two buttons right of the exit (flap opens and closes again):

Accept the blue DDR4 RAM stick from under the drawer with a lock, to the right of the whiteboard.
Have the screwdriver from the desk drawers (lesser drawer under the shredder).
Utilise the screwdriver to remove the two screws from the PC instance and drag the DDR4 stick into i of the blue RAM slots.
⏹ Token seven / viii - hidden within the PC (can just be acquired earlier PC is turned on):

Utilize the power button on the front of the PC to plow information technology on.
**Optional / Token** Open the fridge lock with code H-B-F (from the colours of the stickers on it that stand for the folders effectually the room, which in turn contain numbers to combine with the ASCII table near the desk). Inside you will find the food that provides the code for the next lock. Likewise take the key from the dark-green watering can and open the drawer with a lock next to the fridge to get the menu. Sum up the prices for the combined dish to become the lawmaking.
⏹ Token eight / 8 - within the refrigerator:

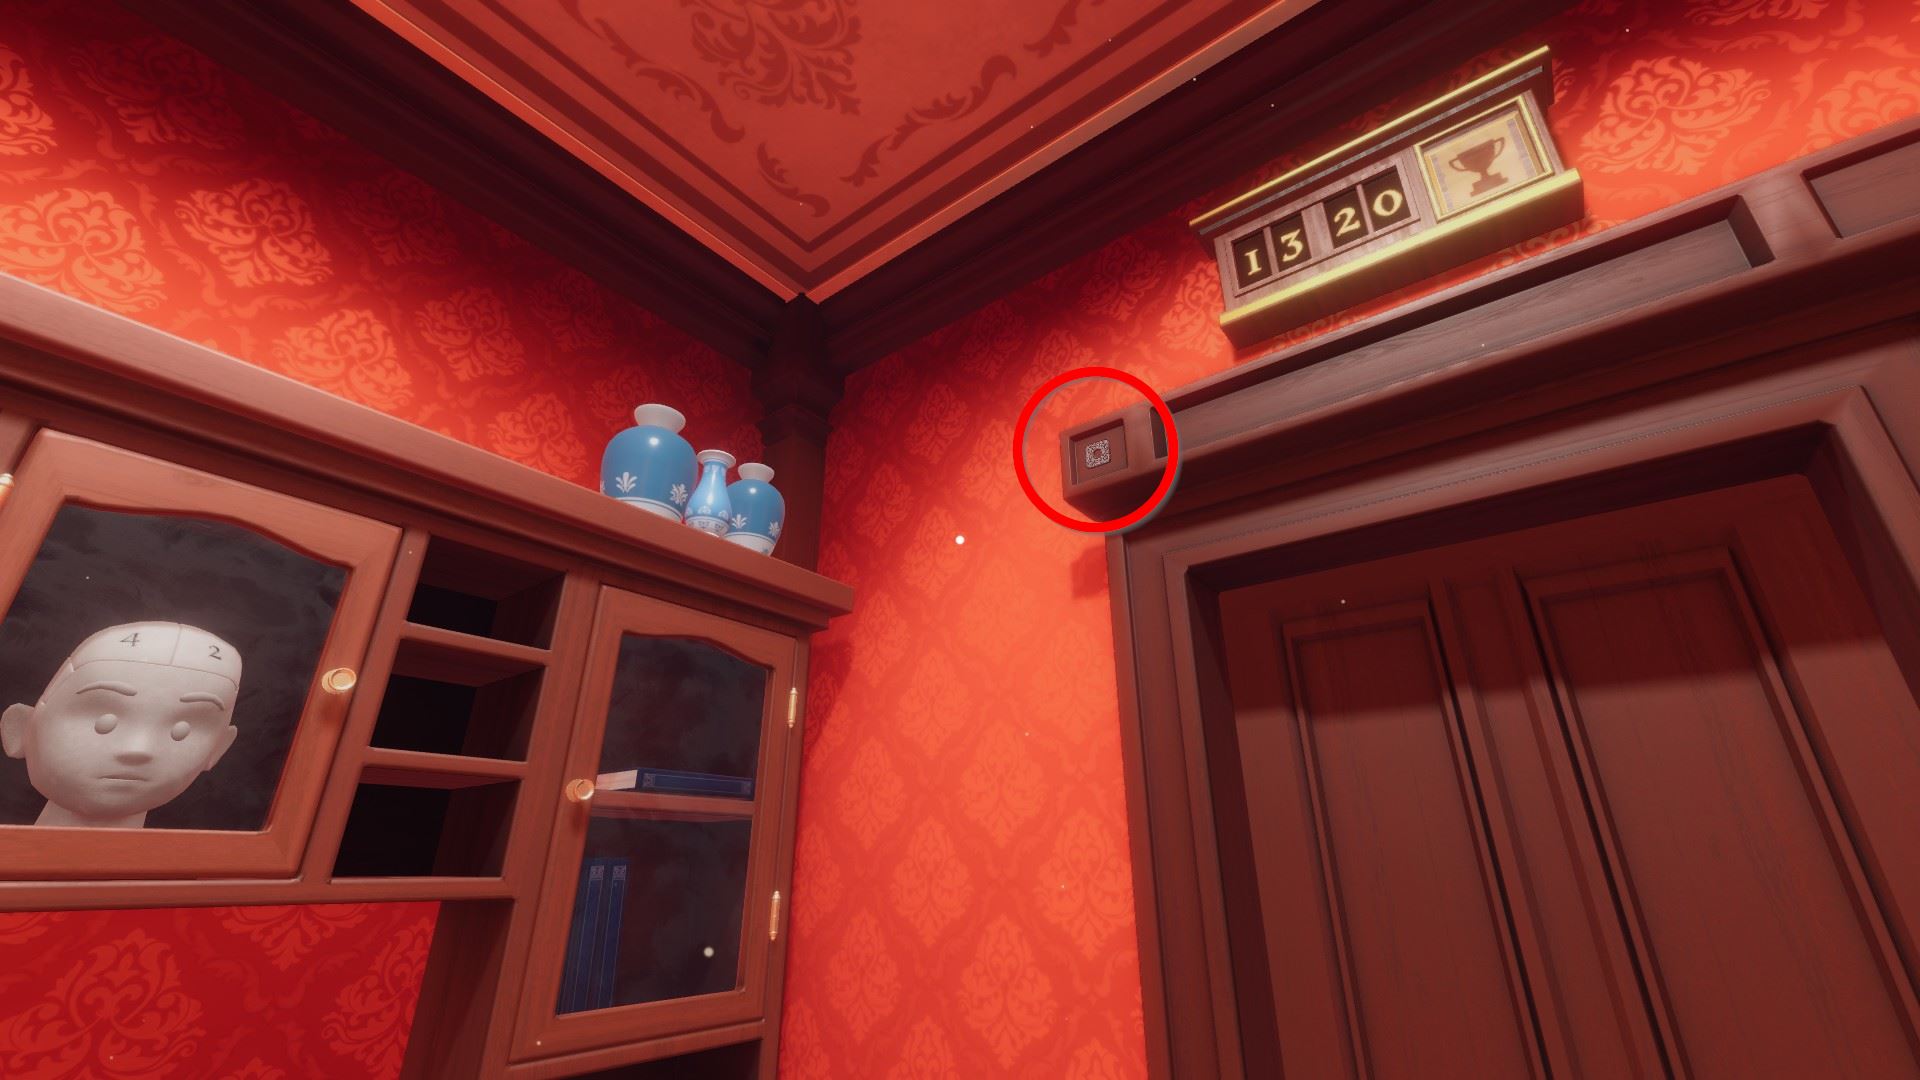
Open the keypad on the cabinet near the exit door with the code 1220, obtained from the optional step right before. Take the USB stick inside, and rotate its blocks and then that each side contains the same symbol.
**Optional** Flip the white board and erase the chart. The remaining lines show the pattern needed to unlock the phone. The phone contains a hint explaining the TQ code to access the PC.
Utilize 930 378 to unlock the PC. (code from TQ lawmaking role pages inside shredder, combined with explanation from phone)
Insert the USB stick into the PC and solve the puzzle the post-obit command social club:
↑ → ↓ ← ↑ ↑ ↑ ↓ →
(upwardly, right, downwards, left, upwardly, upwardly, up, down, correct)
Pick up the USB from the PC and plug information technology into the exit door to finish the level.
Omega Corporation: Executive Part
⏹ Token ane / 8 - on the wall behind the CRT monitor with a blue desktop background, left side:

⏹ Token two / viii - inside the lamp:

⏹ Token iii / 8 - under the desk on the right side:

⏹ Token 4 / 8 - hidden at the bottom of the right defunction:

⏹ Token 5 / 8 - hidden under the big blossom pot; knock it over using physics:

**Optional**
Have the fundamental within the right flower pot on the desk.
Apply the key to open the lock on the cabinet with three drawers. Take the red floppy, insert it into one of the two floppy drives on the PC to the left.
On the PC on the right of the cabinet (purple monitor), printing the eject push to get the blueish floppy, and insert it into the other floppy bulldoze.
Unlock the floppy assay code by matching the game company parodies establish effectually the level:

Use the floppy assay tool to get the code for the next footstep. Combine each of the three bad sector pairs in the floppy analysis tool to form fatigued numbers.
Mandatory:In the 'Unlocker' awarding, insert the lawmaking ii-8-7 that you go from the analysis tool.
Take the quantum scrap.
Step 1:
Dial the BBS number found on a billboard outside: 555-256-222
Footstep 2:
Enter the code 2-half-dozen-8 from the numbers written with lit up windows on the buildings outside.
Accept the quantum chip.
Level i:
PRINT "Hello"
Print "Earth"
RUN Code
Level ii:
TXTCOLOR(2)
PRINT "HELLO"
TXTCOLOR(5)
Impress "World"
TXTCOLOR(2)
Print "Howdy"
RUN Code
Level three:
FOR I = i to 3
Print "Howdy"
Adjacent I
FOR I = i to five
Print "Globe"
Impress "WORLD"
Adjacent I
RUN Code
⏹ Token half-dozen / 8 - on the keyboard after solving the puzzle, beneath the instructional paper:

Take the quantum fleck.
⏹ Token 7 / viii - hidden backside this quantum chip:

The desk's acme drawers open when you lot printing the two hidden buttons on each side of the desk in quick succession. Left side: token; right side: cassette.
⏹ Token 8 / 8 - on the side of the leftmost desk drawer:

Have the cassette from that drawer, and insert it into the tape deck at the turned off monitor. So from the lowest drawer of the cabinet at the start 2 PCs, take the screwdriver box, and open it to detect a screwdriver and 3 heads. Attach the square head to the screwdriver and insert it into the square hole on the tape deck. Adjust the screwdriver rotation until the screen stops flickering and gives a blue image, unlocking the figurer.
Play the mini-game of approximating your way to the right (random) number betwixt ane and 100 to open the compartment beneath. You have to do this within 7 steps.
Accept the quantum chip.
Unlock the quantum computer scrap slots by selecting the patterns & colours on the iii ties plant around the level (one in the middle drawer of the cabinet, ane on the office chair, and one on the desk): the 2nd, 3rd and 6th necktie.
Insert the four breakthrough fries into the device to get the exit primal. Insert it on the right of the door to end the level.
Omega Corporation: The Elevator
⏹ Token 1 / 8 - on the ceiling:

Open up the briefcase, press the secret button in the top left nether a sheet of paper, and if desired accept the orange hint sheet for Floor 2. The push opens a compartment with a key – take this primal.
⏹ Token two / 8 - inside the left pocket of the briefcase:

⏹ Token 3 / viii - on the left end of the metallic bar at the wall with a window:

⏹ Token 4 / 8 - inside the rag in the cleaning bucket:

⏹ Token v / 8 - on the inner side of a wheel of the cleaning bucket:

Open the compartment that appears on floor vii using the code 6-seven-four to receive a fundamental key part. (Code obtained from combining the orange symbol, the reverse L, with each of the other symbols above the compartment, and and so identifying the matching digits from the elevator buttons.)
Take the primal key part.
Employ the mop to remove the stains on the floor and reveal the blueprint you have to replicate on this flooring.
We call the rotatable knobs A, B, C, D, and specify how many steps to rotate them clockwise, past property down the mouse and moving it according to the border yous are holding.
A5, B3, A3, D2, B1, C2, B4, C2 (all clockwise)


Take the primal part.
Floor ivEnter the code 2-6-viii-0 that you tin run across through the window on flooring four and below it (you lot tin can meet the digits arranged from acme to bottom when the elevator moves from floor four to floor 2).
Have the key.
To attain flooring 2, press the 'two' button three times, followed by the '-1' button below. (explained by the hint inside the briefcase)
The symbols on this board correspond to tiles on the ceiling. Leaving just omegas solves it.
Match the following design to get a key part:

Enter the floor numbers missing from the elevator console as the lawmaking: 5-3-1.
Take the key part.
⏹ Token half dozen / eight - while the lift doors are open, in that location's a token on the very top right:

⏹ Token 7 / 8 - while the elevator doors are airtight (and the lift is moving) you can pick up a token on the lesser left of the closed doors; longer journeys give you more time for this:

Click the messages in the Omega Corporation proper noun on the back wall to toggle their color until E-A-C-R-N are ruby-red (hint: 'CRANE' in red on the opposite side of the room).
Insert the key from Floor 4 and the key from the briefcase into the bottom of the Omega cylinder.
Take the key part.
⏹ Token 8 / eight - after opening the cylinder, under it on the right side:

Assemble the central by attaching all other parts to the central key function from Flooring 7. Insert the key into the hole on the elevator panel and click the -i floor choice to finish the level.
Omega Corporation: Metaverse
⏹ Token ane / viii - higher up the illuminated panel, between the D and E server racks:

⏹ Token two / 8 - in the lesser left corner of server rack F, to the right of the VR prepare:

⏹ Token 3 / 8 - nether the yellow safe helmet, you can either see it from the side or remove the helmet:

⏹ Token 4 / 8 - in the notebook holder on the wall, in that location's a hidden token:

⏹ Token v / viii - Token in the lesser right deejay storage unit that held TG61:

If you insert EA7C, it tells you that the disk is corrupt and you should insert the backup. The backup, every bit the wall-mounted notebook explains, is every digit and letter of the alphabet incremented by one – hence FB8D, which you find most the taped 'X' on the floor.
Every bit B24D is unreachable, insert C35E that'southward already waiting in the storage unit (over again incrementing all characters).
Solve the binary tree puzzle every bit follows, combining the lower symbols to class the ones above:

Accept the USB key that'due south given to yous.
On the wall with the timer, printing the 'open up' button to reveal a laptop. Equally you see it slide out, yous can already see a token backside information technology.
⏹ Token vi / 8 - backside the laptop, on the left:

The toolbox on the flooring contains a console remover tool, electrical record, and a battery. Take all.
**Optional** Use the panel remover on the orange floor panel, pressing down on both sides, and use the electrical tape to repair the cablevision damage below it. This starts a project. Continuing in the right spots (10 / Y mark the spot!), the blueish bars form the number 50, and the red ones 74.
The laptop code is -> Ten*Y=3700.
Take the USB fundamental that'due south given to you.
⏹ Token 7 / 8 - beneath the floor panel:

Blazon ACFEDB into the server status panel. (The code is the order in which the server racks are affected by a virus, shown by a cherry lite, every bit explained by the sticky note next to the panel.)
Take the USB key that'southward given to you.
Insert the iii USB keys into the ports above the VR ready.
⏹ Token 8 / 8 - at the top of the VR ready compartments

Insert the battery into the back of the VR ready to brainstorm the VR puzzle road.
First VR puzzle 


Motion the right mirror into the blue beam, and the left mirror into the red beam then that information technology'due south hit by both green and red. Leave the other mirror untouched.

Beat out the CPU opponent at gratis-floating connect 4 as follows, ending the level (don't miss the animation!)
You tin can use the following steps (the O's tin can exist slightly different, simply this tactic always works for a win):

Holiday: Santa's Workshop
Technically everything before crafting the exit primal is optional, just where's the fun in that?
⏹ Token 1 / 8 - on height of this nowadays box (pull it down):

⏹ Token 2 / 8 - on the left of the mailbox:

⏹ Token 3 / eight - loosen the woodworking vise (clockwise) to see it:

⏹ Token iv / viii - inside the locomotive that is already placed on the train tracks on the desk:

⏹ Token 5 / 8 - take cheese from the desk drawer (yellow, heart row) and place it in front of the "trades only" mouse door in the toy making corner to receive a token:

⏹ Token 6 / 8 - open up the following drawers to reveal a token (the hint is given past the left tree drawing higher up the desk):

⏹ Token 7 / 8 - on the side of the Christmas tree:

Unlock the QA station by aligning the stars how the stars announced in the telescope:
downward-right, upwardly-correct, upwardly, up

⏹ Token viii / 8 - using the QA station, transport a gingerbread cookie from the plate on the desk (the cookie won't come up back down over again):

Press the button on the mailbox 3 times to receive three letters that will show you lot what toys to craft. They don't have to exist washed in order.
Robyn's toyBuild the steam train by placing the wagons in the following order from left to right:
locomotive from the desk's lowest greenish drawer
rider carriage from the cabinet'due south drawer
wood wagon from the desk
coal wagon from bottom right drawer under the desk-bound

When you lot combine the right wagons, you get a train box to put into the QA station next to the toy maker. Pull the lever to send it up.
URL-decoding toyX04 5W2 ways plush behave (explained past the paper note behind the telescope & optionally hinted at by the URL decoder from elevation left drawer below the desk). The conduct is found on the top shelf of the cabinet, and the needle and thread to repair it is in the pinnacle right shelf below the desk, which you access by opening the following drawers:

Use the needle and thread to repair the teddy bear, and put it into the QA station. Pull the lever to send it up.
Emerge's toyUse the rocking pony instruction code with the toy maker and and so put the pony into the QA station on the right of it. Pull the lever to send it upwards.

Selection up the blueprint from the QA station and create the exit key according to the pattern:

Insert it into the big carmine door to finish the level.

Source: https://steamcommunity.com/sharedfiles/filedetails/?id=2628078736
Posted by: barnesweng1974.blogspot.com
0 Response to "How To Change Key And Switch 01 Saturn Wagon"
Post a Comment